10 simple magic techniques for children's creativity
1. Monotype
Essence: imprint of paint on paper from a smooth surface. What you need: a piece of glass or tile, paper, watercolor, soft brushes, water. Process: We wet the glass, apply spots of paint on it, put a sheet on top, carefully turn it over and remove the glass. What happens: very picturesque stains that give room for imagination: “Look, mom, these are clouds! And here is the forest... And here are the waves!”Of course, God himself then ordered that what he saw among the spots be supplemented with details. Using this technique, you can make a background, and draw a graphic image on it, using a thin gel pen - when it dries.

You can create targeted prints, including symmetrical ones: paint is applied to one half of the sheet, then we fold it and get the second half of the picture!
You can “print” with paint from different forms - for example, from leaves or templates cut out of cardboard. Then it is better to take thicker paints - gouache or acrylic.

Or pre-apply cut-out simple stencils to the sheet - then the background will be colorful and the images will be white.

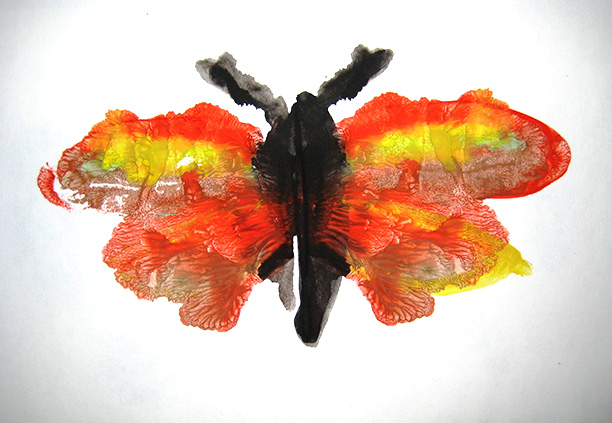
2. Blotography
Essence: You can “inflate” original figures from colorful blots. What you need: thick paper, thick brush, gouache, drinking straws. What happens: we drip paint onto the sheet, then we blow on it through a straw, making lines. Then, depending on what we see, we supplement the image with a drawing or appliqué.
This technique is especially great for drawing trees - the branches come out very naturally curved.

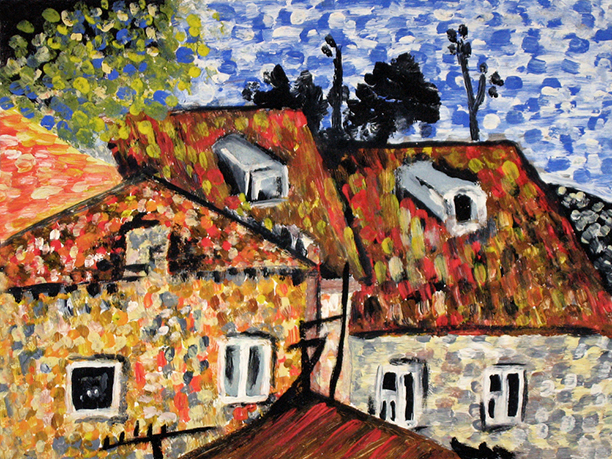
3. Fun dots
Essence: For professional artists this is a separate style, called “pointillism”. What you need: paper, gouache, palette, cotton swabs. What happens: We apply paint of different colors to the palette, dip the sticks - and tightly cover the space with colored dots. For convenience, we’ll first make a light pencil sketch.
You can draw with dots using brushes, but, unlike sticks, you will need to be careful about washing them. Another cool dots are fabric outlines, but you should work with them carefully so as not to squeeze out too much and make puddles.
4. Spray
Essence: What children love is to splash. And doing it with paint is much more fun, and even meaningful! What you need: paper, liquid paint, stencils (silhouettes cut out of cardboard), old toothbrushes. What happens: We put our stencils on the leaf - and with the help of a brush we “spray” the paint on the surface, then we remove the cardboards and see the pictures. You can apply several layers - both contour images and paints.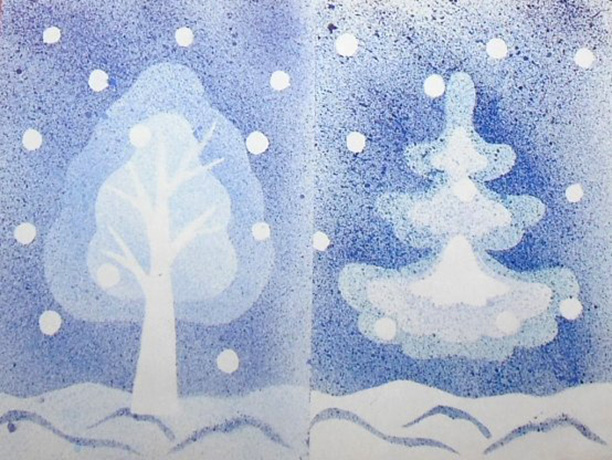
5. Scratches
Essence: This technique goes by the elegant French name “grattage”. What you need: wax pencils, gouache, paper, liquid soap, a candle and a thin stick (for example, a knitting needle or a used rod). What happens: We color the sheet with pencils, then rub it with a candle, and cover it with a layer of dark gouache mixed with soap (so that it lies evenly). When the paint dries a little, scratch the design on it. It turns out very unusual and mysterious, especially the night and space scenes.
6. Candle arts
Essence: the drawing magically appears - white lines on a colored background. What you need: paper, candle, watercolor paints and a wide brush. What happens: We draw the outlines of some objects or creatures on paper with a candle, like a felt-tip pen. Then we cover the sheet with watercolors. As the paint flows off the paraffin or wax, the outlines they draw remain white or dotted.
7. Paper mosaic
Essence: Ancient artists decorated temples and palaces this way, and we can do the same at home. What you need: a sheet of thick paper, a glue stick, colored paper, scissors. What happens: We cut colored paper into strips and then into small squares. We draw the outline of the drawing with a simple pencil, carefully cover the sheet with glue and sculpt a mosaic on it. It turns out beautifully when the slightly visible background is dark.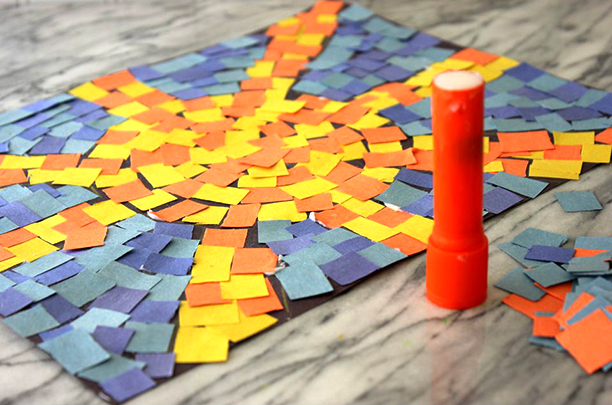
8. Both drawing and applique
Essence: A great idea for a joint family project: the mother draws smoothly, the child enjoys coloring and gluing. What you need: base sheet, paper for details, paints or felt-tip pens, carbon paper (you can make it yourself by thickly coloring the paper with a soft pencil or charcoal), scissors and glue. What happens: The senior artist draws a general drawing on the base “in a conventional style”, and onto another sheet we transfer its individual details - simple and geometric, like circles and semicircles. The child paints the parts in the desired colors, cuts them out and glues them onto the template, putting together a puzzle picture.This lesson shows how to work with color and brush techniques, as well as step-by-step work on the background, middle and foreground.
For beginners, it is best to use inexpensive acrylic or oil paints. For example, acrylic paints from the company "Sonnet"
This picture was chosen for the lesson. A simple night landscape with some brush work on the thistles in the foreground.

This is a sketch. The horizon is below the middle, two mountains, an area with waves and a sand dune in the foreground. Sketch it casually, just as you see in the photograph.

Mix some cadmium yellow light with white and start painting the sky.

Add cadmium yellow dark and more cadmium yellow light to get this color.

Apply paint where I am in the photo and, accordingly, make a color stretch.

Add cadmium red light and black to the final color to get the color shown in this photo.

Fill the mountain behind with color.

Add cadmium red light and blue to get the next color.

Write another mountain like you see in this photo.

Add the same colors for the horizon.

Fill the back area with paint as you see in this photo.

Add black, cadmium red light and blue to get this color.

Make a mixture like for the mountains or use some of what is left and continue writing.

Mix blue and red until you get this color and fill in with paint where you see in the photo.

Here more black, red and blue are mixed to create a darker color. Using upward strokes, blend the paint onto the canvas to create the fluffy outline of soft grass.

Here I used a fan brush to add fluffiness. A fan brush works very well for this process. Now you need to wait for everything to dry before continuing.

Make sure the surface is dry before taking the next step. For the main color of the foam, mix blue, a little black and white.

After the main wave and a few in the back are painted, I add the foam pattern in the foreground.

This is what your underpainting should look like. Leave to dry before continuing.

Using a flat brush, mix black, phthalocyanine green and cadmium red to create a dark green color. Red dampens the brightness, but leaves a green tone.

Draw the lines as you see in this photo. The trick is to make them look more natural, they need to be placed at different levels. Try to avoid very curved and very straight lines. Practice on a separate canvas if you are unsure.

We begin to paint the base of the thistle, moving the brush from below from the middle to the side.

Now mix Neopolitan yellow with light cadmium yellow to lighten the dark green mixture. We will use the resulting color to highlight the lightest areas in the foreground.

Add the thistle stems as you see in this photo. Let them overlap each other at different angles to maximize the natural effect.

Using the same color, bending and turning the brush, we paint the leaves with strokes. This takes practice, so practice on a different canvas to get the effect right in both directions: left and right.

Here I used Alizarin Crimson to change the color of the leaf. This adds interest and play to the foreground.

Mix in a light blue color for the thistle flowers. Use blue or phthalocyanine blue.

We write with sharp movements from below so that the flower seems to dissolve in the darkness. Wipe out the brush and repeat so you don't end up with a dark color on top. Use white and yellow to highlight bright areas.

The lesson is over.
It may take you several times to get the strokes right. Don't give up, keep going. Don't be afraid of mistakes because you will make them anyway. Paint this picture 3 times and the fourth time you will get it right. Use art panels, they are inexpensive and good for practice.
Hi all! You really asked me to publish watercolor painting lessons, and I thought for a long time where to find suitable material, because this topic is not new, and there is already a lot of different information on the Internet, so I decided not to invent it, but to use materials from foreign authors. This article is the first, but not the last. I hope you enjoy it and find it useful!
This article covers the basics you need to know to get started with watercolors. However, if you continue to scratch your head after reading, then please feel free to ask questions in the comments! I will be happy to answer you!
Before I started writing this article, I decided to do a little research on the Internet about painting. watercolor for beginners. This way, I reasoned, I wouldn’t miss a single moment and would write the best post. But good God... I've been painting with watercolors all my life, and the information I found on Google stunned me. After three too many overwhelming articles, I threw up my hands and decided that I would show you how I, personally, work with watercolors - and the adjective to my watercolor approach is “simple”.
Tools and materials
First, I want to talk about the materials and tools you will need. Of course, the most obvious tool would be a watercolor set.
I prefer the set from Greenleaf & Blueberry. It's a little pricey, but I love it! However, if you are just starting out, there is no need to invest in expensive kits.
Advice from the site:
Go to the nearest art store and buy an art set of watercolor paints that suits your price, the main thing is that it is not for children 😉
If you live in the outback, where it is difficult to find such a product, then you can order a set through an online store. So that you can get an idea of the cost, I’m sending you examples of sets that are easy to find in our country:
Finally you will need clean water and cloth(I use an old dinner napkin) or paper towel to dry the brush.

Any glassware will do, I use an old mug.
Transparency of watercolor
The great thing about painting with watercolor is that you have complete control over the opacity of the paint. Watch how one color can change depending on the ratio of water and paint on the brush!


The picture on the left shows what a brush stroke looks like with a lot of water and a little paint. The illustration in the middle has a more equal ratio of water to paint. The picture on the right has more paint than water.
You may be thinking, “That's all well and good, but how can I control this water/paint ratio?” Before you do anything, apply a drop or two of water directly to the cuvettes you plan to use. This will wet the paint and make it ready to go. Then, you can do one of two things:
1. Use a palette
You can take a palette and mix three different shades of the same color on it. For the first color, use a brush to apply about eight drops of water into the indentation. Then, dip the still wet brush into the already moistened watercolor and transfer the color to the palette.


Apply about five drops of water into the second cavity. Again, dip your still wet brush into the watercolor and transfer the color into the water. Be sure to agitate the brush so that all the paint comes off! If this new color is very similar to your first, add more paint.


For the darkest shade, you will simply work directly with the paint from the pan, the shade should be very saturated.
2. We work directly from the watercolor set
You can use the concentration of water on your brush to control the shade of the paint. If you want a very light shade, wet your brush well with water and touch the tip of the brush to the paint. If, when transferring to paper, you find that the concentration of paint is too high, dip your brush in water again, and apply this water directly into the paint on the paper. The color will become more transparent! For midtones, you'll still be applying watercolor with a damp brush, but using more paint. For darker tones, I dab my brush with a tissue (it will still be damp, but not saturated) and then take the paint straight from the kit.


Mixing
The reason we looked into transparency is for mixing and overlaying colors. With different shades of the same color, you can make any look come true. I'm going to show you how to turn a circle into a ball using watercolor blending and transparency:
1. First, draw a circle in the lightest shade.

2. Assume the light is at the top right as shown in the picture. Accordingly, the shadow will be in the lower left corner of the circle. To start painting the shadow, use your brush to pick your medium shade. Draw the shadow as if it is “hugging” a crescent-shaped circle, like this:


3. You can see that there is now a definite separation between the shadow and the highlight. To get rid of this difference and create a smooth transition, you need to mix the colors together - an easy task when painting with watercolors! To mix, submerge the brush in water to remove any remaining paint from the brush. Dry the brush to make sure all the paint is gone, then wet the brush bristles again with water. Then, place the brush on the separation between the shadow and the highlight and drag the middle shade with water, it will blur. Soon, you won't be able to tell where the mid-tone and light end and where the shadow begins!


4. Now it's time to add a dark shadow to the bottom of the circle. Apply a dark shade around the bottom of the sphere, as in the photo.


5. Mix the dark shade the same way you did with the middle shade, and voila!


6. You can add a drop shadow if you want. To do this, draw a thin line on the opposite side of the light below the sphere, like this:


Then, you need to draw out the color with a brush dipped in water until it disappears.


You might find it easier to understand the concept of blending/shading if you watch the video:
If you want more practice with blending and shaping, I'd recommend painting these shapes in different colors:

You could make the sphere green, the cube blue, etc. Drawing shapes like these helps you understand how to make things look three-dimensional. Yes, it can be a little boring... but so rewarding!
Mixing watercolors
To mix watercolors, you definitely need a palette, whether built into your kit or separate. The process of mixing colors is simple: apply one color to the palette and then add another color. Mix them together and you get a new color!

If you have a small selection of colors in a set, knowing how to mix will come in handy. There are many sources that tell you what colors to mix together to achieve the desired result.

If your mixed color dries out in your palette, don't worry. You can re-wet it and it will be as good as new no matter how much time has passed.
It was in this country that special paper suitable for working with watercolors was produced. In the western countries of the continent, watercolor painting was not given due attention for a long time, and only at the end of the 19th century was it given its rightful place in the history of world painting. Using this technique, you can achieve amazing graceful lines, background translucency, and interesting blurry details. All this can give the drawing a mystical effect.
What brushes are needed?
Before you begin to study the technique of watercolor painting, you need to pay attention to the materials for its high-quality execution. The right brushes are the first necessity for those who want to learn how to paint with watercolors from scratch. They must have the following properties: quickly absorb water, have flexibility and the ability to immediately return to their previous shape, and also have smooth, non-brittle hairs. The handles of watercolor brushes are always short. A wide flat brush is used to remove excess paint, since its hairs have increased rigidity. The blur brush is used to paint the background. It is quite large and soft, so it easily changes its shape and does not dry out, holding water and dye in the hairs. Brushes for work can be of various sizes, which vary depending on the technique used.
Paper for drawing with watercolors
The paper you choose is also important. Its quality is easy to determine. If the paper is thick and does not delaminate, and is well glued, then there is no doubt about its quality. With the right choice of paper for drawing, you can paint with watercolors without fear that the water will be slowly absorbed and the colors will become lighter. You also need to pay attention to the grain of the drawing paper. Fine-grain paper is suitable for accurately conveying fine details. For general work, you can choose medium-grain paper. And to perform specific designs, a coarse-grained one is needed. It has a rough surface and distinct texture. This type of paper has a high density and is often made by hand. Paper without grain is not suitable for watercolor painting, as it will warp.

Correctly chosen paints are the key to success
The choice of the right paints is also important for those who are interested in learning how to paint with watercolors. For beginners, the usual school ones are also suitable. But if an immature artist is still focused on a good result, it is better to give preference to professional ones. It will take some effort to prepare to paint in the trays. First you need to drop a little water from the brush into the paint so that it softens a little. The convenience of such paints lies in the fact that there is no need to look for additional containers. If the artist has some experience in watercolor painting, then tube paints will suit him. Then you can create the desired palette yourself.
On the other hand, hobbyists can also use these paints if they buy a ready-made set with many tubes. Although paint sets are sold in sets of twelve and thirty-six, not all colors are used. In any case, there is a need to mix different paints to obtain the desired or unusual shade. In principle, a beginning artist will need no more than ten commonly used tones.

Warm or cool tones
Those who want to learn how to learn how to paint with watercolors need to understand warm and cool tones. If the paint is based on red or yellow, it will be considered warm. And blue and purple shades belong to cold ones. It should be noted that green, purple, gray and black colors have a unique feature and can be classified as either a cold type of paint or a warm one. The initial tone may depend on the characteristics of the color and the influence of surrounding shades. The main colors are considered to be blue, yellow and red. All others that can be obtained by mixing are called derivatives.

Drawing stages
Learning to paint with watercolors step by step is not as difficult as it might seem at first glance. First you need to purchase a pencil, preferably with a hard core so that the lines are only slightly visible. Next, sketch out the main details of the drawing. Afterwards, you can immediately take up watercolors. There's no need to rush here. First you need to think carefully about what colors and shades are desirable for the chosen pattern. Having decided on the color scheme, you can begin to apply paint. At the first stage, you should paint with translucent colors. After all, adding tone is easier than removing it. To do this, you need to dilute the paint with water. Once the bases are applied, you can add color to make the design richer. To obtain dark tones, blot the brush with a napkin after wetting it in water. Next, the brush is dipped into the paint and lines are drawn on the paper. It is important to remember about shadows, which need to be thought out before you start drawing. This is important to know for future artists who are interested in how to learn how to paint with watercolors for beginners step by step.

Removing borders
In order to get rid of the difference between the shadow and light parts, you need to create a smooth transition. This means that all colors must be mixed. To do this, dip the brush into water so that all remaining paint on the hairs is washed off. Next, you need to dry the brush and make sure that there is no paint on it at all. Then the bristles of the brush must be immersed in water again. After this, the brush is placed on the distinction between the light and dark parts, and a line is drawn. Thus, the clear boundary will blur, and it will be impossible to accurately determine where the shadow ends and the light begins.

Drawing a landscape
Nature lovers who want to learn how to learn to draw should first outline the basic compositional lines on paper. When drawing the sky area, you must remember that this area of the paper is first wetted with water. Next, while the sky area has not yet dried, diluted light yellow paint is applied to its lower part. The upper part is painted red or orange. The boundaries of shades are erased with a damp brush.

Experimenting with green
How to learn to paint beautifully with watercolors and easily manipulate different colors on paper? It's much easier than it seems. The only difficulty may arise with the color green. Very often, artists have problems using this tone in their works. In order not to make a mistake and choose the right shade correctly, you need to know a few rules. You cannot lighten green with yellow. To mute the rich green, just add a drop of base red. And to give greenery a darker shade, a cool blue tone is often used. Knowing these basic rules on how to learn how to paint with watercolors, you can draw a great landscape with a mysterious sky in the background and bright green foliage in the front part of the picture the first time.
The most important thing in learning the technique of painting with watercolors is not to grab onto everything at once. You need to gradually increase your level of brush skills, as well as your ability to correctly handle colors. Some artists prefer to use only soft and warm tones in their works, others, on the contrary, use cold and rich tones. It's not so easy to find your way in creating watercolor masterpieces. The main thing is that the drawing touches the senses, then the hand itself will begin to draw the necessary lines, and the brush will begin to add elegant color shades. Consistency is very important in the question of how to learn to paint with watercolors. You always need to go from simple things to complex ones, at each phase of development, acquire new skills and consolidate knowledge through constant practice.
From the article you will learn how to paint flowers with gouache and create picturesque village and mountain landscapes. At the end, useful tips are given to help make the work easier and do it as carefully as possible.
Contents of the article:
It's nice to look at paintings created by artists. Many people like to admire the paintings and mentally transport themselves to where the plot takes place. But not everyone knows that if you wish, you can become a painter and create canvases for yourself, your family, and give them to your friends. If you like this type of creativity and will be able to transfer scenes onto canvas, then this activity can be profitable if you sell paintings. So let's draw, and perhaps you will be so captivated and enjoy this activity that it will become your favorite hobby and even a source of income.
How to draw flowers with gouache

This is one of the most spectacular types of paint. Paintings made using this technique look voluminous and look great. Sometimes a pencil sketch is first made, then the contours are painted over - the dark elements are done first, then increasingly lighter ones.
If you need to draw a landscape in which most of the sky is occupied, then using the filling method, its background is painted, and then the details are drawn.
If you want to reproduce poppies like this on canvas, start your drawing by creating a background. To work you will need:
- gouache;
- palette;
- paper for watercolor or gouache;
- brushes;
- cloth;
- jar of water.
So, before depicting flowers in gouache, starting from the upper right corner, touch up a sheet of paper with straight diagonal movements, not reaching the bottom. Here, paint it with light green paint.
Now mix green and yellow colors in the palette, draw a few light blades of grass in the foreground of the canvas. Add yellow highlights. Watch the video at the end of the article, which explains step by step how to draw flowers with gouache.

Now in a cell of the palette, mix white paint with a small amount of emerald and add a few light highlights to the canvas.

Now make a light pink paint, adding a little white to the red, and use a thin brush to apply highlights to the flowers.

To paint with watercolors, you can use various brushes, each of them has its own number. The thicker the brush, the higher the number. To draw the background, use voluminous wide brushes, and thin ones to depict small details.

Next you need to mix green and white paint to paint the buds and petals. Now draw the core of the poppy in black. Add a little green to the white paint and paint highlights on the buds and stems.
Here's how to paint flowers with gouache to make them look as realistic as possible. With the help of this paint, picturesque paintings are also created.
How to easily draw a winter landscape with gouache

For beginners, such a drawing should not cause difficulties, since it is very easy to create.
For work take:
- a set of artistic gouache, consisting of 12 colors;
- sheet of A 3 format;
- 2 flat pig bristle brushes No. 9 and 18;
- palette;
- a jar of water.
A palette knife is used to apply thick paint to the canvas, as well as to mix and clean the palette. Using it, paint is applied in relief or even strokes.
This is the tool you will need to draw mountains. If you don't have a palette knife, then replace it with a small, dull knife. You can adapt the most unusual objects, for example, use a slightly sharpened ice cream stick, or make a palette knife from an old business card holder.
Mix purple, blue and white paints. Using diagonal movements from right to left, apply several confident strokes on the canvas. The paint in this place should be in a thick layer. Let it dry and apply over white. Then continue painting the landscape with gouache.

Now mix dark green and purple and use the resulting paint to paint fir trees on the left side of the canvas. To do this, make horizontal strokes with a large flat brush, they should be longer at the bottom than at the top. Draw the tops of the Christmas trees.
Next, use whitewash to make them snowy. Also draw white clouds in the background. On the right you can depict another Christmas tree. Below the line of the mountains, draw the outlines of the forest and create snowdrifts in the foreground using white paint. She will also help you draw them in the center of the landscape.
Here's how to paint with gouache so that you get such a picturesque canvas. If you liked the theme of mountains, you can create several more landscapes, first making a pencil sketch.
How to draw a landscape step by step

If you have never done this before, then you can enlarge the presented pencil drawing, attach a sheet of paper to it and simply redraw it.
Here we see all the necessary outlines:
- clouds;
- foreground vegetation;
- bushes

Draw the clouds using whitewash. Apply a few strokes of the same light paint to create white highlights in the sky.
For the mountains you will need a brown tone, here you can use some green strokes to paint the vegetation.
Using the same paint, depict a meadow. Dark green strokes will fall on the canvas in the form of bushes. The same paint will help you paint the stems of plants; you will paint flowers using yellow.
How to draw nature with gouache

We will also start creating nature with a pencil sketch. To simplify the task, also attach a piece of paper to the screen and redraw. Now use green to depict the forest in the center and left in the background. While this paint dries a little, apply blue to the sky and the flowing river.

Apply a light green tone to the lower part of the forest. Now let's work with the yellow paint. With this tone, gild the tops of the trees and the lower part of the forest on the left.
Cover some trees with dark green paint, as shown in the photo. When it dries, apply a yellow or light green tone to make the painted trees more realistic.

Paint the coastal rocks dark purple, then apply gray and crimson tones here. Add small details to the trees, and the gouache painting, depicted in stages, is ready.
You can draw a beautiful landscape by watching the video. A step-by-step lesson will help you create a different picture.
Village landscape in gouache

This is what you will get as a result of your work. But first you need to work a little. Paint the sky with blue, white and burgundy paint. Mix it directly on the sheet, adding water.
While this part of the painting is drying, wash your brush. You need to use it to draw the trees located in the background and the ground. Use dark brown paint to depict a tree trunk, and a thin brush to depict branches.

But what is a rural landscape without rural houses? Draw them in the background using orange, black and brown.
You will create foliage using the following interesting method. Take a brush with round bristles, dip it in yellow, burgundy, green and tap the paper to paint the foliage.
Draw the flowers in the same way, but using red, yellow, and pink paint.

You've got a colorful village landscape that will decorate a wall in your room or become a much-needed gift. You have learned how to paint with gouache. In conclusion, check out some useful tips that will help you do it correctly and accurately.

When using gouache, follow these tips:
- Gouache is sold in tubes and small jars. Buy it in the packaging you like best.
- You don't have to buy a lot of flowers at once. The main thing is to purchase the necessary ones: white, blue, black, yellow, red, brown. You can create some others by mixing these paints.
- Before you apply colors to the canvas, even if you don't mix gouache, apply it to your palette first. This way you won’t make a mistake in color and can make the paints the desired thickness by adding the required amount of water.
- If the gouache cracks, add a little gum arabic to it and stir well.
- Wait for them to dry before adding additional coats of paint on top of the first or lower ones.
- Since gouache is water-based, when you're done and the paint is dry, coat it with varnish. It is better to process each color separately, thoroughly rinsing the brush, which will absorb the paint.
Having learned useful tips and read about how to paint flowers and landscapes with gouache, you will be able to create amazing paintings using this paint and have a pleasant time doing an interesting activity.