In this lesson I will tell you how to draw our solar system, planets of the solar system step by step in pencil.
Look how big our star is, the Sun, compared to the planets, in particular ours. Each planet in the solar system revolves around the sun, each with its own rotation period. We are at such a distance from the sun that we do not freeze or burn, this is the ideal distance for the development of life. If we were a little closer or a little further, we wouldn’t exist now, we wouldn’t enjoy every minute of our lives and wouldn’t sit near computers and learn to draw.
So, on the left side of the paper we draw a small sun, a little higher a planet that is very close to it - Mercury. Usually they show the orbit in which the planet moves, we will do this too. The second planet is Venus.

Now it’s our turn, planet Earth is the third, it is slightly larger than all the previous ones. Mars smaller than Earth and is further away.

The Asteroid Belt occupies a very large distance, where there are many, many asteroids (a celestial body of the solar system that does not have an atmosphere) of irregular shape. The Asteroid Belt lies between the orbits of Mars and Jupiter. Jupiter is the largest planet in our solar system.

The sixth planet from the sun is Saturn, slightly smaller than Jupiter.

Then come the planets Uranus and Neptune.

On at the moment It is believed that there are 8 planets in the solar system. Previously, there was a ninth called Pluto, but relatively recently similar objects were found, such as Eris, Makemaki and Haumea, which were all combined into one name - plutoids. This happened in 2008. These planets are dwarf planets.

We will study how to draw planets with a pencil. But first, a few educational facts. Maybe they will come in handy in astronomy lessons:
- Our solar system is a “star called the Sun” and an assortment of objects revolving around it.
- We have VTsIOM. Study and study public opinion. And this is what they researched: they found out that a third of Russians believe that the Sun revolves around the Earth. No comments =) I hope there are no such people among you?
- The Sun appeared 4.6 billion years ago. At least that's what it seems. You understand that there are no witnesses left.
- The sun warms you and me for a reason. The temperature of the prominence, which is like a mini outgrowth of a star, is 6000 Kelvin. And inside the star is heated up to 13,500,000 Kelvin. It’s hard to even imagine, and there’s nothing to compare it with. - Brain explosion!
- Planets in their sequence from the Sun: Mercury, Venus, Earth, Mars, Jupiter, Saturn, Uranus, Neptune. We live on the third planet from the Sun. Congratulations!
- There is another large object in the solar system. Pluto. If you ask your parents, they will unanimously say that this is another planet. And they will be partly right. Since its discovery in 1930, Pluto has indeed been considered a planet, but since 2006, the definition of “what is a planet” has been accepted. And Pluto didn't fit into it. So now we have a double dwarf planet Pluto-Charon.
Astronomy demo lesson is over, let's try it now draw the planets of the solar system with a pencil.
How to draw the planets of the solar system with a pencil
Step one. Drawing the orbits of the planets. Their shape is an ellipse, close to a circle. But, if we look from one point, then visually we see not circles, but arcs, parts of ellipses. Such as in the picture. On the lines we outline the positions of the planets.  Step two. We draw circles - planets. We start with small Mercury, then larger Venus and Earth, again a small circle is Mars and further, as in the picture. In the lower left corner we will show the edge of the Sun.
  Step three. Let's erase the auxiliary lines - the axes of the circles. Let's make the orbits brighter.
 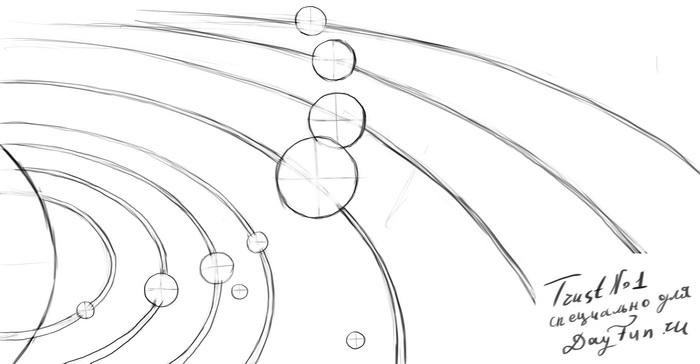 Step four. Let's add others celestial bodies: comets, asteroids. Let's draw “rings” to the large planets.
  Step five. Let's do the shading. With its help we must turn our circles into a sphere. We remember that we have the Sun in the center, and light falls from its side. But the opposite side of the planet will be darkened. The result should be something like this:
  I recommend other interesting lessons with similar topics.
When I was a child, I always dreamed of traveling a lot. In the room there was a small globe that could take me in my imagination to anywhere in the world. I read a lot about new discoveries and places, and spent a long time drawing the endless planet Earth. I was surprised how it could fit on one piece of paper.
How to quickly and easily draw planet Earth
For the drawing itself in simple form you will need:
- Compass.
- Globe or map of the Earth (you can also use a picture from a tablet, for example).
- Pencils (felt pens, paints, gouache, etc.)
- Sketchbook.
Compasses can be replaced by any convenient objects with which it will be possible to draw the shape of a circle. Although our planet is not perfectly round, in the drawing it is customary to depict it in the shape of a ball. Next, you need to divide our ball with a slightly rounded horizontal line in the middle. It will divide the world into the southern and northern hemispheres. We add the same curved lines at the top and bottom, making 7-8 pieces in total. Then the meridian lines are drawn vertically. The highest point in the middle, connecting all vertical lines, is the North Pole, and at the bottom is the South Pole. There will be 6 vertical semicircular lines and straight line in the middle. You will get a degree grid, which can later (if desired) be erased.

Draw the continents
Looking carefully at a map or globe, you need to show Antarctica below, and the Arctic above. You don't have to go into details. Then transfer Asia and Europe to our sheet. Only then will it be convenient to apply Northern and South America. To make the map more visual, you need to outline the continents more boldly. Then you can start coloring a miniature copy of the Earth. Continents are most often colored green, orange and brown flowers, territory with waters - blue, blue or turquoise. With each step, the drawing will become more and more similar to the original and give a lot of joy.

Today, children are given the opportunity to draw online, so create your own unique planet It will not be difficult even for the smallest children.
Space attracts not only scientists. This eternal theme for drawing. Of course, we cannot see everything with our own eyes. But the photos and videos taken by the astronauts are amazing. And in our instructions we will try to depict space. This lesson is simple, but it will help your child figure out where each planet is located.
You will need: a sheet of paper; pencil; eraser; compass;
Step 1
Main circle
First draw big circle on right side leaf. If you don't have a compass, you can trace a round object.
Orbits
The orbits of the planets depart from the center and are at the same distance. 
Central part
The circles gradually increase in size. Of course, they won’t fit completely, so draw semicircles.  The orbits of planets never intersect, otherwise they will collide with each other.

Finishing drawing the orbits
The entire sheet should be covered in semicircles. We know of only nine planets. But what if in distant orbits there are also cosmic bodies that move in the most distant orbits.

Sun
Make the central circle a little smaller and outline it with a thick line so that the Sun stands out against the background of the other orbits.

Mercury, Venus and Earth
Now let's start drawing the planets. They need to be arranged in a certain order. Each planet has its own orbit. Mercury revolves near the Sun itself. Behind it, in the second orbit, is Venus. Earth comes third.

Mars, Saturn and Neptune
Earth's neighbor is Mars. It is slightly smaller than our planet. Leave the fifth orbit empty for now. The next circles are Saturn, Neptune. These celestial bodies are also called giant planets, since they are tens of times larger than the Earth.

Uranus, Jupiter and Pluto
Between Saturn and Neptune there is another large planet - Uranus. Draw it on the side so that the images do not touch.
 Jupiter is considered the largest planet in the solar system. That's why we'll depict it on the side, away from other planets. And in the ninth orbit, add the smallest celestial body - Pluto.

Rings on Saturn
Saturn is famous for the rings that have appeared around it. Draw several ovals in the center of the planet. Draw rays of different sizes that extend from the Sun.

Surfaces of planets
The surface of each planet is not uniform. Even our Sun has different shades and black spots. On each planet, draw the surface using circles and semicircles.

Draw fog on the surface of Jupiter. Sandstorms often occur on this planet and it is covered with clouds.

The last details are the concentric circles on the Sun. On some planets, draw a shadow by separating it with a semicircle. You can also draw its satellite, the Moon, near the Earth.

Coloring
Space in space dark blue. The Sun is yellow, Mercury is gray, Venus and Jupiter are brown. The earth is green-blue. Mars is red, Neptune is green, Saturn is sandy in color, and its rings are white or light blue because they are icy. Uranus is blue-blue and Neptune is gray-black. You can also add other details: stars, comets and asteroids.

Well.. While I’m loading the movie, I’m doing a lesson on drawing space.. It might come in handy.
How to draw space with a pencil step by step
Step one.
Draw a round shape for the planet and the outline of the landscape.
Step two.
Let's correct the contours of the planet and its satellite. In the foreground we draw two men, these are astronauts sent to the moon.

Step three.
Let's add some touches.

Step four.
Let's draw a starry sky. Or more precisely this open space. In the middle of the lunar landscape we will draw several craters.

Step five.
All that's left to do is add some shadows. In the end it turned out like this space picture:

How to draw the Earth with a pencil step by step
Step one. Drawing a circle by hand is very difficult. First we need two squares, divided in half, so that we can fit the colo into them. Of course, you can take a compass and draw a circle. But this is not a royal matter.  Step two. As mentioned above, we make the outline of our planet, draw four arcs at the corners of the square.
  Step three. Now it will be easier to draw smooth circle. We combine the arcs so that everything turns out as clear as possible.
  Step four. Now we sketch all the continents, oceans, islands and peninsulas on our ball. Anything that will fit and be noticeable.
  Step five. We remove the auxiliary lines. We stick dots around the planet - the image of distant stars, move the pencil, depict space so that the planet does not look lonely.
How to draw the planets of the solar system with a pencil
Step one
Drawing the orbits of the planets. Their shape is an ellipse, close to a circle. But, if we look from one point, then visually we see not circles, but arcs, parts of ellipses. Such as in the picture. On the lines we outline the positions of the planets.

Step two
We draw circles - planets. We start with small Mercury, then larger Venus and Earth, again a small circle is Mars and further, as in the picture. In the lower left corner we will show the edge of the Sun.

Step three
Let's erase the auxiliary lines - the axes of the circles. Let's make the orbits brighter.

Step four
Let's add other celestial bodies: comets, asteroids. Let's draw “rings” to the large planets.

Step five
Let's do the shading. With its help we must turn our circles into a sphere. We remember that we have the Sun in the center, and light falls from its side. But the opposite side of the planet will be darkened. The result should be something like this:

How to draw an astronaut with a pencil step by step
There are four steps ahead.
Step one.
At the top of the sheet we will place a large round head. She's big because she's wearing a helmet. Let's draw two down curved lines- this is the outline of the body. We will draw an astronaut in zero gravity. And this immediately sets his position. Let's draw the contours of the arms and legs. The spacesuit has a belt. Let's outline the backpack behind our shoulders.

Step two.
We begin to draw out the details: the helmet, fingers, all sorts of bells and whistles on the “suit”. Moreover, all the elements are quite large.

Step three.
On the helmet we will outline an opening for the eyes, making it three-dimensional. Let's start drawing shoes. Let's show a pocket-bag on the belt. Look carefully at the picture and fill in what is missing on your sheet. Rivets, bends on the fingers, etc.

Step four.
We will show horizontal shading on the belts. Let's draw the shoes: the pattern on the sole, the clasp. The astronaut wears a small electronic device on his hip. Now let's outline the main elements of our drawing. Almost ready. You can use shading to “revive” our hero, or add color using paints!

How to draw a space rocket with a pencil step by step
Step one. Our rocket is not just some kind of device with an engine, but a whole spacecraft. We draw two oval figures - this is the hull of the ship. Below we will notice one wing of the rocket, and behind it is the tail.  Step two. Connecting the ovals. The structure of the rocket and its structural parts have a complex shape, which makes no sense to describe. Therefore, try to repeat it as you see in the picture, or you can come up with your own rocket.
  Step three. The ship should have many different parts on the hull, plates, guns, portholes.
  Step four.
  Step five.
How to draw a lunar rover with a pencil step by step
Step one. Let's divide the device into structural parts, depicting them on paper in the form of rectangles.  Step two. Let's sketch a sketch of an astronaut sitting in a car.
  Step three. Add a small antenna in front of the vehicle and outline the person behind the wheel in more detail.
  Step four. Let's remove the auxiliary lines and outline the contours more clearly.
  Step five. To show the effect of movement, we will make shadows under it, and also add shading to the wheels, the astronaut and other parts. Here:
How to draw a spaceship with a pencil step by step
Step one. Sketching a template with geometric shapes for the ship, we will display the hull and places for the engines.  Step two. Let's draw the jet turbines, adjust the lines of the hull a little and add a small cannon underneath it.
  Step three. You need to highlight the borders with a pencil with a thicker line, add a lot of details to the wing, outline them, and also add number 09 for appearance.
  Step four. With light movements we will shade the entire area of the ship horizontally, and completely shade out the windows, turbine outlets and the cannon.
How to draw the moon with a pencil step by step
Step one. Let's mark the location of the moon on paper using a square.  Step two. Let's draw a circle, preferably an even one. Although the surface of the moon is not smooth, it will appear different from afar.
  Step three. Let's add craters, mountains and depressions to the surface.
  Step four. Let's add some shading.