Good day dear friends. In this article I will show you two simple methods combine two photos into one.
Method 1. Combine two images in Photoshop
- Let's launch Photoshop
- Open the required photos. This can be done using the “File - Open” menu or simply dragging files into the program work area
- Next, we will create an empty image where we will add both images. To do this, press “Ctrl + N” or “File – new”

- If you don’t know what size to indicate, it doesn’t matter. We'll crop the image later.

- As a result, we received a clean work area, where we will combine two photographs. Drag both images onto this area using the tool
(you can find it in the left toolbar)

- Now we set the images the way we need. To switch between images use the layers menu

- To change the image size, go to transform mode. Press Ctrl+t on your keyboard and zoom in or out using the edit points. To maintain proportions, hold down the "Shift" key

- After the photos are displayed, we will crop the image. To do this we will use the tool
from the left panel. Select the desired area of the image and press the Enter key. Everything outside the selected area will be cropped.

- As a result, we will get the desired result. All that remains is to save the image

- To save the image, press “Ctrl+Alt+S” or “File - Save As...”

- Select the location to save the image and the jpeg format, then click “Save”
That's all. This method is the most practical and universal. Even though you will have to install Photoshop, if you don't have it installed and figure it out a little, the result will be worth it.
There is another simpler method that does not require installing additional programs.
How to Combine Two Images in Paint
Although this method is much simpler, do not expect flexibility and ideal results from it.
- Press start and look for Paint there

- Drag the first photo into the program work area
- We increase the working area using the “square” on the border of the area.

- To add a second image, use “Clipboard - Paste - Paste from” and select the image on the computer

- As a result, we have one image superimposed on another. Now you need to drag one of the images

- Next, using the “Select” tool, we move the images as we need them

- Then we adjust the work area to the size of the image

- All that remains is to save the image. To do this, click “File - Save As” and set the path to save the image.
That's all, now you know two simple ways combine two photos into one. Write in the comments whether this article was useful to you.
Today's GIMP tutorial is about combining two photographs (images) into one using basic commands and graphics editor tools.
For example, very often when scanning you get several different images of one whole fragment (drawing, page, large format drawing). And you need to get a digital analogue of this sketch entirely in one file, but your A4 scanner cannot scan the entire spread of your favorite magazine. Then after this you need to glue different parts of the photo into one, and then a free one will come to your aid graphic editor gimp.
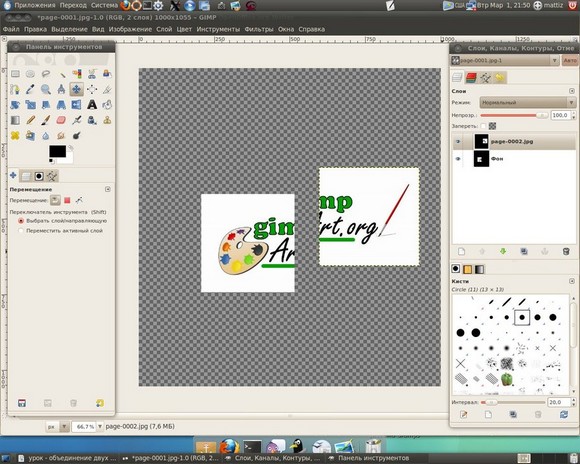
Step 1. Opening the images " like layers" through the menu “File-Open as layers” and select our images one by one while holding down the Ctrl key.
Step 2. For freedom of action, we need to increase the working area, i.e. set new canvas size parameters. Thus, the images can fit freely when unfolded on the “canvas”. To do this, call the “Image - Canvas Size” menu and enter new parameters for height and width.

Then, using the Move tool, we will move our layers apart on the canvas
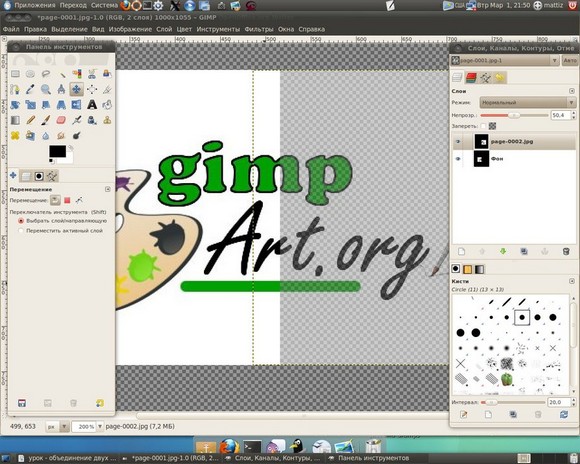
Step 3. Select the top layer in the stack of layers and reduce its opacity to 50%. This way we will ensure the visibility of the second layer overlaying the first and achieve a better match of the elements in the image. In our case, we need to get matches of the inscriptions on the photo, which we do using the “Move” tool

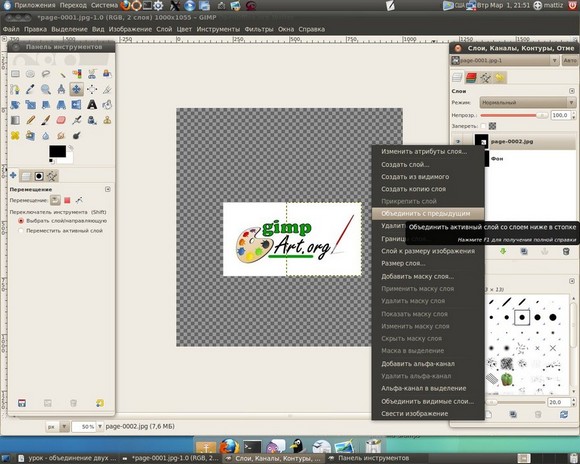
Step 4. Right-click on the active top layer and from the drop-down menu click “Merge with previous”.
Step 5.Using the “Image - Autocrop Image” tool, we will crop our photo.

Thus, on simple lesson In Gimp we learned how to very quickly combine 2 photos into one. Remember, this is only an algorithm of possible actions that you will need to repeat when editing your images.

Thank you for your attention!
While working with existing images, the user may need to combine photos into one online. This could be creating a collage, photomontage, or other tasks that require gluing together several photos into a coherent visual composition. Specialized network services created specifically for combining several photos will provide valuable assistance in implementing your plans.
There are a sufficient number of services on the Internet that allow you to combine two photos online in just a couple of minutes. Some of these resources specialize in creating various types of collages, in which you can combine 5-7 various photos into one single image.
Others specialize exclusively in adding photos to each other and have a simple and user-friendly interface.
Working with tools for gluing images is built in a template manner. You go to such a service, upload two (or more) photos to it, decide on a number of settings, and start the adding process. After that, you view the result and save it on your PC.
In the case of resources that specialize in creating collages, you will need to first select a suitable collage template (or create one yourself), and then follow the steps described above.
The resulting result is usually not marked with watermarks, so you can safely use it for various tasks.
If you want to add any text to your photo, then the corresponding one on our website will be useful to you.
Let's take a closer look at services for merging photos online.
Croper.ru is a specialized photo editor
The resource croper.ru is a multifunctional online photo editor that allows you to perform various operations on photos (cropping, resizing, rotating, auto-processing, applying effects, etc.). Its functionality also includes gluing together user photos, which we use for our tasks.
To use the functionality of the photo editor, do the following:

Service imgonline.com.ua – simple combination of photos online
A feature of the Ukrainian service imgonline.com.ua is a predominantly text-based interface, with minimal inclusion of a graphic component. All operations are carried out by selecting the necessary text options, and at the very end the user has the opportunity to evaluate the result.

Mycollages.ru – easy creation of collages
The service is designed to quickly and easily create collages from the user’s existing photos. To facilitate the process, the resource has a number of standardized templates, but if desired, the user can create his own.

Quickpicturetools.com - English-language online resource for working with images
The quickpicturetools.com service can perform various simple operations when working with photos - cropping, adding text and frames to photos, creating a calendar based on photos, and more. There is also a function for combining and gluing images online, which we will use.
- Go to quickpicturetools.com ;
- Click on “Add” and upload the first photo to the resource;
- Click on “Add” again in the next cell and upload the second photo;
- Using the “Width” and “Height” options, set the required dimensions of the first and second images, and decide on other settings;
- To get the result, select "Generate Image" below;
- Save the result to your PC.

If you are interested in how to make a slideshow from photos with music, then this may be relevant to you.
Photojoiner.net – generation of collages in English online
The photojoiner.net service is similar in functionality to the mycollages.ru service I already mentioned. Despite the English-language interface, working with this site occurs in the same way.
- You go to the resource, select the number of collage cells, and click on “Apply”.
- Using the “Open” button, upload two photos to the resource and drag them into the corresponding cells of the collage.
- The “Save” button is used to save the result.

Conclusion
To stitch 2 photos online, you should use the services I listed above. Of the listed analogues, I would like to focus the reader’s attention on the resource croper.ru, which has a fairly diverse set of tools for working with images. In general, all of the listed services are free, have a simple and user-friendly interface, and can be recommended for quickly combining the photos you need online.
It’s not at all difficult to make one photo out of two—several dozen services have now been created for this. In some of them this is the main function, in others it is a secondary one. Today we will tell you on which sites you can perform this simple action in just a few minutes.
: combining several photos into one is easy!
 Pixlr has a huge range of useful photo editing features
IMGonline: how to take 2 photos in one online
The IMGonline service is a real storehouse of useful functions for photo processing. It contains many tools for color correction and image enhancement, as well as applying interesting effects. Despite all the power of the site, its design is very primitive, but you can use it even from the old one mobile phone with Internet access.
To merge photos, in the “Tools” tab, you need to select the “Merge two pictures into one” function or just click here.
 Don't let it scare you large number information on the page. If you just need to combine 2 photos without editing them, then the proposed settings will not be needed
We perform the following three steps:
- Upload the required photos.
- We note the orientation of their location (vertically or horizontally) and, if necessary, adjust the remaining parameters of the combination. Here you can rotate, crop or flip your photo, although this is not very convenient and not at all clear.
- Select the format of the finished image (jpg or png-24).
Click the “OK” button.
 Next you will be prompted to open or download a ready-made association
will help you combine photos into one online
is another very easy to use but feature-rich photo editor. To make one photo out of two, you first need to upload them one by one to the site. To do this, in the “Files” tab, select “Upload from disk” or “Upload from Vkontakte album”. Then click “Operations” – “Edit” – “Merge several photos”.
 Please note that the pictures are loaded separately: first the first one, and then the second one in exactly the same way.
  Here you can normalize the size of the pictures relative to each other
 If you are satisfied with the finished gluing, click “Accept”; if not, click “Cancel”.
 You can work further with the result obtained or save the image to your computer or VKontakte.
 Do you want to make the association original? For this, Cropper offers a whole archive of decorative photo frames, as well as the ability to create a colored or dynamic frame.
 It is convenient to select images for editing from a special panel on the left
 As you can see, all the proposed services can combine two photos into one online equally well. However, each site has its own characteristics, additional functions and capabilities. Which of them do you prefer - decide for yourself.
Processing photographs, and even more so combining them into one, is something difficult and incredible for many photography enthusiasts. Some people are intimidated by the installation new program on their computer, someone moves further, but having installed the necessary application, they are faced with the banal problem of not knowing its functionality. In any case, finding a way out of the situation is not at all difficult. There are many online applications for this purpose on the Internet, and most of them are quite friendly for novice users. Let's look at a specific example of how to combine several photos into one.
In order to combine several photos into one, you can use the online application Fotor. To do this, you will need to open the page of this photo editor in your browser. Right there on home page website, click on the “Make a collage” button. After this, you should see the editor loading slider appear. Some will need to wait a few seconds, others a few minutes. The download speed is directly proportional to the Internet speed. In any case, you should wait until the slider reaches 100% load. After this, the working field of the collage photo editor will open. To combine several photos into one, 2 modes are provided at once. This is a template and a funky collage. They are in the menu on the left. First, let's use a simpler mode - template. Select it from the menu on the left. A little to the right, set the number of pictures in the collage and select the template you like. For example, we will have 4 pictures, but we liked the fifth template. By default, standard photos will already be loaded on the right. We delete them by clicking on the cross in the upper right corner of each of them. Next, you need to upload your photos. To do this, click “Open” and select the path to the pictures. The photo editor allows loading both from a computer and from some social networks. Select the item you need. In our case, this will be downloading from a computer. In the window that opens, we find the photos we need, select them and click the “Open” button. All selected photos should appear in the menu on the right. Hold down any of them with the left mouse button and drag it to free space template. Do the same with the rest of the photos. This way you must fill in all the empty fields. For those who are too lazy to fill out the template themselves, there is a wonderful button on the right in the “Fill” menu. With one click you will solve all problems at once. All photos will fill out the template on their own. After all the photos are in place, you need to save the collage. To do this, click on the “Save” button above the finished photos and indicate the file name, its extension, saving quality and location.