We talked about drawing in Photoshop using a pencil and brush. Freehand lines are great, but it often happens that you need to depict an even geometric figure. Rulers and compasses are a thing of the past, and now you can do this using simple tools editor.
To select one of them, click the Shapes icon on the tool palette.
Regardless of which group tool you select, the following items, common to all shapes, will appear in the Options Bar.
- Select tool mode. Here you can choose one of three.
- Figure. The value is set to the default, and it creates a vector geometric figure on a separate layer, that is, what you expect from the tool happens.
- Circuit. The outline of the figure is drawn without filling.
- Pixels. It creates not a vector, but a raster figure.
- Filling. Allows you to customize the color and type (gradient, shading) of the drawn figure.
- Stroke. Shape outline settings: thickness, type, color.
- Width and height. They allow you to clarify the size of the figure when it is impermissible to do this “by eye”.
As always, create a new document with a white background. The remaining parameters can be left as default or selected at your discretion.
Rectangle
Select the Rectangle shape and, to draw it, click on the canvas and then drag the pointer while holding down the mouse button. The point where you clicked will be the corner of the shape.
On the options bar, click the icon. The geometric settings window will open.

By default, the switch is set to Rectangle. If you set it to Square, then when drawing you will always get a shape with the same length of sides. A similar effect can be achieved without pressing the checkbox: to obtain a square while drawing a rectangle, just hold down the Shift key.

If the parameters of your rectangle are known in advance, set the switch to the Specified size position and specify the required values in the fields. The figure will be completely drawn as soon as you click on the canvas with the mouse button.
After setting the switch to the Set proportions position, in the input fields that become available, you can specify the aspect ratio of the created figure.
The From Center checkbox allows you to draw a rectangle from the center, rather than from the outermost point.
Rectangle with rounded corners
The next item on the list of geometric shapes. It is clear that it differs from the usual one in the rounding of the corners. Accordingly, the settings for this figure and the rectangle are almost identical. The fillet radius can be specified in the corresponding field in the options bar.
Ellipse
The parameters are the same as a rectangle, only instead of a square you can draw a circle. To do this, in the geometry settings window, check the Circle box or hold down the Shift key while drawing.

Polygon
With this tool you can draw a triangle, dodecahedron, icosahedron, star, or any shape that contains from three to one hundred sides. Their number can be set in the Party input field located on the parameters panel.
The geometric settings window is noticeably different from previous figures.

- Radius. This field specifies the radius of the future polygon.
- Smooth outer corners. If the checkbox is checked, then the corners are rounded; if not, the corners are sharp, as in a classic polygon.
- Star. Check the box if you want to receive a star as output.
- Depth of rays. This input field specifies how long the rays will be.
- Smooth the inside corners. Check this box if you want the inside corners to be rounded, as shown in the image below.

Line
Use this tool to create truly straight lines - freehand is simply not practical. To achieve maximum accuracy, configure the geometric parameters in the appropriate window.

- Start. If the checkbox is checked, instead of a line you will get an arrow that will be drawn at the location where you clicked the mouse button.
- End. Select the checkbox to add an arrow to the end of the line.
- Width. Indicated as a percentage relative to the thickness (it can be set in the parameters panel in the field of the same name).
- Length. It is calculated in the same way as width - in relation to thickness, as a percentage.
- Curvature. The value ranges from -50% to 50% and determines how much the widest part of the arrow will be curved. The figure shows arrows with curvature of 0%, 30% and 50% (from top to bottom).

Free figure
In order not to create a separate tool for each of the dozens of remaining shapes, the developers have combined them here. All elements of the parameters panel are already familiar to you, except for the most important one - the Shape button, clicking on which opens the shape selection window.

If you click on the gear located on the right side of the window, a menu of additional options will open, containing categories of shapes.


Thanks to the tools discussed, you can literally draw in two clicks huge amount figures that would take quite a long time to create by hand.
Drawing tools let you create and edit vector shapes. They make it easy to create various elements for web pages.
The following family of tools allows you to create geometric shapes different shapes.
Rectangle (Rectangle)() - accordingly, allows you to draw a rectangle (and with the key pressed - a square), filled with the foreground color.
Rounded Rectsngle square)— creates shapes similar to those described above, but allows you to set the radius of rounding the corners of the rectangle.
Ellipse- creates ovals (in combination with a pressed key - circles).
Polygon- allows you to create geometric shapes with an arbitrary number of angles, as well as multi-beam stars. By default creates a convex pentagon.
Line— draws straight lines of arbitrary or specified length, thickness, color and direction.
Custom Shape- allows you to create a geometric figure free form and save it for future use.
Create a new training file.
Left click on tool - shapes - on the toolbar, the tool selection window will open:

Here are the basic shapes we can use. Select any one and look at the options panel:
For any shape you can choose:
- drawing mode:
- Shape layer. The figure is created in a separate layer. A shape layer consists of a fill layer that defines the color of the shape, and an associated vector mask that defines the shape's boundaries. The outline of a shape is a path that appears in the Paths tab of the Layers panel.
- Outlines. This mode allows you to draw outlines of shapes that can be filled or outlined with any color. Paths appear in the Paths tab of the Layers panel.
- Pixel Fill . When working in this mode, not vector, but raster images are created, which can be processed in the same way as any raster image
- style and color of the figure
- set parameters specific to this figure
Drawing rectangles
Let's select the first shape - a rectangle. On the panel we will select mode - shape layer. Select a style by clicking on the triangle on the right. 
Choose any one you like. By the way, if you click on the triangle in the circle (on the right), you can select additional styles in the context menu that opens. If you do not want to use a style, then select a white square crossed out with a red line.
Now you can set the geometric parameters:

- Arbitrarily - as you draw, so it will be.
- Square - when you stretch the shape with the mouse, the width and height will always be the same.
- Specified size - you can set the width and height of the rectangle (in cm) and click on the canvas. A rectangle with the specified dimensions will appear.
- Set proportions - you can set how many times the width will be smaller (or larger) than the height. When stretching the figure, the proportion will be maintained.
- From the center - draws a rectangle from the center.
- Snap to Pixels - the edges of the rectangle are snapped to the pixel boundaries.
Now select -arbitrarily- and stretch your rectangle on the canvas with the mouse. For example, this is what I got when using styles: Button, Glass Buttons and Web Styles.

Enough useful tool to create buttons and menus for your web pages, isn't it?
Draw rectangles with rounded corners
Let's select the second shape - a rectangle with rounded corners. In the panel, select the mode - shape layer, corner radius - for example, 15 and color (you can style it as you want). The geometric parameters are the same as for a rectangle.
This is what happened to me various combinations radius and style.

Why not news blocks and menu buttons?
Drawing circles
Let's choose the third figure - an ellipse. In the panel, select the mode - shape layer, color and style. The geometric parameters are the same as for a rectangle, with the only difference being that you can choose a circle instead of a square. Select -randomly- and stretch the ellipse. If you want there to be a circle, then hold down the Shift key or select -circle- in the geometric parameters.
Here's what I got: 
Drawing polygons
Let's choose a shape - a polygon. In the panel, select the mode - shape layer, the number of sides in the range from 3 to 100 (for example, 3 for a triangle, 6 for a hexagon), color and style. Let's consider the geometric parameters:

- Radius - radius of the polygon.
- Smooth outer corners
- Star - with the checkbox unchecked, the polygon is convex, with the checkbox ticked, the polygon is concave.
- Beam depth - if the polygon is concave, then its vertices seem to form rays. This parameter shows what part of the polygon radius will be occupied by rays. The higher the %, the longer and sharper the rays.
- Smooth outer corners - with the checkbox unchecked, the corners are sharp, with the checkbox checked, the corners are rounded.
For example:

The first hexagon has a radius of 3 cm, the rest of the boxes are unchecked.
The second hexagon has a radius of 3 cm, a checkmark at -star-, the depth of the rays is 25%, the rest of the checkboxes are unchecked.
The third hexagon has a radius of 3 cm, the depth of the rays is 50%, all the boxes are checked.
All have a style applied to them.
Drawing lines
Let's choose a shape - lines. In the panel, select the mode - shape layer, line thickness (in pixels), color and style. Let's consider the geometric parameters:

If all the checkboxes are unchecked, there will be just a line, the parameters are set by the arrows at the ends of this line.
- Start- arrow at the beginning of the line.
- End- arrow at the end of the line.
- Width- proportions of the arrow as a percentage of the line thickness (from 10% to 1000%).
- Length- proportions of the arrow as a percentage of the line thickness (from 10% to 5000%).
- Curvature- determines the degree of curvature of the widest part of the arrow where it meets the line (from -50% to +50%).
For example:

The first line has all checkboxes unchecked, width - 500%, length - 1000%, thickness - 2 pixels.
For the second line, everything is the same, but there is a checkmark at -beginning- and the curvature is 5%.
For the third line, everything is the same, but the -end- is checked and the -beginning- is unchecked.
The fourth line has both checkboxes, width - 500%, length - 1000%, curvature - 15%, thickness - 5 pixels.
All have a style applied to them.
Drawing arbitrary shapes
Let's choose a figure - an arbitrary figure. In the panel, select the mode - shape layer, color and style. The geometric parameters are the same as for a rectangle. But here there is a choice of the figure itself:


Drawing multiple shapes in one layer
The principle here is the same as with the rectangular selection tools (in the first lesson we made a non-standard selection area using the tools in the options bar: add to selection, subtract from selection, etc.). The same tools are available in the Shape Options panel.
![]()
For example, create a rectangle shape, now in the options bar click on the "add to shape area" icon, and now select the ellipse shape. Move the mouse cursor to the upper border of our rectangle, press the left mouse button and, without releasing it, stretch the ellipse. It should look something like this:

If the ellipse is not stretched as desired, you can correct it. To do this, select from the toolbar contour selection tool-
Move the cursor to the border of the ellipse and, while holding down the left mouse button, drag the ellipse where it should be. Using all these tools, you can draw shapes of varying complexity.
Saving the shapes
Let's say we liked the last shape we created and want to use it in the future. To do this, you need to save it. For this menu Edit -> Define Custom Shape. Give the new shape a name. 
Now our shape has appeared in the drop-down selection panel arbitrary figures.
Hello, dear readers of my blog. The easier the task, the more difficult it is to solve in Photoshop. There are a thousand articles about or creating the effect of black eyes, but how to draw a circle, square or rhombus - go figure it out! Today I will solve this injustice.
You will find a comprehensive article about geometric shapes for Photoshop - how to draw them yourself, what additional tools you can download for a more impressive result, as well as many other equally interesting and useful information.
We draw ourselves
IN Adobe Photoshop There are several tools that allow you to draw shapes. Just some of them hide some secrets. Now I will tell you about them. So, I If you want to learn how to do it like in my drawing, then I recommend the article, there is nothing easier than making the same one.
So, in the toolbar on the left you can find a rectangle, ellipse, polygon, line or any shape. Maybe you don't see additional tools, but found one of them, just hold down the left mouse button for a split second or click once on the right mouse button. A menu with additional shapes will immediately appear.

To start, I'll select a rectangle. As soon as I finish drawing, an additional menu will pop up on the left. Here you can select the size by width and height if you need to maintain exact dimensions. Just below is a menu with a fill for the shape itself - you can choose no fill, a solid color, a gradient or a pattern.

A little to the right is the stroke menu - you need to determine its width and whether it will be present at all; if you want, make it monochromatic, fill it with a gradient or, again, with a pattern.

To turn a rectangle into a square you need to hold down the Shift button while drawing the shape.

Pressing the Shift button turns an ellipse into a circle.

Also in the list there is such a figure as a polygon. You decide the number of sides yourself. You can enter any value - 3 to make a triangle, 7, 10 and so on.

I won't give lines special attention, this thing is not difficult to figure out on your own. The only thing worth warning is that holding Shift makes the line strictly vertical or horizontal.
Free figure
We are left with an arbitrary figure. What is it?

On the very right side of the top menu you can see ready-made shapes. Various arrows, squares, lightning bolts and so on.

To use the keyboard shortcut Ctrl+T.

How to add new ones
Adding new shapes is not difficult. A lot of free figures can be downloaded from the site photoshop-master.ru . There are about 400 sets with figures - people, patterns, spiders, abstraction, cars, chairs, fire, flowers and much more.

I’ll show you how to install them using “Media” as an example; they will be useful to me in the future. So, I download the file.

Just wait 15 seconds. No pre-registration is required.
Now open the archive and drop the file in CSH format somewhere where it can be easily found.

Now open the shapes in Photoshop and click on the nut on the right side. In the list that opens, select “Load Shapes.”
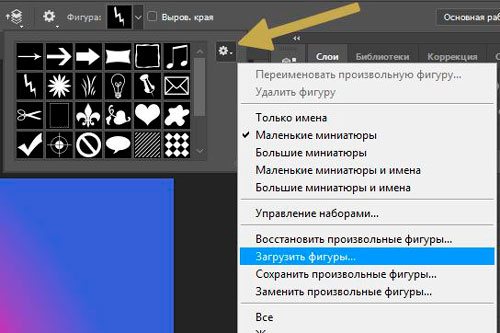
Now find the file that you unzipped not long ago. By the way, after you're done, the file can be deleted from your computer. You won't need it anymore. Everything was copied to the desired folder.

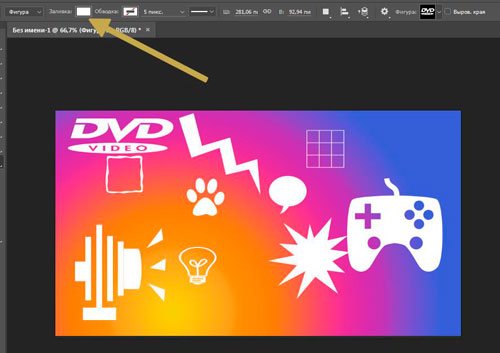
You can use shapes. Don't forget about the fill, thanks to which you can change the color of the shapes, as well as the stroke.
In addition to shapes, you may also need brushes. They can also be downloaded from the website Photoshop-master .

You can load the required set in the same way as when working with shapes. Open your brushes.

Click on the nut and select “Load”.
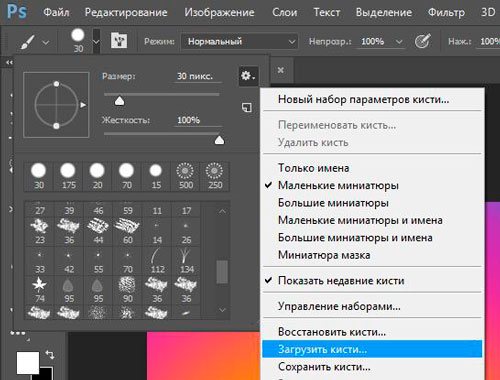
Work with them yourself. There is nothing complicated here. They are slightly different from the figures.

Google to the rescue
Another way to draw a figure is to use the work of others. You'll need Google and its Images section. You will find out why exactly he is very soon. In order for the figure to have a transparent background and fit harmoniously into your composition, it is required. This is what you need to look for: png triangle, circle, oval, and so on.
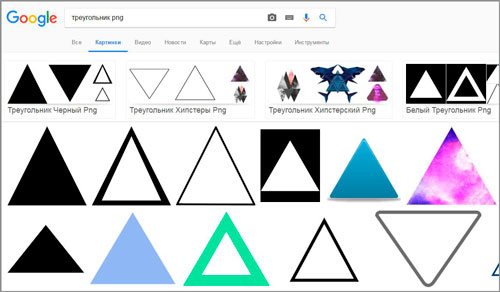
If you are doing work for yourself, then, in principle, you could use Yandex, but if the project is being created for commercial purposes, then Google will be very useful. Open “Tools”, then “Use Rights” and select the desired type - use or use and change.

Next, open the picture after you have found something suitable. This important condition. The drawing should be located on this square-checkered background. If it's just white, then it's not a png. You will understand the difference when you download. In principle, there is nothing wrong with learning from your mistakes.

This is what the PNG will look like. The checkerboard filled with my background.

If you want to learn more about the program, I can recommend the course to you « Photoshop from scratch in video format » . It is suitable for complete beginners. There is a lot of useful information here about the tools and when each is suitable.

The Internet is full of lessons that you can learn from, but it is one thing to blindly repeat after the author and quite another to meaningfully achieve a goal, knowing what you will have to use for this. This is a completely different level.
Drawing tools let you create and edit vector shapes. They make it easy to create various elements for web pages.
Create a new training file.
Left-click on the -shapes- tool in the toolbar, the tool selection window will open:
Here are the basic shapes we can use. Select any one and look at the options panel:
For any shape you can choose:
- drawing mode:
- Shape layer. The figure is created in a separate layer. A shape layer consists of a fill layer that defines the color of the shape, and an associated vector mask that defines the shape's boundaries. The outline of a shape is a path that appears in the Paths tab of the Layers panel.
- Outlines. This mode allows you to draw outlines of shapes that can be filled or outlined with any color. Paths appear in the Paths tab of the Layers panel.
- Pixel Fill. When working in this mode, not vector, but raster images are created, which can be processed in the same way as any raster image
- style and color of the figure
- set parameters specific to this figure
Let's select the first shape - a rectangle. In the panel, select the mode - shape layer. Select a style by clicking on the triangle on the right.

Choose any one you like. By the way, if you click on the triangle in the circle (on the right), you can select additional styles in the context menu that opens. If you do not want to use a style, then select a white square crossed out with a red line.
Now you can set the geometric parameters:

- Arbitrarily- as you draw, so it will be.
- Square- when you stretch the shape with the mouse, the width and height will always be the same.
- Specified size- you can set the width and height of the rectangle (in cm) and click on the canvas. A rectangle with the specified dimensions will appear.
- Set proportions- you can set how many times the width will be smaller (or larger) than the height. When stretching the figure, the proportion will be maintained.
- From the center- draws a rectangle from the center.
- Snap to Pixels- the edges of the rectangle are snapped to the pixel boundaries.

Quite a useful tool for creating buttons and menus for your web pages, isn’t it?
Draw rectangles with rounded corners
Let's select the second shape - a rectangle with rounded corners. In the panel, select the mode - shape layer, corner radius - for example, 15 and color (you can style it as you want). The geometric parameters are the same as for a rectangle.
Here's what I got with different combinations of radius and style.
 Why not news blocks and menu buttons?
Drawing circles
Let's choose the third figure - an ellipse. In the panel, select the mode - shape layer, color and style. The geometric parameters are the same as for a rectangle, with the only difference being that you can choose a circle instead of a square. Select -randomly- and stretch the ellipse. If you want there to be a circle, then hold down the Shift key or select -circle- in the geometric parameters.
Here's what I got:

Drawing polygons
Let's choose a shape - a polygon. In the panel, select the mode - shape layer, the number of sides in the range from 3 to 100 (for example, 3 for a triangle, 6 for a hexagon), color and style. Let's consider the geometric parameters:

- Radius- radius of the polygon.
- Smooth outer corners
- Star- with the checkbox unchecked, the polygon is convex, with the checkbox ticked, the polygon is concave.
- Beam depth- if the polygon is concave, then its vertices seem to form rays. This parameter shows what part of the polygon radius will be occupied by rays. The higher the %, the longer and sharper the rays.
- Smooth outer corners- with the checkbox unchecked, the corners are sharp, with the checkbox checked, the corners are rounded.

The first hexagon has a radius of 3 cm, the rest of the boxes are unchecked.
The second hexagon has a radius of 3 cm, a checkmark at -star-, the depth of the rays is 25%, the rest of the checkboxes are unchecked.
The third hexagon has a radius of 3 cm, the depth of the rays is 50%, all the boxes are checked.
All have a style applied to them.
Drawing lines
Let's choose a shape - lines. In the panel, select the mode - shape layer, line thickness (in pixels), color and style. Let's consider the geometric parameters:

If all the checkboxes are unchecked, there will be just a line, the parameters are set by the arrows at the ends of this line.
- Start- arrow at the beginning of the line.
- End- arrow at the end of the line.
- Width- proportions of the arrow as a percentage of the line thickness (from 10% to 1000%).
- Length- proportions of the arrow as a percentage of the line thickness (from 10% to 5000%).
- Curvature- determines the degree of curvature of the widest part of the arrow where it meets the line (from -50% to +50%).

The first line has all checkboxes unchecked, width - 500%, length - 1000%, thickness - 2 pixels.
For the second line, everything is the same, but there is a checkmark at -beginning- and the curvature is 5%.
For the third line, everything is the same, but the -end- is checked and the -beginning- is unchecked.
The fourth line has both checkboxes, width - 500%, length - 1000%, curvature - 15%, thickness - 5 pixels.
All have a style applied to them.
Drawing arbitrary shapes
Let's choose a figure - an arbitrary figure. In the panel, select the mode - shape layer, color and style. The geometric parameters are the same as for a rectangle. But here there is a choice of the figure itself:

If you click on the triangle in the circle (on the right), you can select additional shapes in the context menu that opens.

Drawing multiple shapes in one layer
The principle here is the same as with the rectangular selection tools (in the first lesson we made a non-standard selection area using the tools in the options bar: add to selection, subtract from selection, etc.). The same tools are available in the Shape Options panel.
![]()
For example, create a rectangle shape, now in the options bar click on the "add to shape area" icon, and now select the ellipse shape. Move the mouse cursor to the upper border of our rectangle, press the left mouse button and, without releasing it, stretch the ellipse. It should look something like this:

If the ellipse is not stretched as desired, you can correct it. To do this, select the path selection tool from the toolbar:
Move the cursor to the border of the ellipse and, while holding down the left mouse button, drag the ellipse where it should be. Using all these tools, you can draw shapes of varying complexity.
Saving the shapes
Let's say we liked the last shape we created and want to use it in the future. To do this, you need to save it. For this menu Edit -> Define Custom Shape. Give the new shape a name.

Now our shape has appeared in the drop-down custom shape selection panel.
This concludes the lesson. Next time we'll deal with outlines and raster images.
This tutorial will help you install new shapes for the version of Photoshop.
Note: screenshots of the Windows 10 operating system, Photoshop CC 2017. For other versions of Photoshop, the algorithm will be the same.
Open Set Management
To get started, download the file with the new figures from the Internet and unzip it if it is zipped.
Next, open Photoshop CS6 and go to the main menu at the top of the screen to the tab Editing -Sets- Set management(Edit - Preset Manager). The following window will appear:
Button below the number 1 (in the form of a small arrow) allows you to select the type of add-on you want to install - brushes, textures, shapes, styles etc.
Button below the number 2 (in the form of a gear) shows the types of addition.
Loading Shapes into Photoshop
Click on the small black arrow and from the list that appears, by pressing the left mouse button, select the type of add-on - Custom figures(Custom Shapes):


A new window appears. Here you indicate the address of the downloaded file with figures. This file is located on your desktop or placed in a special folder for downloaded add-ons. In my case, the file is located in the "Styles" folder on the desktop:

Press again Download(Load)
Now, in the Manage Sets dialog box, you can see at the end of the shape set the new shapes we just loaded:
Note : If there are many shapes, move the scroll bar down and new shapes will be visible at the end of the list

That's all Photoshop program copied the specified file with shapes to your set. You can use it!
