In this lesson you will learn how to draw space and planet .
Step 1.
First we will draw a starry sky. Create a new document and fill it with black. I set the size of the new document to 1600x1200 so that it could later be used as desktop wallpaper. Duplicate this layer (Ctrl+ J) . Next, apply a noise filter to the new layer. Filter - Noise - Add Noise(Filter - Noise - Add Noise). Set the amount of noise to 10%, Gaussian distribution and check the box for Monochrome.

Step 2.
Next we go to the menu item Image > Adjustments > Brightness & Contrast(Image> Corrections> Brightness/Contrast) and set Brightness 30 and Contrast 75 . Now the noise looks more like stars.

Step 3.
Now let's add larger stars. Duplicate the previous layer with stars (Ctrl+ J) and change the brightness and contrast for it Image > Adjustments > Brightness & Contrast(Image> Corrections> Brightness/Contrast) set Brightness 100 a Contrast 50

Step 4
Click (Ctrl+T) and make the big stars layer about twice as big. Hold Shift to transform the layer proportionally. Click (Ctrl+L) to bring up the Levels window. Set the parameters as shown in the picture to increase the contrast. (In my case I had to set the parameters opposite to those of the author 0 , 1.00 , 20)

Step 5
Set the layer's blending mode to Screen. To avoid the echo effect (overlay effect), press Ctrl+T and rotate the layer 90 degrees (while holding down the key Shift while rotating the layer, the layer will rotate in 15 degree increments). Use this technique when rotating.

Step 6
Take a soft rubber band with a diameter of approximately 20-30 px and start erasing our stars on both layers. Try to create various shapes in all directions to make our stars look more natural. Also remember that there should be more black space than star space and more small stars than large ones.

Step 7
Try creating some star areas using the tool Clone Stamp(Stamp) using a soft-edged brush. You have to decide for yourself where to place clouds with stars and where to leave empty space. Use your imagination and you will succeed.

Step 8
Let's add a glow to the stars. Duplicate the layer with the big stars. Apply filter Filter > Blur > Gaussian Blur(Filter - Blur - Gaussian Blur) with a radius of approximately 10 px and change the color blend mode to Linear Dodge(Linear Dodge). Press Ctrl+U and colorize the glow of the stars (I set Hue ( color tone) at 230). Repeat this step several times to make the starlight more expressive.

Step 9
Now let's create the remaining details of our space landscape: huge stars, stardust and colorful nebula. Create a new layer and set the layer's blending mode Linear Dodge(Linear Dodge) and fill it with black. Further Filter - Render - Lens Flare ( Filter - Rendering - Highlight ) . The type of lens I used was 35mm. Create a couple more large stars in this way by changing the location of the center of the highlight and the brightness of the highlight. Use different colors for each of the stars, this will give some variety big picture(most easy way to do this - press Ctrl+U and change Hue ( Color tone)).

Step 10
Create a new layer to create the stardust. Install opacity(layer opacity) to 25% and change the layer blending mode to Screen(Lightening). Select any brush with soft edges and set it up as in the picture. I used a texture for the brush Confetti, this is one of the standard Photoshop textures. Now that we have set up our brush, let's paint our stardust in blue. (#ced0f1).

Step 11
Now let's create a multi-colored nebula. Create a new layer, take a soft round brush and paint a cloud like mine. It's quite easy: first draw blue base, then the red area, and finally yellow and white. Apply a filter to the nebula layer Filter - Blur - Gaussian blur(Filter - Blur - Gaussian Blur) with a radius of 50 px.

Step 12
Now let's give our nebula the shape of clouds. To do this, create a new black layer and apply a filter to the layer Filter - Render - Clouds ( Filter - Rendering - Clouds). Change the layer's blending mode to Overlay(Overlap). After that, duplicate the clouds layer (Ctrl+ J) .

Step 13
Select the nebula layer and change it opacity(layer opacity) to 55%, and layer blending mode to Screen(Lightening). Find best place for your nebula and move it there.

Step 14
Well, we have finished drawing the starry sky. Now let's create a planet. Find a stone texture for your future planet. I used this one from SXC. http://www.sxc.hu/photo/1011795
You can also use your texture.

Step 15
Open the texture image. Let's change the canvas size to give the texture a square shape. Image- Canvas size ( Image - Canvas Size ) . Set the height and width to the same values. Use the tool Clone Stamp(Stamp) to fill the empty spaces with texture. Also remove any dark spots with the same tool. Further Edit - Define Pattern(Editing - Define pattern). Save the pattern under any name you like. After this, you can close the image with the texture.

Step 16
Create a new document (Ctrl+
N)
size 1600x1600 pixels. Fill it with black. Using the tool Elliptical Marquee Tool (“Oval area” selection )
create a selection in the form of a circle. To make the circle even and fit into the square, press Shift +
Ctrl and without releasing these keys from approximately the center of the square, begin to draw a selection. After you draw the selection, fill it with the pattern that we created in the previous step. Image -
Fill- Contents: Pattern
(Editing - Fill - Use: “Pattern”). And select the pattern that we created for the fill.

Step 17
Without removing the selection, apply the filter Filter - Distort - Spherize ( Filter - Distortion - Spherization ) Amount 100% ( Degree 100%). Click Ctrl + F to repeat the last applied filter.

Step 18
Duplicate the planet layer (Ctrl + J) and fill the circle with a light blue color (#455571). This will be the atmosphere of the planet. You can use any other color for this.

Step 19
Duplicate this layer and fill it with black. This will be the shadow of the planet. Now select the atmosphere layer and double click on it to bring up the Layer Style window. Apply the following layer styles to the atmosphere layer:
Step 20
Move the shadow layer above the atmosphere layer ( Ctrl +] -
layer up )
(Ctrl +[ -
layer down )
. Apply a filter to the shadow layer Gaussian blur
(Filter - Blur - Gaussian Blur) Gaussian Blur (Filter - Blur - Gaussian Blur) with a radius of 75 px.

Step 21
Press Ctrl+T and transform the shadow: increase its size and move it a little to the upper left corner. I chose this shadow position because I'm going to place the planet in the top left corner of the painting, and the light is coming from the largest star, which is in the center.

Step 22
Select the atmosphere layer and set the layer blending mode Screen(Lightening), so we will see the surface of the planet. I don't like the brightness and contrast of the planet, so I reduced opacity ( layer opacity ) up to 33%. After that I duplicated the layer with the surface of the planet and set the layer blending mode Soft Light(Soft light). Also I changed opacity shadow layer by 90%.

Step 23
Now we need to copy our planet onto the starry sky. For this
turn off background(background) by clicking on the eye icon
responsible for the visibility of layers. Shift+Ctrl+E to merge visible layers. Now copy the planet to the file from starry sky and place it in the corner of the document. Finally I added a glow to the planet.

Conclusion
That's all!
Good luck and patience in creating your own space landscapes.
Well.. While I’m loading the movie, I’m doing a lesson on drawing space.. It might come in handy.
How to draw space with a pencil step by step
Step one.
Draw a round shape for the planet and the outline of the landscape.
Step two.
Let's correct the contours of the planet and its satellite. In the foreground we draw two men, these are astronauts sent to the moon.

Step three.
Let's add some touches.

Step four.
Let's draw a starry sky. Or more precisely this open space. In the middle of the lunar landscape we will draw several craters.

Step five.
All that's left to do is add some shadows. In the end it turned out like this space picture:

How to draw the Earth with a pencil step by step
Step one. Drawing a circle by hand is very difficult. First we need two squares, divided in half, so that we can fit the colo into them. Of course, you can take a compass and draw a circle. But this is not a royal matter.  Step two. As mentioned above, we make the outline of our planet, draw four arcs at the corners of the square.
  Step three. Now it will be easier to draw smooth circle. We combine the arcs so that everything turns out as clear as possible.
  Step four. Now we sketch all the continents, oceans, islands and peninsulas on our ball. Anything that will fit and be noticeable.
  Step five. We remove the auxiliary lines. We stick dots around the planet - an image of distant stars, move the pencil, depict space so that the planet does not look lonely.
How to draw the planets of the solar system with a pencil
Step one
Drawing the orbits of the planets. Their shape is an ellipse, close to a circle. But, if we look from one point, then visually we see not circles, but arcs, parts of ellipses. Such as in the picture. On the lines we outline the positions of the planets.

Step two
We draw circles - planets. We start with small Mercury, then larger Venus and Earth, again a small circle is Mars and further, as in the picture. In the lower left corner we will show the edge of the Sun.

Step three
Let's erase the auxiliary lines - the axes of the circles. Let's make the orbits brighter.

Step four
Let's add others celestial bodies: comets, asteroids. Let's draw “rings” to the large planets.

Step five
Let's do the shading. With its help we must turn our circles into a sphere. We remember that we have the Sun in the center, and light falls from its side. But the opposite side of the planet will be darkened. The result should be something like this:

How to draw an astronaut with a pencil step by step
There are four steps ahead.
Step one.
At the top of the sheet we will place a large round head. She's big because she's wearing a helmet. Let's draw two down curved lines- this is the outline of the body. We will draw an astronaut in zero gravity. And this immediately sets his position. Let's draw the contours of the arms and legs. The spacesuit has a belt. Let's outline the backpack behind our shoulders.

Step two.
We begin to draw out the details: the helmet, fingers, all sorts of bells and whistles on the “suit”. Moreover, all the elements are quite large.

Step three.
On the helmet we will outline an opening for the eyes, making it three-dimensional. Let's start drawing shoes. Let's show a pocket-bag on the belt. Look carefully at the picture and fill in what is missing on your sheet. Rivets, bends on the fingers, etc.

Step four.
We will show horizontal shading on the belts. Let's draw the shoes: the pattern on the sole, the clasp. The astronaut wears a small electronic device on his hip. Now let's outline the main elements of our drawing. Almost done. You can use shading to “revive” our hero, or add color using paints!

How to draw a space rocket with a pencil step by step
Step one. Our rocket is not just some kind of device with an engine, but a whole spaceship. We draw two oval shapes - this is the hull of the ship. Below we will notice one wing of the rocket, and behind it is the tail.  Step two. Connecting the ovals. The structure of the rocket and its structural parts have a complex shape, which makes no sense to describe. Therefore, try to repeat it as you see in the picture, or you can come up with your own rocket.
 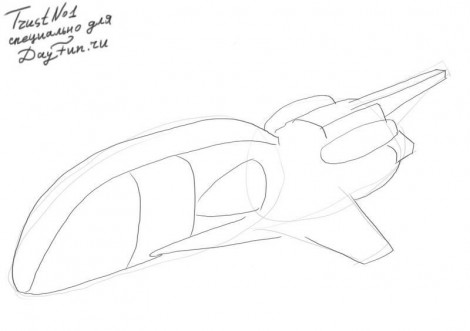 Step three. The ship should have many different parts on the hull, plates, guns, portholes.
  Step four.
  Step five.
How to draw a lunar rover with a pencil step by step
Step one. Let's divide the device into structural parts, depicting them on paper in the form of rectangles.  Step two. Let's sketch a sketch of an astronaut sitting in a car.
  Step three. Add a small antenna in front of the vehicle and outline the person behind the wheel in more detail.
  Step four. Let's remove the auxiliary lines and outline the contours more clearly.
  Step five. To show the effect of movement, we will make shadows under it, and also add shading to the wheels, the astronaut and other parts. Here:
How to draw a spaceship with a pencil step by step
Step one. Sketching a template with geometric shapes for the ship, we will display the hull and places for the engines. 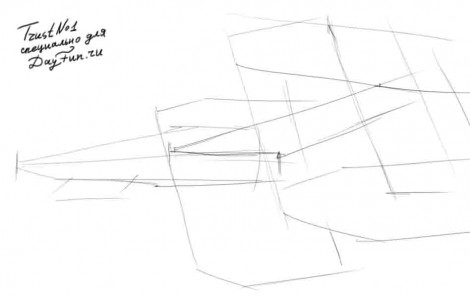 Step two. Let's draw the jet turbines, adjust the lines of the hull a little and add a small cannon underneath it.
  Step three. You need to highlight the borders with a pencil with a thicker line, add a lot of details to the wing, outline them, and also add number 09 for appearance.
  Step four. With light movements we will shade the entire area of the ship horizontally, and completely shade out the windows, turbine outlets and the cannon.
How to draw the moon with a pencil step by step
Step one. Let's mark the location of the moon on paper using a square.  Step two. Let's draw a circle, preferably an even one. Although the surface of the moon is not smooth, it will appear different from afar.
  Step three. Let's add craters, mountains and depressions to the surface.
  Step four. Let's add some shading.
0 1128363
Photo gallery: How to draw space with watercolors, gouache, spray paints - master classes for children, novice artists - Drawing lessons on space with pencils
Both beginning artists and children, working with paints or pencils, do not know where to start creating a drawing. But having chosen the right topic and being serious about work, it will not be difficult to understand how to draw space, planets, satellites and other elements. If desired, objects can be depicted using gouache or watercolor. The use of sponges and spray cans will help you create non-standard compositions. By combining a variety of tools, it's easy to create original creations with objects large and small. In the video master classes and photo instructions provided, you can learn how to depict stellar nebulae, how to draw a rocket in space and space itself.
How to paint space using watercolors - a step-by-step master class for beginning artists

Many novice artists are interested in how to paint space in watercolors and make it unusual. Using watercolors and plain water you can create a real masterpiece. Using the given master class and showing your imagination, it is not difficult to understand how to draw planets in space: they can be marked with ordinary blots or round prints on the created cosmic background.
Materials for painting space in watercolor by beginning artists
- set of paints;
- brush;
- water;
- paper for painting with watercolors.
Step-by-step master class on creating a drawing on the theme of space - for beginning artists

Simple drawings for children on the theme of space - photo master class on pencil drawing

Create beautiful drawing on the topic of space using a pencil is not difficult even for schoolchildren. Using just a couple of tools, you can create an original image. You can learn how to draw space with a pencil in the next master class. If necessary, the workpiece can be painted in bright colors or left black and white. Using sets of 12-24 items, it won’t be difficult to figure out how to draw space with colored pencils in a colorful and bright way.
Materials for creating a drawing on the theme of space for children using a photo master class
- regular pencil;
- eraser;
- A4 paper.
Step-by-step master class on pencil drawing on a space theme for children

How to draw space and stellar nebulae with regular gouache - instructions for beginners

It’s not at all difficult to understand how to draw space with gouache using this master class. Chaotic application of strokes and highlighting the center gives volume to the workpiece. After studying the instructions, you can learn how to draw space for beginners who have not worked much with paints. And using Useful tips, you can understand how to draw stars in space, add a mini-planet and nebulae.
Materials for drawing space and stellar nebulae by beginning artists
- gouache set;
- embossed (embossed) paper for drawing;
- brush, water.
Step-by-step instructions for drawing space and star nebulae for beginners

How to paint space with paints - a step-by-step master class on working with spray cans

Learning how to create drawings on the theme of space using a spray can is really difficult. The work involves applying paint in layers to achieve the volume of the image. By studying this lesson in detail and watching the supporting videos, you can understand how to paint space with paints from a balloon without special skills. Refining the drawing with thin brushes will help achieve the effectiveness of the nebula pattern. How to draw space step by step and how to properly create a background is described step by step in the instructions below.
A set of materials for creating a drawing on the theme of space using spray paints
- a set of spray paints;
- acrylic primer;
- acrylic paint, brushes.
Step-by-step master class on drawing on the theme of space using spray paint

How to quickly draw space with a sponge - step-by-step video master class for children

You can draw pictures with paints not only with brushes or spray cans, but also with sponges. Creating a drawing on the theme of space for children will not be difficult, and the work itself will really appeal to the kids and will help them in their development fine motor skills. An interesting master class from a young blogger will help you learn how to draw space with a sponge.
Step-by-step video master class on painting space with sponges for children
Step-by-step instruction with descriptions of actions will help even a student primary school learn about the rules for drawing outer space with a sponge. Step by step video how to draw space clearly explains the required actions and their order.
Using the given master classes for beginners and useful instructions With photos for children, you can learn a lot of interesting things for development in the field of art. Step-by-step stories about how to draw space and how to highlight elements will help you create your own masterpieces. In your work you can use paints in balloons, regular gouache or watercolor, sponges, and pencils. If desired, these examples can be used as a basis, adding additional elements. On each of them you can draw a satellite in space, planets, comets and other objects.
There is no doubt that any person, thinking, so to speak, about the eternal, imagines the depths of space with its unexplored expanses and tries to express his feelings in the form of a painting or drawing. Let's see how to draw space using various tools and techniques.
What do we associate outer space with?
The primary association of outer space, even on a subconscious level, for any person is reduced to infinity, although not everyone imagines what it is.
If you approach the question of how to draw space step by step, you should pay attention to some elements that are most often depicted in paintings. First, a spatial structure is created. These can be galaxies or nebulae with rarefied gas, then stars visible to the naked eye or through modern telescopes are included here.
Only then can we assume the presence of a planetary system, although in most cases the question of how to draw space comes down to depicting objects known to us in solar system, because we do not know what the surfaces of planets in other star systems look like (the nearest distance is 4 light years - Proxima of the Centaurus constellation).
And, naturally, to depict his view of what might be there, even a novice artist uses completely different tools that best suit his imagination.
If you look at all the drawings and paintings, you will notice that most often they depict stars (constellations), nebulae, galaxies and planetary systems.
In the first, second and third cases, the question of how to draw space is solved quite simply. On any dark background (even black or gray) inclusions are applied in the form of stars, varying in size and light activity. This is the easiest way.

As for nebulae, they often appear colored not only in the ultraviolet or infrared spectrum, but also in the visible to the human eye range. It is from this perspective that it is worth considering the question of how to paint space in watercolors. It is best suited for this due to the fact that when mixed with water, you can get smooth shades and transitions that are inaccessible to, say, gouache or oil paints. But more on that later.
How to get inspiration?
If you’re really thinking about how to draw space, or rather, get some kind of charge that can give impetus to an outburst of emotions, first you should just look at the night sky in clear weather.
Alas, in our hemisphere the sky looks only like darkness interspersed with stars. Another thing is the Southern Hemisphere, where the Milky Way (that’s the name of our galaxy) looks in all its glory.

On the other hand, music is quite a powerful tool for activating thoughts. If previously so-called space music was associated with bands like Space or Zodiac, today it is enough to listen to compositions in the Ambient, Chillout or Downtempo style, which use complex sound effects.
How to paint space with paints?
Now about the colors. Based on the above, the most decisive question will be how to paint space in watercolors.

Here it is worth paying attention to the colors themselves. First you need to apply a dark background to the sheet, let the paint and paper dry a little, and then dilute the depth by adding water as usual. You understand that outer space cannot be equally dark.
After this, you can begin drawing images of galaxies or planets. By the way, it is with the help of watercolors that it is best to depict colored gas nebulae. But you can specify some elements using additional means in the form of gouache or oil.
How to draw space with a pencil?
With pencils the situation is somewhat worse. The fact is that it will not be possible to achieve the blurriness inherent in space.
Here it is better to use vertical, horizontal or oblique shading with a long stylus. In addition, even drawing some global elements requires knowledge of additional effects.
Additional effects
In the case of paints, everything is clear. Regular dilution with water gives a fairly powerful effect. But few people know what else is in Soviet times a method was invented to obtain smooth transitions when drawing with a pencil.

You just need to grind off the lead a little onto a separate piece of paper, then take the powder and smear it over the image on the paper. The effect is simply amazing. By the way, this applies not only to simple pencils, but also to colored pencils. This is called retouching.
Separately, it is worth noting that when it comes to the question of how to draw space, some authors of paintings do not limit themselves only to using standard means. For example, adding sparkles to symbolize stars is quite a hot topic.
Which is better to use?
Now a few words about what is better: a computer program or hand drawing? Both. Of course, applications for creating and processing graphics have their own quite powerful capabilities, but many people first record their flight of thoughts on paper, after which they scan the drawing and convert it into the desired format.
However, programs like Adobe Photoshop or the same package Corel Draw They suggest using complex gradient fills as templates, which are simply not possible to achieve with regular drawing.
Based on this, we can simply advise you to initially make a sketch of the future drawing or painting, and only then decide whether it should be processed in a computer program or left unchanged. In principle, both options are acceptable. Although the solution to the question of how to paint space in the usual way seems preferable.
It’s another matter if the artist does not want to digitize the painting. This is understandable, because a sheet of paper or canvas looks natural. Unlike computer images, when viewing, you can touch the painting and see the paint application technique used by the author of this or that masterpiece.
Drawing on the theme “Space” is an endless field for creative experiments. When depicting the Universe “on canvas,” a small or adult artist makes individual decisions: what paper to use, what colors to choose, how to design the composition and how to complement it. Depending on the choice of materials and execution technique, the design can be more vivid or less pronounced, rich in details or laconic and abstract. Space with planets, stars and a satellite, drawn in pencil or gouache, cannot be compared with watercolor in terms of realism. A small galaxy created with a sponge and acrylic paint will become the greatest pride of a novice artist or talented child. And if you have never had to do this kind of creativity before, don’t be upset. We will tell and show how to draw space in step-by-step master classes with photos and videos.
Drawings with colored pencils or paints on the theme “Space” - step-by-step master class for children

Children's drawings with paints or pencils on the theme “Space” are an excellent way of self-realization for the little ones. By depicting the cosmic abyss, colorful planets and fiery comets, children show their imagination, discover new talents, and show their individuality. And if in a master class on creating illustrations several different techniques, the process immediately becomes many times more interesting, entertaining and educational.
Necessary materials for children's drawing with pencil and paints on the theme “Space”
- thick white paper
- black Whatman paper
- compass (or round objects of different diameters - lids, saucers, glasses)
- pencil
- gouache paints (including white)
- brushes of different thicknesses
- stationery scissors
- PVA glue
A step-by-step master class for children on creating a bright drawing on the theme “Space”
- Place a thick white sheet on your work surface. Using round objects of different diameters and an ordinary pencil, draw nine circles on paper.

- Depending on the diameter, the circle will be one or another planet. For example, the largest figure is Jupiter, and the smallest is Mercury.

- Using gouache paints, apply characteristic colors to the circles. You can look at the real colors of the planets in a children's encyclopedia, or you can create unusual fantasy planets to suit your taste.

- When the paint is completely dry, cut out the resulting shapes using sharp scissors along the contour.

- On a black Whatman paper (you can use half) leave the splashes white gouache paint. To do this, take a little gouache on your brush and wave it over the paper several times.

- Plan the location of your planets "in space". Place them carefully on whatman paper and take a closer look. If you like the composition, proceed to the next stage.

- Using office glue or PVA, secure all the elements in place.

- Press each planet firmly with the palm of your hand or a thick textbook to ensure the pieces stick firmly. Do not overdo it with glue so that excess mass does not leak out to the sides. On a black background, the spots will be especially noticeable.

- After the glue has completely dried, remove the textbook and evaluate the result. Drawing with colored pencils or paints on the theme “Space” step by step master class completely ready for children! Photo 11
How to paint space with watercolors - an unusual idea for beginners

Using watercolor paints to create a “Space” drawing is much simpler than it seems at first glance. On a wet basis, the colors independently mix into bizarre galactic patterns, realistically displaying wondrous nebula and fine stardust. Even a child can cope with such a simple technique visual arts. And for adults, we offer a more complicated option for beginning artists - an unusual idea to paint space with watercolors in a geometric shape.
Necessary materials for painting “Space” in watercolor for beginners
- sheet of thick white paper
- water and brushes of different sizes
- watercolor paints
- acrylic paints (black and white)
- salt
- ruler
- protractor
- sharpened pencil
- masking fluid for watercolors (Art Masking fluid)

How to paint space in watercolor in an unusual way - step-by-step instructions
- Take the “pacific” as the basis for the image - a sign of peace and love. Using a template from the Internet, change the outline to dense white paper. You can also draw the drawing yourself using a ruler and compass.

- To prevent watercolor stains from getting into restricted areas, use a special masking agent. On last stage preparing the drawing, it is easy to remove it from the white area.

- Fill in the sign with watercolor masking without going beyond the outline. Wait until completely dry.

- Wet the areas between the axes of the sign thoroughly. clean water. This way the paint will form more realistic “cosmic” stains.

- Apply a drop of blue watercolor to one of the wet areas. Don't make too harsh strokes; let the paint spread on its own.

- Add black watercolor or ink to the blue tones to create a natural galaxy effect.

- Thus, fill all the free areas with colorful stains. When the watercolor has dried a little, add a yellow glow and purple reflections.

- Don't be afraid to protrude into the white areas of the sign. When you're done, you can clean them.

- More wet picture sprinkle with coarse salt. Sprinkle the resulting space with small specks of white acrylic paint.

- When the image is completely dry, sketch out the outlines of the marvelous space town with a pencil. Using a thin brush and white paint, draw all the lines.

- As a final step, remove the thin film of watercolor masking from the white areas of the sign. The contours will become smooth and clear, and the fields will become snow-white.

- Now you know how to paint space with watercolors - an unusual idea for beginners that will allow you to create it yourself beautiful panel for home or a bright card for a loved one. Photo25
How to draw the perfect cosmos with stars, satellites and planets with a sponge on home ceramics

Most often space is drawn watercolor paints- fast, convenient, practical. But what if you want to cover a household item that is completely unsuitable for watercolor with a fashionable galactic image? After all, ceramics, wood and other popular materials absorb watery paint, leaving only faded shades on the surface. In this case, it is better to use pigment ink or acrylic paints in combination with a soft sponge or foam sponge. This way the image will be successfully fixed and will retain its brightness and clarity for a long time.
To learn how to quickly draw space with planets and stars with a sponge and acrylic paint on ceramics, see our next master class with photos.
Necessary materials for the drawing “Space with stars and planets” on home ceramics
- old plain ceramic dishes
- acrylic paints
- spray with water
- sponges or sponges of different sizes
- synthetic brush
- Matt lacquer

How to paint space with stars on ceramics with a sponge and acrylic paints

Another interesting and original option on how to paint space with paints

Watercolor images of space are good in themselves. They seem to be imbued with a special atmosphere of depth and mystery. But even such seemingly extraordinary drawings can be made even more entertaining. For example, by connecting space background with city panorama. You will learn how to paint space with paints for such an original and unusual option in our next step-by-step master class.
Necessary materials for the original painting “Space” with paints
- thick landscape paper or watercolor paper
- watercolor paints
- masking fluid for watercolors
- white acrylic paint
- medical alcohol
- salt
- pencil and ruler
- brushes of different thicknesses
- artistic adhesive tape
- black gel pen

How to paint space in an interesting and original way - step-by-step instructions
- Draw a horizontal line along the bottom half of the paper with a pencil. This way you will limit the drawing area. From the line up, draw several slender houses by hand. Don't worry about their symmetry. The more chaotic the buildings, the more original the drawing will look.

- Apply artistic tape underneath the line. It will serve as a limiter for paints.

- Paint over the houses with white watercolor masking. Wait for the liquid to dry.

- Moisten empty spaces on the sheet with clean water. Spread on a wet surface of paper various shades blue: from deep inky to sky blue.

- Add additional colors to different tones of blue watercolor - lilac, pink, green, etc. The galaxy should turn out bright and more or less natural.

- Sprinkle the wet pattern with table salt. As soon as the “space” dries, shake off the grains.

- Using white acrylic paint and an art brush (you can use a toothbrush), leave small white drops - stars - on the drawing.

- Place drops of alcohol in several places. The substance will slightly blur the paint and give the image a more complete look.

- Use an eraser to lift the masking layer and remove the thin film. Now the places for houses are in perfect order.

- Using a black pen, draw windows and doors on the houses. Remove the art tape.

- This interesting and original version of how to paint space with paints will appeal not only to children. Even adults will enjoy spending time with such an exciting creative process.

How to quickly draw and successfully use the “Space” drawing in gouache

To beautifully draw space with gouache and use it in an original way in your home interior or as a souvenir, you need to make a blank yourself. To do this you will need thick paper and an ordinary wooden hoop. By carefully pressing a damp white sheet between the circles of the hoop, and then drying it with hairdryers, you will create an ideal field for “cosmic” creativity.
Necessary materials for drawing “Space” with gouache paints
- blank - hoop with paper
- gouache paints
- cardboard die-cuts white(feather, polar bear, diamond, etc.)
- good photo
- white acrylic paint
- tinted or printed paper

Master class on the creation and original use of gouache drawing “Space”

By viewing our step-by-step master classes with photos and videos, you learned how to draw space with a pencil, gouache, watercolor or sponge with acrylic paints. Spend a little more time on the process, and your drawing on the theme “Space” with planets, stars and a satellite will be ideal not only for children, but also for novice artists.