First of all, I want to say that I usually draw noses differently. For me this is a normal process and I don’t even think about how it’s done. I usually draw, change, redraw several noses until I choose one I like. Besides, I never draw lines, I just imagine them. I'm just trying to explain how it can be done differently.
Step 1 – Placement and Angle
One way or another, let's start by drawing the main features of the face - the most important thing is to decide such nuances as the light source, and what kind of nose you want to draw. Don't try too hard, leave the drawing raw. Usually when I draw a nose, I draw out the rest of the facial features at the same time, but for now I'll leave them like that.
Step 2 – decide on the shape

On a separate layer draw an oval dot exactly between the eyes. . Then follow the slightly curved line down and draw a triangle like in the picture. Adjust the triangle to the shape and angle of your face. If it is not shown in profile, or in full face, it will be a little smaller on the side of the face, and as if turned away from us. As shown in the picture below.
Let's draw two a little curved lines from the top point. The end of one line should touch the point directly opposite the vertex of the triangle, the end of the other should touch its left corner. . When you did this, you sort of separated the top of the nose. The most common mistake here is to draw this part very flat, as if the nose is made of pieces of plastic glued together. The borders should be smooth and there won't be any rough dark lines left when we're done. Never leave dark lines unless you are drawing some kind of drawing.
Step 3 – developing the form
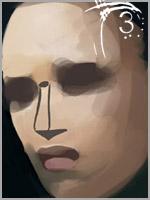
The next thing you need to do is understand that the tip of the nose should not be sharp and flat as in the sketch. It should be rounded. Moreover, the shadow under the nose will by and large not look like a triangle. Therefore, you need to soften its shape, outline it like a wave on top, as in the picture (you don’t need to draw a red line, you just need to give the upper border of the triangle the shape of such a wave). When you have done this, flip the image horizontally to check that everything is done correctly.


Now fill in the point you drew before. It's better to make this area brighter than the entire nose. Also, soften the dark lines a little with more light color, and draw a semicircle from the right corner of your former triangle to the middle right line, as in the picture. .
Now you have already drawn the bridge of your nose and top part nostrils (usually this part is not so noticeable, but we will work on it later).

Now you need to draw side nose To prevent this area from looking flat, draw a line from the top of the dark line at a slightly downward angle, and then straight down to the triangle, as shown in the example. Do not draw red lines!! Only black ones.
Step 4 – create a nose from lines.
Now we need to sketch the area that we outlined in the previous step. Don't be afraid to sketch in the outline of the nostril or other lines - paint this area with a lightly shaded shade. In this picture the shadow is not too obvious - I advise you to make the shadow soft. As you can see in the picture, I did not completely paint over the outline of the nostril; they are visible, but only slightly.


Enlarge the image and paint over the dark lines. You also need to work on the triangle. The right nostril should follow the shape of the top line of the triangle. Also make a smooth transition from dark to light. . Don't change anything except the area of the triangle and the area you painted.

Continue doing the same until you have completely filled in the dark lines. And instead of a sketch, you will get a completely realistic nose. Instead of defining the boundaries of our nose by lines, we define them by changes in color and shadow. You will also see the second nostril, it will look like a shadow on the side of the nose farthest from us.
Step 5 – Light and Shadow


In the previous step, our nose still looks a little flat. To fix this, carefully distribute light and shadows throughout light nose tones. Define the highlight on the tip of the nose - but don't make it too noticeable, then define the line of the nostril and the angle of the tip of the nose, not with lines, but with colors. I chose the color for the highlights from the area on the bridge of the nose - since it is surrounded by shaded areas , it should be brighter.
At this stage, the appearance of the tip of the nose is determined - depending on where you marked the highlight on it, the shape of the nose will change. It's very interesting to watch. Try changing its position until you find a place where the nose shape is exactly what you want.
An enlarged picture of our changes shows a nose with a fairly clear shape and outline. The difference between the color and brightness of the cheeks and nose allows you to see where the nose “rises” from the face.
A simple diagram will help you quickly and easily draw a nose, eyes, lips in a matter of minutes!
Many beginning artists, when drawing something, rely on their “eye” and the accuracy of the lines. But, in practice, they are faced with the problem that the drawing begins to “move”, despite the fact that it “seems to” correctly show the bend of a particular line.
And where do you start drawing a nose?
Off the line? Or are you looking for a simple geometric shape?
 Here is the simplest diagram, which is the easiest way to start drawing a nose
There is a back, sides and a bottom plane. Then everything becomes much easier! Draw wings, nostrils; add the characteristics of a specific person and you're done!
If a rotation or angle is needed, accordingly, change the direction of the entire figure and then complete the details
And so with every detail of the face - you generalize, finding the simplest form; clarify, breathe life!
Read more... How to draw a nose, ears, eyes, lips, hair
look at my upcoming speeches on the Internet, which will take place:
September 18 at 20.00 at the Academy of Painting online we will draw noses from different angles; if we have time, we will touch on the “ears”;
September 19 at 19.00 on the Masaa project (entrance to the webinar room) we will study eye drawing schemes; Let's work on creating an expressive, lively look;
September 20 at 21.00 on the project “Secrets of the Masters” (register) - you will find out How to convey the volume, structure, liveliness of hair in male and female portraits.
September 21 at 20.00 - I will conduct my online Master Class, where we will “assemble all the puzzles” and work on the image as a whole. In addition, I will make an ANNOUNCEMENT of training programs at the School of Portrait!
For all Master Classes you will need:
a) sample photographs:


save it to your computer and print it in A4 format, b/w
b) materials:
- on the first online MK - pencil, charcoal ( charcoal pencil), album sheets and erasers;
- on the second online MK - you can also use coal (pencil); for the more “advanced” - let’s paint with a dry brush: oil paint “gas soot”, fluted bristle brush No. 35-50; watercolor paper, erasers, napkins;
- on the third online MK - we use the same materials as on the previous two.
Once you have a simple algorithm, you can always “build” a nose, lips, eyes, etc.:
- any complexity;
- from any photograph;
- regardless of lighting, rotation and angle
Put yourself a “reminder” in your phone, computer and
get ready to take part in the live broadcast
at Master Classes: September 18, 19, 20 and 21!

In this lesson we will draw a nose with a pencil step by step, front view. The nose happens different forms. Check out the image of the nose from different angles below.

We will draw three different noses simultaneously. Snub-nosed, straight and slightly curved downwards.

Draw a circle as the basis of the tip of the nose.

Draw the bridge of the nose with two curved lines.

Depending on what kind of nose we have, we place two circles of smaller diameter (the wings of the nose) differently. A man's nose is usually longer and larger than a woman's and the ideal nose is a subjective concept; each person's idea of the ideal nose is different, and also depends on culture and race.

Use an eraser to lighten the lines of the nose. We draw the contours of the tip of the nose and the wings of the nose, note that the contours of the wings are different.

Apply shading to the nose with a 2H or HB pencil to highlight the shape of the nose in a light tone. The light source in this version is from the top left, so the right side of the nose will be darker than the left.

Use cross hatching to complete the shading. different parts. Use 2H or HB pencils for light shades and 4B for dark shades, you just need to decide where to place the light and shadow. If you use few contrasting shades, the design may appear flat. Therefore, unless the person has a flat nose, always use a wide range of shades.
Move a little away from the drawing, see what is wrong and add additional shadows.
Author:
Hi all! Today I will show how to draw a nose for beginners in 3/4 perspective from three positions. 
This lesson is a little different from the previous ones. In each step you will be given a choice: each of the three proposed noses from the same angle, but the first is at eye level, the second is below eye level, and the third is above it.
In this tutorial I used the following materials:
— sketchbook (Canson);
— pencils НВ/ТМ and 2В/2М (Derwent);
- kneaded eraser.
Step 1

Decide from what angle you want to draw the nose. Tilt level volumetric shape refers to the height of the nose (how far away it is from the face), while width determines the width of the nose.
Draw the outlines with a hard-soft pencil as discreetly as possible. I purposely draw with bright lines so you can see them.
Step 2

Draw two circles, placing them at the extreme points of the volumetric shape (in the third example, draw another one). The circles should extend halfway out of the lines.
Step 3


Using a soft (2B) pencil, draw a curve from the top of the 3D shape to show the beginning of the bridge of the nose leading into the eyebrow. To enhance the definition of the eyebrow, lengthen this arch.
Step 4


Draw the tip of the nose supported by the main circle.

Draw a line around the nasal septum and give the tip a unique shape.

Connect this line to the top arc. No nose is perfect, so add some bumps to make it look more interesting.
Step 5

Draw curves along the remaining circles to create the wings of the nose.
Step 6


Don't know what size your nostrils should be? Take the circles we drew earlier as a basis.
In the second example, I did not draw the nostrils - they are usually not visible from this angle.
Step 7


Before you start shading, draw a curve parallel to the bridge of your nose that will reflect its shape from step 4.

Erase all unnecessary lines.
If your shadows are barely visible, or if you're concerned about contour lines showing through your design, use the linear shading method.
After you get the hang of drawing noses like these, try experimenting with drawing noses with different sizes circles, as in the examples below:


The article was translated from the site rapidfireart.com.
A special part of drawing is the nose, which is often overlooked by portrait artists. Although this shouldn't happen! If your nose doesn't work out at all, then the whole portrait will suffer. Therefore, we will learn to draw a nose!
Three images of a nose


The image in front of you is a regular sketch of a nose.
The nose has completely simple shapes: both lines running along the entire length of the nose, a rounded ball that indicates the type of nostrils and nose.

This drawing indicates the initial sketch of the nose, with shadows applied to it.

Here is a completely finished illustration of the nose.
In this figure the sketch is no longer visible. Here you can notice that the features of the nose are no longer filled with sharp lines, but with shadow.

The illustration above indicates the structure of the nose using red lines. To adjust the appearance of the nose, we raise and lower our red lines.
Below in blue color shows how you can draw a shadow that will be located directly under the end of the nose.
Occasionally the shadow will be heavier and sometimes a little lighter and softer, but most of the time when lit it will be exactly as shown.

Of course, it is clear that there cannot be much shadow on the side of the nose or on the side of the bridge of the nose, which is more illuminated.
In order to avoid making the mistake that beginners most often make, you should not highlight the entire contour of the nose on both sides. This is not beneficial because the outline makes the portrait look completely unrealistic. So it’s better to draw the outline of the nose using shadows.

When you draw or shade around the nose, try to apply less pressure with your pen or hand, because... they require light pressure. These three areas are shown in the figure.
If you are drawing a theme that does not contain many sharp shadow transitions on the face, then you should not draw these features too much. In normal cases, you can simply shade it slightly. For example, as shown above.
1) The area marked in blue has an almost invisible shadow and shows the nose from the side.
Here the area near the edge of the eye and the area where the invisible “ball” sign is located near the nose are shaded.
Typically where the highlighted side of the nose is, few portraits allow for a little more shading, but not much anyway. When shading, special attention should be paid to the bridge of the nose. In order to ensure the proper illusion of size and depth of the nose, it is usually necessary to shade and highlight the details of the nose in the area dark side, as shown on the left side of this figure.
2) A further area, when working with which you need to press lightly when drawing - the “smile line” highlighted in the image green. This line is usually called the nasolabial fold.
On this image you can see a slight smile effect. Imperceptibly downwards, the strokes first weaken and then completely disappear. There are types of faces in which the “smile line” is much darker and longer.
3) On the surface of the skin, on the upper lip, from the area of the line located in the middle, a labial groove emanates, which joins the protrusion of the upper lip. In the figure, the groove is indicated in red and is also applied with light strokes.

Also you can't get around special attention white areas near the nose, which are shown in the picture above.
As the highlighted image aptly points out, the areas near where the nostrils begin are not delineated in many cases. The pattern will look much rougher if you highlight the entire base of the nose (under the nostrils).
Let's pay attention to the area on the side of the nose, located between the beginning of the “smile line” and the nostrils. You don't have to place the "smile lines" directly next to the nostril. Some people have a gap between the nostrils and the “smile line.”
Pay attention to this nuance when you begin to depict the area near the nose. In this picture, the space is slightly increased. By paying attention to the various typical characteristics of faces, you will notice this space.

This figure shows the nose at an angle, located in the projection?.
If our portrait, instead of the front view, is depicted in a projection?, then the nose is also in the same projection, and that means it will look at a slight angle.
In the picture you can notice a purple line that is located in the very center of the face.
To the left of the purple line is a section of the nose sketched with red lines.
On the other side of this line there is a blue shading that indicates the nostril areas. IN in this case, the nose is drawn turned, and does not look symmetrical on any side at all.
The green color indicates that the edge of the nostril lives approximately on the same line as the corner of the inside of the eye. Likewise, when viewed from the front, they will be located on the same line.
I used an orange line to indicate how the edge of the nostril should be drawn in relation to the center of the mouth.
Although different people various shapes nose or mouth, they are mainly depicted in this way. The girl depicted in the picture does not have a very large or very wide nose, however, we will apply the “line method” to her.
Those who are just starting to master drawing techniques depict their noses as too narrow. To achieve a successful nose width, pay special attention to this.

Look at the purple nose. This indicates how far away it is from the face. Don't be afraid to draw it. Feel free to experiment with your nose, but don't change its length too much.
Keep in mind that if the noses you draw are the same length, they will look completely unrealistic. Since people different faces, then their noses should be different. Depict them as closely as possible to the original.
The proportions of your nose must be respected.
As you can see from the two red and two purple lines above, the length is not that much greater than the width.
Not everyone has the same size. However, some of the artists draw the nose either too long or very short. Mainly, your portrait should be realistic.
Draw a nose with a pencil, step by step:
1) First, draw a sketch of the nose. The lines on the sides of the nose should not be darkened. One side is usually shaded more than the other.
2) Now you need to shade the base of the nose and its side that lives in the shadow. Mark the nostrils in the drawing. Next you need to shade the nostril that is in the shadow.
3) Finish shading the nose. Using soft shading, we highlight the areas of the roundness of the nostrils and the area of the “ball” of the nose.