With the widespread use of modern television, there has been a stir and, accordingly, many questions. how to set up digital television . The reason for its popularity is the variety of channels in terms of direction, quality, language, type of content, etc. Due to the lack of information on setting up digital TV, companies have appeared like mushrooms after rain, charging fees for these manipulations. You don’t have to pay at all, you can actually achieve the goal on your own.
How to set up digital television on a TV - general provisions
Mostly all methods for setting up digital television reception use approximately the same scheme, but due to the variety of manufacturers, the actions may be slightly different, but their logic is similar. In order not to get confused in all the sequences, it is worth applying the algorithm directly to each TV model. Thanks to logic and intuition, you can correctly configure the settings on almost every TV model using the instructions provided.
- Take the remote control and expand the menu;
- Proceed to the “Options” item;

- Next, you need to activate “Auto Configuration”. With this action, a window appears containing information about the signal sources; it can be a cable or antenna signal. In our case, we need to select a cable;
- At the end of the operation, information about the quality of signal reception should appear in a new window, here you should select “Digital”, then click “Start”;
- The final setting point is “Search mode” and select the method for detecting channels. The proposed fields must be filled in with information. The frequency is 314 MHz, the speed is 6875 kS/s, and the modulation is 256 QAM.
More advanced TV models allow you to perform a network search, which will independently perform all the necessary actions. When the desired method for detecting TV channels is selected, you need to click on “Search”.
If this instruction is not effective, you should use a detailed algorithm for LG TVs. The technique is relevant for almost all models of the manufacturer.
- From the remote control go to the Menu;
- Click on “Options”;
- In the “Country” category, change the checkbox to Finland or Sweden;

- Then go to the “Settings” category and launch “Autosearch”;
- In the fields you need to enter a search method, usually a fairly fast type, frequency - 298 MHz, modulation - 256 QAM, characters - 6952, ID - auto;
- If everything is done correctly, then during the search a number of TV channels will be displayed;
- The manufacturer LG integrates an automatic system for searching and updating TV channels into the system. This function can be inconvenient as the prepared list will be reset regularly. To prevent this phenomenon, be sure to go to the settings for connecting via cable and turn off “Auto channel update”;

- For convenient sorting, you need to uncheck the auto-numbering box in the “Cable” section in “Autosearch.”
Now let’s look at the Samsung method, because the manufacturer is one of the most popular in the industry. The actions are like:
- Press Menu on the remote control;
- Next, go to the “Channel” category (there is a satellite dish on the icon);
- On the right you need to select the “Antenna” option, and in the type field - “Cable”;

- Now in the “Country” section you need to set “Other”, now you will need to enter a PIN code, by default 0000;

- Go to the “Auto-configuration” menu and specify the source of the signal – “Cable”;

- You need to specify the parameters, they correspond to the data in the first one, general example articles, and click “Search”;
- Now the TV will find all TV channels.
How to set up digital television on Smart TV
Let's look at digital television and how to set up channels on a TV with the Smart function using Samsung as an example. The action is performed fairly standardly, but there are some differences.
- Go to the “Channel” section in the Menu;

- Click on “Country”, you may now need to enter a PIN code, by default 0000, 1111 or 1234;
- Follow the "Other" section;
- Then, step back, select “Cable search options”;
- Standard parameters are now being introduced;

- Again you need to go to “Auto Configuration”, here select the “Cable” source mode;
- You need to activate the “Digital” section;
- Using the search mode, select “Network” and activate the setting.
All methods allow you to create a high-quality connection to digital TV channels and find the maximum available quantity interesting programs. Despite the lack of data on devices from Toshiba, Philips and others, the connection method is no different.
If you have any questions about the topic " Detailed instructions on setting up digital television", you can ask them in the comments
if(function_exists("the_ratings")) ( the_ratings(); ) ?>
After the advent of digital television, many users wanted to switch to its reception. It's not just about frequent discussions and the desire to try something new. The signal quality is an order of magnitude higher, and ease of access increases attractiveness. It is possible to connect digital TV to both outdated CRT models using additional devices and to modern TVs.
Methods for receiving a digital signal
There are several ways to connect a high-quality signal to your TV:
- Cable television. Reception is carried out via a common cable. The disadvantage is the subscription fee and not universal availability;
- Satellite TV. The signal is transmitted via satellites, and received using an individual dish. A subscription fee plus the purchase of special equipment is also required;
- Terrestrial television. The digital TV signal is distributed from terrestrial repeaters and can be received from an indoor or outdoor antenna. This is a completely free method of watching TV shows in a modern format. It has disadvantages: the signal level is often low, the picture quality can be affected by the weather, the location of the tower, etc.
The least expensive method is to receive digital television through an antenna installed and configured by the user.
How digital television works
The transmission of pictures and sound for digital television is accomplished by encoding the video signal and sound over digital channels. Digital coding differs from analogue in its immunity to interference (external obstacles). Blurred, fuzzy picture, stripes are impossible here. The image is either clear or completely absent.
If the reception is uncertain, then perhaps the picture will disintegrate into squares, disappear from time to time and reappear. It depends on how you set up the antenna. Alternatively, you can install a different antenna or raise and deploy the existing one, pointing it at the TV tower.
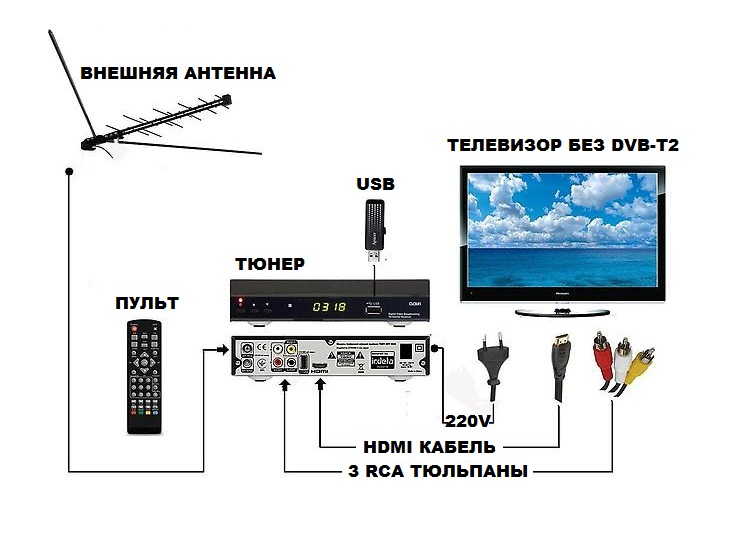
Required equipment for viewing
- Antenna;
- A separate set-top box with a DVB T2 tuner that supports the MPEG 4 standard and can operate in Multiple PLP mode.
You can use a regular analog antenna. If the TV was released relatively recently, then it may have a built-in tuner of the required format (the outdated DVB T format is no longer supported). Then you don't need to buy anything else.
To find out whether there is a built-in DVB T2 tuner, you can look at the data in the data sheet. It’s even easier to find a TV model on the Internet and get a comprehensive answer.
Selecting a digital tuner
At first glance, all set-top boxes are the same. The main thing is not to make mistakes in the main technical specifications. But there are other features that affect the further operation of the equipment and the breadth of functions covered:
- The lack of buttons on the external panel of the set-top box will require you to use it only using the remote control, which is not always convenient;
- If the tuner does not have a USB port, this equipment cannot be used as a media player. If available, you can record TV shows and play back photos and videos.

Important! A good choice is a set-top box with a separate power supply. Usually it is built inside. The most common cause of tuner failure is a faulty power supply. If it breaks, you need to repair or replace the entire set-top box, and the remote power supply must be replaced separately without any problems.

Many people hang the TV on the wall, and quite high. Then it is inconvenient to use the usual design of the console. There are equipment modifications - compact set-top boxes that are attached to the back of the TV with tape. The strength of the fastening needs to be considered. Such a receiver is controlled by a remote control through a separate sensor attached to the same tape on the external panel of the TV. Power is supplied via a wire from the TV's USB port.
The set-top box can also be used in conjunction with a computer monitor (if there is an HDMI port). Then you can watch digital television from a regular antenna. If the built-in television tuner fails, it can be easily replaced using the receiver.
What channels are available for viewing?
To watch free digital channels through a regular antenna, the 2017 list contains two multiplexes:
- first RTRS 1 – frequency 546 MHz, channel 30;
- second RTRS 2 – frequency 498 MHz, channel 24.

Technical data is valid for Moscow and the region. They may differ in other regions. A total of twenty television channels and 3 more radio programs are available.
Important! The TV does not receive additional channels. Antenna settings will not affect the number of received channels, but only their quality.
How to locate a TV tower
Users living in the city, in the signal reception area from the TV tower, are not puzzled by such questions. But for residents of remote towns and villages, the information is relevant. What knowledge is needed for best choice And correct settings antennas:
- The exact location of the tower and the distance to it;
- Technical parameters (channels and broadcast frequencies), using which you can catch a digital signal in a given area. This is necessary so that the user can configure TV channels on the set-top box manually;
- Is the entire list of channels available for reception? There may be one or two packages.

Full information about TV towers is on the official RTRS website. There are maps where you need to enter the name of a specific locality in the search bar. A map of the given area will immediately open, on which all transmitting television towers are indicated (green - operating, black - under construction). If you click on the cursor hovered over the selected village, information will be available about where and how many kilometers away operating transmitters are installed, channel numbers (TVCs), broadcast frequency, number of packages).
The active menu includes a function, using which you can find out the coverage areas of individual repeaters.
Now, armed with knowledge, you need to determine whether it is enough to install an indoor antenna or whether you will need an outdoor, more powerful one.
Antenna types
The analog signal is received by the MV antenna. DVB antennas are more compact. There are combined samples capable of receiving both ranges. From such a combined design, you can remove unnecessary elements, and you will get an excellent UHF antenna. For example, if long whiskers (an element for the MV signal) are present, they can be removed.
All antennas are divided into:
- active;
- passive.
Active are those whose devices use amplifiers. The antenna with amplifier must be connected to a power source. If a receiver is used, 5-volt power for the amplifier is supplied through it. This is done in the menu settings. The option is called “Antenna Power”.
An amplifier does not always mean the best reception, in some cases its use can even be harmful:
- In an area near a TV tower, turning on the amplifier may lead to a complete loss of reception due to the signal being too strong;
- The amplifier is the weakest element of the antenna and often fails. Plus a power supply and additional wires, which also require repairs and replacements;
- The intensity of the TV signal itself is provided by the design of the antenna. And the amplifier simultaneously increases the level of noise and interference;
- If you want to connect another TV to a passive antenna, this is easier to do.
Passive designs do not have additional amplification and are usually used in areas with a stable signal.
Antenna selection and installation
An old antenna may be suitable for receiving a digital signal if it consists of short elements or a combination. If you have working, serviceable antennas, all that remains is to find out whether they will effectively catch “digital” in local conditions.
The UHF signal does not have a wide coverage area. Therefore, to distribute it, it is necessary to build a network of transmitters. The quality of the signal is greatly influenced by the surrounding landscape, the presence of high-rise buildings, mountains, forests, and the power of the repeater. Antenna installation must take into account all these factors.
Reliable reception area
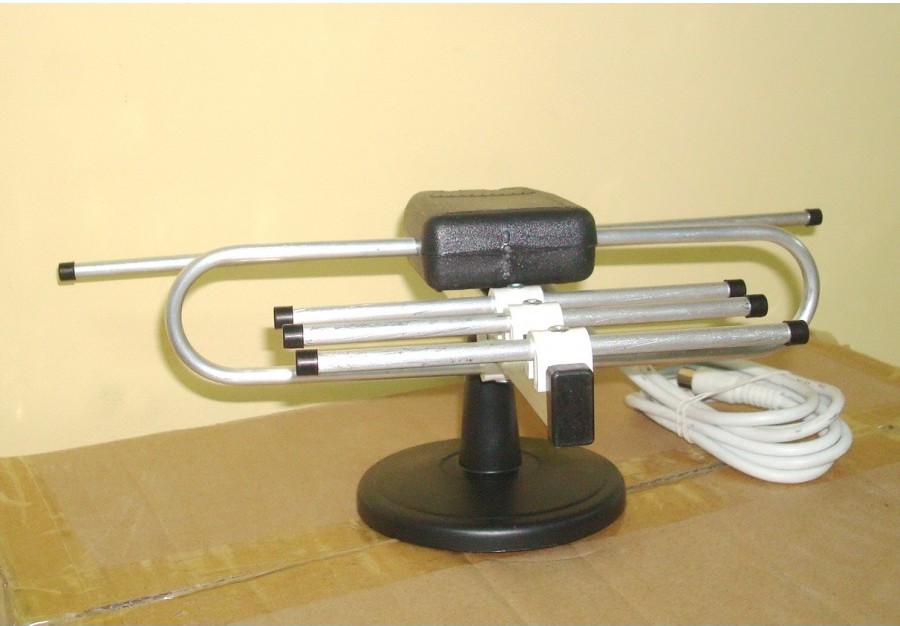
The zone of a stable and reliable signal is considered to be an area within a radius of no more than 10 km from the television tower. Here, a simple indoor antenna will do an excellent job of reception. If you have an amplifier, you don't have to use it.
If the signal disappears, the image is torn, then you need to connect the existing amplifier through the set-top box by using the corresponding menu item. Power will be supplied via the antenna cable.
Multi-storey buildings can become a problem due to the reflection of decimeter waves. But this same reflection can be used. Let's say the antenna does not receive reception when it is oriented towards the TV tower. Point it at nearby tall buildings; reception of the reflected signal may be much more effective.
It is necessary to check the presence of electrical appliances (third-party power supplies, etc.) near the indoor antenna, as well as metal blinds on the windows. They can significantly weaken the signal.
Short circuit
There are times when the set-top box suddenly stops responding to the use of the remote control or buttons, the image and sound disappear, and “Antenna short” is displayed on the screen. The problem does not mean that digital television is not working. There is simply a short circuit in the antenna cable or in the receiving device itself.
Why did the short circuit happen? There may be several reasons:
- The presence of a short circuit in the cable due to careless installation, most likely at the connection points. The antenna plug can only be damaged due to a manufacturing defect;
- The active receiving device is in operation, power is supplied to the amplifier. The amplifier is sensitive to lightning and can be damaged during bad weather;
- The passive antenna is connected, and the amplifier power is turned on in the receiver menu. Passive devices are often short-circuited.
IN the latter case you need to disconnect the receiver from the network, separate the antenna from it, then apply power again, on the connected tuner in the menu settings, set “Antenna power” to the “Off” position.
Important! Finding and eliminating the causes of the short circuit is carried out after separating the set-top box from the power supply.
Area remote from the TV tower
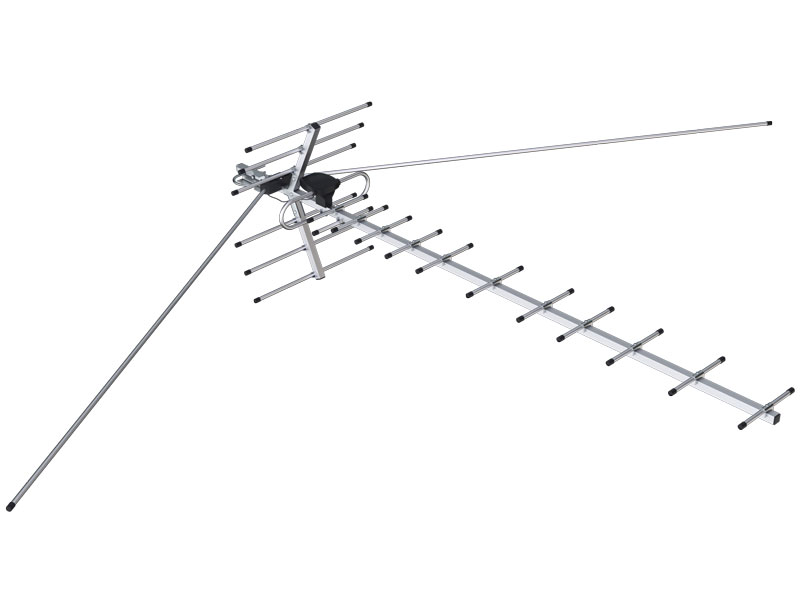
Far distance is considered to be more than 30 kilometers from the repeater. If there is a powerful transmitter and line of sight, we install a small receiving device such as a wave channel or log-periodic. You need to point the antenna at the TV tower. In such conditions, it is even possible to use a room device with an amplifier.

With increasing distance and when a populated area is located in low places, the requirements for the antenna increase. More powerful samples are needed. A good receiving device must include an amplifier, and its boom is long enough. There are examples with several arrows, but they will only be needed under extremely bad conditions.
Many users have the Polish antenna, as in the recent past it was popular due to its affordable cost. Another name for it is lattice. Can this design be adapted for digital television?
It is quite functional, but a number of changes are required. The antenna amplifier does not contribute, but interferes with signal reception. Therefore, he must be taken out of work. Simply unplugging the power supply is often ineffective. It is more reliable to remove the television cable from the amplifier board and connect it there to the two upper bolts: to one - the central core, to the other - the shielding braid. Thus, the amplifier is excluded from the circuit, and the antenna becomes passive.

Antenna and TV setup
There are several ways to properly configure a digital signal. The choice depends on the reception conditions.
Auto search
This method is the simplest, but it requires a strong, stable signal. The equipment is installed, turned on, digital channels are selected in the settings menu, and auto search is turned on. The TV automatically finds and stores the entire list of channels.
Manual mode
Let's say the TV cannot catch anything in auto search mode. Or channels with interference were found. These images are not digital. Perhaps the TV at the same time went through the entire frequency range and picked up several analog channels.
Now it will be useful to know the numbers of TV channels (TVCs) through which the signal is transmitted for each multiplex. Information about the location of the television broadcaster will also be useful for pointing the antenna in the right direction. If the house is surrounded by other residential buildings, you can navigate by neighboring receiving devices, but not by satellite dishes that “look” at their satellite.

- In the menu you need to enter manual settings by first selecting DTV (digital television);
- Enter the channel number or its frequency by dialing from the remote control;
- At the bottom of the menu, two indicators will appear showing the intensity of the television signal and its quality. Sometimes there is one indicator;
- If even a slight signal is present, you can begin to rotate and move the antenna to amplify it. You should not expect an instant reaction when changing the position of the receiving device. It will appear in a few seconds. The search must be carried out step by step, with pauses. When the antenna is external, it is difficult to do this alone; it is better to take an assistant;
- Immediately after the appearance of a stable signal from good level you can start searching for channels and saving;
- The channels of the second multiplex are configured in the same way, if its reception is technically possible in the given area.
Important! If the signal disappears, then appears again with the scale filled to 100%, and so on one by one, this means there is no reception.
Complete lack of signal reception
This situation is typical for particularly unfavorable conditions, in low places, closed by mountains, near high-rise buildings, with low-power towers located far away.
Searching for a television signal must be done manually. At the same time, for its initial display on indicators, you need to show patience and endurance, having tried different methods:
- Purchase a powerful active antenna;
- If there are other towers nearby, you can sometimes try manual searching on a TV set to alternative repeaters. Perhaps the signal conditions will be better;
- Raising the antenna to a height using a mast gives a good effect;
- When the TV tower is located close, and the house is located in the center of a densely built-up area with high-rise buildings, you should not rush to buy an expensive, powerful receiving device. It is better to experiment with the reflected signal, alternately pointing the antenna in different directions at neighboring buildings or placing it on the roof.
Setup via receiver
Old TVs, models without built-in tuners with DVB T2 support require configuration through the receiver.
CRT TVs are connected to digital set-top box tulip cables (RCA), LCD models - HDMI cable. In the first case, when setting up, the AV mode is selected, in the second - HDMI. The mode is selected from the television remote control. On remote controls, the mode selection is located under different buttons: INPUT, SOURCE, VIDEO, just a rectangle with an arrow.
Subsequent configuration is performed using auto search or manual using the add-on remote control. The antenna must be connected to the set-top box.
Receiving a digital television signal with a regular antenna is an easy way to ensure yourself viewing a high-quality picture, requiring minimal financial costs and physical effort. With the development of the network of television towers, signal reception conditions will improve.
Video
Make sure your TV has a built-in digital signal receiver.
TVs with a built-in digital DVB-C receiver
SONY BRAVIA:
Almost all models with letter indices D, S, W, X, V, E, Z and a diagonal size of 32 inches or more,
series:
3000/3500/4000/4020/4030/4050/4210/4500/4710/5300/5310/5500/5510/5600/5610/5710/5740
LOEWE:
Almost all models.
SHARP:
model: 46 (52, 65) XS1, LE700
PHILIPS:
series: **PFL****Н
Toshiba:
series:
AV633/RV633/AV635/RV635/XV635/V635/SV685/LV685
JVC:
series: LT32DC1BH, LT26DC1BH
Panasonic:
series: TX-P42G10
LG Electronics:
Attention: it is necessary in the search menu: Country - include Sweden.
LCD TV series:
LH2000 DVB-T/MPEG-4/DVB-C
LH3000 DVB-T/MPEG-4/DVB-C
LH4000 DVB-T/MPEG-4/DVB-C
LH5000 DVB-T/MPEG-4/DVB-C
LH7000 DVB-T/MPEG-4/DVB-C
LU4000 DVB-T/MPEG-4/DVB-C
LU5000 DVB-T/MPEG-4/DVB-C
PLASMA TV series:
PS3000 DVB-T/MPEG-4/DVB-C
PS7000 DVB-T/MPEG-4/DVB-C
PS8000 DVB-T/MPEG-4/DVB-C
PQ200 DVB-T/MPEG-4/DVB-C
PQ300 DVB-T/MPEG-4/DVB-C
PQ600 DVB-T/MPEG-4/DVB-C
SAMSUNG:
Decoding of SAMSUNG TV models:
DVB-C receiver is built into all models starting from 2009! (letter index B, C or D)
Before setting up, you need to set the following parameters in the menu:
Country - Slovakia or Slovenia, Auto search for digital and analogue channels, Source - Cable, Network.
You can obtain more complete and accurate information on the presence or absence of a built-in digital receiver from sales consultants at the place where you purchased the TV!
Parameters for setting up a digital television test broadcast
(test broadcasting of digital television is available only for subscribers of the “Basic” package)
If there is no network search, then enter all frequencies manually.
Other frequencies: 642, 650, 658, 666, 674, 682, 690, 698, 706, 714, 722, 730, 738, 746, 754, 762, 770, 778, 786, 794, 802, 810 MHz.
Setting up digital channels on Toshiba branded TVs*
Now you can fully enjoy the capabilities of your TV by watching high definition channels. Enjoy watching and bright emotions!
Setting up digital channels on LG TVs*
| 1. In order to set up high-definition digital TV channels for the vast majority of LG models, press the “Menu” button on the remote control, you will see the TV menu in which you will need to select the “Options” section |  |
| 2. Specify the country Finland or Germany |  |
| 3. Now go to the “Settings” menu, “Auto search” item and specify the method of connecting to the TV “Cable” |  |
| 4. Now in the window that opens, go to “Settings” and enter the following parameters: Search type fast Frequency (kHz) 642000 Symbol speed 6875 Modulation 256 Network ID: auto |
 |
| 5. If you did everything correctly and saved all the changed parameters, then during the search you will find more than 100 digital channels and radio stations |  |
| 6. Important feature LG TVs have the “Automatic channel update” function. It must be disabled, otherwise the TV will periodically reset the channel list you have configured. Go to “digital cable settings”: Auto Channel Update: Off |
 |
*Your TV menu may differ from the model shown. In this case, you need to find tabs that are similar in meaning and enter the specified parameters
If it works, we are happy for you!
Setting up digital channels on Samsung TVs*
| 1. In order to set up digital TV channels for the vast majority of Samsung models, press the “Menu” button on the remote control. The TV menu will open, in which you will need to select the “Channel” section (Satellite dish icon). In the “Antenna” tab, specify the connection type as “Cable”. Go to the “Country” tab and select the “Other” option. The TV will ask for a pin code, if you have not changed it, you will see 0000 |  |
| 2. Go to “Auto Configuration” Signal source: Cable, You choose the type of channels at your discretion, you can find only digital channels or digital + analogue |
 |
|
3. Specify Click "Search" |
 |
| 4. As a result of the search, you should find approximately 100 television and radio channels. |  |
*Your TV menu may differ from the model shown. In this case, you need to find tabs that are similar in meaning and enter the specified parameters
If it works, we are happy for you!
Now you can fully enjoy the capabilities of your TV by watching high definition channels. Enjoy watching and bright emotions!
Tuning digital channels on Philips TVs*
| 1. To tune in to high-definition digital TV channels on the vast majority of Philips models, press the “Menu” button on the remote control. The TV menu will open in which you will need to select the “Configuration” section |  |
| 2. Select the Installation tab. After clicking OK, you will be taken to the second menu field, then go to the Channel Settings tab. After clicking the “OK” button, the third part of the menu will open, where you need to select “Automatic”. Installations". Next you will see a message about updating the channel list. Click "Get Started" |  |
| 3. Select "Reinstall Channels" |  |
| 4. In the “Country” section, you must select Finland. If this country is not in the proposed list, then select Germany |  |
| 5. Since you are connecting to digital television via the DVB-C cable network, you must select “Cable” |
 |
| 6. Before you start searching for channels, select "Settings" to manually adjust the search parameters |  |
| 7. Set the baud rate to manual mode. In the tab, the transmission speed is manually changed from the control panel to 6875. In some TV models, the bit rate is indicated in the “Character 1”, “Character 2” tabs. |  |
| 8. Now set the network frequency to manual mode and enter the network frequency 642.00 from the control panel |  |
| 9. After clicking the “Done” tab, you will again be taken to the channel launch menu. Now you can start scanning. |  |
| 10. If you did everything correctly and saved all the changed parameters, then during the search you will find more than 100 television and radio digital channels |
General algorithms for setting up digital channels for various models of LCD TVs:
- Click on enter menu (green button)
- Select in the menu - “Channel” (icon “Satellite dish”)
- Select - "Auto-tuning"
- Select - "Digital"
- Click - "Start"
First, we read the stickers on the back wall of the TV, where separately for each tuner (DVB-T and DVB-C) there is a list of countries in which, according to Philips, there is digital broadcasting (at the time the TV was released, but if you update the firmware through their official website, this list may change in subsequent firmware). If our country is not there, then we will have to put some other one from this list.
- Click on the icon - "House"
- Select - "Configuration"
- Select - "Install"
- Select - "Digital mode"
- Select - "Cable"
- Select - "Automatic"
- Click - "Start"
Setup takes approximately 5-10 minutes.
Philips TV models 2011
- Click on the icon - "House"
- Select - "Install"
- Select - "Search for channels"
- Select - "Reinstall channels"
- Select - “the country indicated on the sticker on the back panel” (usually France, Finland or Germany)
- Select digital mode – “Cable (DVB-C)”
- In the “Network frequency” line, enter the frequency 642.00 MHz
- In the line “Transmission speed” we enter 6875
- Next, select the line “Frequency scanning”
Setup takes approximately 5-10 minutes.
- Press the button - "Menu"
- Select from the menu - "Options"
- Select - "Auto-tuning"
- Select the country - "France, Switzerland, Sweden or Finland"
- Select the signal source - "Cable"
- Select - "Digital"
- Click - "Search"
Setup takes approximately 5-10 minutes.
If your TV model provides for the reception of digital channels, but there is no “DTV MENU” item, then first select another country - France, Switzerland, Sweden or Finland.
- Press the button - "DTV"
- Click - "DTV MENU"
- Select - "Installation"
- Select - "Auto installation"
- Click - "OK"
Setup takes approximately 5-10 minutes.
Since not all SONY models are equipped with a digital tuner for cable TV (DVB-C), you need to check the model of your SONY TV.
Models equipped with a DVB-C tuner are marked KDL-**EX*** or KDL-**NX*** - for example KDL-32EX402R2. The first 3 letters in the model name (KDL) indicate that the TV is “digital”. In models KLV-**BX***, etc. There are no DVB tuners.
- Press the "MENU" button (for some models it is called "HOME" on the remote control (hereinafter referred to as the remote control). This button is usually blue
- Select "Settings"
- Find the “Digital Configuration” menu in the list of settings and enter it
- Select "Auto search for digital stations"
- A source selection window will open - select the TV connection type. Select "cable"
- In the selection of scan type - select the "full scan" mode
6.1 Or select "Manual"
6.2 Next, enter the frequency 642.000.
6.3 Leave the access code as “Auto”. Next, enter the symbol rate 6.875. - Click "get started"
Wait until the TV finishes searching for channels.
!!! Pay attention to the bottom of your TV's OSD menu. The bottom menu bar displays hints on which remote control buttons to perform certain actions in the TV menu.
Panasonic
- Press the button - "Menu"
- Select the item “Settings”
- In the window that appears, select “Analog settings menu”
- In the window that appears, select “Add TV signal”
- In the table that opens, put a tick on the “DVB-C” line and, going down below, click “Start auto-tuning”
- After searching for all digital channels, going to the main menu in the “Settings” item, the line “DVB-C setup menu” appears. By selecting this item, you can adjust the settings manually (set the frequency and speed)
If it works, we are happy for you!
Now you can fully enjoy the capabilities of your TV by watching high definition channels. Enjoy watching and bright emotions!
Features of CETV
Digital terrestrial television (DTTV), makes it possible to receive Federal TV channels and radio stations included in the first and second multiplex in the MPEG-4 standard. Below you can find a list of these channels.
The peculiarity of this type of television broadcasting is that you can watch the listed television channels in high quality. As you know, the previous generation of broadcasting - analogue terrestrial TV - is already outdated, since the broadcast picture has a low resolution, and on modern wide-screen TVs the image is of very low quality and blurred. The new format of television broadcasting opens up new dimensions, giving subscribers a high-quality, clear picture and high-quality stereo sound.
TSETV broadcasting is carried out in principle, like regular broadcasting of UHF channels, only one channel includes 10 digital ones. There are only 2 such channels, they represent the first and second multiplex. To process the signal, you need a special digital terrestrial receiver - set-top box.
Equipment
Let's take a closer look at the set of equipment that is necessary to receive high-definition digital terrestrial TV channels.Required equipment:
- Antenna;
- Receiver (tuner);
- Amplifier;
- Coaxial cable;
- Cable for connecting the receiver to the TV.
To receive the CETV signal, you need a conventional decimeter antenna that receives channels in the frequencies 470–860 MHz. Antennas can be of two types: home (indoor) or external. The type of antenna must be selected in relation to the distance from the TV tower (repeater).
A home antenna is only suitable in cases where there is a TV tower in your city, at a distance of no more than 15 km from your home. In this case, you can get by with an indoor antenna. If your distance to the TV tower exceeds 15 km, then you must use an external antenna.
In the store household appliances or radio electronics, decimeter antennas for DVB-T2 will definitely be available. Buy special antennas that are designed to receive a decimeter signal; they are designed according to all the rules of radio physics and will ensure high-quality signal reception.
Talk to your neighbors, probably some of them watch CETV, find out what antenna they use and what the level and quality of the signal is.
If in doubt, buy an external antenna.

Receiver (tuner)
The first thing you need to do is choose a receiver. A receiver is a special set-top box for a TV., as mentioned earlier, which processes the signal and sends it to, setting up channels and switching them is also done through the receiver. Today there is a fairly wide selection of receivers on the market for receiving DVB-T2 channels.
As for the choice, they are all almost identical and simple; choose a device based on the availability of additional functions: functionality and menu design, as well as the availability of connectors for connecting to a TV.
Some modern TVs, from the middle and premium segments, have models with a built-in DVB-T2 tuner, thanks to which you do not need to buy a receiver, but simply connect the cable from the antenna to the appropriate socket and tune the channels.
If you have, then some models support the installation of CAM modules, including the DVB-T2 module. Thus, you only need to install the module in the receiver, connect the cable from the antenna to the second incoming socket, and you can watch digital terrestrial television channels along with satellite ones.
Amplifier
Most UHF antennas (both indoor and outdoor) include a built-in amplifier, the signal from which is amplified by the receiver, which is quite enough for reliable reception if the antenna type is chosen correctly.
Let's consider cases when a separate signal amplifier is needed. Using a DVB-T2 receiver, you can check the signal level; to do this, you need to enter the settings and the corresponding scale will be displayed there. Connect the antenna to the receiver - if the signal level is around 75%, and the picture quality is quite satisfactory, then an amplifier is not needed. When the signal level is lower and the picture is noisy, it is recommended to install an amplifier.
Coaxial cable
This is a regular television cable that transmits a signal from the antenna to the receiver. We recommend purchasing a cable with a copper circuit and screen, as it is of the highest quality, which will ensure good transmission signal and long cable life. Pay attention to the cable braid; the stronger it is, the better, since the cable will be less susceptible to external influences: interference and destruction.
Cable for connecting the receiver to the TV
If the receiver you choose includes an HDMI connector, which is also available on the TV, then it is better to use it for connection, since this type connection provides best quality images. To do this, you will need an HDMI cable, which can be purchased at any hardware or computer store.
If there are no HDMI connectors, which is somewhat bad, then use SCART, RCA and others connectors.
Installation and configuration
First, we install the antenna. An indoor antenna is usually installed on a window. You can try installing an external antenna on a balcony or mounting it on a bracket near a window if you live in the direction of the TV tower. Lay the cable from the antenna to the receiver. If the signal is weak enough, or the TV tower is located in the other direction, the antenna must be installed on the roof of the house. Point the antenna towards the TV tower; to do this, just look at the direction of neighboring antennas.Unpack the receiver, connect the cable from the antenna to it, then connect the cable from the TV. Next, turn on the power to the receiver, turn it on and make the initial settings: language, time and time zone, etc.
If the model supports automatic channel scanning, then you can use it. If there is no automatic search, then in manual mode you need to select the necessary channels of two multiplexes. In regions, these channels may differ, most often these are channels 35 and 45.
Find the channel of the first multiplex and scan it, and then select the channel of the second multiplex and scan it too. The fact is that each of these channels contains its own package of 10 channels. By the way, it is in this settings menu that the signal level scale will be displayed. If the signal level is low, you can rotate the antenna, choosing its best direction, based on the scale indicators.
That's it, now you can enjoy watching terrestrial digital television.
The advent of digital television caused a kind of excitement, as content in digital quality became available to a wide circle users. IN lately it is this direction of television that is developing very actively, large number offices that will provide services for connecting and setting up digital television for a fee. The good news is that you can set up digital television on your TV yourself.
So in this article we will look in detail at all aspects of setup, both in general and for TVs from specific manufacturers. It is worth noting that there are different types of digital television. All proposed schemes relate to cable “digital”.
General instructions
First, let's look at the general scheme for setting up digital television reception. In different TV models, the sequence of operations and the names of items may differ slightly. Don’t worry, next we will look at the configuration features for specific brands, all points will be illustrated.
1. Using the remote control, enter the menu of your TV. In the window that appears, select the “Options” item. In order to go directly to the configuration, you must select the “Auto Configuration” item. A window should appear on the screen asking you to select one of the signal sources: cable or antenna. Select the first option, and then click the “Start” button.
2. After the operations have been completed, a window should appear in which you must select “Digital” as the signal source and then press the “Start” button again.
3. We are at the final stage of setting up digital television. In the window that appears, we find the “Search Mode” item, several options will appear, we need the “Full” item. Click and fill in all fields with the data indicated below.
Frequency (kHz) - 314,000 (314 MHz).
Modulation - 256 QAM.
Transfer speed - 6875 kS/s.
Please note that some TV models support network search. This means that you do not need to manually specify the above parameters. Simply, after selecting the desired search mode, press the “Search” button. As you can see, setting up digital television on your TV is quite simple. For those who are confused, read on for the illustrated instructions.
LG
It is logical to assume that different TV models from the manufacturer LG use their own firmware and their own menu. However, in general, the menu of all TVs has characteristic similarities. Find the “Menu” button on the remote control, press it and a window appears on the screen in which you need to select the “Options” item.

In the “Options” tab you will see several parameters available for change. In the “Country” item you must indicate either Germany or Finland.

After this, you need to go to the “Settings” menu, there select the “Auto search” item in which you specify “Cable” as the connection method.

After the completed manipulations, a window should open in which you need to select the “Settings” item and specify all the values as in the figure below.

If you followed all the instructions correctly, then after searching, the TV will detect all available channels, as well as radio stations.

Please note that LG TVs use an automatic channel update feature that, at certain intervals, resets the existing channel list and starts new search. For convenience, it is advisable to disable this feature. To do this, you need to go to the “Digital cable settings” tab and turn off automatic updating. Thus, setting up digital television on LG TVs is quite simple. All it takes is a little care.
Setting up digital television on TVs Philips
So, find the “Menu” button on the remote control and use it to go to the menu of your TV. Next, you need to go to the “Configuration” section.

In the window that appears, click on the “Install” item, after which a secondary menu will appear on the TV screen, in which you need to select the “Channel setup” section. Another submenu will appear, in which we select the “Automatic” item. Settings.” If you have completed all the transitions correctly, a message should appear warning you about the upcoming update of the list of all channels. Click “Start”.


Go to the section"Country" and select either Finland or Germany from the list.

For connection method, select"Cable".

Before you start the channel search process, go to the “Settings” item and make the settings according to the images below.


Now you have managed to set up digital television on your Philips TV. You can start directly searching for channels; to do this, click “Start”.

Setting up digital television on TVs Samsung
On the remote control, press the “Menu” button. Your TV menu should appear on the screen. Go to the “Channel” section (shown as a satellite dish). Several tabs will appear on the right, select “Antenna” and select “Cable” as the connection type. Next, you need to go to the “Country” tab and specify the “Other” parameter. In this case, the TV should request a pin code. If you did not change it yourself, then enter 0000 (default value).

Go to the “Auto Configuration” tab and select “Cable” as the signal source.

Set all parameters as in the image below, then click “Search”.

After all operations, your TV will detect all available channels.

Setting up digital television on TVs Toshiba
Using the “Menu” button, go to the TV menu and select the Russian menu language.

Find the "DTV Manual Tuning" tab.

Manually enter all the parameters as in the image below.

After that, click “Ok”, the search for channels will begin.

Conclusions
We have discussed in detail the diagram of how to properly set up digital television on your TV. We supported all sequences with images for better perception. If you have any questions, use the feedback form on our website or ask a question in the comments.