Already drawn +12 I want to draw +12 Thank you + 265
On this page we will show you in detail how to draw a pumpkin for Halloween. with a simple pencil step by step. We have collected for you step by step lessons and video, choose any lesson and start drawing. Good luck!
How to draw a pumpkin for Halloween step by step
Video: how to draw a Halloween pumpkin with a marker
How to draw a scary white pumpkin with a pencil step by step


How to draw a Scary Pumpkin with felt-tip pens
Halloween is considered a dark and slightly creepy holiday because it contains frightening images. One of the main symbols of this night holiday is a pumpkin. Holes are cut out for the eyes and mouth, and a candle is placed inside. This is how a lamp is created. But today we’ll dream up a little and imagine that the pumpkin has come to life. We can draw it on paper by learning how to draw a Halloween pumpkin. She will be wearing a black magic hat, which brought her to life for this holiday.
Tools and materials:
- White sheet of paper;
- Simple pencil;
- Eraser;
- Black handle;
- Thin black marker;
- Colored pencils (yellow, orange, dark yellow, brown).
- Step 1
Draw a horizontal oval in the middle of the sheet. We draw an axial (vertical) line through the middle of the oval.

- Step 2
We'll draw an ellipse on top, which will later help us draw the edges of the hat. Add a long cap in the middle of the hat, which will curve at the edge. In the middle of the large oval at the bottom we will make a mouth for the pumpkin. It will be big and wide. The corners of the mouth are raised because the pumpkin is smiling.

- Step 3
In the middle of the pumpkin we will draw a small triangle, which will be the character’s nose. Let's add two eyes, the outer corners of which will be slightly raised, due to the fact that the pumpkin is smiling. In the mouth we will draw two teeth. We will add one on the top right, and the second on the bottom left.

- Step 4
Let's draw the shape of a pumpkin. The bottom of the pumpkin is divided into fragments, which we make rounded. Let's add a few small stripes under the hat.

- Step 5
Let's make the pumpkin more voluminous. We thicken the inside of the pumpkin, where the cuts for the eyes, mouth and nose go. Add an additional line and connect them at an angle.

- Step 6
The hat will look wrinkled, so let's add more folds to it. There will be folds not only on the cap, but also on the brim. At the base of the cap you need to draw a strap that will decorate it.

- Step 7
Use a black pen to outline all the necessary contours of the pumpkin and hat. We make the internal lines thinner, and the external ones can be made thicker. We will make cracks on the pumpkin from below.

- Step 8
Using a black marker, draw the entire mouth, nose and eyes. The hat will also be black, but let's leave some highlights on it.

- Step 9
Interior the cuts of the mouth, nose and eyes will be yellow. Let's make the pumpkin orange, but at the bends you need to add a darker tone. A brown pencil is suitable for this task. Using it you can draw a shadow on the pumpkin at the bends and under the hat. The hat strap will also be orange.

- Step 10
The Halloween pumpkin drawing is ready!

How to Draw a Pumpkin Wearing a Halloween Hat
Autumn. Beautiful, a little sad and always magical. Its color is like a playful bright fire before the restraint and wisdom of winter. The earth is full of harvest and generously shares its fruits with us. What could be more beautiful than a luxurious queen pumpkin, bunches of grapes, a basket of apples, a basket of mushrooms... you can name it all! Let's draw cute autumn pumpkins.
To paint a wooden board using the double stroke technique we will need:
1. Sand the board, prime it and dry it.

2. Before painting your pumpkins, let's prepare a background for painting. We paint the board with Ivory color, which will then appear through the abrasions.

3. Rub the painted surface with a candle, but do it gently, with a light layer. Applying too thickly will prevent the next layer of paint from firmly adhering to the surface.

4. Now our task is to create an autumn color scheme for the background for painting. We want warm, ocher and green tones. We put the paints on the palette and apply them to the board one by one, without washing off the brush, but as if connecting the colors with each other.

You can start with a yellow-green palette, and then add ocher-brown shades.

5. At the end of the work, we pass over the entire surface with a wide, slightly damp and clean brush to even out the color transitions. And be sure to paint the sides of the product.


6. Gently sand the dried surface, exposing the lower light background. We do this over the entire surface, but the main emphasis is on the outline of the board and the edges.

7. Cover the finished background with varnish. This will allow the paint (top layer) to adhere to the surface and it will not be damaged during painting.

8. You can move on to drawing pumpkins. It's better to practice a little with a pencil on paper. We outline a circle, place a point slightly above the center from which the pumpkin slices will come out, and draw arcs from this point in all directions. We draw a stalk on top.


9. We will draw pumpkins using the “double stroke” technique. To do this, put three colors on the brush. It's done like this. Dip one tip of the brush into yellow, the other into orange and move it back and forth across the palette. It turns out a soft yellow-orange transition, and then at the very tip of the orange we add a dark brown color.


10. First, let's practice drawing a pumpkin on paper. Take our three-color brush and paint the pumpkin slices, making them thinner at the top and bottom. At the end, add a thick tail. Instead of brown You can add green, then our pumpkins will be very picturesque.


11. Let's move on to painting the board. You can't draw with a pencil here, it will damage the surface. Therefore, we will draw them in white along the outline. And we’ll also paint our slices with white, this will be an underpainting for painting, so that the tone looks brighter.


12. Paint pumpkins. At the same time, on each slice we place a brush with light paint on one side. We try to make the range of pumpkins varied, adding, in addition to yellow and orange, reddish shades, brown and green.


13. Be sure to add highlights and spots on the sides of the pumpkins, making their color more natural.


14. The pumpkins are ready, you can start working on the details - finishing the leaves, spirals of antennae, autumn leaves etc. For inspiration, you can take a maple leaf ( maple leaves a little like pumpkin ones), trace it along the contour and practice drawing it on paper in the “double stroke” style, using a yellow-green color scheme.


15. We fit the leaves closer to the cuttings. They may not all be written out frontally; some seem to have turned and only part of the leaf is visible.


16. Add other details. Using a thin brush, we draw the springs of the antennae by weight - twist the spirals in different directions, thin the paint. We finish drawing - we outline the leaves with a bronze outline.


17. Add a couple of autumn maple leaves along the edge of the board, our composition is ready.


9. At the end of painting, be sure to cover our product with finishing varnish and dry it. If the product is intended for decoration, then we cover the back with paint and varnish. A wonderful product made with your own hands must be shown to your loved ones by inviting them to a home party. Autumn is the time for harvest, treats and fairy tales!


Artist: Aelita Rada
Good afternoon New lesson drawing, as always, is already waiting for you on our website, and today we will tell you about how to draw a pumpkin. The lesson is very simple, however, as you can see in the title of the article and in the last step of the lesson, our pumpkin should look quite realistic.
It may seem that our main character becomes incredibly important only. In fact, it not only does an excellent job of demonstrating the horrors of the demonic world, the doors to which open on All Saints' Day, but also perfectly complements semolina porridge in boiled form. Let's get started with this lesson and find out!
Step 1
First, let's draw a flattened oval. It may well not be completely even - as in our sample.

Step 2
Then at the top of this oval we draw a pumpkin tail. Please note that almost all of it is inside the outline of the pumpkin.

Step 3
This step will be especially important. Here we need to mark our pumpkin with smooth lines into segments that are very similar in size. Please note that the parts of the fruit that are closest to us look much larger and wider than those that are farther away. Another point is that the segment lines become more and more intense as they move away from us.

Step 4
Let's work on the ponytail. Let's erase extra lines so that it does not appear transparent. Then draw a circle at its tip to indicate the thickness. Finally, draw the outline of the ponytail with clear, confident lines and outline a few light lines inside, closer to the tip.
Here we will finish drawing the lower parts of the pumpkin segments.

Step 5
We finish the lesson by applying light shading to our pumpkin. Please note that the light falls to our left, which means we will be shading the right parts of the segments. As you can see, the shadow here is not complicated at all - just ordinary shading. The density of the shadow is regulated by the degree of pressure on the pencil.
It was an art lesson about how to draw a pumpkin. The site’s artists have prepared a lesson for you, don’t forget to follow the news on official page our website VKontakte. All the best, learn to draw with us every day!
You are in the pumpkin coloring page category. The coloring book you are considering is described by our visitors as follows: "" Here you will find many coloring pages online. You can download pumpkin coloring pages and print them for free. As you know, creative activities play a huge role in the development of a child. They activate mental activity, form aesthetic taste and instill a love of art. The process of coloring pictures on the theme of pumpkin develops fine motor skills, perseverance and accuracy, helps to learn more about the world around us, introduces us to all the variety of colors and shades. Every day we add new free coloring pages for boys and girls to our website, which you can color online or download and print. A convenient catalog compiled by category will make it easier to find the desired picture, and a large selection of coloring pages will allow you to find a new one every day interesting topic for coloring. 2,808 ViewsA pumpkin drawn with a pencil and painted with paints or other materials looks very bright and beautiful. These vegetables are widespread and have long been used not only for preparing all kinds of dishes, but also for decoration. For example, Americans make fancy and very scary lanterns out of pumpkins for Halloween. Also, florists often use pumpkin as an original vase in which any bouquet can be placed. Many people who want to paint an original autumn still life think about how to draw a pumpkin. The easiest way to understand how to draw a pumpkin is to draw this vegetable directly from life. You can also draw a pumpkin from a photograph or from a painting of some famous master.
Before you draw a pumpkin step by step, you need to prepare:
1). Eraser;
2). Pencil;
3). A piece of paper;
4). Multi-colored pencils;
5). Liner.
A pumpkin is drawn in several stages:
1. There are pumpkins different forms. The most common are round and oblong pumpkins. Draw the outlines of two pumpkins - make one round and the other oblong;

2. Draw grooves on the round pumpkin;

3. Draw a thick stem in the middle of the round pumpkin;

4. Draw stripes on the oblong pumpkin;

5. Now you understand how to draw a pumpkin with a pencil step by step. To make the drawing look clear, outline it with a liner;

6. Erase the pencil sketch of the pumpkin with an eraser;
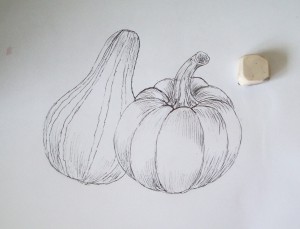
7. Color the round pumpkin with pencils in a yellowish-orange color scheme;

8. Color the stem of a round pumpkin with green, marsh and yellow pencils;

9. Paint the second pumpkin with different shades of green. Make the stripes on it yellowish-green.

The pumpkin drawing is ready. Now you understand how to draw a pumpkin with a pencil step by step for beginners. IN in this case pumpkins were depicted using the most ordinary multi-colored pencils. But this does not mean at all that they cannot be painted with a variety of colors or, for example, with bright felt-tip pens. Professional artists often use oil, acrylic or watercolor paints. For beginners, watercolor is best suited, since it is relatively inexpensive, and it is much easier to paint with it than, for example, with oil. The main thing, when drawing a still life with pumpkins, is to use thick and high-quality paper, such as whatman paper, as well as good brushes.
