Valentina Zyuzya
GCD "Drawing"
Theme: “Rime covered the trees”
Program content. Cultivate a love for nature. Learn to create an image of winter nature, convey its beauty, the diversity of trees. Develop the skills of depicting a tree without leaves (trunk, branches, thin twigs) by representation. Promote the development of aesthetic perception, memory, imagination, creative abilities.
Material. Tinted paper, white gouache, watercolor.
1. Remind the children that they recently learned S. Yesenin’s poem “Birch”. Offer to read it.
Talk about the beauty of winter nature.
2. Offer to draw a tree in frost.
How can we best depict branches silvered with frost?
What parts does a tree consist of?
3. Independent work.
Individual work is carried out as needed.
4. Upon completion, examine all the work and admire the beauty winter forest. Note which trees turned out all different.
5. Set up an exhibition for parents.
Frost. Drawing a winter landscape in unconventional technology
Nadeenskaya Elena Alekseevna
Job title: teacher fine arts
Place of work: Municipal educational institution "Arsenyevskaya Secondary School", Arsenyevo village, Tula region
Description: the material will be of interest to teachers primary school, educators, teachers additional education, creative children 7-10 years old.
Purpose: Use in fine arts lessons, the work can serve as interior decoration, an excellent gift or exhibition piece.
Target: acquaintance with the method of drawing a winter landscape in gouache using printing technology.
Tasks:
- improve skills in working with gouache;
- develop a sense of composition, the ability to notice and reflect the beauty of nature in a drawing;
- develop color sensitivity, imagination, creativity;
- cultivate neatness and love of creativity.

Materials:
-gouache;
- squirrel brushes No. 3, 5;
- A4 sheet);
- sheets of paper.

Enchantress in Winter
Bewitched, the forest stands -
And under the snow fringe,
motionless, mute,
He shines with a wonderful life.
And he stands, bewitched, -
Not dead and not alive -
Enchanted by a magical dream,
All entangled, all shackled
Light chain down...
Is the winter sun shining
On him your ray with a scythe -
Nothing will tremble in him,
It will all flare up and sparkle
Dazzling beauty.
F.I.Tyutchev

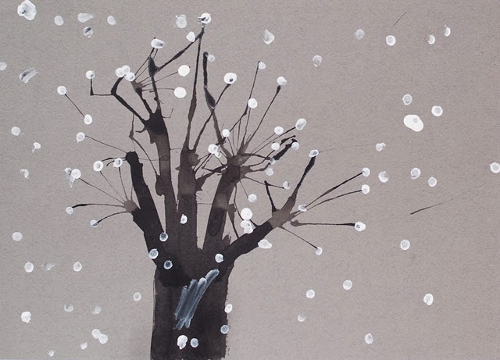
B. Smirnov-Rusetsky “Rime”
Work progress
1. Cover the album sheet with gouache. The paint layer should be dense and even. Then we take an additional sheet of paper, crumple it, and form a ball. While the paint has not dried, we apply a wad of paper to the sheet, leaving marks and giving the surface of the sheet a peculiar relief and texture.

2. We work over the entire surface of the sheet, imprinting a lump of crumpled paper.

3. Mark the snow with white gouache at the bottom of the sheet.

4. We outline the tree trunks.

5. Draw twigs and branches on the trees.

6. Now we move on to the image of frost on tree branches. To do this, we again prepare lumps of crumpled paper, dip them in white gouache and apply them to the drawing, leaving uneven prints.

7. Mark frost on tree branches.

8. Add an image of bushes under the trees using printing technology.

9. Add branches on trees and bushes by scratching their outline with the back of the brush (the tip of the pen). If necessary, add missing details with a thin brush.

The work is ready.
You can also try other options for constructing the composition of a winter landscape.


Thank you for your attention!
I wish you creative success!
I found an interesting selection on the Internet. (the most interesting, for me, is at the end))
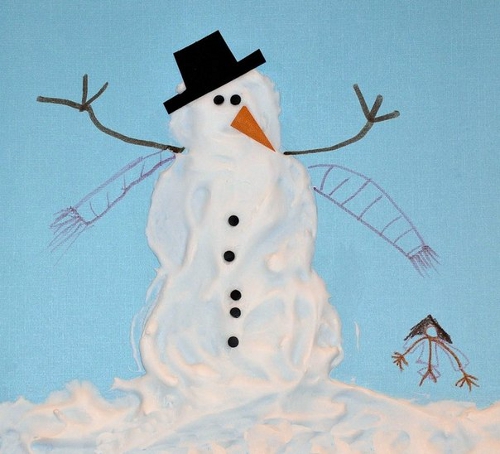
1. Winter drawings. "Volume snow paint"
If you mix equal amounts of PVA glue and shaving foam, you will get wonderful airy snow paint. She can draw snowflakes, snowmen, polar bears or winter landscapes. For beauty, you can add glitter to the paint. When painting with this paint, it is better to first with a simple pencil outline the contours of the drawing, and then color it with paint. After some time, the paint will harden, and you will get a voluminous winter picture.

2. Winter drawings of children. Using electrical tape in children's creativity

If there is snow outside the window, you can depict it using a cotton swab.

Or use a brush to put snow on each branch.

11. Winter drawings. Drawings on the theme of winter
An interesting idea on the topic of children's winter drawings was suggested by the author of the blog Homeschool Creations. She used putty to paint snow on the transparent film. Now it can be applied to any winter pattern or appliqué, simulating falling snow. They put the film on the picture - it started snowing, they removed the film - the snow stopped.
12. Winter drawings. "New Year's lights" We would like to tell you about one interesting unconventional drawing technique. To draw a New Year's garland like in the photo, you will need a sheet of thick paper of a dark color (blue, purple or black). You will also need regular chalk (the kind you use to draw on asphalt or a blackboard) and a light bulb stencil cut out of cardboard.
On a piece of paper, use a thin felt-tip pen to draw wires and light bulb sockets. Now apply the light bulb stencil to each socket in turn and outline it boldly with chalk. Then, without removing the stencil, smear the chalk on the paper using a piece of cotton wool or directly with your finger to create rays of light. You can replace chalk with colored pencil graphite chips.

It is not necessary to use a stencil. You can simply paint over the light bulbs with chalk, and then gently rub the chalk in different directions to make rays.

Using this technique, you can also draw a winter city, for example, or the northern lights.

13. Drawings winter's tale. Winter forest drawings
On the site already mentioned above Maam.ru you will find interesting master class on drawing winter landscapes using templates. You will only need one base color - blue, a coarse bristle brush and a white drawing sheet. When cutting out templates, use the cutting method from paper folded in half. Look at what a magnificent drawing of a winter forest the author of the painting created. A real winter fairy tale!


14. Winter drawings. Drawings on the theme of winter
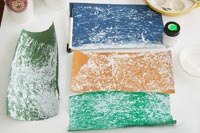
You are probably very eager to find out how the wonderful “marble” Christmas tree in the photo below was painted? We'll tell you everything in order...To draw such an original drawing on the theme of winter you will need:
Shaving cream (foam)
- watercolor paints or green food colorings
- flat plate for mixing shaving foam and paints
- paper
- scraper

1. Apply shaving foam to a plate in an even, thick layer.
2. Mix different shades of green paint or food coloring with a little water to make a rich solution.
3. Using a brush or pipette, drip paint onto the surface of the foam in a random order.
4. Now, using the same brush or stick, beautifully smear the paint over the surface so that it forms fancy zigzags, wavy lines etc. This is the most creative stage all the work that will bring pleasure to the children.
5. Now take a sheet of paper and carefully apply it to the surface of the resulting patterned foam.
6. Place the sheet on the table. All you have to do is scrape off all the foam from the sheet of paper. For these purposes, you can use a piece of cardboard.
Simply amazing! Underneath the shaving foam you'll find stunning marble patterns. The paint has time to quickly absorb into the paper; you just need to let it dry for a few hours.
15. How to draw winter. How to paint winter with paints
Concluding our review article on winter drawings for children, we want to tell you about one more in an interesting way, how you can paint winter with paints with your child. To work you will need any small balls and plastic cup(or any other cylindrical object with a lid).

Place a piece of colored paper inside the glass. Dip the balls in white paint. Now put them in a glass, close the lid on top and shake well. As a result, you will end up with colored paper with white streaks. Do the same colored paper with white streaks of other colors. From these blanks, cut out the details of the applique on a winter theme.


Material prepared by: Anna Ponomarenko
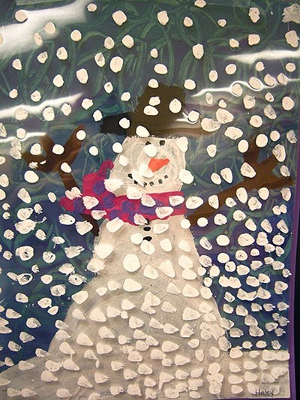
Abstract of the GCD for the NGO “Artistic and Aesthetic Development”.
Drawing “Rime covered the trees”
Integration educational areas: “Artistic and aesthetic creativity” (drawing)
Types of children's activities: educational
Goals of the teacher:
Teach children to paint a picture of nature, conveying the structure of various trees (large, small, tall, low, slender, straight and crooked); choose visual content and reflect the most characteristic features; consolidate techniques for working with paints, the ability to beautifully arrange an image on a sheet of paper; develop aesthetic perception, evoke a desire to admire the beauty of the winter landscape; cultivate a love for nature.
Material: reproductions of paintings - I. I. Shishkin “Winter”, K. F. Yuon “Russian Winter”, I. E. Grabar “Rime”; for children - gouache, brushes, album sheets.
Preliminary work:showing illustrations with reproductions of frost, talking about winter natural phenomena, reading the poem “White Birch”.
Move.
1. Organizational moment. The teacher asks a riddle:
I will paint the branches with white paint
I will throw silver on your roof.
Warm winds will come in spring
And they will drive me out of the yard. (Winter)
The teacher invites the children to come to the window and look outside.
Children, look how beautiful it is outside the window. Why do you think it became so beautiful? (children's answers). Yes, winter is in control of nature now. The days are frosty, snowy, a lot of snow has fallen. It enveloped fields, forests, houses in a white fluffy blanket - it became light, elegant, fabulous, beautiful! You and I have seen how snow sparkles in the sun, how different it can be: pink in the morning, bluish in the afternoon, yellow from the sun’s rays, shimmering with brilliant lights.
Enchantress in winter
The forest is bewitched -
And under the snow fringe,
motionless, mute,
He shines with a wonderful life. (F. Tyutchev)
2. Guys, look at how different artists depict winter. Ivan Ivanovich Shishkin’s painting “Winter” depicts a dense winter forest after snowfalls, the artist used only white and gray colors. Nikolai Romadin depicted winter in a different way - clear frosty weather, blue and yellowish colors are visible in the picture.
Listen to the riddles, what they are about:
1. Not snow or ice
And with silver he will remove the trees. (Frost)
2. Non-prickly, light blue
Hanging on the bushes... (frost)
When does frost appear? (children express their opinions). Trees are covered in frost when it was warm on the eve of this day, and frost hit at night. Let's look at images of trees covered in frost. (children sit down, show presentation)
Look how Konstantin Fedorovich Yuon depicted winter in his painting “Russian Winter”.
Questions: - Who is depicted in the picture; - What trees?
How did Igor Emmanuilovich Grabar depict trees in frost in his painting “Rime”? (children look at the picture).
Questions about the painting:
How do you feel when you look at them?
What kind of trees are there, what can you say about them?
Have you ever seen such a winter as in the paintings of Konstantin Yuon and Igor Grabar?
Looking at his painting, we see a magical picture of silently standing trees, covered with the thinnest cover of frost. The forest was fabulously transformed, it became as if crystal and weightless. Trees covered in frost are beautiful in the background bright sky. Covered with delicate silvery frost, each branch acquires a special fragility and charm. The forest is painted in smooth halftones, and even the shadows become transparent and blurry. It seems that the whole world is painted white, and this feeling is emphasized winter mood. (slide)
The trees fancifully decorated with frost at dawn appear incredibly light and as if transparent; they appear light and sparkling in the rays of the low winter sun, casting thin shadows on the silvered ground. (slide)
Looking at a twig covered with tiny needles of frost, you can imagine how this fleeting beauty crumbles and melts. (slide)
Beautiful and mesmerizing trees covered in frost remind us of how magnificent nature is in all its manifestations. (slide) (Children look at the trees covered in frost again and share their impressions).
3. - Now let’s also draw our trees in the frost. (Children sit at tables). Let's start the picture with an image of the snow cover, then draw the trees. What parts does a tree consist of? We begin to draw the trunk from below, moving the brush upward. Carefully paint over it. Then use the tip of the brush to draw branches. Then we paint frost on the branches with white paint. (The teacher accompanies the story by showing drawing methods). Try to draw different trees, young, slender and old, spreading ones.
4. Children do work on the topic “Frost on trees.” As the work progresses, the teacher provides the children with the necessary assistance.
5. Analysis of children's works.
Upon completion, examine all the work and admire the beauty of the winter forest. Note which trees turned out to be different.
Guys, let's put all your drawings together and look at them. Ask whose drawings they liked best and why? Guys, looking at your drawings I imagine myself in a winter forest.
There is silvery frost on the trees,
All dressed in white in winter
It’s like I’m having a wonderful dream,
The fairy came into this dream herself.
And waved her magic wand,
Everything around has changed its outfit
In the frost the trees turn silver,
Winter gave us a fairy tale.
I would like to stay in that fairy tale,
The Fairy settled there herself.
Create a new layer. Take a round brush, color white, make the diameter 12 pixels, hardness 30% and draw something like this. Apply the main lines with this brush, then reduce the diameter to 8 pixels, opacity to 50% and add additional lines:
Set the Opacity of this layer to 20%:

Create a new layer and “sprinkle” the shape with white dots:

Merge all layers into one (Ctrl+Shift+E), and then invert the colors by pressing Ctrl+I:

Go to Edit --> Define Brush Preset to save the brush, the brush will be located in the lower right corner of the selection window:

Let's go to the brush settings (press F5). Set the intervals to 30%; keep in mind that during the drawing process this parameter should be changed and selected depending on the image:

On the Shape Dynamics tab, increase the Size Jitter to 70% and the Angle Jitter to 30%:

Let's add a little Scattering:

The settings are ready. Use this brush to outline the edges of an object:

But tracing the edges is not enough; you need to fill the entire surface of the branch. To do this we need another brush of our own.
Create a new document and fill it with black. Using a semi-transparent soft-edged brush, paint the following object on a new layer:

Reduce the Opacity of the layer to 40%:

Create a new layer and add small dots to it for a glitter effect:

Merge all the layers into one, invert the colors and define the brush through Edit --> Define Brush as we did earlier.
Open the Brushes panel (F5) and set the Spacing to around 60 percent:

Set the "Dynamics" value to the same as on the previous brush:

Apply this brush to the body of the object.
Finished result:
