Another article on this popular topic. Probably everyone who checked the connection speed through their Wi-Fi network was interested in why it is so low, why the router slows down the speed, and how to increase the speed of the Internet connection. I have already answered almost all these questions in the article: . And in this article we will talk about how to increase Internet speed over a Wi-Fi network. And as far as possible.
The whole problem is that when connecting the cable (from the Internet provider, or even from the router) directly to the computer, we usually get a speed of 80-100 Mbit/s (if you have a 100 Mbit/s tariff), but when connecting via Wi-Fi, it depends. Maybe even 20 Mbps, or even less. If your router is not the cheapest, then the speed will be approximately 50-60 Mbit/s. But, it all depends on the specific case. And in general, the speed that a router provides over a wireless network depends not only on the router itself. There are many different factors, which I will write about later in this article.
Separately, I would like to write a few words about the maximum speed of the wireless network, which is indicated on the box of your router, or in the specifications. Many people are interested in this question. 150 Mbit/s, 300 Mbit/s, this is the maximum theoretically possible speed that the router can produce. Of course, under normal conditions such speeds will never be achieved. And this is normal, it does not mean that you have a bad router.
Why is the Internet speed slower over Wi-Fi?
I think you will agree that wireless connection not as stable as wired. And no matter how it is, a cable connection has always been and will be the most stable and reliable.
Directly, when you connect the Internet cable directly to the computer, there is a direct connection to the provider’s equipment. When we install the router, it already manages this connection. The router controls the flow, distributes the Internet to other devices, etc. This is precisely why the speed drops when connecting through a router. And especially when connected via Wi-Fi network.
How much a router will cut speed mainly depends on the power of that router. The more powerful the router, the faster it can process information, and it has a higher maximum speed flow. And the more powerful the router, the more expensive it is. And believe me, there is a difference between a device for 20 dollars and 200. Otherwise, there would simply be no expensive routers. No one would buy them or make them.
We found out why the router slows down the speed, and now we’ll take a closer look at some of the ways you can increase the speed over a Wi-Fi network. At least you can try.
Before doing anything, it would be good to connect the Internet directly to the computer and check the speed. You can check it on the website http://www.speedtest.net. There is a separate article on this topic that you can view.
If your tariff rate is, say, up to 20 Mbit/s, then you won’t be able to squeeze out any more. Therefore, we measure the speed at direct connection, then via Wi-Fi network. We will find out how slow our router is. And yet, you can check from different devices that you connect via Wi-Fi. Since the speed also depends on the device we connect.
1 Let's probably start with the most working method (in my opinion). Search for a free Wi-Fi network channel and replace it in the router settings. When your devices see many other Wi-Fi networks, all of these networks can interfere with your wireless network. And because of this, connection speed often suffers.
Therefore, you can try to determine the freest channel and set it in the settings of your router. There is a very detailed article on this topic:. It also shows how to change the channel in the settings of different routers. Here, for example on TP-LINK:
Here you need to experiment, try different variants. And if you already have a static channel, then set it to Auto.
2 Wi-Fi 5 GHz. If you have a lot of neighboring networks and a lot of interference that affects the speed, then the best option, is to switch to Wi-Fi 5 GHz. Buy a router that supports broadcasting a Wi-Fi network at a frequency of 5 GHz. The speed will definitely be higher there. I recently wrote about one such router: . But there is one caveat: not all devices.
New phones, tablets, and laptops that are already going on sale most likely already have support for Wi-Fi networks at the new frequency. But older devices do not support it. This can be easily found out from the characteristics. But this is not a problem, since all dual-band routers broadcast a wireless network at a frequency of 2.4 GHz. So older clients will be able to connect to it.
Not only is the 5GHz network now almost completely free of interference, but also according to the 802.11ac standard, the speed is higher than 802.11n. If at 2.4 GHz maximum speed 300 Mbps, then at 5 GHz there are already 433 Mbps (for Tp-Link Archer C20i).
3 Wireless adapter drivers. This method is only suitable for computers and laptops. As I wrote above, the speed also depends on the Wi-Fi receiver that is installed in your computer. In a wireless network, the speed is always matched to the slowest device. No matter how powerful your router is, if you have an old Wi-Fi adapter on your laptop that doesn’t even support 802.11n mode, then we won’t see any great speed.
Replacing a laptop's Wi-Fi adapter is of course problematic. But, you can try updating the driver for this adapter. Perhaps it's already out a new version with various improvements, and after the update we will get an increase in speed.
4 Set the 802.11n operating mode and channel width. If you do not have very old devices that do not support 802.11n, then you can try setting this operating mode in the router settings. As a rule, the default is automatic selection of the operating mode. For greater compatibility with different devices.
You can do this again in the settings of your router, which you can access according to the instructions. As a rule, these settings can always be found on the tab where the Wi-Fi network is configured. This settings item is usually called " Mode", or " Network mode". You need to select " 11n Only" (N Only), and save the settings. This is what it looks like on TP-LINK routers:

On the same page you can also change the channel width (Channel Width). You can try to put 40MHz.

Save the settings and reboot the router.
If after these settings you have problems connecting to Wi-Fi with some devices, then return everything back.
5 It is possible that your router settings have old WPA encryption method. Not only is it unsafe for protecting a wireless network in our time and is already very outdated, but it also tends to limit the speed.
You need to install WPA2-PSK encryption (you most likely already have it installed). You can install correct settings safety according to the instructions. Using D-Link, Tp-Link, ASUS as an example. And in the “Setting up a router” section on our website there are instructions for other devices.
6 The closer to the router, the stronger the signal and the higher the speed. Therefore, try to install the router like this (I will enter the location) so that there is a good signal throughout your home.
And if you have big house, and the router cannot penetrate the signal to distant rooms, then you can install. Or buy a more powerful router.
7 You can try again update router firmware. In new versions of the software, things are improved and finalized. Therefore, after the update, the speed on the Wi-Fi network may increase. We have instructions on our website for all popular manufacturers. I give a link to the instructions, and instructions.
8 Also, do not forget that the more devices are connected to the router, the lower the speed will be. Firstly, the router will simply divide the initial connection speed between all devices, and secondly, from the load that the devices will create on the router, it will reduce the speed even more.
Afterword
Most The best way The solution to this problem is to buy a more powerful and expensive router. And even better, dual-band, so that you can use the Wi-Fi network at a frequency of 5 GHz and get good speed.
Well, if buying a new router is not part of your plans, then be sure to try the tips that I wrote about above. I think there will definitely be some result. Don't forget to share your results on increasing Wi-Fi speed in the comments.
From the Internet. It is especially acute for users who use it outside the city. Today we will talk about how you can increase Internet speed in the Windows 7 operating system.
This method was once tested when the connection to the network was provided via a 3G modem. The connection speed was not always stable and often dropped. Therefore, a solution was made by removing all restrictions set by the operating system. We start by increasing the port throughput speed. To do this, go to “Start”, then go to “Control Panel”, select “System” there. We go to the “Equipment” tab. Here you need to click “Device Manager”, where select “Ports (COM and LTP)”. The content immediately expands, where you need to find “Serial port (COM1)”, after which, using the right button of your manipulator, select “Properties” and, after a new window has opened, click on the “Port parameters” tab. There we find “Speed” and select 115200, then Ok. This completes the procedure for increasing speed. By default it is 9600 bits per second.

It is very important to take into account one nuance here, namely, which port is used to connect the modem. It's very easy to find out. Go to the “Control Panel”, then go to “Phones and Modems”, where you find the “Modems” tab, the port will be indicated here. If you don’t know the name of your modem, do this: double-click on the connection icon, which is located on the desktop. On it, right-click the manipulator, select “Properties” and the “General” tab. A window will appear in which the modem used, and in some cases the port, will be indicated. You can also do the following: click “Start”, select “Connections”, after which a list of all connections will be displayed. Find yours and see the properties.

Next, to increase your Internet speed, you need to increase your connection channel. Click “Start”, select “Run”, where you enter “gpedit.msc” and click Ok. In the window that appears, find the item called “Computer Configuration” and select it. Now you go to “Administrative Templates”, then “Network”, then “QOS Packet Manager” and finally “Limit Backup Bandwidth”. Now in the tabs find “Option” and select “Enabled”. Look carefully at the “Bandwidth Limit” dialog box that appears, in which you select the value “Zero percent” instead of twenty.
Using this method, I was able to increase my Internet speed by more than twenty percent. I am sure that you will succeed too. If you are using a wireless connection, you must skip the point about increasing the port speed. In this case, you will be able to increase your Internet speed by exactly twenty percent. There are still several ways to do this using some programs, but this is a separate topic for discussion.
Most of us want to increase the speed of the Internet, but few people know that the speed of the Internet connection depends not only on the provider. To begin with, I recommend fine-tuning your computer to increase Internet speed. I will show you in more detail in my video lesson, which you can watch below.
We increase Internet speed by disabling the 20% reserve that is reserved for the Windows system (circled for system updates and other unnecessary nonsense).
Increase internet speed windows 7, 8, 10
Disabling the restriction
The first thing you need to do is disable the default settings. The settings described below will give you a 20% increase in Internet speed.
1. Go to – “Start” – “All Programs” – select “Accessories” – click “Run”
2.In the window that appears, enter the command – “gpedit.msc”
3. Go to “Computer Configuration”
5. Go to the section – “Network”
6. We need a folder – “QoS Packet Scheduler”
7. Select “Limit backup bandwidth”
8. In the window that opens, set “Enable”, and in the bandwidth limit field set the value to 0% - then click “OK”
How to increase internet speed
Setting up COM and LPT ports
Correctly configuring your ports will give you an increase of about 7.5% of the rated speed. After all, initially the ports are not configured for maximum throughput; as a rule, 9600 bits/second is set.
2.Right-click the auxiliary menu and go to “Properties”
You will be shown a list of all devices installed on your computer. In this list we are interested in ports. So, to increase the speed of your Internet connection, in the “Ports” section, on the port called “Serial port COM 1”, right-click on its properties.
Hello, dear users! I think you will agree with me that every user wants to get the most out of their computer, and this also applies to Internet speed.
If you asked yourself this question: “How to increase Internet speed?”, it means that the standard speed, of course, is not enough for you. In this material I will explain in detail how to increase this parameter in such operating systems as Windows 10 and 7. I will say right away that my article today is designed for two popular versions of operating systems, although they should also work on the “eight”, but I Of course, I didn’t check there, but I still think that today’s methods for increasing Internet speed will also work on eights. All instructions contain supporting screenshots, so any novice user can increase Internet speed.
So, first of all, it will be necessary to note that after studying this material, you will receive answers to the following questions:
— How to remove speed limits in Windows 10 and 7.
— How to remove speed limits in individual applications in Windows 10 and 7.
— Is it possible to increase traffic by disabling programs in Windows 10 and 7.
— How to launch Turbo mode in browsers (Opera and Yandex).
— How to update the firmware.
— Speed test.
IMPORTANT! Browser-specific instructions apply to all versions of Windows.
1. Remove speed limits in Windows 10
By default, the speed limit in the “ten” is 20%. It is performed by reserving communication channels, the option starts automatically. We won’t go into details about why this is needed, our task is to disable restrictions.
The process goes according to the following scheme:
We go to “Start” and find the “Run” menu - you can enter this word in the search bar. Open the menu and enter the gpedit.msc command there, after which the “Group Policy Editor” will open.
In the upper left corner you will see sections - go to “Computer Configuration”, and then click on the “Administrative Templates” tab, then go to “Network” - “QoS Packet Scheduler” - “Limit Backup Bandwidth”, all these actions are displayed on screenshot below:

In this window, you need to set the marker opposite the “Enabled” position; now go to the “Restrictions” field and enter the value “0”. Click the “Apply” button, and then confirm the action by clicking on “OK”.

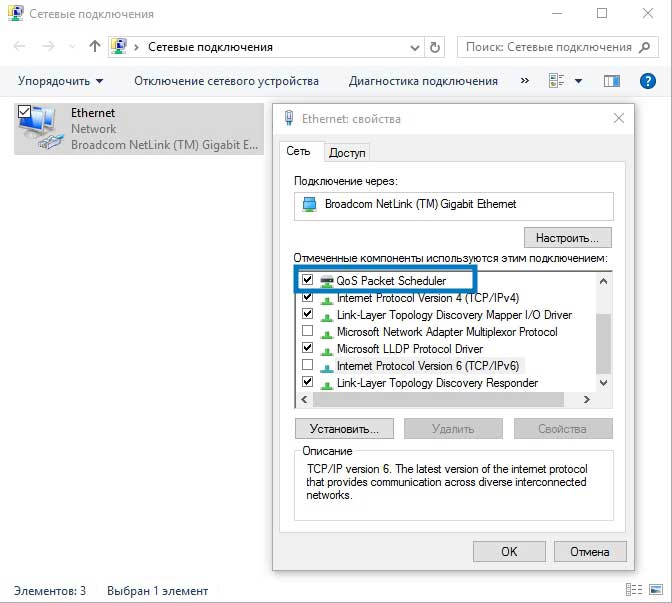
Now you need to check if the QoS scheduler is present on your network connection. To do this, go to the “Control Panel”, then to the “Network Control Center” - “Change additional settings”. access settings" and select the adapter through which you are using the connection (it will be active, not gray). Now go to “Properties” and check if the “QoS Packet Scheduler” option is checked.
Check the box if it has not been checked before. Done, now the speed will increase. I would also like to say before I forget that in one of my previous articles I already considered the question: How to find out the Internet speed. In it I brought basic concepts about speed, how it is measured, how it is calculated, etc. I recommend you read this article first:
How to increase Internet speed on your computer?
How to increase Internet speed in Windows 10?
2. We remove restrictions in Windows applications 10
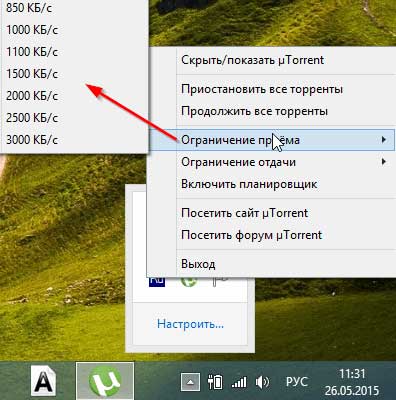
We need speed not only for opening in the browser, but also in individual programs. What immediately comes to mind among users from the CIS? Of course, torrent! Let's look at how to increase download speed using the example of the most popular uTorrent downloader.
Open the tray where the uTorrent client is minimized.
Right-click on the program icon. Go to the “Reception limitation item” - click on the “Unlimited” item to use the maximum Internet speed to download files.
Most likely, you already have this mode set. In any case, it's worth checking out. In exactly the same way, you can increase the speed in similar downloaders. As you can see, the process goes quickly. In general, I have already talked about torrenting in more detail in these articles:
Interesting! The uTorrent client is the most popular for a reason. It provides maximum connectivity while having a simple interface. And the most important advantage is the presence of all the necessary functions for downloading and uploading files in the free version of the application. You can download the client on the official website - choose the free version (Free).
3. Check which programs are using traffic in Windows 10
Perhaps some applications are using your traffic, hence low speed Internet connection. This could be sending statistics or downloading updates, transferring data, etc. We will check this in the “Task Manager”. You can learn more about task manager from this article:
You can call it using the key combination “Ctrl+Alt+Esc” or right-click on the desktop and select “Task Manager” from the context menu.
In the window that opens, go to the “Processes” tab, then click on “Network”. The screenshot shows an example with running applications that use traffic. For example, uTorrent requires the most speed, which is not surprising, followed by the browser. Other programs and services do not use the Internet.

So, how else can you increase your Internet speed and what will you need to do to do this?
If your Internet speed suddenly drops to a minimum, then you should check your computer for viruses. There are malware that takes up all the traffic. As a result, you cannot open pages normally, watch videos or download files. Use a reliable antivirus (it may be free) to make sure that the slowdown is not due to viruses. If you don’t know which antivirus is best today, I recommend that you read this post:
4. Launch Turbo mode in the browser (suitable for all versions of Windows)
Modern browsers are equipped with an excellent feature that significantly speeds up opening sites. Turbo mode is available in the two most popular browsers - Opera and Yandex browser. As for other browsers, you need to use special extensions in them. For example, for Chrome there is a “Data Saver” extension in the plugin store. Install it and enjoy instant display of information on web pages.
Opera browser
Go to the browser, click on the Opera icon in the upper left corner and select “Opera Turbo”. Place a checkmark next to it, as shown in the screenshot below:

Done, now check the result. After activating this mode, pages on the Internet will open much faster.
Having opened the browser, we need to go to the “Settings” section and then click on “Show advanced settings”. Here you will see the “Turbo” block, check the “Always on” option.

There is no need to restart the browser, the function will immediately start working after activation - we enjoy the instant opening of pages.
5. Firmware update
This section is relevant for users who use a Wi-Fi wireless network to connect to the Internet. If your speed has dropped, then perhaps the router firmware is to blame. I recommend updating it. To do this, you need to find out the router model, and then go to the manufacturer’s website.
In the future, I think I’ll look at the router firmware in more detail. Therefore, be always up to date, and for this, if you have not yet subscribed to my news, I recommend doing so right now. Here is an article on how to do it correctly and best:
In the special column, indicate the model you are using. After this, a page with drivers will open. Download latest version, and install it on your computer. Then the computer should be restarted. After turning it on, you may have to enter the password again to connect to the router. Most likely, the Internet speed will increase after updating the firmware.
6. Check the result of increasing Internet speed
So, we have considered all the necessary ways to increase Internet speed and now it’s time to check the above procedures. I recommend checking your speed before and after following my instructions. Of course, there are many applications for connecting speed tests, including free options. But if you need to perform the check several times, then why install programs. You can test your connection speed directly on the website.
One of the most popular testing services is Speed Test. Follow the link http://www.speedtest.net/
The site is in Russian, so you will quickly understand the controls. You only need to click one button – “Start scanning”.
The program will conduct the test and give you the results in a minute. For example, the operator claims that the speed on your tariff is 50 Mbit/s. And the service showed 25 Mbit/sec.
You can also track how the indicator has changed after following the instructions from this material. It is possible that the result will be insignificant. This suggests that you initially had high Internet speed. I also recommend using the Yandex service for these purposes https://yandex.ru/internet
In addition to speed, the program will show you other useful parameters. For example, IP address. You will recognize the outgoing and incoming connection. I also suggest that you watch the following video: how to increase the Internet speed on your computer.
If your performance is approximately the same, then the speed is quite good. You should be able to download large files without difficulty. With uTorrent, my files are downloaded at a speed of 10 MB or higher.
Concluding today’s post – “How to Increase Internet Speed”, I hope this material was useful for you and now you are not experiencing lack of internet speed. If the instructions did not transfer the expected results, then it’s time to call your provider.
Almost every user wants the speed of his computer’s connection to the World Wide Web to be as high as possible. Particularly relevant this question is for low-speed data networks where, as they say, every KB/s counts. Let's find out how to increase this indicator on a PC running Windows 7.
It should be noted right away that it is simply impossible to increase the Internet speed parameters beyond those that the network bandwidth can provide. That is, the maximum data transfer speed announced by the provider is the limit above which you cannot jump. So don’t believe various “miracle recipes” that are supposedly capable of speeding up the transfer of information significantly. This is only possible when changing providers or switching to another tariff plan. But, at the same time, the system itself can act as a certain limiter. That is, its settings can reduce bandwidth even below the level set by the Internet operator.
In this article, we will explain how to configure a Windows 7 computer so that it is able to maintain a connection to the World Wide Web at the highest possible speed. This can be done either by changing certain parameters within the operating system itself, or by using some third-party programs.
Method 1: TCP Optimizer
Exists whole line programs that are designed to optimize the settings for connecting your computer to the World Wide Web, which, in turn, leads to an increase in Internet speed. There are quite a few such applications, but we will describe the actions in one of them, which is called TCP Optimizer.

Method 2: NameBench
There is another application to speed up the speed of receiving data from the network - NameBench. But, unlike the previous program, it does not optimize the computer settings, but searches for DNS servers through which communication will be as fast as possible. By replacing existing DNS servers in the connection properties with those recommended by the program, it is possible to increase the speed of loading sites.
- After downloading NameBench, run the installation file. It is not necessary to have administrative rights. Click "Extract". After this, the application will be unpacked.
- In field "Query Data Source" the program itself selects the browser that is most suitable in its opinion, which is installed on this computer, for testing. But if you wish, by clicking on this field, you can select any other web browser from the list. To start searching for DNS servers, click "Start Benchmark".
- The search procedure is in progress. It may take a significant amount of time (up to 1 hour).
- After the test is completed, the browser that is installed on your computer by default will open. On his page, the NameBench program is in the block "Recommended configuration" will display the addresses of three recommended DNS servers.
- Without closing the browser, perform the following manipulations. Click "Start", sign in "Control Panel".
- In the block "Network and Internet" click on the position "View network status and tasks".
- In the window that appears "Network Control Center" in the parameter group "Connect or disconnect" click on the name of the current network, which is listed after the parameter "Connection".
- In the window that appears, click "Properties".
- After launching the window in the component block, select the position "TCP/IPv4". Click "Properties".
- In the window that appears in the section "Are common" Scroll to the bottom of the options. Set the radio button to position "Use the following DNS server addresses". The two bottom fields will become active. If they already have some values, be sure to rewrite them, since some operators only work with certain DNS servers. Therefore, if, due to further changes, the connection to the World Wide Web is lost, you will have to return the old addresses. In field "Preferred DNS Server" "Primary Server" browser. In field "Alternate DNS server" enter the address that is displayed in the area "Secondary Server" browser. Click "OK".


After this, the Internet speed should increase slightly. If you cannot access the network at all, return the previous DNS server settings.
Method 3: Set up a package scheduler
The value of the parameter being studied can be increased by changing the packet scheduler setting.
- Call the remedy "Run", applying Win+R. Enter:
Click "OK".
- A window opens "Local Group Policy Editor". In the left area of the shell of this tool, expand the block "Computer Configuration" and click on the folder name "Administrative Templates".
- Then move to the right side of the interface and click on the folder there "Net".
- Now enter the directory "QoS Packet Scheduler".
- Finally, after going to the specified folder, click on the item "Limit reserved bandwidth".
- A window opens with the same name as the item we previously clicked on. In the upper left part of it, set the radio button to the position "Turn on". In field "Bandwidth Limit" be sure to set the value «0» , otherwise you risk not increasing the speed of receiving and transmitting data over the network, but, on the contrary, reducing it. Then click "Apply" And "OK".
- Now you need to check whether the packet scheduler is enabled in the properties of the network you are using. To do this you need to open a window "State" current network. How this is done was discussed in Method 2. Click on the button "Properties".
- The properties window for the current connection opens. Make sure that opposite the item "QoS Packet Scheduler" the checkbox was checked. If it is standing, then everything is in order and you can just close the window. If there is no checkbox, check it, and then click "OK".


After this, you will most likely receive some increase in your existing Internet speed.
Method 4: Setting up a network card
You can also increase the speed of your network connection by adjusting the power supply of your PC's network card.
- Navigate using the menu "Start" V "Control Panel" just like we did above. Go to the section "System and safety".
- Next in the settings group "System" go to item "Device Manager".
- Window opens "Device Manager". On the left side of the window, click on the item "Network adapters".
- A list of network adapters installed on the computer opens. This list may contain one element or several. IN the latter case you will have to perform the following operations on each adapter in turn. So, click on the name of the network card.
- The properties window opens. Move to the tab "Power Management".
- After the corresponding tab is open, check the checkbox next to the item "Allow the computer to turn off this device". If the mark is present, it should be removed. Also, if available, uncheck the box "Allow this device to wake the computer from sleep mode", if, of course, you have this item active at all. Click "OK".
- As mentioned above, perform this operation with all elements that are located in the group "Network adapters" V "Device Manager".


If you are using a desktop computer, negative consequences There will be no steps after applying these steps. The function of waking up a computer from sleep mode using a network card is used very rarely if you need, for example, to communicate remotely with a switched off computer. Of course, when you deactivate the ability to disable the network card when it is not in use, power consumption increases slightly, but in reality this increase will be minimal and will have almost no effect on the level of power consumption.
Important: For laptops, disabling this function can be quite significant, since the rate of battery discharge will increase, which means the period of operation of the device without recharging will decrease. Here you will need to decide what is more important to you: a small increase in Internet speed or a longer operating time of the laptop without recharging.
Method 5: Change the power plan
You can also achieve a certain increase in the speed of data exchange with the World Wide Web by changing the current power plan.


The fact is that in economy mode or in balanced operation mode, the supply of electricity to the network card, as well as to other system components, is limited. By performing the above actions, we thereby remove these restrictions and increase the performance of the adapter. But, again, it is worth noting that for laptops, these actions are fraught with an increase in the rate of battery discharge. Alternatively, to minimize these negative effects when using a laptop, you can switch to a higher performance mode only when directly using the Internet or when the device is connected to an electrical outlet.
Method 6: COM Port Extension
You can also increase the connection speed on Windows 7 by expanding the COM port.


Thus, the port capacity will be increased, which means the Internet speed will also increase. Particularly useful this method is when using high-speed networks, when the provider provides a higher connection speed than the one for which the computer’s COM port is configured.
You can also give some general tips that will improve your Internet speed. So, if you have the choice between a wired connection and Wi-Fi, then choose the first one, since a wired connection operates with less loss than a wireless one.
If it is not possible to use a wired connection, then try to place the Wi-Fi router as close to the computer as possible. If you are using a laptop that is not connected to the mains, then, on the contrary, you can position it closer to the router. Thus, you will minimize losses during signal transmission and increase Internet speed. When using 3G modems, place the computer as close to the window as possible. This will allow the signal to pass as freely as possible. You can also wrap the 3G modem with copper wire, giving it the shape of an antenna. This will also provide a certain increase in data transfer speed.
When using Wi-Fi, be sure to set a password for the connection. Without a password, anyone can connect to your point, thereby “taking” part of the speed for themselves.
Be sure to periodically, using not the standard antivirus, but specialized utilities, for example. The fact is that many malicious programs use the computer to transfer data to its “master” and other manipulations through the network, thereby reducing the connection speed. For the same reason, it is recommended to disable all unused toolbars and plugins in browsers, since they also transmit and receive information that is often useless to the user through the network channel.

Another option to increase your target is to disable your antivirus and firewall. But we do not recommend using this method. Of course, antiviruses somewhat reduce the speed of receiving data by passing it through themselves. But by disabling the protection tools, you risk picking up viruses, which in turn will lead to the opposite of the desired effect - the Internet speed will decrease even more than with the antivirus program turned on.
As you can see, there is a fairly wide list of options to increase Internet speed without changing tariff plan and provider. True, you shouldn’t delude yourself. All these options can only provide a relatively small increase in the value of this indicator. At the same time, if you use them in combination, and not limit yourself to using any one method, you can achieve significant results.