How to draw a person's nose with a pencil
Drawing a nose, step by step.
If you decide to draw a person’s face, it is important, first of all, to correctly draw the person’s eyes, but not only. There are no “little things” in a person’s portrait. All facial features must be drawn accurately, including the nose must be drawn correctly and beautifully. In this lesson you will be able draw a person's nose step by step. Nose drawing done with a simple pencil.
1. Let's start drawing the nose with simple markings

Every person has a nose unique features, therefore, it is impossible to give precise advice on how to draw the nose of a girl, child or man. You can only make an abstract or, as they say, “academic” drawing of the nose. This is exactly the version of the nose that I suggest you draw. I hope there is no need to explain how to draw these two lines.
2. Contours of the “wings” and bridges of the nose

The human nose consists of “wings” and the bridge of the nose, and it is these contours that need to be drawn in this step. The segment of the width of the “wing” in my drawing is equal to exactly half of the perpendicular line from the beginning of their intersection. You need to draw the nose carefully, accurately observing the proportions.
3. The nose takes on a real shape

After precise preliminary marking of the drawing, drawing the nose correctly and beautifully will be easy. You can see for yourself that it’s not at all difficult to draw further. Outline the streamlined shapes of the wings of the nose. Draw two lines from the bridge of the nose and draw the tip of the nose.
4. Lesson "How to draw a nose" is almost finished

At this step, remove the extra contour lines, and you will get a real academic nose, all that remains is to draw a few small details. Be prepared to have to adjust the final shape of the nose in the drawing several times. Drawing a nose is not difficult, but the slightest inaccuracy leads to the fact that the nose will become “plump” like Santa Claus or thin and skinny like Baba Yaga.
5. How to draw a voluminous nose

This stage of drawing and the next one will consist of only one thing. You need to apply shadows with a soft, simple pencil so that the nose looks voluminous, like in a painting by real artists.
6. How to draw a person's nose. Final step

When to draw a nose, at the beginning of the drawing of a person's face or at the end? Usually, when drawing a nose at the end of a lesson, the nose turns out to be distorted, either too small or, on the contrary, large. The eyes and nose are the most important elements of drawing a person's face, so it is better to start drawing with them. You can correct the chin, ears and even lips, but if you didn’t “get it right” with the nose and eyes, the person’s portrait will not look like anything.


- Drawing a nose, step by step.
If you decide to draw a person’s face, it is important, first of all, to correctly draw the person’s eyes, but not only. There are no “little things” in a person’s portrait. All facial features must be drawn accurately, including correctly and beautifully...
- We draw a portrait step by step (option 1).
Drawings of a person's face, a portrait is the most complex look visual arts. Learning to draw a portrait of a person correctly, even with a simple pencil, requires not only time to learn, but also talent. The difficulty of drawing a portrait of a person lies in the ability...
- Drawing Easter eggs, step by step.
1. First of all, using simple shapes, designate the space occupied by the future drawing 2. About two-thirds of the resulting quadrilateral will be occupied by the basket 3. Draw an elegant napkin and handles of the basket 4. Next, you can draw eggs. They have to...
- Drawing spring, step by step (option 2)
This landscape is a wonderful drawing for nature lovers. Follow the red lines in each illustration to find out exactly what to draw in this step. The lines drawn in the previous steps are highlighted gray. I will show you...
- Drawing lips, step by step.
This lesson presents several diagrams of how to draw a person's mouth with a pencil step by step. First you need to draw the guides, the middle of the lip and the ends. Then we draw out the very shape of the lips and apply shadow.
First of all, I want to say that I usually draw noses differently. For me this is a normal process and I don’t even think about how it’s done. I usually draw, change, redraw several noses until I choose one I like. Besides, I never draw lines, I just imagine them. I'm just trying to explain how it can be done differently.
Step 1 – Placement and Angle
One way or another, let's start by drawing the main features of the face - the most important thing is to decide such nuances as the light source, and what kind of nose you want to draw. Don't try too hard, leave the drawing raw. Usually when I draw the nose, I draw out the rest of the facial features at the same time, but for now I'll leave them as they are.
Step 2 – decide on the shape

On a separate layer draw an oval dot exactly between the eyes. . Then follow the slightly curved line down and draw a triangle like in the picture. Adjust the triangle to the shape and angle of your face. If it is not shown in profile, or in full face, it will be slightly smaller on the side of the face, and as if turned away from us. As shown in the picture below.
Let's draw two a little curved lines from the top point. The end of one line should touch the point directly opposite the vertex of the triangle, the end of the other should touch its left corner. . When you did this, you sort of separated the top of the nose. The most common mistake here is to draw this part very flat, as if the nose is made of pieces of plastic glued together. The borders should be smooth and there won't be any rough dark lines left when we're done. Never leave dark lines unless you are drawing some kind of drawing.
Step 3 – developing the form
The next thing you need to do is understand that the tip of the nose should not be sharp and flat as in the sketch. It should be rounded. Moreover, the shadow under the nose will by and large not look like a triangle. Therefore, you need to soften its shape, outline it as a wave on top, as in the picture. (You don’t need to draw a red line, you just need to give the upper border of the triangle the shape of such a wave). When you have done this, flip the image horizontally to check that everything is done correctly.


Now fill in the point you drew before. It's better to make this area brighter than the entire nose. Also, soften the dark lines a little with more light color, and draw a semicircle from the right corner of your former triangle to the middle right line, as in the picture. .
Now you have already drawn the bridge of your nose and top part nostrils (usually this part is not so noticeable, but we will work on it later).

Now you need to draw side nose To prevent this area from looking flat, draw a line from the top of the dark line at a slightly downward angle, and then straight down to the triangle, as shown in the example. Do not draw red lines!! Only black ones.
Step 4 – create a nose from lines.
Now we need to sketch the area that we outlined in the previous step. Don't be afraid to sketch in the outline of the nostril or other lines - paint this area with a lightly shaded shade. In this picture the shadow is not too obvious - I advise you to make the shadow soft. As you can see in the picture, I did not completely paint over the outline of the nostril; they are visible, but only slightly.


Enlarge the image and paint over the dark lines. You also need to work on the triangle. The right nostril should follow the shape of the top line of the triangle. Also make a smooth transition from dark to light. . Don't change anything except the area of the triangle and the area you painted.

Continue doing the same until you have completely filled in the dark lines. And instead of a sketch, you will get a completely realistic nose. Instead of defining the boundaries of our nose by lines, we define them by changes in color and shadow. You will also see the second nostril, it will look like a shadow on the side of the nose farthest from us.
Step 5 – Light and Shadow


In the previous step, our nose still looks a little flat. To fix this, carefully distribute light and shadows throughout light nose tones. Define the highlight on the tip of the nose - but don't make it too noticeable, then define the line of the nostril and the angle of the tip of the nose, not with lines, but with colors. I chose the color for the light areas from the area on the bridge of the nose - since it is surrounded by shaded areas , it should be brighter.
At this stage, the appearance of the tip of the nose is determined - depending on where you marked the highlight on it, the shape of the nose will change. It's very interesting to watch. Try changing its position until you find a place where the shape of the nose is exactly what you want.
An enlarged picture of our changes shows a nose with a fairly clear shape and outline. The difference between the color and brightness of the cheeks and nose allows you to see where the nose “rises” from the face.
This time we are learning to draw a nose.
1. Let's start drawing the nose with simple markings
Each person’s nose has unique characteristics, so it is impossible to give precise advice on how to draw the nose of a girl, child or man. You can only make an abstract or, as they say, “academic” drawing of the nose. This is exactly the version of the nose drawing that I suggest you draw with me.
I hope there is no need to explain how to draw these two lines.
2. Contours of the “wings” and bridge of the nose
The human nose has “wings” and a bridge of the nose, and it is their contours that need to be drawn in this step. The segment of the width of the “wing” in my drawing is equal to exactly half of the perpendicular line from the beginning of their intersection. You need to draw the nose carefully, accurately observing the proportions.
3. The nose pattern takes on a real shape
After precise preliminary marking of the nose drawing, drawing the nose correctly and beautifully will be easy. You can see for yourself that it’s not difficult to draw anymore. Outline the streamlined shapes of the wings of the nose. Draw two lines from the bridge of the nose and draw the tip of the nose.
4. How to draw a nose. The drawing is almost ready
At this step, remove the extra contour lines, and you will get a real academic nose; all that remains is to draw a few small details.
Get ready to have to adjust the shape of the nose in the drawing several times. Drawing a nose is not difficult, but the slightest inaccuracy leads to the fact that the nose will become “plump” like Santa Claus or thin and skinny like Baba Yaga.
5. How to draw a voluminous nose
This stage of drawing and the next one will consist of only one thing. You need to apply shadows to the drawing with a soft pencil so that the nose looks voluminous, like in a painting by real artists.
6. How to draw a person's nose. Final step
How to draw a nose, at the beginning of the drawing of a person’s face or at the end? Usually, when drawing a nose at the end of a lesson, the nose turns out to be distorted, either too small or, on the contrary, large. The eyes and nose are the most important elements of drawing a person's face, so it is better to start drawing with them. You can correct the chin, ears and even lips, but if you didn’t “get it right” with the nose and eyes, the person’s portrait will not look like anything.
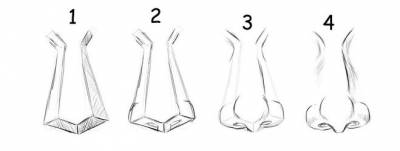
As an example, we will use the so-called Nubian nose - long and wide at the base.

Let's start with the proportions of the nose. They are shown in the first picture. The ratio between the height and width of the nose should be approximately 1.5:1. Let's draw approximate boundaries within which it will be located. You don’t have to make the lines so bold so that it doesn’t look like it’s in a frame. Just a couple of light strokes are enough to make it clear, or just imagine it in your mind.

Let's draw a curve in the bottom middle - the base of the nose. And two small convolutions at the edges for the nostrils. Of course, each person has different noses (thicker, wider, narrower, longer), so you shouldn’t limit yourself in choosing these parameters.

Now we draw the contours of the nose, the so-called “wings” on the sides. Make them curved at the bottom and fairly flat towards the top. Their size should fill a little less than a third of the entire length of the nose.


Lightly apply the main lines in the center, as well as the lines where the nose meets the face. It is difficult to copy from a photo, because in reality there are no clear contours, so you need to learn the basic techniques for drawing a nose with a pencil.

Applying darkening in those places where clear lines are not visible will help solve this problem. Start adding shadows in those places as shown in the following pictures:


Fill the nose holes with black, starting from the top corner. Then draw two small lines below the sides of the nose to create a smooth transition to the lips.

Now carefully add shadows to the edges of the nasal wings and the tip of the nose, as well as a small area below the wing of the nose.
Our nose is ready:

How to draw a person's nose
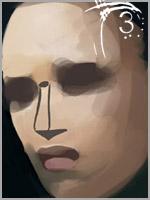
Any drawing begins with a sketch on paper. I sketch a human nose with a pencil - these are just a few lines in order to correctly position the drawing on the paper and see the contours of the nose.
After I made a sketch in the lesson on how to draw a nose, I need to indicate the shadows, without which the drawing would be flat and not beautiful. Shadows add volume, and when I draw a shadow, I always use light shading, it makes the shadows soft and the drawing more pleasing to the eye.
The sketch is ready, the shadows are indicated, and I begin the detailed drawing of the nose. I erase the unnecessary details of the sketch and draw the contours more clearly. I also draw the darkest part of the drawing - the nostril. For more detailed drawing of the nose, I use light pencils marked H, and a dark pencil 3B for the nostril.
The next step is to begin drawing the transitions between the shadows. I detail the drawing, displaying the transitions of light and shadow, in other words, I soften the drawing.
The drawing of the human nose is ready, but to make it look even more beautiful, I will draw a few more shadows around it - shadows above the lips and near the eyes.
HOW TO DRAW A NOSE?
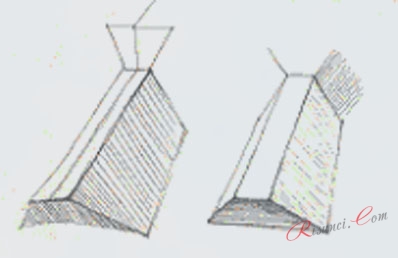
Take a ruler or by hand (if your hand is well trained, of course) draw an even shape as shown in the first picture. Color the bottom a little with a pencil and then give it the desired look.

Draw the same as in the first one, but only shade the bottom and right side.
This stage of drawing the nose in profile, we do everything that was in the first stages.

Let's start with the planes. The volume of the nose, as we already know, can be determined in a pyramid (or, in other words, a prism).
It makes it very easy to understand proportions. So, we have a pyramid. The structure of the nose, like the eyes, has general structure- all sorts of bones, muscles, cartilage. Now let’s look point by point at what to do next:
First, we check, verify, and calculate the basic proportional values.
Then we define general shape, its dimensions, so to speak: length, height, width.
Now let's start marking the brow ridge, the length of the nose prism, its width in the area of the bridge of the nose, wings, the front plane with the tip of the nose and the bridge of the nose itself. All this can be done using the already studied and such useful design points. They are located symmetrically to the axis of symmetry, which divides the nose into two equal halves. These points are paired and are located in the following places: points on the upper surface of the nose are located at the level of the bridge of the nose and the tip of the nose, points on the lateral surface - at the level of the inner edges of the lacrimals and the corners of the edges of the wings of the nose.
Simplified nose shape
If you bypass the enumeration of all the cartilage and simplify the shape of the nose, changing it only slightly to achieve the level of “liveliness,” you will end up with something like this:

After all, since the nose is a living form, we do not have to study its entire structure - we are not doctors. The form that is covered with the skin is enough for us. But, nevertheless, it is up to you to choose how you want to depict your nose - easier or more difficult. For greater clarity, examine your own nose in the mirror. Do you see? The muscles are clearly visible on top of the large cartilages, which look like droplets; the tip of the nose is enveloped by them and then they flow down the lateral cartilages.
The cartilages of the wings are located according to a similar system - they look like smaller drops, which seem to go under the larger ones. But this living form can also be enclosed in a plane - in the sides, bottom and top - and chiaroscuro can be applied to the planes. Everything else can be learned by comparison, after you have become sufficiently skilled in drawing a wide variety of noses, spouts and wear
Most importantly, don't forget about proportional relationships and perspective distortions.

learning to draw a nose with a pencil
|
A special part of drawing is the nose, which is often overlooked by portrait artists. Although this shouldn't happen! If your nose doesn't work out at all, then the whole portrait will suffer. Therefore, we will learn to draw a nose! Three images of a nose |
|
The image in front of you is a regular sketch of a nose. The nose has completely simple shapes: both lines running along the entire length of the nose, a rounded ball that indicates the type of nostrils and nose. |
|
This drawing indicates the initial sketch of the nose, with shadows applied to it. |
|
Here is a completely finished illustration of the nose. In this drawing, the sketch is no longer visible. Here you can notice that the features of the nose are no longer filled with sharp lines, but with shadow. |
|
The illustration above indicates the structure of the nose using red lines. To adjust the appearance of the nose, we raise and lower our red lines. Below in blue color shows how you can draw a shadow that will be located directly under the end of the nose. Occasionally the shadow will be heavier and sometimes a little lighter and softer, but most of the time when lit it will be exactly as shown. |
|
Of course, it is clear that there cannot be much shadow on the side of the nose or on the side of the bridge of the nose, which is more illuminated. In order to avoid making the mistake that beginners most often make, you should not highlight the entire contour of the nose on both sides. This is not beneficial because the outline makes the portrait look completely unrealistic. So it’s better to draw the outline of the nose using shadows. |
|
When you draw or shade around the nose, try to apply less pressure with your pen or hand, because... they require light pressure. These three areas are shown in the figure. In the event that you are drawing a theme that does not contain many sharp shadow transitions on the face, then you should not draw these features too much. In normal cases, you can simply shade it slightly. For example, as shown above. 1) The area marked in blue has an almost invisible shadow and shows the nose from the side. Here the area near the edge of the eye and the area where the invisible “ball” at the nose is located are shaded. Typically where the highlighted side of the nose is, few portraits allow for a little more shading, but not much anyway. When shading, special attention should be paid to the bridge of the nose. In order to ensure the proper illusion of size and depth of the nose, it is usually necessary to shade and highlight the details of the nose in the area dark side, as shown on the left side of this figure. 2) A further area, when working with which you need to press lightly when drawing - the “smile line” highlighted in the image green. This line is usually called the nasolabial fold. On this image you can see a slight smile effect. Imperceptibly downwards, the strokes first weaken and then completely disappear. There are types of faces whose “smile line” is much darker and longer. 3) On the surface of the skin, on the upper lip, from the area of the line located in the middle, a labial groove emanates, which joins the protrusion of the upper lip. In the figure, the groove is indicated in red and is also applied with light strokes. |
|
Also you can't get around special attention white areas near the nose, which are shown in the picture above. As the highlighted image aptly points out, the areas near where the nostrils begin are not delineated in many cases. The pattern will look much rougher if you highlight the entire base of the nose (under the nostrils). Let's pay attention to the area on the side of the nose, located between the beginning of the “smile line” and the nostrils. You don't have to place the "smile lines" directly next to the nostril. Some people have a gap between the nostrils and the “smile line.” Pay attention to this nuance when you begin to depict the area near the nose. In this picture, the space is slightly increased. By paying attention to the various typical characteristics of faces, you will notice this space. |
|
This figure shows the nose in projection at an angle. If our portrait, instead of the front view, is depicted in a projection, then the nose is also in the same projection, and that means it will look at a slight angle. In the picture you can notice a purple line that is located in the very center of the face. To the left of the purple line is a section of the nose sketched with red lines. On the other side of this line there is a blue shading that indicates the nostril areas. IN in this case, the nose is drawn turned, and does not look symmetrical on any side at all. Green color indicates that the edge of the nostril lives approximately on the same line on which the corner of the inside of the eye is located. Likewise, when viewed from the front, they will be located on the same line. I used an orange line to indicate how the edge of the nostril should be drawn in relation to the center of the mouth. Although different people various shapes nose or mouth, they are mainly depicted in this way. The girl depicted in the picture does not have a very large or very wide nose, however, we will apply the “line method” to her. Those who are just starting to master drawing techniques depict their noses as too narrow. To achieve a successful nose width, pay special attention to this. |
|
Look at the purple nose. This indicates how far away it is from the face. Don't be afraid to draw it. Feel free to experiment with your nose, but don't change its length too much. Keep in mind that if the noses you draw are the same length, they will look completely unrealistic. Since people different faces, then their noses should be different. Depict them as closely as possible to the original. The proportions of your nose must be respected. As you can see from the two red and two purple lines above, the length is not that much greater than the width. Not everyone has the same size. However, some of the artists draw the nose either too long or very short. Mainly, your portrait should be realistic. |
|
Draw a nose with a pencil, step by step: 1) First, draw a sketch of the nose. The lines on the sides of the nose should not be darkened. One side is usually shaded more than the other. 2) Now you need to shade the base of the nose and its side that lives in the shadow. Mark the nostrils in the drawing. Next you need to shade the nostril that is in the shadow. 3) Finish shading the nose. Using soft shading, we highlight the areas of the roundness of the nostrils and the area of the “ball” of the nose. |
Drawing the nose from the front view
Let's look at how to draw a nose with a pencil, step by step.
- The first thing you need to decide is what kind of nose you want to draw. There are many types, sizes, shapes and even designs of the human nose.
- First try to draw the nose that you are looking at from the front. Draw a two-dimensional triangle or a pyramid-like figure.
- This sketch shows the third stage. Draw more clearly the lines of the bridge of the nose, and also sketch out the nostrils and the tip of the nose.
- When the sketch is ready, look carefully at the drawing again. Erase all unnecessary lines, and also decide on the size of the nose. Apply the desired shadows to the nostrils, eye sockets and a little on the bridge of the nose. Your nose will look incredible.
Drawing the nose from the side view
Now let's try to figure out how to draw a person's nose, viewed from the side.
- In order to draw a nose from the side or if you want to depict a person's face in motion, you need to start with the following. Draw the shape of a half diamond, as shown in the figure, and then move on to the sixth point.
- The nose that we are trying to draw will turn out to be straight and rough, more suitable men or women with large facial features. Draw a thicker line on the bridge of the nose, smooth out the corners at the tip and depict a nostril.
The pinnacle of artistic skill is the depiction of a person. Probably because his body has too complex a structure compared to other creatures. It's not easy to draw his appearance. Of course, for most people, the problem is the correct transfer of body proportions, as well as the symmetry of the pattern. But if you delve into the details, then the most the hard part human image is the face. They say that it only seems to us that a person’s head is symmetrical; in fact, everything is not so. Our eyes are not the same size. One eyebrow may be slightly higher than the other, and the nose is not as symmetrical as it seems. Although it is difficult to notice with the naked eye. In order to learn how to depict a human face, real masters recommend practicing working on its individual elements. This lesson will focus on how to draw a nose.
The importance of each element
There is an opinion that the main attractive detail of the face is the eyes. But this is not entirely true. No matter how beautiful and expressive the eyes may be, a large aquiline nose or a small, inconspicuous nose can easily ruin big picture. That is why it is very important to correctly convey all the features. Whatever the face, beautiful or not, nature created it harmonious. And all its parts fit one another. Therefore, if you draw from life, it is extremely important to convey all the details as accurately as possible. And how to draw a person’s nose remains an important point.
Step-by-step technique
Nature created each person unique, and it is impossible to find two completely identical people on the entire Earth. Each of us is original. It is impossible to establish exact rules on how to draw a woman’s or a man’s nose. But there are a number of tips that, if you adhere to, will help you quickly learn how to depict this part of the face.
First of all, draw two strictly perpendicular lines. These will serve as guides during the process. The horizontal line must intersect the vertical line at the bottom. For those who, before drawing a nose, were interested in anatomy human face, it will not be a secret that the main features of this part are the wings and the bridge of the nose. Starting the actual work, you need to outline the contours of these elements. On this moment We are depicting an abstract nose, so it must have the correct shape and strict proportions. If you make accurate notes from the very beginning, then further work will not be difficult. We outline all the smooth lines of the nose and give it the desired shape. When the main outline is set, remove all additional strokes using the eraser. Be prepared that you won’t be able to draw the perfect nose on the first try, and you’ll have to erase and re-draw the lines several times. At first glance, everything is simple. But any little thing can ruin the design, and the nose will turn out to be too small or aquiline. So be careful. To give your nose volume, you need to apply shadows. For this we use a soft pencil. So we have determined how to draw a nose correctly.

Of course, this is just a test drawing, but get used to the purity of the image. This means don't put too much pressure on the pencil or rub marks with the eraser. In addition, it is better to take high-quality paper. Make sure it is not glossy. This type of paper is difficult to draw on and almost impossible to tint. And the pencil should not be too hard. Otherwise, all the lines will be light and too thin. These unwritten truths need to be remembered not only to learn how to draw a nose with a pencil - they will be useful when depicting any object.

The million dollar question
Many beginners wonder when it’s time to draw the nose: after the eyes or along with the mouth, or do you need to sketch all parts of the face at the same time and then smoothly shape them? There is no right answer. But it’s better not to draw it at the end, otherwise there is a high probability of distorting the entire face. Professionals recommend drawing the nose and eyes at the same time. Moreover, by their location they serve as landmarks for each other. And mistakes in these parts of the face are too difficult to correct.
Now you know not only how to draw a person's nose, but also when. But the key to success is most often the possession of information and the development of skills.

How to draw an anime nose
Anime style has its own rules for depicting a nose, and it cannot be said that they are much simpler than in realistic drawing. Basically, the shape of this part of the face can convey the age or gender of the character. Thus, older people usually have their noses drawn in more detail than younger people. The guys are drawn with its sharp shape. And girls get a small, neat nose. Of course, shadows and highlights play an important role. For detailed drawing, use the same type of auxiliary lines: two perpendiculars. Sometimes only the nostrils are depicted. Remember that if something doesn’t work out, then start drawing with the usual geometric shapes and straight lines, and then smoothly give them shape. There is no need to rush and neglect additional touches. The idea that they will bother you is wrong. Their main goal is to give you the necessary guidance. It's the same as writing on a squared page or on a blank album sheet. There is a difference? The checkerboard will allow you to make the inscription even. Likewise, auxiliary lines are intended to ensure that the drawing is correct.
Don't forget to apply shadows. They add volume and realism to the drawing. In addition, they are depicted based on the light source, and not as they please. Often female nose make it slightly noticeable. And sometimes they don’t draw at all. Guys' noses have more defined contours. And if they are not drawn, then at least a shadow is used. Remember that the image of the nose changes with every turn of the head.

Nose and character
There is a science of physiognomy. She studies different nose shapes and their relationship to a person's character. This science can be useful for those who create their own characters and draw comics. Changing the shape of the nose can also be an indicator of certain emotions. Often you want to portray a cheerful person, but you end up with an angry or sad character. Therefore, to the knowledge of how to draw a nose, it would be good to add some information about facial expressions and physiognomy. So much for the relationship between art and psychology.
In order to become good artist, you need to train your hand all the time. Sketches of any objects or certain fragments of human figures should become a kind of exercise. For example, do you have a question about how to draw a person’s nose beautifully? Feel free to pick up a pencil and try, the main thing is not to be afraid to make mistakes. Athletes also train almost every day in order to achieve success. Everywhere you need to make an effort, and often a lot.
If you are just learning the basics of drawing and trying yourself in the portrait genre, perhaps this lesson will help you figure out how to draw a person’s nose. We will not delve into complex anatomical details, but will try to schematically make this task easier for ourselves.
There are many different techniques and options. Every teacher and every art studio will teach you how to draw using his knowledge and tips. Today we will use a not very complicated diagram and try to draw a person’s nose from the front. If this tutorial is easy for you, try sketching from other angles. Change the angle of rotation, make sure that in your drawings you can “read” whose nose it is: a man’s or a woman’s.
So, how to draw a nose with a pencil step by step?
1. We won’t remind you about pencils and paper here. Let's start drawing. The first step, as always, starts with a sketch. Draw a small circle - this will outline the tip of the future nose.
2. The next step will be the bridge of the nose. Draw two vertical lines up. Yes, it doesn't look much like a nose. But be patient, it will soon begin to emerge.

3. After the bridge of the nose, we move on to the wings of the nose. We outline the future nostrils. You see, it’s already better! Even in this form, the nose is easy to guess.

4. At this stage you need to focus a little. Take a closer look at the drawing, you will see that you need to draw lines from the wings of the nose to the bridge of the nose. We outline the horizontal line of the nostrils - this will be the place of the future highlight at the very tip of the nose. We lower the lines of the bridge of the nose to the line of the nostrils and bend them slightly in the middle towards the base of our initial circle. It may seem a little confusing, but these lines will help you with the next step. Try to draw everything lightly, barely touching the sheet. Then you will need extra lines erase.

5. Now you can move on to creativity. We begin to designate the shadows, without which your drawing will remain flat. Try to develop an academic stroke at 45 degrees and place the strokes close to each other. Here the lines that we outlined in the previous step will serve as a kind of boundaries.

6. Now you need to erase all the lines that bother you, correct the shadows, soften them with your finger or a piece of soft cloth, lightly rubbing along the main lines. Don't get too carried away; if you are not sure that you will rub the pencil correctly, skip this step. However, you can fix everything with an elastic band.

7. Make the shadows a little more contrasting, draw in the nostrils. Correct the bridge of your nose. This is the last step in how to draw a nose.

Your nose is ready! Now you can show others how to draw a nose.
In conclusion, I would like to remind you that even when drawing individual parts face or portrait as a whole, try to maintain proportions, pay attention to the angle of rotation of the head and, accordingly, the nose, do not forget about chiaroscuro. Practice drawing yourself while looking in the mirror. Good luck with your studies!