
- cheeks
- tail
- paw shape


In this lesson we will show you how to draw a fox in different options. First of all, let's try to draw a fox step by step. In particular, let's draw a cartoon fox, like a fox from a cartoon. Below are a few photos showing the stages of drawing.
1. First of all, let's outline the main lines of the future fox - the shape and size of the head, body, tail and paws.
- cheeks
- tail
- paw shape
At each stage, don't be afraid to make bold strokes. If a stroke turns out to be unsuccessful, it can be canceled, covered with a new one, or erased with an eraser.
3. Draw the details of each part of the body. Using simple lines we draw the shape of the ears, fluffy tail, chest, nose and paws.
4. On last stage we correct all areas to the desired level, correct bad places, erase the contours and you’re done
Using this scheme, it will be easy for even a child to draw a fox, because it shows step by step all the actions that need to be done to achieve an acceptable result.
By taking such lessons, you not only develop the skill of drawing a given fox drawing scheme, but also train and develop general skills in seeing the canvas and methodically achieving any result in artistically.
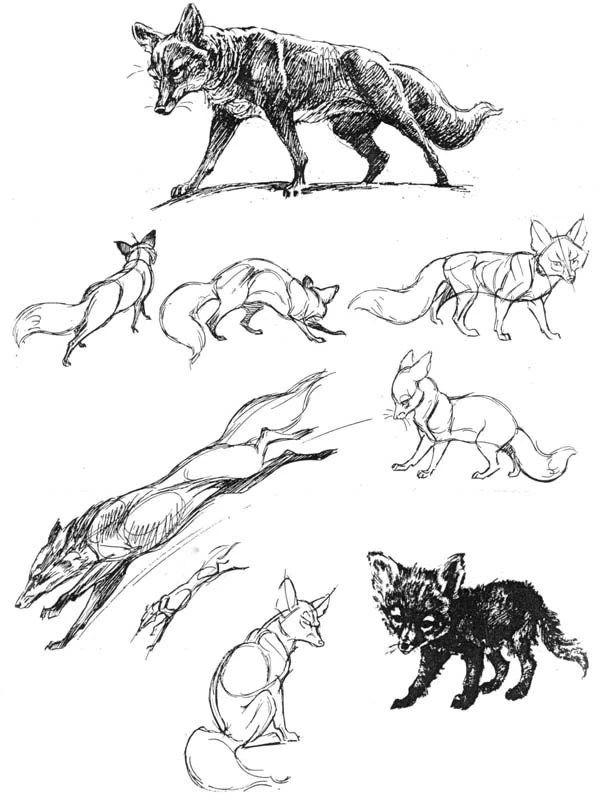
Here are a few drawings depicting foxes, for a general overview of the design features of these forest beauties.
Here is a good picture of how to draw such a fox with a pencil.
6. how to draw a fox for a child 198
Video on how to draw a fox
The video tutorials show the process of drawing a fox with a pencil and brush on a computer. Drawings of foxes in to a greater extent exaggerated everywhere, which is why here we describe how to draw a cartoon fox. The first video tutorial tells you how to draw the face (muzzle) of a fox.
I wish you good luck and success in drawing, friends!
Now we will look at how to draw a real fox with a pencil step by step for beginners. The fox belongs to the canine family, which also includes wolves and dogs.
Step 1. Draw a circle, divide it with straight lines, mark with lines where the fox’s eyes should be, and draw them, then draw the nose and muzzle.
Step 2. First we draw the forehead, then the ears, then the hairs in the ears. We paint over the side parts of the eyes, add lines near the eyes, then draw the fur of the head with separate lines.

Step 3. We draw a mustache, hair on the face, which separates the fox’s color, and a few hairs on the head and below.

Step 4. First we draw the back, then the bottom line, don’t draw the curves too much, because we will erase some of them.

Step 5. We draw the paws and tail of the fox; we do not draw the paws completely, because The fox is standing in our snow.

Step 6. We look at the picture, erase the lines and in their place draw the fur with separate small curves. We also make the tail bushy.

Step 7. We finalize the picture, we also make fur on the legs, draw lines near the legs, showing that the legs have gone deep into the snow, you can also draw a snow mound with blades of grass in the foreground. So we learned how to draw a fox.

It’s difficult to say which elements are easiest to start mastering painting with. Some people advise trying still lifes, others recommend three-dimensional geometric figures, but if we are talking about children, then they definitely need to learn from images that are interesting and understandable to them.
What could be more fun than trying to portray a fairy tale or cartoon character? Red Fox Patrikeevna is an excellent option for creativity and development of artistic skills.
If you are taking the very first uncertain steps in the world of painting, do not take on difficult realistic drawings, especially if you have not made any attempts to draw before. First you need to gain an understanding of composition, proportions, projection, and only after that try to achieve light-shadow transitions and texture imitation. Therefore, the most the best options For training there will be children's cartoons or fairy-tale images.
- To create a sketch, use pencils of medium softness (HB) or soft (H, 2H): if necessary, their mark is much easier to erase. But the final stroke can be done with a hard (B) pencil or even a felt-tip pen.
- Do not press on the lead - it should leave a very light but clear mark. At the same time, it is important to move your hand confidently so that it does not tremble and gives a straight line.
- If you can’t draw basic elements, practice first on a separate sheet of paper. If we talk directly about the silhouette of a fox, then it is dominated by deformed circles.
Before you pick up a pencil, take a look at an example of the finished drawing if you are working through repetition step-by-step scheme, and evaluate the relationship of the main parts, as well as their location on a sheet of paper. This basic and fairly simple rule is often forgotten.
How to draw a fox for children for beginners step by step?
For children's drawing Most often, stylized images are chosen, in which the elaboration of each shadow and hair does not play a special role. Object recognition is based on the silhouette, facial expression, and some characteristic features.

- So, draw a lying oval, left-hand side which should be slightly pointed: it will be a fox nose. Then on top, almost in the center, add a small pointed vertical oval with the corner pointing up. Exactly the same, but more elongated, should be placed to the right, at a distance equal to its width. These will be the ears.
- Now draw a new lying oval, which is the body of the fox: it should be clearly in the center of the drawing (figure) and partially overlap the oval-head - at the top a little less than half its length, and no more than 1/4 of the height. The oval can be absolutely smooth, or you can narrow it slightly towards the right edge, since the animal’s chest is usually more pronounced.
- Often no one has any problems with drawing paws: these are 3 small vertical ovals, equal in height to the height of the far ear. They have the same dimensions and are located approximately at an equal distance from each other, however, between the back and the front it is slightly less than between the pair of front ones. Lying ovals are added to each paw, the underside of which is flat: these will be pads.
- The drawing is close to its completion: now you need to make a tail - first you can draw a vertically reflected letter “C” with an extended lower tip to the right side of the body, and then draw a bend on top. Remember that even fairy fox the tail comes out from the spine, so it should be almost at the same level as the head (joint).
The last details to appear are: an inverted elongated heart in the ear, which shows its shell, an elegant line to the nose, button eyes, a mouth, straightening of the back, “fingers” on the paws. Then the main lines are duplicated with a hard pencil, and the auxiliary lines are erased.
How to draw a fox from fairy tales: job description
We suggest trying an alternative version of this charming animal, which was often found in Soviet cartoons. The silhouette turns out to be quite simple, but much closer to the real one. In addition, there are fewer steps than in the previous scheme. Here the body will become the largest element, the tail is close to it, but narrower, and the head is quite small.

- In the center of the compositional area, draw a horizontal oval that is slightly raised on the left side. There you need to draw smooth circle and connect it to the raised end of the oval with soft diagonal lines indicating the neck. Its height should be approximately 20% greater than the diameter of this circle. Above the head, add ears that look like an elongated letter M - they are located very close to each other, as well as an elongated triangle of the nose.
- Now, at a short distance from the neck in the lower part of the oval, outline 2 front legs, taking into account that the far one should be smaller, and they themselves are concave, since they are under tension. There is only 1 hind leg, it is voluminous in the upper part, and its width takes approximately 1/4 of the length of the lower side of the oval.

- The tail is freely lowered, so it is drawn with soft lines around hind paw in the forward direction, it widens towards the end and then softly tapers. Its tip should stop on the vertical of the far front paw, and the distance is equal to the height of 2 paws. The basic sketch is now complete.
- Now comes the turn of details: start connecting all parts of the animal with smooth lines, Special attention paying attention to the neck, transitions from the chest to the paws, as well as the muzzle. On the tail with a zigzag of different depths you need to show the difference in fur. It is also advisable to designate the white chest, dark lower parts of the paws, and, of course, draw the eyes and nose.
Red-haired cheat, outwitted everyone, fluffy tail - what a beauty! What is her name? ... Probably everyone guessed that today we will talk about how to draw a fox, one of the most beautiful forest dwellers.
A picture of her will be a picturesque decoration in every home. After all, the image of a fox is associated with fairy tales, in which she is always presented laughing, sly, with a mysterious look and sharp ears on the top of her head.
Drawing such a miracle is a real relaxation and pleasure. So let’s sharpen our pencils and start creating from scratch.
The predator went hunting
Let's try to start with a drawing in which the cheat went for food. After all, this beast of prey who laboriously obtains food for himself. Mice, fish, birds - she loves to eat. Let’s begin to depict the clever huntress step by step, following the instructions, because it’s so easy to draw a fox step by step.
The cunning heroine of fairy tales
A serious and wise forest dweller is great, but sometimes you want something fun, like a cartoon image. It takes us to the world of childhood, where there was always a lot of joy and laughter. No matter how old people are, they always believe in miracles. Let's draw a magical hero and travel briefly to a fairy-tale world.Its design is quite simple - several ovals as a base, which just need to be slightly changed in shape to get a cute face, small paws, pointy ears, and a chic tail.
And if you’re not too lazy, after you’ve drawn the fox with a pencil, color it bright colors, then you can make him the main character of your exciting story.

Chanterelle in a couple of minutes
If you are a beginner artist and have picked up a pencil for the first time, then most likely you still doubt your abilities. To strengthen your faith in your abilities, try to portray such a cute red-haired cheat.The job description is available to every student and anyone can handle it without difficulty in literally five minutes. All you need is to be familiar with this geometric figure like a triangle.

Red-haired beauty
The main decoration of a fox is its rich fur coat and, of course, its fluffy tail. It helps her keep her balance when running, keeps her warm in winter and is a source of pride for her. Well, how to draw a fox with a pencil without this bright dignity?In this step-by-step guide, we get a picture in which the huntress appears before us in all her glory.
- We draw three circles of different sizes, which will later become the head and torso.
- We give the muzzle a shape.
- Using strokes we combine the outlines of the animal up to the tail.
- We depict a fluffy tail and add color to the drawing if desired.

Cheerful fox
Such a wonderful little fox with shining eyes will become a great friend and will always delight you with his smiling appearance. His scheme is not easy, but were real winners ever afraid of difficulties?Having gained experience, you can safely begin to conquer higher peaks. Let this prankster be one of them. After sitting and studying the description a little, you will definitely understand how to draw a fox’s face, body, paws and tail with a pencil step by step.
And then all that remains is to paint it with bright, rich shades. And you will definitely get a picture that is no worse, and maybe even better. finished sample. The main thing is to do everything with good mood and bright thoughts.

In that step by step lesson we will learn to draw a fox. If you perfectly know how to draw cats, dogs, tigers or wolves, then you can easily draw a fox, because the drawing techniques are practically the same.
Especially, the fox is similar to dogs, only with a different muzzle and a more magnificent tail. Well, it's time to start drawing the fox.
An example of drawing a fox with a pencil

We will try to analyze the drawing of this fox in as much detail as possible, and we will show you further examples without description.
Stage 1
You can draw a fox in two ways: sketch out its entire body, and then detail it, or immediately draw every part of it in maximum detail. In this example we will use the second method.
Let's start with the muzzle.
Important note, when drawing the circle and face, be sure to leave some space on the sheet for drawing the body.
Draw a circle divided into four equal parts. Then we draw the nose and mouth (almost like cats). Also, while drawing the eyes, try to draw them as similar to each other as possible. For beginning artists, different eyes are one of the main problems. 
Stage 2
We make eye cuts. Around our circle we sketch out the head using arbitrary strokes. Also, at this stage we draw the ears and the fur inside them. 
Stage 3
At the third stage, we add antennae and a little fur under the muzzle to add volume. If you don’t really understand why you add wool here, you can scroll to the beginning or end of this example and look at the finished fox. This will allow you to understand what we are actually drawing. 
Stage 4
Now we have come not to the most difficult part, but to the most important stage. At the fourth stage we sketch the body of our fox. To do this we need to draw two rounded lines. The upper one will create the back and pelvis, and the lower one will create the stomach and chest.
As mentioned earlier, if it is not clear to you where the paws and tail will grow from these lines, you can look at the next stage before drawing them and everything will immediately become clear to you.
Why is this stage so important? It is important because if you draw these lines incorrectly, then your paws and tail may grow from the wrong place and will not look very beautiful. You may even have to redraw this step several times. 
Stage 5
At the fifth stage, we add paws and a tail to our fox. The front legs should be straighter than the hind legs. The tail of foxes should be very fluffy, do not draw a thin tail like that of dogs or cats.
Please note that we did not draw the paws completely. Our fox will stand in the snow, so a small part of its paws will not be visible. 
Stage 6
We cover our fox with fur and make a fox tail tip. 
Stage 7
Draw snow and some grass.
Our fox is ready! Now you can color it. Below we will give a few more step-by-step examples of drawing a fox.
Additional examples of drawing a fox
Example No. 1


Example No. 2


