I don’t dare tell my story, how I painted an autumn landscape in watercolor, a master class... In my opinion, a master class is when you already masterfully draw some kind of plot, have a clear plan of action and have the right to teach it to others.
I paint autumn forests in the open air extremely rarely, it’s good if one or two sketches a year, so every time for me it’s the same search as for a beginning watercolorist.
However, the last sketch turned out to be quite successful, on my Instagram it was a success, and I promised that I would show the stages of writing this sketch. I keep my promise.
Marina Trushnikova "Autumn Forest", watercolor, 22x25 cm
I consider the purpose of this demonstration not only to show you how I painted an autumn forest in watercolor step by step, but also voice your thoughts on why I took this or that step in my work.
I guess understanding "WHY" is more useful than knowing “how the author did it.”
I’ll start with a description of the materials, because someone will ask anyway... :)
Sketch "Autumn Forest". Materials:
I painted on Arshes watercolor paper, 100% cotton, density 300 g/m, Grain Fin texture (medium grain).
Paints "Nevskaya Palitra":
- Indian yellow
- Indian golden
- Venetian red
- Lilac quinacridone
- Blue
- Sepia
- Large round squirrel
- Medium round with thin tip, synthetic
- Thin brush with long bristles (liner brush or needle brush)

What is the difficulty of drawing an autumn landscape with limited space?
That is why I approached the sketch with caution and a readiness to ruin everything...
Let's see how I managed to maintain the integrity of the perception of the painting and not dry out the watercolor.
HOW TO DRAW AN AUTUMN LANDSCAPE WITH WATERCOLOR STEP BY STAGE:
Preparing paper for watercolor painting
I consider this point technologically important.
Through experience, I came to the following option for preparing paper in the plein air: wet the back side of the sketch, wait for the paper to stretch and attach the sheet to the tablet with masking tape. The top of the sheet remains dry.
This way the sheet will not move in waves, the paint will spread evenly inside the layer of paper and will not form sharp boundaries.
At home, I wet both sides of the paper, but in plein air there is no time to wait for it to dry.
Drawing of autumn landscape
Execute easy drawing. IN in this case it's not complicated. It is important to find the ground line and place the main tree trunks.
I paint all the small details immediately with a brush.
I didn’t photograph the drawing because I wasn’t sure of the result. After the first fills, a work plan matured in my head, and I started photographing the stages. Therefore, there will be photos further.
First fill
- I begin to paint a sketch of an autumn landscape from a light layer of the sky behind the trees.
I fill it very fluidly with a gradient from pale blue at the top of the sheet to slightly warm near the horizon line.
2. Below is the surface of the earth. I stretch from a pale solution of Venetian red to its mixture with Indian golden at the bottom of the sheet.
When I paint the earth, I leave gaps between the horizontal brush strokes so that there is an effect of light on the lying leaves. This gives luminosity and airiness.

How to paint autumn trees using spray paint
Since the trees here are in backlight, against the light, the distant leaves glow more, they are light, and the front leaves are dark.
This is very convenient when painting an autumn landscape in watercolor, since in watercolor we move from light to dark.
That's why I draw the crown, gradually increasing the tone of the foliage. I start with Indian yellow, then I give a mixture with Indian golden, and at the end I will paint the brightest crimson leaves simply with Indian golden.
I love this paint from Nevskaya Palitra - it is very rich and allows you to create both light and dark shades of yellow!

And now, pay attention to how I drew the crown to avoid detailing!
I splashed her!
To repeat this trick, take a large, soft brush that picks up a lot of solution, and shaking it, splash the paint onto the wet surface of the sketch.
This method does not allow you to tightly control the image of foliage and eliminates detail.
The paint on damp paper begins to spread out into larger spots.
My second layer of spray is darker and a little thicker, the paint spreads less, the spots are more visible:

But cotton paper makes itself felt - it is still damp inside, and the paint spreads quite well.
To restore more gaps between the leaves, I dab a paper towel onto the damp layer. She dries and selects part of the layer:

When the layer is a little more dry, I spray the brightest purple leaves of Indian aurora.

By the way, as you can see above, while I was waiting for the crowns to dry out, I painted the ground with fallen leaves.
How to draw the surface of the earth in an autumn landscape
Remember a simple rule that will allow you to depict the earth as a lying, rather than standing on end, horizontal surface.
The ground in the foreground should be darker than in the distance.
Those. in the lower part of the sketch the color of the earth should be much darker:

To depict the ground, I used a mixture of Venetian Red and Sepia. In the foreground there is more sepia to make the color darker.
Drawing an autumn forest in watercolors:
Tree trunks

I start painting tree trunks. Looking at the color of the birches, I understand that They're pink in the shade! That's why you need to paint en plein air - not a single photo will show you such subtle nuances of color!
Therefore, I take Venetian red as the basis for the birch trunk.
For dark marks and other tree species I use a mixture of Blue and Sepia.

At the same time, using a paler solution of this color, I paint an array of trees in the distance, in the gap between the trunks.

To separate the tree trunks from the background and show backlight, I scratch light lines with a card along the outline of the trunk on the left:


As it dries slightly, I add black marks into the base color of the trunk.
tree branches

The crown has dried up. You can draw branches. To do this, I use a thin brush with long bristles, which allows me to make calligraphically light flying lines.
Crown of trees. Using spray

Once again I return to spraying.
I spray a concentrated solution of Indian yellow on the crown of birch trees. Now the spots don't spread out. That's why I spray it deliberately. For this I tap a large brush with paint on the shaft of another brush.
I add some sprayed leaves on the foreground bush. I use Indian yellow for this.
The final stages of DRAWING AN AUTUMN LANDSCAPE:
Generalization
At the end of the work, you must definitely step back from it and see if there are any fragments that can be combined?
In my case, I didn't like the rhythm of the trees on the right. (When I was drawing them, a local alcoholic came up to me and tried to buy this sketch for 100 rubles. 🙂 I got excited and stuck the trunks as I saw them, without thinking about the composition...)
So I decide to darken the background behind the trunks and thereby combine the obvious stripes of the trunks into a larger mass. This way the viewer’s attention will be more drawn to the left side of the sketch, where the sunlight through the trees.
So to finish, I enhanced the dark tones of the black birch branches and the markings on the trunks.
(If drawing trees and landscapes with them is difficult for you, pay attention to the master class below!)
So, let's summarize.
I solved the difficult task of a sketch with limited space through the correct distribution of tone: the distant plans are light, the near ones are dark. Backlight helped with this.
In order not to get too detailed, I did most of the work raw, using spray instead of drawing the crown with strokes.
For a harmonious perception of the landscape, do not forget about the generalization stage and the placement of accents with the darkest and lightest colors.
If you found this demonstration helpful, feel free to leave a comment. This will give me an understanding that I am on the right path.

By the way, there is interesting way coloring using colored corrugated paper. You must first draw leaves on paper in exactly the same way with white wax crayon. After this, tear corrugated paper of autumn colors (red, yellow, orange, brown) into small pieces and, thoroughly wetting each piece in water, stick them onto the drawing. Make sure that there are no two pieces of paper of the same color next to each other. Let the paper dry a little (but not completely!), and then remove it from the drawing. You will get a wonderful multi-colored background. Leave the work to dry completely, then put it under the press.

Method 2.
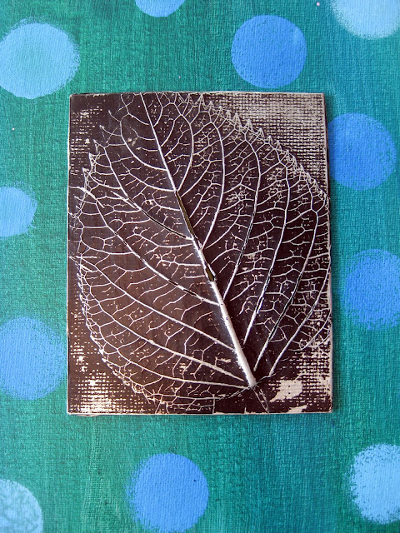
You can make an interesting autumn craft if you place the leaf under thin foil. The foil should be placed with the shiny side up. After this, you need to carefully smooth the foil with your fingertips so that the design appears. Next you need to cover it with a layer of black paint (this can be gouache, ink, tempera). Once the paint is dry, very gently scrub the painting with a steel wool pad. The protruding veins of the leaf will shine, and dark paint will remain in the recesses. Now you can paste the resulting relief onto a sheet of colored cardboard.
Autumn leaves. How to draw autumn
Method 3.
A very simple and at the same time effective technique is to print leaves on paper, onto which paint is first applied. You can use any paint, just apply it to the side of the leaves where the veins appear.

Link
Here are prints of rowan leaves. And any kid can draw rowan berries - they are made using cotton swab with red paint.

Link
Beautiful autumn drawing It will work if you print leaves with white paint on a sheet of dark-colored cardboard. When the paint dries, you need to color the leaves with colored pencils. It will turn out beautiful if some leaves are left white.


The background can be left as is, or made colorful by painting with paints using a sponge. In this case, you need to leave a small unpainted space around the leaves.


If you decide to make the background colored, then the leaves themselves can be left white.

How to draw autumn leaves. Autumn crafts
Method 4.
To add volume to your drawings, you can use the following interesting technique. You will need thin wrapping paper or white crepe paper.


Method 6.
Another original autumn pattern, made in warm and cold colors. The leaves themselves are drawn in warm colors(yellow, red, orange), background - in cold colors (green, blue, purple). To do this job you will need a compass.

1. Draw some leaves different shapes on paper.
2. Now, using a compass, draw a circle of small radius in the lower left corner of the piece of paper. Next, adding about 1 cm at a time, draw circles of larger and larger radius, as far as the compass allows.
3. Now do the same in the upper right corner.
4. Finally, color the autumn leaves with felt-tip pens or pencils in warm colors (the colors should alternate sequentially), and the background in cool colors.
Maple Leaf. Maple leaf drawing
Method 7.
Help your child draw on a piece of paper Maple Leaf. Divide it into sectors with veins. Let the child paint each sector of the leaf with some special pattern.


You can combine two methods.


Autumn crafts for children
Method 8.
Another unusual autumn pattern.

1. Draw leaves of different shapes on paper. They should occupy the entire sheet of paper, but not touch each other. Some of the leaves should start from the borders of the sheet of paper. Draw only the outlines of the leaves, without veins.
2. Now, using a simple pencil and a ruler, draw two lines from left to right and two from top to bottom. The lines should cross the leaves, dividing them into sectors.
3. Choose two colors for the background and two colors for the leaves. Color them in the chosen colors as in the picture.
4. When the paint has dried, trace the outlines of the leaves and the drawn lines with a gold marker.
Drawings on the theme of autumn
Method 9.
To make this autumn crafts you will need regular newspaper and paints (including white paint).
1. Draw a maple leaf on a piece of newspaper.

2. Paint it and, after the paint has dried, cut it out.


3. Take another sheet of newspaper and use white paint to draw and color a large square on it.

4. Place your sheet over the paint and wait for it to dry completely.

5. This is what you should get in the end!
Emma Zhavnovskaya
It's time to be golden autumn-an unusually beautiful phenomenon in nature, but so fleeting, and given to us as if as a consolation before the long winter. I really want to keep such beauty in my memory and preserve it.

Today we will try draw the simplest,elementary landscape using natural materials, accessible to older children. We will need watercolor and gouache paints, thick and thin brushes, yarrow inflorescences and different leaves. 1 Wet the sheet with water.

2 Draw clouds on a still wet sheet. We fill the sky with different shades of blue and purple watercolor. Closer to the bottom of the sheet the sky should be lighter.

We also depict the earth using a damp leaf. Take soft colors, with shades of brown and yellow. Remember, the earth below is darker, closer to the horizon it is lighter.

3 Draw a strip of forest on the horizon line.

4 We depict trees. Hold the brush vertically we start drawing from the ground,and not vice versa.

5 Using a thin brush from the trunk, we draw branches; with the tip of the brush we draw small twigs, “worms,” on thick branches.


6 Mix brown paint with a little black and apply a shadow on the trunk.

7 We tint the birch tree in the same way. Add a drop of black to the white gouache, mix it, you get a shade of gray, and also apply a shadow on the trunk and branches.


8 Spread the yarrow inflorescences with red, yellow and a little green gouache. We squeeze it tightly into a bundle and “print” the foliage. Experiment with paints to achieve interesting shades.


9 We also cover the leaves with gouache and apply them to the drawing. The result is an image of small trees or bushes. Draw the trunk and branches. Yes, and don’t forget to “print” foliage under the trees.

That's all. Try, create and you will definitely succeed!

Publications on the topic:
Hello everybody! The whole country is creating autumn theme, and of course we do too! Today I would like to present the collective work of children from the middle group.
Master class “Autumn leaf” Using natural materials in manual labor.
Materials: blue cardboard for the background, a set of colored paper, scissors, a simple pencil, glue for paper. From a sheet of blue paper.
Wet felting is one of the traditional look handicrafts in Rus'. Felting is an unpredictable process and does not require special ones.
Easter is one of the brightest, purest and most family-friendly spring holidays. The main attributes of which are Easter cakes and Easter eggs.
I welcome guests to the blog and propose to make three-dimensional trees from twigs and colored printer paper to decorate a group for the fall.
Fun crafts made from colored paper and cardboard are more common in children's creativity. They are easy to make, so kids won't get tired at all.
Children's autumn drawings occupy a large place in children's creativity. After all, this wonderful time of the year, although it is considered a time of withering, manages to charge everyone with positivity thanks to bright colors foliage and blueness of the endless sky. Young children are especially susceptible to changing nature and want to express their observations in creativity.
Children's drawings on the theme “Autumn Landscape”, “Golden Autumn”, “Autumn Forest”, etc., made in pencil or paint, are very popular in gardens and schools. Very young children do not yet draw very neatly and beautifully, because they are just learning to mix paints and choose the right colors in order to depict the splendor of nature.
If the baby doesn’t yet know how to draw children’s drawings on an autumn theme, then parents should help him a little and remember together what color leaves they saw on a walk, and then try to draw them. But you shouldn’t do everything for the child; you need to allow your imagination to develop without the limiting framework of “right” and “wrong.”
IN preschool institutions Exhibitions of children's drawings and drawings are traditionally held. You can arrange such an exhibition at home. This helps a lot in development imaginative thinking and the baby’s visual memory. Before you start creative process, you need to take a sightseeing tour to the forest or the nearest park and show your child all the delights of this time of year, and after receiving the impressions, begin to display them on paper.
Children's drawing "Autumn" with paints
All kids love painting. To work you will need gouache or watercolor, a landscape sheet and a brush. An older child can improvise on his own, but it will be clearer and easier for the baby when his mother with a simple pencil will draw the outlines of the future masterpiece, and the child will paint it with the color he likes.
There are other ways to paint autumn leaves using paints. To do this, you will need the leaves and paints themselves. The sheet is painted on one side and an imprint is made on the paper. Or vice versa - the sheet is applied to the base and painted over the contour with paints. After this, a white print remains, which can be left as is or painted over at your discretion. Instead of the usual brush, you can use a sponge for convenience.
Children's drawing “Autumn bouquet”
Another option for display is a classic vase with multi-colored leaves. You can make a drawing with paints and pencils, or you can combine these techniques or use some extraordinary method. For example, leaves of different shapes can be arranged in the shape of a bouquet, pressed on top with a sheet of paper. Then, using wax crayons, show the contours and veins of each leaf; for this you can use different colors. The very last step will be the vase; you should not draw it too bright and pompous, so as not to distract attention from the bouquet itself.
Children's drawings “Autumn Forest”
Older children who are already familiar with autumn themes can already draw more complex compositions with more details. This pattern could be an autumn forest, shimmering with many colors. When a child draws spontaneously, you can conduct a kind of drawing, because they can tell observant parents a lot about things.
The use of dark shades in several pictures in a row indicates that something is bothering the child, and he is trying to express it with dark colors. Psychology children's drawing very interesting science. But you shouldn’t do it yourself and draw hasty conclusions. If a child has problems, a child psychologist will help to sort them out. And behavior correction is carried out using the same art therapy.
 |
 |
 |
 |
Already drawn +14 I want to draw +14 Thank you + 279
Drawing an autumn landscape step by step
- Step 1
Select the object of the future drawing. Let these be two trees growing on a hillock near a wide river. First of all, we outline the horizon line and perspective
- Step 2
The trees are in the foreground; we denote the trunks with two lines.

- Step 3
The next step is to mark the left bank of the river

- Step 4
We do the same with the right one, draw a winding coastline

- Step 5
How to draw autumn as realistically as possible? It is important to be curious and attentive, to notice even small details. For example, to prevent trees from hanging in the air, you need to “tie” them to the ground using a small mound covered with stunted grass

- Step 6
Trees lose almost all their foliage in late autumn. This means you need to pay more attention to drawing the tree trunk, its branches, and the visible part of the rhizome.

- Step 7
No matter how hard the wind tries, a few leaves still cling to the branches and are in no hurry to fall to the ground

- Step 8
Trees grow on a high hill, show the reeds below

- Step 9
Cover the hill with shading of varying intensity, this way you can show the volume and texture of bare earth

- Step 10
Using shading, draw a distant view of the forest on the right.

- Step 11
In autumn, life practically comes to a standstill; use pencil strokes to show the slow flow of the river, the blurred silhouette of the forest

- Step 12
This period is characterized by prolonged rains and cold showers. The sky is covered with continuous clouds and leaden clouds

- Step 13
Birds fly away to warmer climes, draw a crane wedge that, heading south, will definitely return to its native land in the spring

- Step 14
To liven up the drawing a little, you can show the remains of the web in which the forest dweller, the spider, fell asleep soundly and “went into hibernation.”

- Step 15
With the help of highlights we give the picture a cold look, the sun practically does not heat, frost glistens on the fallen leaves

How to draw autumn with colored pencils
- Step 1
On the sheet, mark the location of the main objects - fir tree, oak, birch and fields in the distance;

- Step 2
Draw the oak tree, depicting its massive branches and hollow;

- Step 3
Draw a birch tree next to the oak tree. Mark the grass under the trees and draw a mushroom near the birch tree;

- Step 4
Draw fir branches and the leaves lying on them. Draw the fields and the outlines of the forest in the distance. Draw grass, mushrooms and leaves falling on the ground;

- Step 5
Draw a field in the distance. In the sky, depict cranes flying away to warmer climes;

- Step 6
Now you understand how to draw golden autumn pencil. Of course, the autumn landscape must be done in color, so don’t stop at this stage. Carefully outline the image with a liner;

- Step 7
Using an eraser, carefully remove any pencil lines from the paper;

- Step 8
Use a black pencil to paint over the hollow of the oak tree. Use brown pencils to shade the trunk of the oak tree, as well as its branches;

- Step 9
Use yellow shades, as well as orange and swamp green, to paint over oak foliage;

- Step 10
Paint the fir branches with green tones. Use yellow and orange pencils to color the leaves lying on the branches of the spruce tree, as well as on the grass and mushroom caps;

- Step 11
Shade the birch trunk a little with a gray pencil. Draw stripes on it with a black pencil. Color the birch foliage with yellow and orange pencils;

- Step 12
Color the mushroom legs with a black pencil, and their caps with red and burgundy pencils. Color the grass and forest in the distance with green pencils, as well as shades of yellow and brown;

- Step 13
Use brown and black pencils to color the field in the distance. Gray Shade the cranes, and blue the sky.

- Step 14
The drawing of the autumn landscape is ready! Now you know how to draw golden autumn.
