Felting, or as it is also called felting, felting - special kind handicrafts, along with embroidery. With the help of wool, craftswomen create delightful unique paintings, toys and crafts. It’s not at all difficult to make such a craft with your own hands, because now handicrafts are widespread, and in stores you can find a wide variety of ready-made kits for creating paintings. There are 2 ways to make crafts. In this article we will talk about what felting is and what kind of pictures can be obtained, depending on the chosen needlework method.
Pictures made using the felting technique from wool turn out very airy and warm
Felting paintings: types
On at the moment There are several types of this type of needlework - dry and wet. In the first case, paintings and other crafts are created using a special felting needle. When dry, wool is pierced many times to obtain the desired texture and create a pattern.
In this case, the wool is felted, its fibers are bonded to each other, resulting in a homogeneous material.
During wet felting, wool is felted using a special solution or regular soap. To make a craft in this way, you first need to lay out the wool, then apply the solution, and felt the wool using friction. Then the finished product dries, resulting in an unusual and very beautiful picture.

The classic wet felting technique involves the use of soap and hot water.
It is this type of felting that is most often used to create flat products, for example:
- Paintings;
- Panel;
- Decoration of clothes and fabrics.
Dry felting is better suited for making toys, jewelry and various figurines. Of course, for different types Felting will require a variety of materials. For a dry look, you will need to purchase the wool itself, a special needle with serrations so that the wool can adhere to each other and create the desired texture. Otherwise, you will need to create or find a ready-made solution for felting.
The most popular and easy-to-use wool is merino wool; it is often called combed sliver. It may vary in thickness and texture. At the same time, ordinary cotton wool, wool for stuffing, making crafts from felt, as well as padding polyester, sliver, silk and other decorative threads for decoration are also suitable for felting. Ordinary yarn will not work, neither will ordinary threads, you only need wool.
Dry felting of paintings: master class
To create a unique picture with your own hands, you will not need many tools and materials. For beginners, Nadezhda Ganyukova’s dry felting master class looks simple.
Namely:
- The first step is to purchase a special needle;
- Then prepare wool of various colors;
- Take foam rubber of medium thickness;
- Choose a picture and get to work.

The dry felting method produces more voluminous products, and the colors remain bright and uniform
Merino or carded wool is best suited for creating a picture. The needles can be either triangular or star-shaped. The procedure for doing the work is simple. The wool is placed on a piece of foam rubber, take a needle and begin to tangle the wool with its help, you can make a backing from padding polyester and then cover it with wool. As the work progresses, you can replace the needle with a thicker or thinner one to work on certain details. Also change coat color. You should know some nuances when working with wool and needle. The felting needle is very sharp, so you need to work extremely carefully and carefully and keep the tool at a right angle to the craft.
If, as you work, it is clear that there is not enough wool, you can add more and hide the flaws in this way.
Dry felting makes better toys than paintings; they look too clear and sharp; wet felting is ideal for creating canvases.
Wet felting of wool paintings: stages
Another type of felting is wet felting, which is felting using a solution of soap or regular liquid soap. Gauze is also used, on which wool is laid out according to the pattern. A ready-made composition can be used as a fixing solution.
The composition can be prepared with your own hands at home according to a specific recipe.
2 pieces of any soap are grated, pour a couple of liters of boiling water over the finished shavings and mix well, leave for 1-2 hours until the mixture becomes thick enough. After this, you need to prepare the place where the work will be done. Any flat surface is suitable, be it a table or the floor. It’s better to put something under the future painting.

With the help of wet felting, modern and unique works which will be a wonderful gift for family and friends
Stages:
- You need to put gauze on the surface, and on it - the base and the necessary pattern.
- The wool should be laid out in the shape of a cross and in stripes, holes and bald spots should be avoided, the layers should lie at right angles to each other, and also have the same thickness.
- You should lay out the base first, then the background and the drawing itself.
- When you already have an idea of the future picture, and the workpiece has already been laid out, the wool is sprinkled with water, covered with a thin cloth, preferably nylon, and generously lubricated with a soapy mixture. Excess should be blotted with a napkin.
- And finally, direct felting - the wet method is to use friction from side to side to create the desired texture and volume of wool.
You can also felt wool by machine using a washer, but this method is not very convenient. Ultimately, you can create many different color solutions and the technique of paintings and canvases.
Kits for beautiful felting of paintings
If you have no experience in buying wool for felting, you can go to any handicraft store and pick up a set already assembled by professionals for making the most different paintings. The main advantage of this type of creativity is the absence of the possibility of getting dirty - after all, to create a product you only need wool and a needle or soap, depending on the chosen style of work. Ready-made kits may include different volumes of wool, needles of different sizes, and a special solution for wet equipment.
The advantage of ready-made sets is that after creating one picture, the needles and composition remain, and you can work with them more than once, so after the first picture you don’t have to purchase the set again - you can try to select the wool yourself.

Kits for felting paintings are best suited for beginners, because few people can immediately come up with ideas for future work.
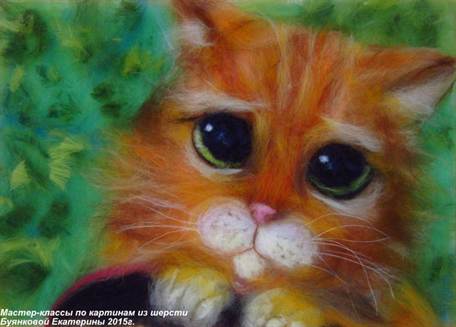
Manufacturers of handicraft products have come up with designs of varying degrees of complexity. For example, nature and sky are the simplest and ideal for beginners, animals and flowers (cat, poppies, bullfinch) are more complex and better suited for experienced craftsmen, people and reproductions famous paintings– it’s up to the professionals to choose.
The sets usually include:
- Dyed sheep wool, the number of colors depends on the pattern;
- Wooden frame for the finished product;
- Fabric backing.
Wet felting of paintings (video)
Each set comes with step by step instructions. Wool and tools can remain after work, which allows them to be reused. However, dry felting is not suitable for children - working with a needle is very dangerous for a small child. The resulting paintings will delight creative individuals and will become a wonderful home decoration.
This article is for beginners in painting with wool, for all those who are interested in this technique, want to try laying out paintings from wool, or are already creating warm paintings, and at the same time need advice.
I write as it is - what comes to mind, what I consider necessary to convey to you.
- It is recommended to complete the work not in one session, but in several. Let it take several days for 1-2 hours, rather than 1 day, during which you will be very tired from being unaccustomed to it. Fatigue leads to sloppy work. This is often observed in the first paintings “made on the run,” when you want to complete the work here and now. After all, the eye is “blurred” from fatigue, and the proportions are taken incorrectly... As a result, the picture turns out to be sloppy, the drawing is often disproportionate (for example, a large lopsided vase and a bouquet that extends beyond the boundaries of the picture, the flowers are all unnaturally large - in relation to containers in which they stand, etc.) I understand that the creative process itself is so interesting, so exciting that you no longer pay attention to anything. But sometimes you need to take a break - to rest and evaluate your work with a sober, clear eye.
- Glass needs to be applied to the painting very often. This way you can promptly detect flaws in your work and quickly correct them. After all, the end result is a picture under glass, therefore, when working with wool, you need to focus on the image that you see under the glass.Glass serves as a kind of indicator. By attaching it to the layers that have already been laid out, you will see how well these layers of wool lie (you can see, for example, that the layer is not dense enough and does not cover the working surface well) or you can see how small details look under glass (usually with glass and without him everything looks different). The wool is voluminous, when you press it with glass, the details of the picture “flatten” and thereby increase in size. It often happens that you put a thin stem, but when you apply the glass, you realize that it turned out to be too big for this flower and you have to make it smaller. And most importantly, the glass “removes” the visible imaginary volume of the depicted objects (the volume of the wool itself), which the camera captures so well and human eye Same. And the true volume that you yourself express becomes visible color(as in drawing with paints).
- Each object in the picture has shadows, or highlights, or light and dark spots/sides of the object, at least they must be there, otherwise the object will not look three-dimensional. When laying out a picture, try to shade parts of the objects with the appropriate color of wool for the occasion, create highlights on the vases (it’s glass!), and always try to enliven the picture by using the play of light and shadow. Read literature and watch videos on drawing and painting.
- Paintings made from wool are quite easy to correct. You can rewind the process as you work with wool and layer it; you just need to remove part of the layer or remove those details that you didn’t get. You will lose a little time, but gain invaluable experience. Don’t be afraid to dare - you always have a chance to change everything. Just don’t overdo it with “alterations”, otherwise the picture will lose its freshness and lightness and become “tormented”.
- If the painting has been put aside to be completed tomorrow, or simply gone somewhere, you need to cover it with glass (under the weight of the glass it will rest and settle, which will make further work with the painting more comfortable).
- For your first works, choose the simplest and most understandable subjects for your work, and gradually complicate them; or find a master in your city who can convey to you the nuances of the technique of laying out paintings from wool. Now there is a great opportunity to learn how to draw with wool online - using ready-made lessons - video master classes. And even consult on Skype and social networks... Progress does not stand still). Choose good master, learn, experiment, create a lot of work, sooner or later quantity always turns into quality.
Do you want to learn how to draw with wool using my lessons? Find out more about my wool painting course on this page
Sincerely,
Alexandra
Copying and distribution of photographs and text is possible only with the indication of the author and an active link to the original article.
Recently, natural wool has become even more highly regarded among lovers of arts and crafts. Painting, where paints were replaced by felted material, came into use. Second title creative process- felting. The article contains recommendations and master classes from craftsmen on how to create paintings using this technology.
Basics of wool painting techniques
Felt ones look stylish and unusually gentle. Materials for work are predominantly environmentally friendly and do not cause harm environment and human health. A beginner should not take on a complex painting. large size. First, make a small drawing. To do this you will need:
- frame with glass (can be used for photographs);
- fleece a little more sizes this frame (an alternative is viscose fabric);

The process of creating a painting
- curved nail scissors for fine work;
- small tweezers;
- wool for needlework.
Attention! For a complete picture you will need at least 9-10 colors and shades. More the better.
Before you start, decide what and how you will draw. It's better to sketch it on a rough sheet approximate diagram paintings. For the rest, rely on your ability to work with a brush and paint. Felting works on principles similar to painting, only you will shape the strokes on the canvas yourself.
Master class on creating a simple wool painting
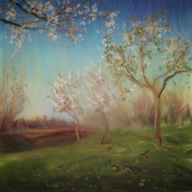
Having worked out the basic nuances in practice, you will be able to master the technique and make paintings from wool of a more complex class. But you still need to start with simple drawings. For beginners, the dry wool felting method is suitable. As an example with step by step tips- summer landscape: earth, sky, meadow.

Master class: how to depict flowers in a painting
You can decorate the meadow with flowers. Before making daisies, decide where the inflorescences will be located. Felt the yellow centers and place them at the planned points in the picture. Place white felt petals around. They are small, so it is convenient to use tweezers.
Advice. It is better to fix such complex designs as a daisy in a painting with hairspray.
For cornflowers, you need to choose a thread of a suitable color, which is not so easy. Make lumps of sepals from dark greenery. In general, meadow herbs will look good in the picture. Use colorful balls to depict small flowers in the background.
The wool painting looks soft. The lines are smooth and blurry. Without richness and bright accents, it will look pale. Therefore, experts advise not to be afraid to add dark thick strokes, where you think it is necessary. The final stage of creating a picture from wool is fixing the applique under glass.
Making a winter landscape
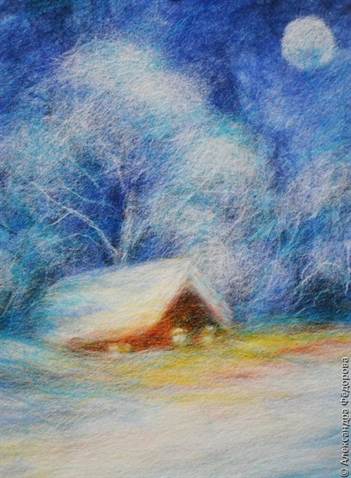
A simple but very atmospheric image is a winter landscape. For such a picture you will not need too many shades. Take blue, dark blue, light blue, white, brown, yellow, turquoise. Can be depicted winter evening, snow-covered house under a tree.

Winter landscape
Operating procedure:
- Form a backing layer from white wool. Lay the strands in different directions. If the edges extend beyond the cardboard, trim them with scissors.
- Layer a background on top, combining blue, cyan (sky) and white (earth). Lay out from dark to light shades. Create a snowy plain in the picture using horizontal strands.
- Twist several strands of different thicknesses from dark blue threads. They will be silhouettes of trees in the background. Make the front trees larger from white wool. Light whitish fluff along the perimeter of the crown is a snow cap.
- Decorate the moon by rolling a woolen flagellum into a thin ring. Fill it with finely chopped wool of the same color.
- Pick up some brown thread and make a shape to represent a house. In the place where you plan the windows, the walls should be a little lighter.
- For the roof, use a white bunch of tightly laid threads. To give the roof the desired shape (with an eaves and two slopes), use scissors. The direction of the threads in the bundle is close to the horizon line.
- Cover the bottom of the house with a couple of snowdrifts. Cut out the windows from white wool. Don't forget to include frame elements. You should throw yellow threads on the snow under the windows, and turquoise threads on the snow and trees. These are reflections from the windows and the moon, respectively.
The technique of making a painting from felted wool is accessible even to children. Therefore, making it together will be a wonderful activity that strengthens family ties.
Painting with wool: video
Wool painting is another fun and very creative activity. fine arts. It is becoming more and more popular, and now master classes on hand-made paintings are appearing on the Internet, and creative schools, and handicraft clubs introduce this type of creativity into their program. Let's keep up with fashion trends and try to get involved in creating paintings using colored wool.
Wool painting "Winter evening"
This MK is designed for beginners, for everyone who wants to get acquainted with the technique of felting pictures, so anyone who has a sufficient amount of perseverance and patience can cope with the work.
To create this picture we will need:
- combed wool tape, colors: white, blue, dark blue, light blue, turquoise, dark brown, brown, yellow, orange, red;
- non-woven fabric 18*24 cm for backing;
- scissors;
- tweezers;
- photo frame;
- glass.
We fix each stage, leaving the work with glass. However, this applies only to “dry” techniques: wet felting does not require such fastening.
1. Pulling strands of wool from the tape, we cover the surface of the substrate with them. We lay them in different directions, the ends of the threads should extend 1-2 cm beyond the non-woven fabric. After attaching the glass, we cut off the excess.

2. By pinching the wool, we form cotton wool for work. We create the background in layers, laying from dark to light shades. We control the quality of laying the material, also applying glass.

3. We create snowdrifts using white strands laid parallel to the horizon. This technique can often be seen when looking at landscapes made of wool.

4. Pull out strands from the dark blue ribbon and twist them a little. This way we draw silhouettes of trees.

5. Add trees made of white wool.

6. We collect fluffy wool mass and, giving the desired shape, thus making the crown of a tree.


7. Use a thin ring of wool to mark the outline of the moon. We fill it with wool fluff, cut as finely as possible. Wool paintings for beginners often use this technique.
8. From dark brown and brown wool, we cut and lay wool for the house. Note that the part on the right is darker than the left.

9. We “make” the roof for the house from dense white strands, carefully using scissors. Here you need to take into account the direction of the fibers.

10. We cover the lower part of the house with snowdrifts, invariably made of white wool.

11. Continue felting. We cut out the windows, add the finest strands of turquoise and blue to the snow. A little of it should end up on the roof.

12. Add light pouring from the windows using yellow, orange and red strands. They should slightly overlap the house, which is why the windows will need to be clarified: cut the fluff again and place it with tweezers.

13. Toned down with translucent white strands bright colors. We see the result in the photo. Let's add picturesqueness with the help of turquoise fibers placed on the trees and along the horizon.

The picture is ready! All that remains is to cover it with clean glass.

1. Try to touch the glass to the painting as often as possible. The final result of the work will be located under glass, so it will serve as an indicator of the correctness of the layers, their density, and the size of the parts.
2. Warm paintings easy to fix. The work is done in layers, so the wrong layer can simply be carefully removed. However, you shouldn’t get too carried away with this - the picture will lose its freshness.
3. If you are putting off work to finish later, cover it with glass. The work will become much more comfortable when the painting rests under pressure.
Ideas for creativity
The paintings of the famous craftswoman Nina Mazyreva attract people with the skill with which they are made.


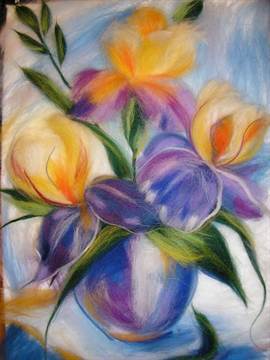
Flowers are also very popular among fans of this type of creativity:


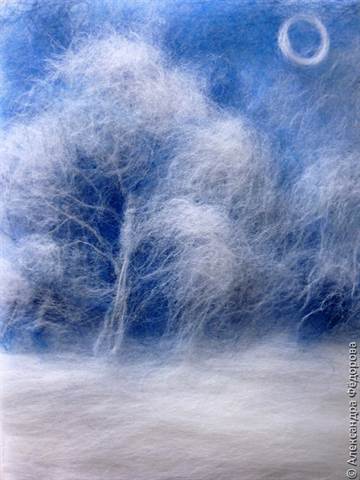
It is impossible not to mention the landscapes: autumn, winter, summer and spring in all their manifestations are reflected on the canvases.


Video selection
Nowadays a lot of women are engaged in needlework. Cross-stitching, knitting, origami - all this, of course, is very interesting and requires effort and talent, but it has become banal and not so interesting. But felting paintings from wool is definitely an original activity, the paintings turn out simply amazing, they can be a wonderful accessory for decorating your interior or a gift for any occasion. In our article we will tell you everything about this unusual activity.
There are two felting techniques - dry and wet, we will try to tell you about both options. Our first lesson will be in the dry felting technique; after each stage of work, the product should be held under glass to secure it; this technique is not used in wet felting.
"Winter Night"
We bring to your attention a master class that is perfect for beginning needlewomen, because the painting itself is not complicated, and the lesson will be very detailed, with step-by-step instructions and photos of each stage of the work.
To work you will need:
- Wool (white, blue, dark blue, light blue, turquoise, dark brown, brown, yellow, orange and red);
- Non-woven backing measuring 18 x 24 centimeters;
- Scissors;
- Tweezers;
- Photo frame with glass.
We take strands of wool and cover the surface of the base (non-woven backing) with them. We put our pieces in different directions, the wool should extend beyond the base by about two centimeters (a little less is possible). Now cover the craft with glass and cut off the excess pieces.

Now we need to make the background. We lay wool in different shades (from dark to light). Then we put the glass on again and cut off the excess particles.

Since our painting will depict winter, we need to make snowdrifts. To do this, take white wool and lay it horizontally at the bottom of the picture.

Now we take dark blue wool, twist it into small “sausages” and lay out the silhouettes of trees with them.

It’s winter here, our trees need to be “dusted” with snow. We take white yarn, twist it into a “sausage” and lay out snow-covered trees.

Again, we make a tree crown from white wool; to do this, the wool needs to be fluffed up a little.

Now we make a ring out of white or yellow wool and place it on the picture, thus we have outlined the outline of the moon. We cut the wool into small pieces and fill our moon.
Now we “build” a house from brown and dark brown wool. The wall located on the side of the moon should be lighter; this should be taken into account when working.

Now we make dense pieces of white wool and make the roof of our house from them. The edges should be smooth and crisp; it is best to trim them with scissors.

The lower part of the house needs to be covered with “drifts”; it is not worth mentioning what color yarn we make them from.

Now we make windows and a door from yellow or white wool.

Now let's give our picture even more realism by adding light pouring from the windows. We make shimmers from orange wool, yellow. You can use tweezers to drape white and yellow wool over the house.

It is better to mute bright colors with thin strands of white wool, and small turquoise hairs can add expressiveness to the picture.

Our painting “Winter Night” is finished. Now place it in a beautiful frame under glass and you can safely hang it on the wall or give it to family or friends.

We invite you to look at some other paintings, perhaps you will gain new ideas or be inspired to create a new masterpiece.
Wet felting
As noted above, there is another technique for creating paintings from wool - wet felting. It is a little more complicated in its execution, but the resulting paintings are no worse, unusual and beautiful.


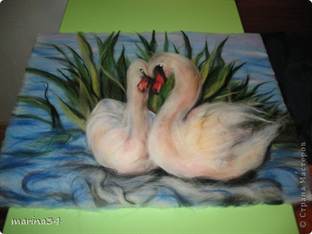
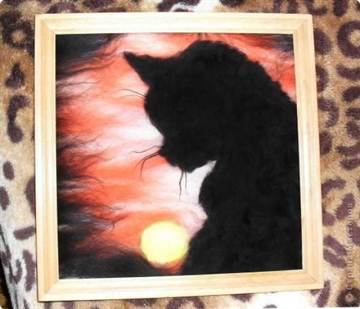
We invite you to watch a very interesting video tutorial from which you will learn how to make three-dimensional picture with cats.
The master class is very detailed, each action is explained in accessible language, the instructions will be understandable to both beginning needlewomen and experienced girls who have long been familiar with the wet felting technique. This work will be a little more complicated, but no less interesting and exciting.
Video on the topic of the article
Now you can proudly call yourself an experienced felter. As you can see, this work is painstaking, but it is addictive, and what beautiful paintings come out. Of course, it is very important to choose the right sketch, drawing that you want to immortalize in an unusual way. We invite you to familiarize yourself with the materials in this video collection, thanks to which you will be able to consolidate your acquired knowledge and acquire new interesting ideas.