An unusual drawing technique opens up a world of fantasy and wide possibilities even for a person who does not know how to depict anything on paper. For a child, these are ideas for self-expression and space for inspiration.
There are many interesting ways when it becomes possible not only to get an exciting drawing, but also to have fun with your baby.
Blotography
The method involves applying an ordinary blot to a sheet of paper. This can be done by simply dropping paint onto a wide brush.
After this, the child is asked to think about what his blot looks like and fill in the missing details. Perhaps these will be legs, tail or rays. Then the blot comes to life, and then you can fantasize and draw in the rest of the background.
As the child draws, his imagination develops through questions asked. He learns to fantasize and realize his plans on a piece of paper.
Drawing with stamps
Unusual techniques drawings for children do not require complex preparation and unusual instruments. You can easily create a masterpiece using ordinary things:
- potato halves;
- apple slices;
- foam sponges;
- bricks from Lego.
To get a picture, you must first draw the future base. It could be a twig, flower stems, a road where houses will soon appear.

Then take any stamp you like and dip it in paint. After applying it to a sheet, a color print is obtained. This way you can depict leaves on a branch, flowers, or using Lego cubes you can create nice houses with brick walls.
Drawing with autumn leaves
A very fascinating and unusual drawing technique, and the drawings turn out incredibly delicate and beautiful. To do this, you need to prepare and collect leaves. Moreover, you will need completely different specimens: large, small, red, yellow, round or elongated.
Walking through the park with your child on an autumn evening, you should draw your child’s attention to the beauty autumn nature, for a riot of colors. Then you can offer to collect leaves and create a small miracle on a simple sheet of paper.
Leaf print options
There are several ways to create a picture using leaves.
1st method. Invite your child to temporarily turn into a wizard autumn forest and go on a trip. You need to choose a few leaves you like and coat them on one side with paints. The leaves are then pressed onto the paper, leaving imprints reminiscent of trees in a forest.
2nd method. Young children really like it because it does not require any special skills, and the drawing looks simply amazing. Together with your baby, lay out 2-3 beautiful leaves on paper. Next, it is better to lightly secure them with tape so that they do not slip during operation.
Using a sponge or wide brush, apply paint over the entire remaining surface, including the spread out leaves. As soon as the watercolor dries, you can remove the leaves and admire the resulting miracle.

Create a fancy drawing
Unusual drawing techniques for children at school will require some preparation and a little patience. But the result will please not only children, but will surprise even an adult.
So, you can offer younger children school age create colored paper own production. For this you will need:
- Paper.
- Disposable plastic plate.
- Watercolor.
- Thick cardboard.
- Shaving foam.
- Cotton buds.
First, the foam is squeezed out in an even layer onto a disposable plate. Then, using a brush, you need to drip multi-colored paints in random order.
Next comes the time for magic. Using a cotton swab, carefully mix the paints and get a multi-colored, snowy foam. Now take a sheet of paper and press the entire side against the plate. Excess foam is removed with a piece of cardboard.
When the multi-colored sheet dries, it can be used for further work. The result is a wonderful colored background that is suitable for all kinds of crafts.

Unusual watercolor painting techniques are suitable for even the smallest children. And joint creativity not only brings adults and children closer together, but also gives many wonderful works that can be framed and decorated in a room.
Using gouache in unusual art
Gouache, unlike watercolor, is heavier and opaque. The colors are rich and lighten slightly as they dry. Unusual techniques for painting with gouache are based on its properties.
You can encourage your child to draw with dots. First, a child or adult draws the outline of the future drawing. It is then gradually filled with paint using cotton swabs.
Children are especially delighted with foam drawing. Gouache diluted in water gives amazing saturated color. If you dilute different colors in disposable cups and then pour out the bulbs, then the resulting foam can depict fancy landscapes.
To become a wizard, you don't need to have a magic wand. An unusual drawing technique will help show your child a small miracle.

In the absence of the child, draw a picture in advance with candle wax. And then offer the baby supposedly Blank sheet paint over it. Surely he will be surprised where such beauty came from on the sheet.
Hobby for adults
Adults or older students can try to create an atmospheric drawing using watercolors. Hanging gardens are an unusual painting technique where an image appears by spraying paint from a spray bottle.
You should definitely try to depict this miracle in the presence of a child. To do this, you need to apply several stripes of different shades of green on top of the sheet. Then you spray water from a spray bottle, the watercolor begins to flow, bizarrely changing shape and movement.
One of the varieties of such drawing is the appearance of an image on wet paper. There are a number of landscapes that come out successfully only when an unusual drawing technique is used.
First you need to teach your child to make the sheet slightly damp. If you wet the paper too much, the effect will not work and the paper will be damaged. A piece of cotton wool moistened with water is suitable for this.
After this, you can use a brush to touch the sheet and leave marks, thinking through the plot in advance. It could be a rainy day, a city at night, or flowers in the fog.

There is no limit to imagination and creativity. Teachers advise using all kinds of materials in your work and not being afraid to experiment.
In this article you will find 11 interesting ways to draw with children.
Monotype
Draw something with your child on cellophane or glass, and then print it on a piece of paper.

Blotography
Place a few bold blots or draw lines on one half of the sheet. Then fold it in half. Unfold again. Now look closely at this drawing with your child to see images, objects, or come up with a whole plot.

Drawing on wet paper
Moisten the paper clean water. Next, paint with paints.

Drawing with dots
You will need a cotton swab and paints. Use poking to draw flowers, berries, or whatever you want.

Drawing with threads
To do this, you need to dip a woolen thread in thick paint and then sandwich it between two sheets of cardboard. Next, pull the end and move the thread inside the cardboard. It will work out interesting image, in which you can see many interesting images.

Prints
Make different figures from foam rubber. Then dip it in paint and make prints. Start chaotically, then draw a pattern. Prints can also be made using vegetables or fruits. Cut the apple in half, or take a head of Chinese cabbage. Dip in paint and stamp on paper.


Foam drawing
Mix water, shampoo and a little paint in a glass. Take a cocktail straw, place it in a glass and blow into it until the bubbles rise above the glass. Then apply the paper to this foam and see what happens.

Magic drawing
Draw an image on white paper with a wax candle or wax pencil. Then apply paint over this image. The paint will not stick to the greasy candle image. The drawing you made seems to appear.

Finger painting
You can draw with your fingers, fists, palms, feet, and even your nose!

Painting with salt
First, draw with glue. And then sprinkle the drawing with salt.

Relief drawings
Add flour to the paint. Paint with this paint, and when it dries, you will see the result.

In this article you will find a lot interesting ideas How to diversify painting activities with your child and make them interesting and educational.
Eco-friendly paints for children
There are 3 types of safe paints for children, which parents prefer:
- finger-shaped
- gouache
- watercolor
It’s better to start with finger paints; they are suitable for younger children. You can learn more about them from the article. Gouache and watercolor for older children.
A child is interested in exploring something new, but over time he may get tired of the monotonous procedure of coloring a sheet with paint. To prevent this from happening, parents need to show their child how to draw.
There are many ways to paint with the above paints. Various techniques They won’t let your child get bored and will show him a lot of new and interesting things that he hasn’t seen before.


Finger painting for kids
This is the most interesting activity for little ones, because you first need to feel the paint before learning how to paint with it. Dip your index finger into the paint and use it to make spots on the paper, using them to draw a flower or a caterpillar. Draw lines with your finger, make rays of the sun. Show your child that you can draw like this and let him create on his own, let him draw what he wants.


Painting with a brush for children
When the child can already hold a brush in his hands, show him how to paint with it. Explain to your child that before taking a new color, it needs to be washed. Take the paint with a brush and apply it to a piece of paper. Try painting with brushes of different sizes and shapes, see what kind of drawing you get.
You can paint with a brush in the following ways:

Dot painting for kids
Show how you can draw with dots, for this you can use a brush, a finger, and cotton swab. Dip your tool into the paint and quickly touch it to the paper. You can color simple pictures using this technique, kids really like this activity, and it is also very useful for development fine motor skills hands


Drawing with stamps for children
Apply paint to the stamp and apply it to the paper, press down. An imprint of the picture will remain on the paper. Show your child how to work with it. Stamps can be painted different colors, instead of ready-made stamps, you can use homemade ones. For example, to make circles with straws, you can use figures from sorters, parts from construction sets, and even cut vegetables and fruits. 
A very interesting texture is obtained if, instead of a stamp, you use a regular napkin with pimples. Dip it into the paint and, as if blotting, walk it over a sheet of paper.
Drawing with foam rubber
Cut a piece of foam and dip it in paint, then press it onto the paper and remove it. You can draw lines and paint over some shapes. Show your child how to draw. Also, the child will be interested if you make different foam rubber geometric figures. You can attach them to a pencil or stick and use them as stamps. This way, by playing, you can learn not only colors, but also shapes. Then complicate the task, try to draw ornaments, first from two shapes, then use more shapes.


Drawing on wet paper
Wet a piece of drawing paper with water. Now paint on it with paint. The contours of the lines blur, become fuzzy, smooth transitions and haze are excellent. Just don’t overdo it with water; it will be better if you wipe it with a damp cotton swab. This technique is good for paintings with rain, images of fog, flowers behind a curtain.


Blotography
Teach your child to make blots, because then it’s so interesting to guess what they look like.
Take a sheet of paper, fold it in half, unfold it and put a few blots on the fold; you can make them the same color or different ones. Fold the sheet along the fold line and run your fingers from the center of the design to its edge. You can say something like “sim-salabim”.
Unfold the sheet and show your child what you came up with. When the child grows up a little, you can ask him what he sees in the drawing, what it reminds him of. When the drawing is dry, you can add small details with a felt-tip pen or trace the outline. This develops imagination and abstract thinking very well.

Nitcography
To do this you will need a sheet of thick paper and a woolen thread. Bend the sheet in half and unfold it, lower the thread into a jar of paint, then place it on the paper and fold it. Move the thread, pressing the sheet with your palm. Unfold and see what happens. You will see chaotic strokes of paint, look at them with your child, maybe you will see some familiar objects in them, circle them and complete the details, say what they are called. The combination of creativity, mental and speech work will help your child develop intellectually.


Wax painting
This is a very common and interesting technique. Draw a picture on a sheet of paper with a wax crayon or a piece of wax candle, and then with your child, paint over this sheet of paper with paint. Since the wax is greasy, the paint will not cover it and you will see your drawing. This method can also be used to make secret notes or write congratulations.


Waxing and waxing technique
Place something under a sheet of paper, such as a coin or other embossed object, rub the sheet with wax, paint on top and you will get an image of the object.
Drawings with salt
Sprinkle the finished drawing with salt. When the paint dries, the salt will remain on the sheet and give an interesting texture to the design. This way you can do volumetric drawing, for example, highlight stones or a path in the image. On blue paint, salt will look like snowflakes; if you sprinkle green leaves with salt, they will become like alive, translucent.


Drawings with masking tape
Molar tape sticks and peels off paper well, so it can be used in drawing and get interesting effects. For example, you can make a birch forest: cut out tree trunks from tape, you can glue twigs and branches from the leftovers, and glue the tape onto a sheet of paper. Paint everything on top with paint, when it dries, remove the tape, white stripes will remain under it. All you have to do is add details and the forest is ready!

You can cut out something more complex, such as houses and draw the whole city. The good thing about adhesive tape is that it can be used instead of a stencil, but paint drips are unlikely to get under it, and there is no need to fix it additionally.
You can also use the tape as a frame for the picture, when you remove it, the edges of the picture will be clear and it will be neat.

Drawing pictures using cling film
Yes, yes, with the help cling film You can also make interesting drawings. Lay it on a sheet of paper covered with wet paint and move it around a little. When you remove it, you will see interesting abstractions that resemble crystals.


Blowing paint through tubes
Thin the paint with water to make it thinner. Take one or two colors. Drop paint onto the sheet and blow into the tube, directing it in different directions onto the paint. What you draw will resemble the interweaving of tree branches, or you can add a face and it will be hair - let the child dream up.

Coloring drawings
Draw some animal on a piece of paper and ask the child to hide it, just show how first: paint it completely over it. You can tell a fairy tale, for example, that there was a mouse, she went for delicious cheese, and a cat was waiting for her, who wanted to eat the mouse. And ask your child how you can help the mouse? Of course, it must be hidden. And ask him to do it.


Leaf drawing
Very interesting way drawing. For this you will need leaves from trees. Apply paint to the leaves, you can paint them in different colors, attach the leaf with paint to the paper and press it, then carefully remove it. You can make such a beautiful forest.


If you turn on a little imagination, you will come up with a lot of new ideas with which drawing will not only a fun activity, but also informative, educational and useful.
In addition to paints, there are other tools for drawing. Your baby will definitely like it wax crayons, markers, crayons. More details about fine art and other types of creativity are described in the article
VIDEO: Let's paint! Drawing games
We recently looked at seven simple watercolor painting techniques, and if you've mastered them, then it's time to move on to something more complex and interesting. Today we will look at six more interesting techniques that will help you create your own masterpiece.
Spray
We wet the bottom of the paper to see what would happen.
This technique is quite simple. Just put paint on the brush and start tapping the bristles of the brush on your finger so that the splashes scatter chaotically
If your brush is too wet, it will be difficult to control the splatter. Therefore, shake a few drops off it, and only then get to work.
If you don't like hitting your fingers with a brush, then you can use any available tool, a pen, for example.

Before we start splashing our paint, we'll place some pieces of paper in the top corner of our canvas.
We also wet the bottom edge of the sheet with clean water and painted it light purple.
Find an old toothbrush, rinse it and remove any remaining toothpaste. And get ready for chaos.

There are several ways to get paint onto your toothbrush. You can dip it in paint, which makes it very difficult to fill the bristles with paint. You can try filling your toothbrush using a brush. This way you can control the amount of paint.

Take your toothbrush and run your thumb over the bristles. You can also use improvised means. Choose a tool that you can use to spray paint off the bristles. Notice how the speed of your movements and the distance of the brush from the paper affect the paint atomization.

When you want to spray paint of a different color, rinse your toothbrush thoroughly and dry it with a towel.
Don't worry if you don't get this technique as well as you'd like. Practice and you will succeed.

As you can see, it turns out to be quite an interesting effect. Use the available tools that you have, use your imagination and be creative in your drawing.

Sgraffito and stamps
Sgraffito is an Italian term that refers to a scraping technique associated with wearing away the top coating of pottery to expose the layers underneath.
In the example, we scraped off the paint using a pocket knife. If you scrape off paint that has not yet dried and has soaked deep into the paper, you will get dark lines.
If used wisely, this technique can be used to create interesting landscapes by scraping out the shapes of trees and other flora.
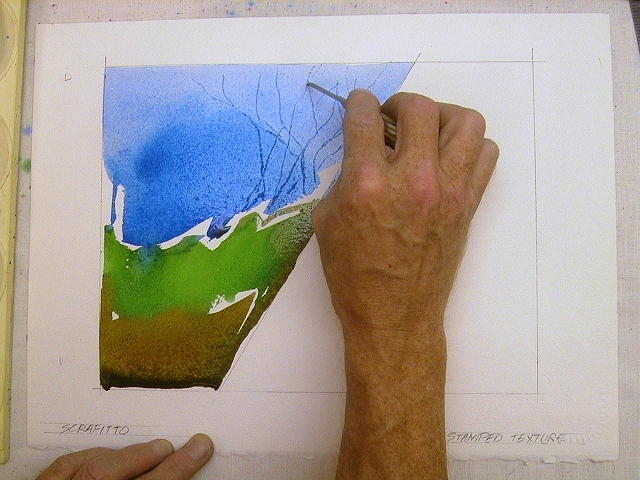
You can use old ones credit cards to scrape off the paint. Use a smooth side card to sweep away any remaining paint.

Many brushes have a pointed edge. You can use these brushes to create fine lines.
It is very important to understand at what interval you need to start scraping. Practice on a separate sheet of the same paper and with the same colors.

A stamp is the application of paint by pressing other objects onto paper. You can choose any material to create stamps. Try everything you can get your hands on.
On in this example we use facial tissues. Let's fill them with paint and put stamps on them. top part paper.

You can also use a sponge. With its help we will depict grass.
You can play with textures using various materials. Experiment!

Don't be afraid to use body parts for stamps. Everything can be used!

Washing out
Relatively simple technique will help you create unusual and interesting textures.
First, cover the top of the paper with blue paint.

Then quickly paint the rest of the canvas red. This is what our drawing will look like at this stage.

Now rinse your brush thoroughly and refill it with clean water. Using light brush strokes, sprinkle drops of water onto the still wet paint.

Continue spraying water until you are satisfied with the result.
How far the paint has dried can be determined by the force of the water on it. Notice that the more water applied to the same area, the lighter the color of the paint became.

Don't be discouraged if you can't control the blur. You most likely will not succeed, since it is quite difficult to influence this process.

Experiment with the amount of water, colors and how dry the paint is. This technique can help you create an interesting and textured background.

We use alcohol
You will need cotton swabs and alcohol.

Paint your sheet thickly with paint.

Create the background color you want and get ready for the fun.

Dip a cotton swab into alcohol and start dripping it onto the paint.
Alcohol, when it gets on the paint, repels it, creating a light spot.

Try dripping alcohol onto the paint as it dries to see the effect.
It turns out quite nice, doesn't it?

This interesting technique allows you to create unusual textures.

We use salt
Obviously we will need salt for this technique.

Let's draw the sky and the hill.

Our second hill will be raspberry in color, let's mix it a little with the first hill to get an interesting transition.

Now take salt and sprinkle it on our drawing. After a few minutes, add a little more salt. It pushes the paint away from itself, creating an unusual texture.

Let's wait until it all dries and see what happens next.

Once the design has dried, the effect the salt created becomes more visible.
Shake the salt off the drawing and enjoy the result.

It is better to use a sponge to brush off the salt. This way you don't damage the paint. Clean the drawing with light movements, try not to rub it.

The salt absorbed the paint, creating great amount star-like specks.
It is worth noting that coarse salt will leave larger specks, and fine salt will leave smaller ones.

This article will focus on drawing with a pencil. If you want to learn how to draw, but can't get started, now is the time to start learning. Take a sheet of paper, a pencil and try it :) Let's start with drawing techniques.
Pencil drawing technique
There are two main drawing techniques - shading and pencil shading.
Hatching
Using strokes ( short lines) can very successfully convey the tone of the subject. Depending on the number of strokes drawn, you can get different levels tone saturation (the fewer strokes, the lighter the tone, the more strokes, the darker). By the direction of the strokes you can convey the texture of the surface of the figure. For example, horizontal strokes will convey the surface of the water well, and vertical strokes will convey the grass.
Basically, shading is done with short, straight strokes with approximately the same distance between them. The strokes are applied to the paper with a pencil torn off. First, one thin line is made, then the pencil returns to the starting line, and in this way all other strokes are applied.
Cross hatching can be used to enhance the depth of tone. For example, horizontal shading is applied to the oblique shading, darkening the tone, then on what came out, you can apply oblique shading in the opposite direction to the first - this will darken it even more. The darkest in this case will be the tone where shading in all directions is combined.
Feathering
Shading is one of the main techniques that can be used when drawing for beginning artists. Using gradation of tone, you can add volume to your figure. In general, shading is a special case of shading. After applying the strokes, using the properties of pencil graphite and a special shading tool, they are shaded (smeared) until a uniform tone is obtained.
However, the implementation of shading itself has a number of features.
- Shading of strokes must be done along the strokes, but not across. By shading along the strokes, you will achieve a more natural toning.
- For shading, not only simple shading is used, but also zigzag strokes.

With the help of such techniques, you can depict anything on paper.
10 common mistakes that beginners make
Most people who like to draw take their first steps on their own. And even if it's just a hobby, they still make various sketches. We want to write about 10 possible errors, which all aspiring artists probably encounter.
1. Wrong pencil
If your shadows aren't coming out well, check the markings on your pencil. Most likely it is too hard. It is recommended to draw shadows with pencils marked B, 2B and 4B, but not HB.
2. Drawing from photographs
Every artist begins to draw from photographs. But very often photographs do not convey enough facial features to good drawing. When a person's face is positioned from the front, it will be difficult to correctly model their face on paper, since the perspective from behind the head disappears. Try taking a photo where the person's head is tilted slightly to the side. This way the portrait will be more realistic and with best transmission shadows
3. Wrong basic proportions
Very often people begin to immediately pay attention to details, drawing them completely without sketching the entire drawing. This is wrong because you are not planning the correct proportions in advance. First, it is advisable to sketch out the entire drawing, and only then draw in detail the details.
4. Crooked features
We are used to looking at a person directly and aligning them when drawing. As a result, the portrait comes out quite distorted. When drawing complex objects, first try to outline guidelines along which it will be easier to build the drawing later.
5. Drawing of animals
Usually we look down at our animal. This makes the head seem larger to us than the whole body, and normal proportionality is lost. Try to distract the animal so that it turns its muzzle to the side, then the drawing will come out more truthful.
6. Strokes
If you draw each hair or blade of grass separately, the drawing will come out disgusting. Try to make sharp sketches, going from dark to light.
7. Trees
Do not try to draw trees, flowers, and leaves with the correct shapes. Use outlines and penumbra for realism.
8. Wrong paper
Before you buy paper, test it on a sample piece of something light. The paper may be too smooth and the design will be faded. Also, the paper may be too stiff and the design will be quite flat.
9. Volume
When conveying volume, try not to use clear lines for the edges. They can be outlined by light lines of different tones.
10. Shadows
Very often it is not possible to apply shadows evenly. Try to use the full color range of the pencil, going from lightest to darkest. If you are afraid to overdo it with the dark, put a piece of paper under the edge, and all the black will be on it.
 At first it may seem that pencil drawings are too ordinary and dull. But with the help of a pencil you can convey a huge amount of emotions.
A small selection of video channels based on pencil drawing:
From the author: If you are interested in painting, drawing, composition, and art in general, then this is the place for you! By profession I am a Painter-Monumentalist. Graduated from MGAHI named after. Surikov. On the Art Shima channel you will find videos in which I draw and paint in oils, and videos with tips. Since I know many techniques, you can feel free to ask questions, and I will be happy to answer them. By subscribing to my channel, you can see all my new videos.
Interesting video lessons on any topic.
The work is more difficult, but with good description. If you really want it, it will happen.