Drawing for junior schoolchildren “Sea Turtle” using the “pointillism” technique. Master class with step-by-step photos
Thematic drawing for younger children school age using the unconventional technique of pointillism.Lavrenko Tamara Mikhailovna, teacher additional education MBOU DO Youth Center, Yeysk, Krasnodar Territory
Description: This master class is conducted with children 7-8 years old; it will also be useful for art teachers, additional and preschool education teachers.
Purpose: use in drawing classes with children, home or exhibition interior decoration.
Target: drawing a turtle using the unconventional pointillism technique.
Tasks:
- promote the development of creativity and artistic imagination
- teach how to correctly position a drawing on a sheet of paper (composition solution)
- develop skills in working with paints
- develop work skills cotton swabs
- cultivate interest in visual arts
Materials:
Cardboard A3 blue, gouache paints, flat brushes No. 5 and No. 8, round brushes No. 5 and No. 3, palette, water jar.

The course of the master class.

Here comes a turtle
The shell is like a hat,
Rows his paws quickly,
It's swimming straight to the shore!
The turtle rarely eats
Not enough food per sitting
The turtle will live
Three hundred years and he will not die!
Sea turtles are excellent swimmers and divers. Clumsy on land, they glide gracefully in the water using flipper-like forelimbs and a streamlined shell. Sea turtles often come to the surface of the water to breathe. And during rest, some of them can remain under water for several hours. The color of the shell is predominantly brown with stripes, dark and light spots. Below it is yellow or white. This coloring helps the turtle camouflage among the colorful corals at the bottom and against the background of the light surface of the water. Sea turtles have large upper eyelids to protect their eyes when searching for food among corals.
Gave it to a turtle
A multi-colored shirt.
With blue flowers
With yellow dots.
The turtle is unhappy:
- I have one shirt,
Although she is not bright,
Protects from the enemy!
In your silk shirt
I would have suffered fear
Moreover, despite everything, despite
It would be necessary to build a house!
Yulia Dulepina
This is the kind of turtle in a multi-colored shirt that we will now draw.
Turtle pattern.

Let's cut out the template.

Let's trace it on blue cardboard.

Take a round brush No. 5. In a deep cell of the palette, create a color to paint the head and legs of the turtle (white gouache + a little emerald green). We will paint the shell with “sunny” yellow mixed with white paint.

We will paint the lower part of the shell with lemon yellow mixed with a little white gouache.

We will paint “corals” around the turtle using the same paint as the head and legs. Try to draw corals smoothly, especially at the junction of the stem and shoots there should be no sharp corners. All connections are smooth. Let's add more white paint to this color. With this light shade we will draw smooth lines on the corals, try to do it on one side. Let's draw patterns on the head and legs.

Take a round brush No. 3 and use a green emerald brush to outline the corals on one side and the entire turtle, except for the shell. We made chiaroscuro on the corals.

Using a flat brush number 5, draw lines on the shell and outline the lower part of the shell. The lines should be wide.

Now we will work with cotton swabs.
Using green emerald we will make “poke points” on the sheath and head of the turtle.

We will use red “scarlet” to make patterns on the turtle’s shell.

Now let's work with white gouache. Let's make patterns on the shell. We’ll put “poke marks” on the brown lines. Around the blue turtle we’ll make impressions with a cotton swab. Don't forget to poke around the corals. Our picture is ready. This option looks good in the photo.

In a “live” picture, it is better to outline the turtle with blue paint.

Children 7 years old draw:

Children 8 years old draw:
Oksana Stol
Target: introduce children to amazing world turtles; teach children to draw turtles using an unconventional technique - “pointillism” (drawing with dots); develop color perception, improve fine motor skills fingers and hands; develop the ability to independently choose the color scheme of paints that corresponds to a joyful mood.
Materials: tinted sheets, turtle patterns, gouache paints, cotton swabs, wet wipes
Progress of the lesson:
1. Introductory part.
My house, with me everywhere.
It is located behind the back.
I'm friends with frogs
I walk very slowly.
Not a bug at all
Who am I? (Turtle).
Today we will talk about turtles.
Turtles are divided into two groups: sea and land.
Land turtles, despite their slowness, can walk up to 2-3 km during the day. Marines are another matter - they swim very quickly and can easily overtake a boat.
Turtles live on almost all continents, as well as in some seas; they can be found in deserts, mountains, swamps, rivers and lakes.
Let us travel to the Karakum desert to visit land turtles.
The teacher shows illustrations. Children look at illustrations of different turtles. Notice that in the desert there is sand everywhere. And these are the conditions in which these turtles live. Turtles are usually silent, but some can hiss and even growl. The hearing of these animals is not important, but their vision and sense of smell are excellent. Turtles have enemies. These are local foxes, feral dogs, birds of prey - falcons and eagles. Turtles cannot run fast, so it is easier for them to hide from enemies under their shells. The shell protects the turtle's delicate body from attacks. With such a tough shell, turtles are considered one of the most protected animals that exist today. They also have massive paws ending in claws on the toes.
The teacher shows illustrations of the most unusual and interesting turtles.
These are the largest, giant turtles and they live on Seychelles. The length of the shell in some individuals can reach up to 120 cm.
These are river vulture turtles. Its weight reaches up to 100 kg. The nose is topped with a sharp, predatory beak, like a vulture bird, hence the name, and they live in North America.
This is a swamp turtle and it lives in a swamp. Their shell is dark brown, almost black. There is a pattern on the shell that serves the turtle not just as decoration, it helps to hide from predators. These patterns are of amazing beauty.
The teacher invites the children to draw and color a marsh turtle using the pointillism technique.
Reminds children of the rules of drawing in this technique.
Finger gymnastics "Turtle"
Turtle, turtle, (straighten your palms, clench them into a fist)
Lives in a shell (straighten your palms, clench them into a fist)
Sticks out his head (pull out index finger, put it back)
Put it back (extend your index finger, put it back)
2. Independent activity of children.
First, trace the turtle according to the template and apply dots with white gouache.


Children paint the turtle themselves, using a cotton swab for each color.
3. Summary of the lesson
Educator:
Guys, look what beautiful and bright turtles we got. They have different character, color and different mood. Children show off their turtles, hang them on display and clean up their work area.

Such turtles can be drawn with children of middle preschool age


These are the turtles you can draw in the traditional way

Publications on the topic:
Today I want to present to your attention the works of children preparatory group using the pointillism technique. "Pointillism" comes from the word "pointe".
Greetings everyone! I bring to your attention a lesson on drawing “Lizard”, creative ideas and work of children of senior preschool age.
Summary of educational activities on drawing using pointillism technique “Blue Snowflake” Abstract educational activities By unconventional drawing for children mixed age group 3-5 years old “Blue Snowflake” Educational.
Tasks: continue to teach children to depict flowers using various non-traditional techniques - with their fingers, using a paper stamp, plastic.
"Celebration of wonderful flowers." Lesson notes on unconventional drawing (pointillism) Lesson summary using unconventional methods drawing (drawing with cotton swabs). Topic: “Celebration of wonderful flowers.”
Pointillism is a unique movement in painting, which, translated from French means "to write in dots." Drawing important.
After today's lesson you will learn how to easily draw a turtle. Here's a special video. After watching it, you will learn how to create a drawing of such a cute turtle.
In addition to the video tutorial, I picked up several step by step instructions that will help you understand how to draw a turtle. Shall we begin?
How to draw a funny turtle with a pencil step by step
First draw a small oval - this is the head of a turtle. Below, draw the shell in the form of a figure resembling a semicircle.
Now you need to combine the head and shell of the turtle by drawing two curved lines from one point. Draw a semicircle shape on top.

Draw three legs (we don't see the fourth). Draw a line under the shell - this is the body of the animal. And one more important detail - a small sharp tail.

And now the most difficult thing is to draw the eyes of the turtle, or rather only one eye, because the other is not visible. You need to add folds above the eyes, and at the left eye you also need to add a corner of the cheek. Using two long curved lines draw a nose. Place a dot closer to the bottom edge, and draw a wide smile even lower. And to make our turtle drawing look more realistic, we need to add a few folds to the neck.

We are approaching the finish line - erase extra lines and draw the contours.

I'm delighted! Did you like it?

This is interesting! Did you know that turtles can live over 100 years? You can find out about age by counting the rings on the scutes that make up the turtle's shell. These animals also know how to remember people’s faces. They stretch their necks if you speak kind words to them, and if you speak rudely, they hide in their shell.
How to draw a cartoon turtle
On the left side of the paper, draw something similar to an oval. Add a line below - this is the turtle’s mouth.

Now draw another oval, which will be larger than the previous one. Closer to the bottom edge draw two wavy lines- the boundary between the shell and body of the turtle.

A little more - and the drawing of the turtle will be ready. Draw the turtle's legs.


Now all that remains is to draw the eye and tail of the turtle.

Color the picture.

How to draw a sea turtle
Draw these two ovals - the head and body of the turtle.

Draw the contours of the head and draw in the details: eyes, mouth and put a small dot - the turtle’s nose.


Now draw the contours of the body and draw transverse stripes on it.

It's time to draw the turtle's flippers. Yes, yes, in marine species of these animals, the limbs have turned into flippers, of which the hind ones are smaller than the front ones. These are the kind of flippers you need to draw.
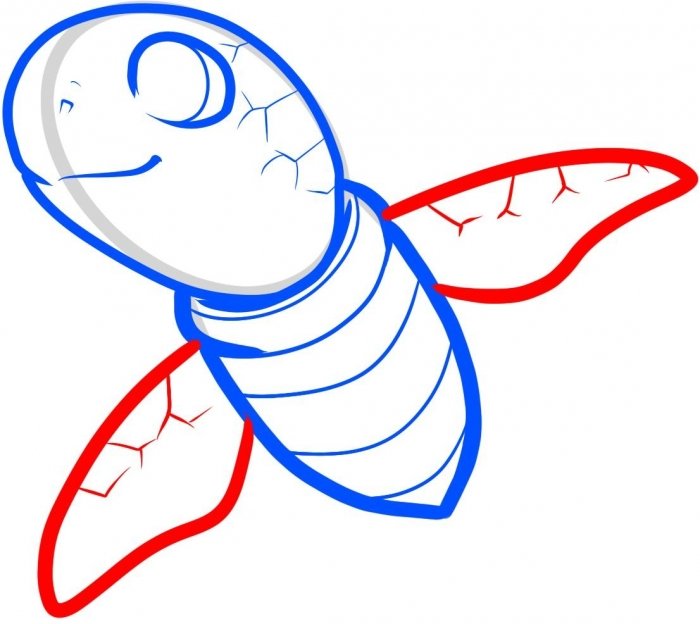


Erase the extra lines and color the drawing.


How to draw a turtle using lines
Finally, I have prepared for you this simple drawing of a turtle. I am sure that you will easily be able to draw such an animal even without explanations.
Hello, young animalists. Today we will find out pencil. Turtles are very ancient reptiles, living for more than 220 million years, and there are marine ones that live in salt water and do not go onto land, and terrestrial ones: land and freshwater. They all have a basic distinctive feature in its structure it is a shell. They come in a variety of sizes. Marine species are usually larger than their land and freshwater relatives. The largest turtle is the leatherback. Its body weight is more than 900 kg, and its shell length is 2 m. The fact that the animal is slow is an absurd myth. Yes, the land turtle has a heavy shell and its movement speed is not great. But marine and freshwater ones are quite nimble. The speed of a sea turtle can reach 35 km/h. So don't believe the rumors. So, let's start drawing.
How to draw a turtle with a pencil step by step
Step one. On the left side of the sheet we will draw a large horizontal oval - the future head. Below, closely, we will place a figure similar to a semicircle.  Step two. Now, using two curved lines emanating from one point, we will connect the shell and the head of our turtle. On top of the oval - let's draw a figure: it feels like there is a circle hidden behind the oval.
  Step three. Let's draw three legs: two larger, one smaller. We don't see the fourth one. The animal’s body peeks out from under the shell: let’s draw a line. Let's draw a sharp small tail.
  Step four. This is perhaps the most difficult step. You'll have to take a closer look to find out if it's similar to the real thing. Let's be patient and put an eraser nearby just in case. Our cute and playful turtle has two large eyes.
  We see only one, it is located at the top of the face. Above it is a fold of skin. Therefore, it is as if we are starting to draw a circle above the eye, but, resting on the oval of the face, we finish the line. Exactly the same fold above the other eye, it peeks out from behind the head. And then we’ll depict it next to each other small corner second cheek. Two long curved lines they will show us the nose on the oval. Let's add a dot a little lower. And below is a wide smile. A couple of dashes and folds on the neck will add liveliness to our image. Step five. Now we take a soft pencil in our hands and trace the outline of the drawing. Carefully erase the auxiliary lines with an eraser.
  Well, now you will know... True, there are such things in cartoons, but you can also try. Good luck in your future drawing activities. I also recommend watching the lessons.
Anyone can draw on craft paper; we use simple available tools and materials. However, colored pencils alone will not be enough. After all, you need to bring the picture to life, and this difficult task can be accomplished perfectly with a white marker or gel pen.
So let's get started!
Required materials:
- colored pencils;
- eraser and HB pencil;
- sheet of kraft paper.
Steps for drawing a turtle:
Draw the body of the turtle in the form of a circle. At the top we will add an oval, which will become the head of the animal.

At the top of the head we will draw two large ovals and one small one in the middle of each figure. These will be the turtle's eyes.

Then we will add highlights and pupils in the eyes, as well as eyelashes on the sides of the eyes. At the bottom of the head we draw a mouth in the form of a small smile.

Let's move on to creating the body. To do this, add the lower and upper legs to the circle. We draw a line for the base of the shell.

Then, on top of the circle outline, we will add another arc, which can create the shell of the animal. Draw the texture in the form geometric shapes, having decided on the contour and base.

Now you can move on to coloring the picture. First, take a light green pencil, which we use in the muzzle, paws and some areas of the shell.

Dark green Using a pencil, add volume to the already colored areas of the drawing.

Pencil yellow add shade to the lower part of the shell-tummy. Then orange we get the volume in these areas of the picture.

When coloring the upper part of the turtle's shell, you should use three pencils at once. different colors: beige, turquoise and dark brown.

You can't color a picture without a black pencil. After all, it will help create a contour and add color to some parts. For example, depressions in the shell or pupils and upper eyelids.

A white pencil will help to “revive” a little the drawing of a turtle on craft paper. Apply strokes to the eyes. If you are drawing on plain paper, you can skip this step.