How to draw easily step by step and by cells?
Using a simple step-by-step drawing technique, even novice artists will be able to draw beautiful animal figures. Here's how to draw a happy puppy.
And so with the help geometric shapes you can draw a cow.


Start drawing a chicken that sits on eggs in a circle. Gradually the beak, eyes, wings and tail are drawn in.

And after the chicken has hatched the eggs, you can draw chickens.

Drawing a bat seems difficult at first glance, but if you use the step-by-step drawing technique, this cute bat will appear in your album in just 5 minutes. Also two circles, but the larger one at the bottom and the smaller one at the top will help you draw a cat.


Birds are difficult to draw, but parrots are even more difficult to draw. But three circles of the same size will help you cope with this task.

And this is how you can draw a mouse.


A very cute Cat Lady is drawn with a pencil, the auxiliary lines are carefully removed and the cat is painted. watercolor paints.


Anyone who knows how to draw circles, ovals and rectangles can draw a drawing of an elephant and a horse.

The difficult task of drawing a camel only seems difficult. But in the technique of step-by-step drawing there is nothing impossible.


Domestic animals sheep and pigs are drawn slightly differently. For a pig, first draw the face, and then the body. In a sheep, on the contrary, the body comes first and the muzzle ends.


The non-flying bird of the cold seas, the penguin, and the forest bird, the owl, are drawn in stages and painted with watercolors.


It’s easy to draw a snail if you draw a circle, then draw the snail’s body and add a curl on the shell, eyes and antennae.

To draw a duckling, just draw an oval to the circle and finish drawing the tail, beak and eyes and wings.


And this is how you can draw babies.


It happens that girls draw in albums, but do not know how to draw a beautiful face. A simple diagram will come to the rescue, where the correct proportions of the face are observed.

You don’t have to rack your brain for a long time about what hairstyle to draw for a girl in your diary, but simply choose the one you like and draw the same one.


You can also draw flowers in albums step by step. In order for the flower to have the correct shape, it is enough to make a circle or oval and complete the center and petals.


Beautiful and easy drawings in cells for sketching in notebooks and personal diaries for girls aged 5 – 12 years
The easiest way to draw is by cells. Of course, if you have a lined drawing. These cute kittens can appear in your diary if you draw them in cells.


For diary pages about love, a drawing with a boy and a girl exchanging hearts is suitable.


Another drawing on the theme of love is easy to redraw, but very interesting.


A bear holding a heart will decorate the pages of the girls' diary, and the cells will help you draw it.


A smiling dog in flowers is suitable for those who like to communicate with dogs and draw them.

Drawings of girls in anime style will decorate the pages of the diary. It’s easy to redraw them cell by cell and color them with watercolors or felt-tip pens.


A more complex drawing with a girl, a butterfly and a strawberry. However, if you carefully count the cells and draw on them, success is guaranteed.


An anime style portrait of a girl in profile is also suitable for girls’ diaries. The drawing is transferred into cells; the color of the hairstyle and eyes of the drawn girl depends on the wishes of the owner of the diary.


A bear-boy and a bear-girl will remind you that friendship exists both between animals and between children.

Beautiful and easy drawings in cells for sketching in a notebook and personal diary for boys 5 – 12 years old
Both boys and girls love to draw cats. Such a cheerful cat will appear in an album or notebook if you draw it cell by cell.


Boys love to draw motorcycles. Let them not have a motorcycle yet real life, but you can always draw it in cells.


Space theme It’s also relevant for boys’ drawings, and they might like the astronaut cat.


Beautiful and easy checkered drawings for girls and boys: ideas, photos
A lion with a red mane, drawn in the cells with its fiery mane, will decorate any diary.


You can draw a whole picture from the cells. On it, in dense thickets, sit a lion, a zebra, a giraffe, an elephant and a hippopotamus.


These animals can be drawn separately. Blue elephant for sketching by cells
And this way you can draw and color a butterfly. She can decorate girls' albums.

If you complete the pond and reeds, you will get a picture with cheerful frogs in the center.


A little fox drawn in cells can be drawn on fairy-tale pictures, or you can add flowers and grass and decorate your diary with such a picture. Tree for sketching by cells
A cheerful dragonfly will surprise you with its bright wings.


VIDEO: How to draw a bee step by step?
The craft of a good draftsman is based on 2 basic things: the ability to control your hand and correct vision. If you want to create or design websites, then you can’t do without special training.
The next 6 sections of the article are essentially the first step in in this direction— you will learn how to learn to draw and where to start. Immediately after this, proceed to the second part of the topic and go through some more.
This is a translation of a note from Medium by Ralph Ammer (all the graphics are his).
Advice. For the next 6 tasks, use one type of pen and one type of paper (for example, A5).
Dexterity of hands - two trainings
The first two techniques are about controlling your hand. You should train your hand, and also learn to coordinate the vigilance of the eye and the movement of the hand. Mechanical practices are great for beginners. You can use them later to try out new tools. They also allow you to relax and take a break from mental or physical work. So, how to start drawing correctly.
1. Many, many circles
Fill a piece of paper with circles different sizes. Try not to let the circles intersect.

Learning to draw circles is not as easy as you might think. Note that the more circles there are on the paper, the more difficult it is to add the next one. Draw them in two directions and as many as possible.
Advice. Shake your hand when it starts to cramp, do this after each approach.

2. Hatching - creating a structure
Fill a sheet of paper with parallel lines.

Diagonal lines are the easiest for us, as they correspond to the movement of our wrist. Note that a left-hander prefers the opposite direction of strokes than a right-hander. Take a look at your favorite artist (in my case, Leonardo da Vinci) and try to guess which hand he wrote with?

Try different stroke directions. Enjoy the shading process. Combine different strokes and enjoy how the paper is covered with different shadow spots.
Advice. Do not rotate the paper. It is very important to train your hand in different directions.
So, after we trained our arms, we need to do some exercises for our eyes!
Perception - learning to see
Drawing is primarily about vision and understanding what you see. People often assume that everyone sees the same thing, but this is actually not the case. You can always improve and improve the quality of your vision. The more you draw, the more you see. The following four techniques will force you to expand your view of familiar objects. This is exactly where they start learning to draw in different courses.
3. Outline - show me your hands!
Do you see these different fascinating contours of your hand? Draw them on a piece of paper. Don't try to recreate everything, just pick a few of the most interesting ones.

Whether you're drawing a person, a plant, or your favorite animal, you're creating an outline of what you see. Contours define a body or object and make it possible to recognize a pattern. The goal is not to immediately display all existing distinctive features, but to learn to see them!
Even if you know the shape of an object, it's still worth taking a closer look and re-examining it.
4. Chiaroscuro - adding light and shadow
Draw a piece of fabric. Start with outlines, and then use your shading skills to find the light and shade transitions.

This exercise will help you learn how to convey light and shadow on paper. I must admit that this is not the easiest way for beginners. Keep in mind that you don't have to make perfect light and shade transitions. The fabric provides a playing field to practice the skills learned in previous lessons. Plus, you'll also understand how to learn how to paint chiaroscuro using only your hand.
Advice. You can do curved shading to create shape and cross shading to achieve deeper shadows that resemble fabric texture.

Advice. Close your eyes slightly when looking at the fabric. You will see a blurred image of the fabric and increased contrast between light and shadow.
5. Perspective - cubes in three-dimensional space
Let's draw some cubes! Follow simple steps.

Perspective drawing is a projection of a 3D object into 2D space (your sheet of paper).
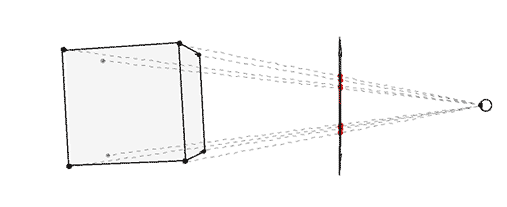
Building a perspective is a separate science that cannot be fully considered in one article. However, we can have a little fun within the confines of a simple technique that gives us an intuitive sense of the magic of drawing in perspective.
Step 1: Draw a horizontal line. This will be the horizon.

Step 2. Place two points on the edges of the line - two invisible vanishing points.

Step 3. Draw a vertical line anywhere.

Step 4: Connect the ends of the vertical line to the vanishing points.

Step 5: Add two more vertical lines as shown below.

Step 6: Connect them to the vanishing points.

Step 7: Now use a black pencil or pen to trace the cube.
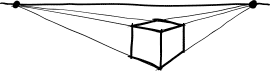
Repeat steps 3 to 7 as many times as desired. Enjoy the build! Have fun drawing, then you will succeed. You can shade the sides of the cube.

Advice. When you draw cross lines, it is better to slightly overlap one line over the other, this will make the shape easier to see.

Mastering perspective drawings will help you create the illusion of depth. And most importantly, you will teach your brain to see and recognize three-dimensional space. This is a great practice on how to start drawing from scratch without any skills.
Even if you decide to ignore the rules of perspective and make “flat drawings,” this knowledge will never be superfluous, but on the contrary, it will help expand your horizons and sharpen your visual receptor.
6. Construction of the composition - why here?
Make 5 different designs one object. Position the item differently each time.
As you create various options placement of your subject on paper, try to trace how this changes its connotation - meaning.

The author Ralph Ammer has several other interesting articles, but this is the one you should watch first in order to understand where to start drawing with a pencil and more. In the comments I would like to see your opinion about the pros and cons of the presented methodology. Which exercises really gave you pleasure and which ones didn't? What else do you want to know on the topic or perhaps you have your own ideas on how to learn to draw from scratch - write it all below.
P.S. Free and complete SEO analysis of a website page - sitechecker.pro. In promotion it is important not only external factors, but the web project itself must be good.
adminMost likely, everyone periodically has the desire to draw something, and not just a doodle, but so that everyone likes it. Especially often, such a desire appears when looking at a beautiful and talented picture. It would seem that it’s so difficult? I want to learn how to draw coolly with a pencil, so I take paper and draw a masterpiece. But when it comes to implementation, then difficulties arise: either the center is shifted, the scale and aspect ratios are incorrect, or the details did not work out. How to quickly learn to draw with a simple pencil , if immediately, due to one’s own ineptitude, the desire to create masterpieces disappears?
Remember that even the most talented masters did not learn immediately: everyone has gone a long way in order to improve their skills and delight others with beauty. This is preceded by more than one year and more than one month of hard work - very little time will pass, and now we are already drawing well simple pictures and people.
The pencil is considered the most simple tool for drawing, so it’s worth starting your training with it.
It takes some getting used to carry a pencil and notepad with you in order to make sketches. Only hard work and perseverance will help you achieve your goal. But what to do if, apart from desire and some abilities, there is nothing?
Drawing: how to draw something beautiful and easy for beginners
So, to draw pictures, you need to know where to start. remember, that For beginners, a pencil is the most convenient tool. This is because it is easy to erase, and if the line is wrong, it can be changed. Moreover, there is different types pencils, with the help of them you can easily create a beautiful drawing.

The main advice for future artists is never do not start drawing with complex and large paintings until you learn how to depict details. You are unlikely to succeed, and the desire to draw again will simply disappear.
First, learn to depict individual objects. To do this, highlight one element from the others with your eyes. Then visually evaluate the shape and size. Next, highlight where on the paper it is best to place it, taking into account the size and shape. Do not forget that tall elements are positioned along the length of the paper, and wide elements are positioned along the width.
In addition, keep in mind that a real object is usually larger than a piece of paper, so you need to draw it, taking into account aspect ratio and scale. Is not simple task for a beginner. Therefore, to develop skills, below there will be simple exercises that will help allocate space for drawing.
Drawing exercises
In these drawing exercises, we draw objects as diagrams, without creating small details - this is something that a beginner can draw simply and beautifully. Here it is important to see how objects are created using simple figures and their dimensions are taken into account. By acquiring such skills, in the future you will be able to automatically find the location and size of the picture.
Exercise No. 1: so the first task is that you need to draw an object not from its natural size, but from a picture. This greatly simplifies the task, since there is no need to select an element and find a place to place it - everything has already been done. You need to reproduce the same thing, but in a different size, so that it does not become a copy.
Repeat similar exercises with other images, developing an understanding of proportions and space.
Let's draw a mountain. First, take a close look at the picture. Visualize it on your sheet. Now draw a straight line. This will be the foundation. Study the shape of the hill and its slopes. If the mountain has equal sides, then depict it as a regular cone, whose height is less than the width of the base. To understand how many times the parts differ in size, you can take a ruler, but the main thing is to be able to do this by eye. In this situation, the proportions of height and width are 1:3.

For correct definition aspect ratios, create the vertex first. Find a place on the horizontal line where you will place it. Create 3 equal segments on the line. Next, find the middle and draw a perpendicular. Then mark the top of the mountain at a distance of 1 division from the base. If the image matches, everything was done correctly. Now try to create the same mountain, but in a different size.
Do not forget that to correctly determine the aspect ratio of an object, you need to start by dividing the base into equal parts, and then move on from there. A task like this will teach you to accurately determine ratio of various elements of objects. And this is the basis of drawing.
Exercise No. 2: another challenge is that it is required to depict a mountain with different proportions of width and height. Here they will be 1:4, and the top deviates at right side. The task is more difficult, but not impossible.
First, repeat the steps of the first exercise: draw a straight line, dividing it into equal parts (here 4). Then there is a peculiarity - the vertex will not be in the center of the segment. It seems to be above the third segment, so we draw a perpendicular line from it. Then the top is laid off. Usually, when creating a drawing, the base is divided by 2 or 3, rarely by 5.
Exercise No. 3: this exercise will require depiction on one sheet profiles of different mountains, which have different vertices in location and height. Don't be afraid, the task is not too difficult. Imagine each hill separately, mentally dotted line to the bases. And then you will understand that the first exercise is simply repeated several times.
Another skill - skills to draw straight lines without tools. This is not too easy, it will require training. First draw a vertical line using a ruler. Now practice, trying to create maximum parallel by hand. A similar exercise is repeated with the horizon.
Mastering shading
When creating masterpieces with a pencil, you will need to master shading skills for the volume of an object. It will show where the shadow falls and where the light falls. Start with simple shapes: cube, ball, cone, etc. In addition, if you look closely, you will notice that these figures have penumbra.

In order to obtain a smooth transition from light to dark, you will need pencils with different densities. After mastering this skill, you will easily learn how to draw three-dimensional details. For classes, you can choose interesting and stylish drawings for beginners - not very complex, but beautiful, they will delight you with the results and maintain confidence in your abilities.
How to draw a person correctly
If you have achieved success in previous tasks, then let's figure it out now, how to draw a person. This is not the easiest task. Let's consider step by step drawing. First try creating people on paper who are standing - this is important for distinguishing between aspect ratios.
Draw a vertical line and build off of it to create a mesh, i.e. the main lines of the waist, shoulders, head, arms and legs. But how do you understand the size of these lines? When drawing from life It is important to use a pencil as a measuring tool. For example, you want to determine the distance from the waist to the head. Take a pencil, visually align its tip with the level of the crown, then mark on it where the waist is located. Transfer the size onto paper. This way you can measure all the items.
Drawing people is a difficult task. Start by creating the base, then draw in the details.
To test yourself, remember that the body is visually divided into 8 parts. One part is equal to the size of the head. In representatives of the stronger sex, the body length is 3 heads, and the border is located on the chest, chin, crotch and belt. The legs are 4 heads, and the center is near the knees. The width of the shoulders reaches 2 1/3 the size of the head. The length of the arms reaches 3.5 times the size of the head. Women's proportions are different - the body is more elongated, and the hips are considered the widest part.

If you have determined the proportions of a person, drawn marks, then give shape to the body. To do this, all elements are drawn in the form of cylinders and ovals. If you like everything, then draw the outline. Now all that remains is to create the details - fingers, hair, face, clothes.
How to draw a portrait
The greatest difficulty is creating portraits. The difficulty is that to obtain a similarity you will need to correctly draw all the details and features. So, let's figure out how to draw a portrait for beginners.
First tip: think about what can be easily drawn or copied from a photo with a pencil? Separate areas of the face: nose, eyes, lips from different angles, even ears. Then move on to creating the full image. For beginners there will be easier work Based on the photo, you can gradually move on to personal observations, sketches and sketches from life.
Tip two: Start by creating an oval shape for the head. Then draw a vertical line down the center. She will divide the face into equal parts. Then divide it into 2 parts horizontally - this is the line where the eyes are located. The eyebrows are located in line with the upper edges of the ears.
Third tip: The length of the nose can be determined as follows: divide the gap between the eyes and chin by 2 - this is the location of the tip. Its width corresponds to the gap between the edges of the eyes. These relationships are not an axiom, but most often faces are drawn this way.
There is a certain concept of facial proportions that can be taken as a basis.
When positioning the parts of the face, you need to create the contour of the lips, nose, ears, and hair. If you are satisfied with the details, then start drawing. Now all that remains is to add the finishing touches.
Graffiti style
If you like lettering, then you should consider. Eat different directions and stylistic exercises for drawing words, letters, phrases. And to understand in what specific direction you will create, you will need to study them all.

Practice on paper first. Create a word. The letters need to be placed at a distance corresponding to ½ the height of the letter, because they will need to be outlined. Now give each letter volume and convexity with shading.
Selecting Tools
The choice of tools and sheets plays a significant role in drawing. So, what devices to choose:
There are different types of pencils. A simple pencil happens With different levels softness. They are often designated by Latin letters: B - the softest, H - the hardest, and HB - hard-soft pencils. Besides this, there are also numbers from 2 to 9. These show the tone;
a beginner will need different pencils with different hardness. In addition, when drawing you will need soft eraser;
paper doesn't play last role. It is better to use thick white sheets - they can withstand corrections. A grainy sheet is suitable for a pencil because the shades are visible on it.
We looked in detail at how to learn to work with a pencil and how to draw something beautiful at home, but now let’s sum it up. Let's look at some brief tips on how to get better at drawing - the list, of course, is far from complete, but it sums up the experience:
Create sketches.
This is the main point. Required to create per day at least 5 sketches. It's worth doing your best here. Take advantage of every chance to create drawings: on the road, in the office, at home. This improves your skills, develops imagination, and the ability to understand size relationships. Drawing storyboards and comics is useful.

Copy the works of masters.
Imitate the masters, it develops taste. Do 1 copy every 3 months. This should include the originals good artists. Try to get as close to the source as possible, study not only the techniques of the masters, but also the cultural features of that era.
Experiment, don’t be afraid of mistakes and don’t put off creativity until later. This way you will soon learn how to create masterpieces.
Draw from memory.
Even when drawing from life, you have to create an image from memory. Besides, it is important to draw from memory small elements - this will improve visual memory and imagination.
Repeat mistakes.
People often quit at the first problem: they are afraid of repeating the mistake. But you shouldn't do this. If it doesn't work, start again. Don’t avoid mistakes; they are worth taking a closer look at - perhaps this is where your individuality lies.
You shouldn't draw from a photo.
Yes, at first this is the only way to train, but then you shouldn’t do it. The lens is not able to convey the full depth of forms.
Take a break.
Don't concentrate on one thing it's important to be able to switch. If something doesn't work out, take breaks. Start different drawings, change points of view, technique.
Conclusion
Even if drawing with a pencil or paints (pastels, watercolors, oils, etc.) is a completely new area of life for you, don't be afraid to set goals, both modest and global. It is important to remember why you decided to learn drawing: will it become future profession or a hobby, do you want to please your friends or relatives with a landscape or portrait as a gift, have you just decided to master a new creative niche?
Fears of your own inability do not give you peace, constantly buzzing in your ear, “You won’t succeed anyway”? Don’t put off ideas and plans for later, gradually purchasing boxes of pencils and paints or spending weekends searching in stores for that very “ better paper». Make your wishes come true today- just take a notebook and pencil and start making, albeit not very skillful, but at least your own sketches.
January 23, 2014The basis artistic arts— drawing with a pencil, or to be more precise, sketching with a pencil. After basic exercises with a pencil (for example, on a stroke), you need to take up sketching in order to acquire drawing techniques, use your hand and understand how certain things are drawn. How lighting and shadow are drawn, how to create a “skeleton” of a drawing and attach detailing to it. We offer you pictures for sketching with pencil: beautiful and easy images that will help develop all of the above. The pictures are collected all over the Internet, both Russian and foreign.
The author of the collection was engaged in drawing at an elementary level. Drawing was not easy for me, but my diligence paid off. The pictures presented in this collection are suitable for both beginners and advanced beginners. Get ready to scroll down for a long time, because there are more than 60 pictures in the selection! You will surely find something to your liking and skills.
A large selection of beautiful and easy pictures for sketching in pencil
A simple outline of a camel-ship of the desert for sketching in pencil.
A beautiful and easy to draw silhouette of a cat.
Kawaii hamster with highlights on his eyes. But they don't make it much more difficult to draw. Beautiful and simple drawing!
Outlines of an anime cat for drawing, easy to draw even for a beginner.
The frog is a small animal with few curves. Try to work the shadow as closely as possible to the original, and you will get an excellent copy.
Another frog with more detailed eyes and muscles. But have you already trained on the previous frog?
A simple and surprising volume. Surprise him even more by drawing him well!
It’s very simple to draw this cat’s face; the main thing is to immediately estimate the lines of symmetry and mark the ovals. There's nothing complicated about the drawing itself (except maybe the eyes), so just make it symmetrical.
Elementary pencil drawing of a bird. You can not stop there and continue to detail it by adding feathers and shadows.
How to draw an elephant: step by step instructions.
Pencil drawing for advanced beginners. The face of a lion cub from a Disney cartoon.
Zebra is the perfect animal to draw with a simple pencil. We suggest drawing this zebra, which does not have complex detailing. Lightweight and beautiful image!
Large bear for sketching. The main thing here is to follow the rhythm and direction of the stroke. The bear should be combed, as in the original. If you can draw a nickel as cool as the original, then you're not so bad at drawing!
A drawing without detail, but which will require a confident hand and a clear delineation of space. You can first draw the cup more freely, applying a lot of extra strokes, and then remove them with an eraser.
An owl under a blanket with a cup of hot drink. Great autumn drawing It will work if you develop it and detail it. But for this you need to draw at least one like this! You know what to do.
Cute kitten is playing. An excellent drawing in terms of anatomy and shadows, although a minimum of strokes were used. The cat is alive! You can also convey this in a drawing, try it!
A ballerina with a minimum of detail and a very abstract figure, and even with her eyes closed. A real gift for a sketcher.
Panda looks out of a cup. You can make the shadows better than in the original, but you have a basis for sketching.
Scrabbles cat in an original drawing style. Large eyes, which will be very convenient for you to practice highlights on. Also the shadow and the rhythm of the stroke are very important here. Notice how the stroke becomes more frequent where the shadow thickens, and how it thins out in the illuminated place.
Fox from Zootopia, depicted in a slightly casual style. You can first portray him in severe negligence, and then remove the excess.
A beautiful drawing for sketching in pencil: a pretty girl has a Pikachu sitting on her shoulder. But it has a minus: it is not so simple. You'll have to try hard to draw it well. But there's not much detail, so go ahead!
An easy way to draw a horse.
A simple way to draw Winnie the Pooh in the Russian style.
Vinnie in an overseas, Disney style. Both options are cute and easy to draw with a simple pencil.
A cute kitten with virtually no detail, easy to draw.
Boots with lace-up heels. Try sketching just one shoe first.
A sad but funny owl sits on a branch and waits for you to start sketching it with a simple pencil.
A simple landscape, without unnecessary detail. But there is something to practice in applying shadows and being steady with your hand.
Little penguin for sketching.
Little squirrel with a potion in his hands. Eyebrows are the final touch in conveying emotion, as are facial wrinkles at the bottom of the drawing.
Stylish, beautiful street pattern. Sketching it in pencil will be the first step to depict something similar in paint in the city.
A girl's cute face in profile, not burdening you with unnecessary detail. Only outlines, only basics.
Waist and legs of a ballerina. There must be very subtle work with shadows. Do everything in your power: eraser, fingers, movements barely touching the sheet of paper.
A bullfinch sits on a branch.
Another bird on the branch. Here you will have to try to shade the bird properly. Notice where and how the lines become denser and darker.
A great picture for sketching that will develop your skills. No special detail, just playing with strokes and darkening.
A picture to practice drawing bird feathers. The ideal angle for these purposes.
Key from DeviantArt.com; A watermark will not interfere with copying from this picture.
Landscape with two boats, trees, silhouettes of mountains in the background. An easy picture, but requiring initial preparation
Half detailed house. Try to draw at least half of it. Notice how the roof tiles are made. Rocks are less of a problem here.
Cute parrots communicate, and you copy them, because they are really light and beautiful.
Cool drawing with an abstract silhouette of a girl with curves.
Landscape with trees, stones, bridge and mountains in the background. The picture is easy, does not require any super technical skills, but tests your diligence and perseverance.
Flower buds for sketching

Do you dream of learning to draw? And look for detailed step-by-step drawing lessons for beginning artists? I will try to help you in this difficult matter and tell you about the many nuances when writing beautiful drawings and portraits in pencil and watercolor! With the help of my step-by-step lessons, master the basics visual arts Not only adults, but also children can!
In this section I publish all my step by step lessons drawing, and separately, in the section Drawing Lessons for Children, I collect simple lessons drawing for beginner artists. Therefore, if you are just taking your first steps in drawing with pencil and watercolor, I recommend starting your training with this section. Be sure to check out all the drawing lessons and tips for artists collected on my blog!
Before you start painting a full portrait, you need to learn how to draw the details of the face. In today's lesson we will learn, how to draw lips in pencil, thanks step-by-step description. The lesson is not difficult and is intended for beginner artists, but do not rush. To achieve a result, namely beautifully draw a person's lips, you need to carefully follow the rules of construction and shading.

Almost every person wants to have their own portrait at home, which is considered one of the most complex drawings that an artist can draw. It is not surprising that there is a great demand for this type of drawings. Therefore, it is the responsibility of the beginner and experienced artist The point is to step by step improve your skills in drawing a person’s facial features, because through the face you can convey not only gender and age, but also the character and temperament of a person. According to their characteristics, portraits are divided into three types: children's, women's and men's. Today we will learn to draw the last view - male portrait with a simple pencil. It has its own characteristics and secrets, which we will tell you about in this step-by-step lesson.


Many people dream of painting a portrait of their family and friends. But before you draw the face as a whole, you need to learn how to draw the details of the face. This lesson for beginning artists is devoted to the question “ how to draw a nose" This task is not difficult, you just need to use the information about constructing and applying shadows. The shape and size of the nose may vary, but the basic design remains the same. Let's quickly find out how easy it is draw a nose with a pencil.

Hands are a personal and unique part of the body. They can often tell a story about a person's life through their shape and size. Long years people study their lines and structure, trying to read the future from the lines. Today we will learn draw hands with a simple pencil by using step by step lesson. Let's pay Special attention their construction and application of shadows so that the drawing comes out as realistic as possible.

A step-by-step lesson on how to draw a woman's portrait with a simple pencil. After going through just a few steps, you can understand the main features that are inherent in portrait of a woman
and are absent in the rest. The face will be positioned from the front, hair pulled back. This is important to know before starting work. Now you can get started.
