One of the most complex species art it is. The physique needs to be studied in detail in parts. We have already looked at some elements. Before you begin, be sure to read these few tips from professional artists:
- First you need to think about the approximate location of all the elements
- For sketches, take a sharpened pencil of medium hardness (I used HB and 2B, write in the comments which pencils you used), which will allow you to sketch thin lines.
- Do not erase the sketch lines until the desired result is clearly visible.
- Maintain proportions
- Please note that the face has a pointed shape at the bottom and a more rounded shape at the top.
- Practice! The more you practice, the better you will learn to convey the necessary emotions and nuances of human facial expressions.
Now let's move on to the lesson.
How to draw a person's face step by step:
Step one. This face is oval shaped. First, let's make an oval and divide it with lines. A vertical line crosses it exactly in the middle, and horizontal lines are located as follows. The first divides the face just below half, and the second another half from the remaining lower part of the face. We cannot give exact sizes, since everyone's face is different. But the task of these lines is to outline (this is the vertical line), as well as the location of the lips (the horizontal bottom line). Don't forget that you'll have to erase them later, so don't press the stylus too hard on the paper. If you press hard on the paper, it will become deformed, and the drawing will look like a girl getting ready for a wedding. plastic surgery. (Will )  Step two. Make approximate strokes in the place where. And also add lines for , and halfway between the nose and chin. Make the line that marks the lower lip wider.
  Step three. Let's move on to drawing. They are located just above the nose. The outer edges of the nose indicate where the inner corners of the eyes will go. Make a sketch as shown in the picture. Consider one more thing here important factor. Human anatomy is designed in such a way that the distance between the eyes is equal to the size of another eye. This is indicated by a red arrow in the figure. Now let's add the eyebrows. Tip: Even if one eyebrow is raised and the eyebrows are the same height, start drawing from inside(points closer to the nose). To get an idea of how high the eyebrows are, add another dummy eye above the left eye - this should give you more or less the correct height for the eyebrows.
  Step 4. Add a mouth. In the previous lesson we already covered some points. For example, we tried to depict . But there's another one important point, a lot of questions novice artists have about how big the mouth should be? Mentally draw two lines from the inner edges of your eyes down. This will be the approximate size of the mouth; when smiling it may be a little wider.
  Step 5. Now we erase the auxiliary lines that we made in the first two steps. Let's see what we got. In principle, the sketch is ready. Now all that remains is to decorate and add shadows.
  Step six. Give your face shape more specificity. Pay attention to the cheekbones and the shape of the chin. This woman has a strong chin, but try not to make it too strong, otherwise she will turn into a man. Sketch in the black pupils and add eyelids. requires concentration. This is the mirror of the soul.
  Look closely at the animation. You will see in what order it is best to do this.
 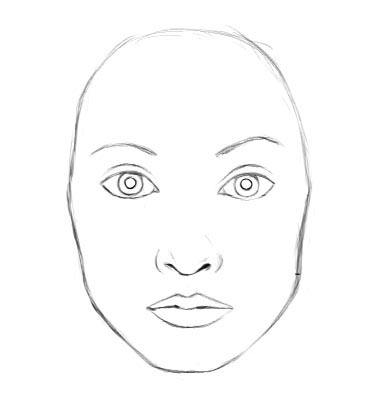 The last step. We add shadows with a simple pencil to give the drawing volume and make it more realistic. That's all. We will look in more detail about other parts of the human body in the following lessons. Also leave your works and write comments about how only we have such lessons, see for yourself.
Who among us didn’t draw pictures of our family in childhood and didn’t get offended by those around us who “didn’t guess” who was who! And all because while the body could still be dealt with somehow, the face could not be managed at all. Modern children are luckier: they have access to a considerable number of descriptions telling step by step how to draw a person’s face with a pencil.
Portraits accessible to beginners
It is believed that only those painters who use the theory of the “golden section” of Leonardo da Vinci succeed in depicting faces. But non-professionals shouldn’t worry: to draw a person’s face with a pencil step by step, even for beginners it will be enough to familiarize yourself with the simplest technologies and learn a couple important nuances. So acquaintance with the brilliant leadership of Leonardo can be postponed. But get hard and soft with simple pencils and with a black pen. Nowadays it is very popular among young people to draw portraits. famous personalities- Let's take this mini-current as a basis.
The face of a representative of the stronger sex should have well-defined cheekbones and chin. Let's look at the technology male portrait using the example of a drawing by German actor Til Schweiger.
Materials:
- hard pencil;
- soft pencil;
- ballpoint pen with black ink.
Instructions:

Girls' and ladies' faces, unlike men's, have more subtle features. Therefore, in their depiction, preference is given to a hard pencil. As in the previous instructions for beginners, we will master a technique that describes how to draw a girl’s face with a pencil step by step, on a celebrity. This time - on actress, singer and model Hilary Duff.

Instructions:

When depicting aged faces, it is necessary special attention pay attention to wrinkles, because they are what give the drawing a naturalistic look. Drawing a portrait of an elderly person with a pencil step by step is quite difficult for beginners, but detailed instructions make the task much easier. Consider a double portrait: there will be both a man and a woman.

Instructions:

Nuances in the depiction of faces
Here are the proportions main principle, which should be used to guide the depiction of a face. In addition, it would be useful for novice artists to know that:
- eyes are the accent of any portrait, but you should not draw them in the center of the oval of the head. We move them a little down, since we need to leave room for the forehead and hairline;
- the “mirror of the soul” occupies 1/5 of the face in the figure;
- the point of intersection of the horizontal and vertical lines in the oval is the place where the nose should be located;
- instead of an oval, you can mark the contours of the face with two trapezoids, touching long bases (which will be the location of the eyes and the top of the ears), and a triangle - the chin;
- When drawing eyes, you should start with the pupil, and then proceed to the eyelids and eyelashes;
- all lines are first drawn with a hard pencil;
- When darkening with a soft pencil, you don’t need to press it too hard, otherwise your face will turn out rough.
After reading this article, you can try yourself as an artist and draw a portrait of your mother, father or any other person.
Sometimes sitting at home you just don’t know what to do. You start to draw flowers little by little with a pencil, but you want to depict something more serious, for example, a portrait. But how to do this? How to learn to draw correctly?
Many artists of various eras, each time practicing the art of drawing, were able to achieve incredible skill. Our task is to study the main principles of drawing in order to learn how to draw a portrait of a person using a pencil and paints. Of course, one cannot say that it is very difficult. But if you don’t know the basics, then you won’t be able to draw a beautiful portrait.
First, you should find out what kind of portraits of a person exist. Each of us considers a portrait to be an image of a person’s face. But is it really so? There are various types of portraits in nature:
- Shoulder portrait. Only the head is depicted here.
- Bust-length portrait. In this case, a person is drawn up to his chest.
- Half-length portrait. It shows an image of a person from the head to the waist.
- Generational portrait. In such a portrait, the human body is depicted from head to knees.
- Full length portrait.
Portraits can also be divided into the following categories:
- Profile portrait.
- Full face portrait.
- Half-turn portrait.


In performing each of these types, you need to take into account some nuances. But, and most importantly, you need to carefully study human anatomy. Otherwise, you will not be able to correctly depict the proportions of the human body.
If you are a beginner artist, then you first need to try to depict a portrait of a woman or man from the side. After you master this technique, you can proceed to more complex ones, for example, drawing a face from the front.
How to correctly draw a portrait of a person with a pencil: a detailed explanation for children and beginners?
You may be surprised, but many famous artists They say that it is more difficult to draw not a portrait, but nature. Therefore, if you want to try to draw a portrait of a person, feel free to get to work.
To get a beautiful portrait, you need:
- Choose the appropriate model at your discretion. Yes, you must like the object you choose.
- Possess basic geometry skills. This is required in order to correctly calculate the places where they should be located: mouth, nose, eyes.
Drawing a portrait of a man:
In a man's face, the lines are not quite smooth, but more straight. However, this does not mean that they are easier to draw. Accordingly, try not to waste paper, draw the facial contour until it acquires the required outline. Now start drawing and follow the following instructions:
- Make an oval to contour your face.
- Now draw a clear horizontal line in the center.
- Step back a little from this line and draw a second one, which will be parallel to it.
- From the center of the second line, draw a perpendicular line. Mark on it the location of the mouth and tip of the nose.
- Step back a little along the oval and draw an ear.

 Start of drawing
 - In the central part of the lower half, draw the pupils and complete the eyelids
- Add the outline of the hair.
- Draw your eyebrows, make a beautiful hairstyle.
- Proceed to the lips. To begin, use a smooth line to indicate the lower lip. After this, mirror the upper lip so that it has a depression in the center.


- Draw the nose. Show the tip of the nose with a slightly extended “tick”. Draw a couple of arc-shaped lines from it.
- From the arch of the eyebrows to the right, draw a curved ruler so that it deviates to the right.
- Add detail to the contours of the eyelids and eyebrows.
- Draw the hair.
- Draw the missing elements of the ears.

- Erase the guide lines.
- Start with the shadows. Make small shadows in the area of the cheekbones, forehead, and nose, blend them.
- Shade a little under the eyes and in the neck area.


With the help of these instructions you will understand how, without much difficulty, you can draw a man’s face step by step with a pencil.
Let's depict a woman's portrait:
In a portrait of a lady, avoid hard, angular lines. In return they will get smoothness and femininity:
- Sketch out the oval of the face.
- Draw a couple of lines. They should intersect and be located in the center of the face, deviating slightly to the right.


- On the resulting lines, mark the main elements: lips, eyes and nose. Draw each curve in detail.
- Draw a ruler from the cheekbone down and shape the chin.
- Make the folds of the eyelids, eyes and nose.
- Draw the lips.

- Now you can start working on the eyelashes and pupils. Don't forget to show the highlights below.
- Draw the ears.


- Start applying shadows. Take a soft pencil and blend the shadows around the eyes, cheekbones, neck and nose.
- Draw an approximate hairstyle.


- Remove all additional rulers and begin shading the portrait.


- Make your hair look voluminous by shading at the roots.
- Shade the background more intensely to make it darker.


Learning to draw eyes:
As we all know, eyes are considered the mirror of the soul. Therefore, it is your eyes that you should pay special attention to.
- Make two ovals - these will be the eyes.
- Draw the pupils and irises of the eyes.
- Be sure to complete your eyebrows, otherwise you won’t get the eyes you want.
- Draw eyelashes. They should look from the arc up or down. In the central part of the eyes, draw the eyelashes a little shorter.
- Detail them: draw short eyelashes inside the corner, and thick and long ones along the edges.
- Shade the third part of the irises of the eyes so that there are light spots on the pupils and the edges are dark.
- Add shadow to the lower eyelids and along the edges of the upper eyelids.

We have found out that to depict a portrait you need to adore geometry and know what proportions are. Now let's look at some anatomical features that will be useful to you for drawing a face.
- The horizontal ruler in the center of the eyes should be equal to the distance between the right and left eyes.
- The same ruler between the lips should be equal to the distance that is between the right and left pupil.
- The distance between the mouth and eyebrow is equal to the length of the ear.
If you want to see all the errors in the resulting portrait, hold the portrait up to the mirror. Believe me, all the imperfections in the image will become more noticeable.
Video: How to draw a man's face with a pencil?
Video: How to draw a woman's face with a pencil?
How to beautifully create a portrait of a girl and mother with a pencil step by step?
Prepare all materials for drawing. On the right paper, soft pencils can be erased well and do not leave marks. Avoid hard pencils as they leave marks on paper. Now you can start drawing a portrait, but at the professional level.
- We fix the paper. Attach the paper sheet using buttons to a special tablet (plywood sheet attached to a wooden frame). Attach the tablet to the stretcher so that the angle is 45 degrees.
- We are working out all the details. Mark all the lines that were indicated in the first version of the portrait image. Here, pay special attention to exactly what shape the parts of the face will have.
- Take into account every little detail, work out all the details. Because your portrait must look like a human face.

- Draw the eyes. There are three rulers used to draw eyes. The central line is where the pupils of the eye are depicted. Mark the eyes yourself and eyeballs. While you only need to draw outlines of the contours, strokes are not needed. Eyebrows should be drawn on top of the eyes. Once you are done with the pupils, carefully draw the eyelids and outline the wrinkles. Draw eyebrow lines above the eyes.
- Draw the lips. The lips also have three lines. First, draw the lower lip, as it is much easier to draw. After that draw the upper lip. Divide it into two equal parts using a hollow. Use eyeshadow to make your lips look prominent. Indicate folds if the person has a smile on his face.
- Draw the nose. Mark the tip of the nose above the lips. Mark it with a tick, that is, in the form of a soaring bird. On one and the other side of this “tick” draw a couple of small arcs. Now apply shadow to your nose.


So, you have outlined and drawn the main details of the portrait. You have completed great job, namely:
- You were able to determine the locations for the eyes, nose, lips and ears.
- You sketched them on paper.
- You drew every detail and every element.
- You put shadow on your nose.
The final stage of drawing a female portrait
The next step is to add shadows to the person’s portrait. This stage is considered very important, since it is what makes the face come to life. Pay special attention to your eyes. A look that does not have a touch of life will simply ruin your work, so work on your eyes with special care and thoroughness. Draw the eyeballs, draw the pupils inside. Don't make them dark. There must be glare on each pupil of the right and left eyes.
The last stage in a portrait of a person is to draw an oval of the face and shadows. Also draw the hair. You probably remember that at the first stage you outlined the ears? If your portrait has a short hairstyle, then thoroughly work out each ear. If your hair is long, then you can cover your ears with a hairstyle.


Apply shadows
Now a soft pencil will fully come to your aid. Here's the thing: a pencil that has medium hardness, or a hard pencil, cannot apply shadows perfectly. Many artists have one trick - they make pencil strokes invisible. Everything happens as follows: they smear strokes on paper using a fingertip or a piece of paper. Now you can draw a correct portrait of a girl and mother with all the nuances and subtleties.
How to beautifully create a portrait of a girl and mother with paints?
Do you want to draw a portrait of a girl or mother with paints, but are you afraid that the drawing will not work out? Cast aside your own fears and read our recommendations. To draw, you need to stock up on the following materials:
- A set of watercolor paints.
- Soft brushes of various sizes (squirrel wool or kolinsky).
- Watercolor paper.
- A wooden tablet (we described it a little higher).
- Hard pencil and eraser.
- The paper on which you will sketch.
First, make a few sketches of the future portrait, and also decide how exactly the person’s face will be depicted in the drawing.
Step-by-step instructions for drawing a portrait with paints:
So, you have completed the preparatory process, now you can create a picture. Break the entire process into the following sequential steps:
- Draw a portrait using a pencil. This stage is considered very important. Make every line visible, don't use the eraser too much. Because this will cause your paper to be worn out, and, accordingly, the colors will lie unevenly. You can draw a portrait on separate paper in advance, and then transfer the drawing to special watercolor paper.

- Now start drawing. To begin, apply a transparent, very light underpainting to the paper using paints. Use pale orange face paint. Paint in broad strokes over the entire face. Where there will be highlights, leave the paper untouched. After that, select other shades of paint and brush over your hair and clothes. Leave the lightest areas untouched.


- Do the eyes and lips. Select the paint you need. It needs to be diluted with water to get a pale shade. Paint the iris of your eyes with the resulting paint. Draw the lips in the same way.

- Apply shadow all over your face. You can apply a warm reflection of light to one side of your face. Display cold highlights from things on your chin. Learn this when drawing a portrait, depict them in the drawing using additional tones.


- Next, take a closer look at each shadow. Find the darkest areas of the cheekbones, lips, sides and wings of the nose, near the hair, and so on. It is thanks to the shadows that you can sculpt your face and give it natural volume. There is a main principle here - constantly move from the lightest shades to the darkest.
- Find light intermediate shades of shadows and light: in the area of the face where the ray of light falls, there are also dark and light places. Watch how the light “plays” and repeat this while drawing on paper.
- Carry out the same actions with your hair and things as when working with your face.
- The final stage: take the thinnest brush, highlight the smallest elements and lines with it. Draw each strand of hair, eyelashes, lips. Remember - when working with paints, even in very dark areas, the paint should be transparent.


- Draw the background as you draw the portrait, but you can also postpone this process until last moment. The most important thing is not to work on the background more than the portrait, but also avoid negligence.

We hope you were able to learn general outline how to correctly draw a portrait of a girl using paints. Portrait for copying 
 Portrait of a man
Video: How to draw a girl’s face with paints step by step?
To draw a portrait of a person with a pencil, aspiring artists do not necessarily have to complete courses, become students at an art academy, or take private drawing lessons. Drawing a person’s face is not difficult, the main thing is not to be lazy and develop your skills.
The main thing in the article
Do-it-yourself pencil portrait of a person: what will you need?
To draw a portrait of a person you will need:
- simple pencils;
- a sheet of white A4 paper;
- eraser;
- stationery knife;
- scotch.
Learning to draw portraits of people with a pencil: where to start?
There should be no unnecessary objects on the working surface. Take a sheet of white paper, place it vertically or horizontally in front of you and secure it at the edges with tape. Remember that you cannot tilt the sheet while drawing. You only work with your hand.
Use a pencil from Koh-i-Noor medium soft HB or soft B.
An improperly sharpened pencil affects the quality of the drawing. Do not sharpen pencils with a sharpener, but use a utility knife. This method of sharpening a pencil allows you to expose the rod as much as possible and make it sharp. By properly sharpening a simple pencil, you will be less distracted from the process and draw longer.
For training, use a regular sheet of A4 paper. In the future, if you like to draw, buy professional drawing paper, such as drafting paper, kraft paper.

How to learn to draw a portrait of a person with a pencil?
To begin, take a photo of the person whose face you want to draw. Look at it carefully. A person's face on a piece of paper consists of geometric shapes, which change their shape during the drawing process. Remember that people's faces are disproportionate. Therefore, during detailed drawing of parts of the face, this must be taken into account.
To learn how to draw a portrait of a person with a pencil, you need to make sketches on paper.

How to draw a portrait of a person with a pencil for beginners step by step
The process of drawing a person's face with a pencil can be divided into the following stages:
- drawing the general contour of the face;
- marking the main parts of the face inside the oval;
- drawing eyes;
- drawing eyebrows, drawing nose and mouth;
- detailed drawing: wrinkles, shadows, moles, hair, etc.

Getting started: building the head and general contour of the face
To draw correctly general outline face, you need to know quite a bit of human anatomy. To begin, draw an oval, which will be narrower at the bottom than at the top. Next, change the outlines individually.
Marking parts of the face and working with planes
Full face
- The skull and jaw are an oblate sphere; to put it roughly, the face in this position resembles chicken egg, inverted with the narrow part facing down. Draw such an oval and draw two perpendicular lines through its middle.
- The horizontal line is the eye line. Divide its right and left parts in half. This will be the middle of the eyes (pupils).
- Divide the lower part of the vertical line into 5 equal segments. The tip of the nose will be located at the 2nd mark from above, and the mouth will be between the 2nd and 5th marks.
- Divide the upper part of the vertical line into 4 equal segments. The hair should be on 2 sections from above. The bottom of the ears should be at the level of the tip of the nose, and the top should be at the level of the eyelids.
Artists use small tips to draw portraits:
- the width of the face consists of 5 segments equal to the width of the eyes;
- the distance between the eyes is approximately equal to the width of one eye;
- The width of the chin is equal to the length of the eye.
These standards are adjusted individually.
 Profile
- The profile also resembles an egg in shape, but its sharp part is shifted to the corner.
- Divide the drawn figure with two perpendicular lines.
- The ear is behind the vertical line. The depth of the skull is drawn individually.
- The correct location of the nose, eyes, eyebrows has already been discussed in the “Full Face” subsection.

Detailing the face: drawing eyes, contours of eyebrows, nose, lips, ears
Eyes
Since the shape of the eyes is different for each person, it is impossible to accurately describe this process. The middle of the eye is already marked. Now draw two arcs on the right and left, which you will later “turn” into eyes.
Key points to pay attention to when drawing eyes:
- the outer part of the eye is always slightly higher than the inner part;
- the arches of the eyes are rounded closer to the inside of the eye and narrowed to the outside;
- if a person looks straight, then the iris of his eye is always slightly covered by the upper eyelid;
- eyelashes always begin to draw from the eyelid;
- the lower eyelashes are always shorter than the upper ones;
- do not forget that the tear ducts, lower and upper eyelids should be drawn around the eye.
Very often, beginners, having drawn one eye, stop looking at the photograph and copy the second eye from their drawing. Don't forget that people's faces are not proportional. The second eye will be a couple of millimeters wider/narrower, higher/lower. The eyelid above the right eye may be lower than that above the left. All these little details must be carefully copied from the photograph.
If you draw a face in profile, then the eye here will resemble the shape of an arrowhead with convex and concave sides. The iris is hard to see from the side, but when drawing a portrait, you need to draw it so that the eye does not look strange.
 Brows
Brows
The widest part of the eyebrow is often closest to the bridge of the nose. Don't start drawing the hairs right away. Define the shape of the eyebrows. If you draw a face in profile, then their shape will resemble a comma.
 Nose
Nose
The easiest way to draw a nose is illustrated in the picture. Draw a circle, then add wings and “backs” to it. At the very end, all that remains is to outline the nostrils with a pencil.
 There is a more complex but realistic way to draw this part of the face. As shown in the picture, draw a polyhedron. The shape of the polyhedron changes depending on the position of the face. Next, start rounding the geometric shape.
 Lips
Lips
Start drawing the lips from the inside line, where the lower and upper lips meet. This line will never be perfectly straight; it always consists of several curved lines.
The inner line of the mouth is always darker in the drawing than the outer contours of the lips, and the upper lip is often smaller than the lower.
If you draw a face in profile, then never draw the tip of the lip sharply upward. Draw the middle line of the lips first straight or down, and then lift it up.
 Ears
Ears
The human ear can be represented in the form of the letter C. Do not forget that the ear has a rim and inner part, which resembles an arc, and a lobe. Be sure to draw these main parts of the ear.

Hatching and halftone development
It seems that you are already at the finish line, but the portrait is completely unrealistic. Hatching and working out halftones is something you can’t do without when drawing a portrait of a person.
First of all, determine where the light falls on your face and where the darkest places are. Apply strokes to the face in one direction - from top to bottom. To give the skin a matte look, blend the lines with your finger or a regular napkin. To lighten areas in the portrait, use an eraser.

Highlighting and darkening areas of the face
Highlighting and darkening areas of the face is necessary to make the face on a sheet of paper look voluminous and not flat:
- If you need to lighten an already painted area, use an eraser.
- Start sketching out areas of the face with light lines. Don't press too hard on the pencil.
- Apply lines in layers. The more lines, the darker the area of the face will be.

How to draw portraits of people with a pencil from different angles: full face, profile, head turn
We figured out how to draw the full face and profile of a person.
- If you draw a person from the back, then you may not be able to see all parts of his face.
- With the face turned almost in profile midline the lips are very small, the line of the neck merges with the line of the chin. Also visible is part of the cheek, behind which the person's nostril is shown.
- When a person’s back is turned almost to you, you can clearly see the line of the eyebrows, the cheekbone, the line of the neck, which tends to the ear (if this part is not covered by hair).
- When you turn a person's face more, you see eyelashes, a small part of the eyebrow, the ridge of the lower eyelid, and the tip of the nose.

How to draw a portrait of a person correctly with a pencil: the basics and secrets of the skill
- The focus should be on the person's eyes.
- Try to draw not only the head, but also the shoulders, neck decoration, collar, etc.
- Never start drawing small details without correctly marked outlines.
- When tracing the contours, do not press hard on the pencil, draw with barely noticeable lines.
- Pay special attention to the proportions of the person's head.
How to draw a portrait of a person with a pencil: video tutorials
The person whose portrait you decide to draw will definitely appreciate your efforts. You can give such a gift to yourself. If you are afraid of the amount of work ahead, practice drawing individual parts faces. In the future it will be easier for you to draw a portrait of a person with a pencil.
If you dream of drawing realistic portraits, you cannot do without knowledge of drawing individual details of the face. In this article, artist and teacher Lee Hammond shares tips and techniques for drawing realistic faces in pencil.
Learning to draw facial details
Before you draw faces, you must learn how to depict their individual features. As you go through drawing each feature in turn, you will study the structure of the face and understand what to look for in the drawing.
Consider a ball. Its shape is constantly traced in the outlines of the human face: in roundness and curved lines, especially in the cheeks, nose and chin. And, like a ball, the chiaroscuro of each facial feature consists of five elements: the falling shadow, the edge of the shadow, the penumbra, the reflected light and the highlight.
In the three images below you will see how the shape of the ball is clearly visible on different parts faces. Remember that chiaroscuro should be visible in everything you draw.
Nose
The shape of the nose is close to spherical. In fact, three spheres are visible in the outline of the nose: the tip and the nostrils.

Chin
The shape of the chin is also spherical. See how the light reflects along it and creates a shadow on the neck.

Cheeks
Spheres are visible in all roundness of the cheek. The five elements of chiaroscuro are clearly visible.

Now let's move on to drawing facial features. Let's start with the nose.
You need:
- Drawing paper
- Eraser
- Simple pencil
- Ruler
- Tortillion
Drawing the nose
Of all the facial features, the nose is the least difficult to draw and most closely resembles a sphere. It is easy to see the five elements of chiaroscuro. It is important to learn to draw facial features from different angles.
Drawing the nose from the front and profile will give you enough experience. Follow the step-by-step instructions for drawing the nose from both angles.
Front view
1. Creating a contour line
Using the markings, draw a line of the nose from the front with a pencil.

2. Image of chiaroscuro
Draw highlights at the wings and the tip of the nose. Add shadows at the bottom of the nose to make it look 3D. Draw a shadow under the nose.

3. Mixing
Lightly blend the pencil tones using a tortillion. Leave a little white. Many artists, when painting light skin tones, leave only the highlights as white as paper.
Blend from darker tones to lighter ones, just like you did in the sphere drawing exercise. This will give the drawing realism.

Profile view
1. Sketch the contour line
Using markings, use a pencil to draw a line for the nose in profile.

2. Image of chiaroscuro
When you are confident that the outline is accurate, erase the mesh. Mark the light and shade with a pencil. Remember to respect the shape of the sphere.

3. Mixing
Gently blend the tones using a tortillion. A dark background will help highlight the contour of the nose.
Lighting plays a decisive role. Against a dark background, the drawing looks completely different.

Drawing a mouth
Drawing a mouth can be difficult. Many beginning artists emphasize it too much. But this is necessary when cosmetics are used on the lips that clearly outline its contour.
When learning how to draw a mouth, pay attention to the fact that the upper lip is smaller and darker than the lower. Its shape resembles the letter M.
Male and female lips differ from each other. Women's lips are more clearly defined and appear fuller and brighter. Men's lips are thinner and less noticeable on the face.
Drawing female lips
1. Drawing a contour line
Using markings, draw a lip line with a pencil.

2. Dimming
The upper lip is depicted darker because it is turned inward, and the lower lip is drawn outward.

3. Mixing
Gently blend the tones using a tortillion. Draw skin around the lips to make the drawing look more realistic. Use an eraser to create highlights on your lower lip so it will look shiny.

Drawing male lips
1. Creating a contour line
Using a marking line, use a pencil to outline the line of your lips.

2. Dimming
When you are confident that the outline is accurate, carefully erase the markings. Use a pencil to add dark areas.

3. Blending and brightening
Mix tones by the tortillion. Do not leave white spots on the paper. Deepen the color of dark areas with a pencil, then use an eraser to lighten the highlights.

Drawing a smile
It is much more difficult to draw a mouth if the teeth are visible. When drawing teeth, do not press hard on the pencil. Too expressive lines will look like chips.
It is also necessary to depict chiaroscuro. Teeth are voluminous, and without light and shade they will look flat. The deeper the tooth is in the mouth, the darker the shadows will be. The lower teeth are also depicted as darker, as they protrude less forward.
1. Creating a contour line
Using markings, use a pencil to draw the outlines of the mouth and teeth. Strive to achieve as close a resemblance as possible.
Avoid pressing hard on the pencil. To achieve greater accuracy, draw both the outline of the gums and the outline of the teeth.

2. Dimming
When you are confident that the outline is accurate, erase the markings. Use a pencil to add dark tones. The darkest tones are inside the mouth. The upper lip is darker than the lower lip, and there are no bright highlights on it.

3. Mixing and drawing chiaroscuro
Lightly blend the tones using a tortillion. Apply a little shadow to each tooth to add dimension. Add a highlight to your lower lip to make it look voluminous and shiny.
The lines between the teeth should remain barely noticeable. This can be achieved using an eraser.

Drawing Facial Hair
When drawing a man, the question of depicting facial hair: mustache and beard may arise. At first glance, this is difficult, but in fact it is very similar to drawing animal fur.
Facial hair, like animal fur, is drawn with strokes in several layers.
1. Creating a contour line
Using the markings, draw the lines of the nose, lips and mustache with a pencil.

2. Drawing and blending
Once you are confident that the outline is accurate, carefully erase the marking lines. Add dark colors with a pencil.
Using a pencil, draw the mustache hairs in the direction of growth. Mix by the tortillion and then draw the next layer of hair.

3. Deepening tone, blending
Deepen your tone. When you reach the desired color depth, use the eraser to create some highlights. This way you will achieve the volume of the drawing.

Drawing eyes
The eye has a complex structure, and when drawing each element it is necessary to take into account a lot of nuances:
- The iris and pupil have perfect shape circle when the gaze is directed straight. If the eye is depicted at an angle or looking up or down, then they take an oval shape.
- The center of the pupil coincides with the center of the iris.
- The pupil is the darkest element of the eye. Color it as dark a shade as possible. Don't forget to draw a highlight.
- Half of the highlight is on the pupil, the other half is on the iris. Reduce the glare if it occupies more than half of the pupil in the photo from which you are drawing.
- A very important detail is the drawing of the skin fold of the lower eyelid. To make the drawing look realistic, you should not limit yourself to just the line under the eye.
- The patterns of the iris differ from each other depending on the color of the eyes and are similar to rays diverging in different directions.
- It is necessary to slightly shade the white of the eye. This will give it a spherical shape. Never leave it pure white.
- Eyelashes upper eyelid, layering on top of each other, look like a thick dark line.
- The upper eyelid hugs the eyeball.
Now let's move on to drawing the eyes.
1. Creating a contour line
Using the markings, draw the outline of the eye with a pencil.

2. Drawing the iris and blending
When you are sure of the accuracy of the outline, erase the marking lines. Draw the iris pattern. The lines should resemble rays diverging in different directions, or the spokes of a wheel.
Leave some room for the highlight (half of it should be on the pupil and half on the iris). Mix gently using a tortillion. Use an eraser to create highlights on the iris.

3. Further blending, drawing eyelashes
Draw the skin, creating a distinct outline. Shade the white of the eye to give it a spherical shape.
Draw eyelashes with quick strokes. They should be pointed at the ends. They grow in several layers, so don't draw them at the same distance from each other.
Please note that eyelashes grow inner surface lower eyelid. Thanks to this, the eye looks more voluminous.

Drawing the nose and eyes together
Once you've learned the structure of the eyes and learned how to draw them realistically, you need to figure out how to depict them along with other parts of the face, such as the nose.
Here are some tips:
- The width between the eyes is equal to the width of one eye.
- Both eyes should be on the same line.
- If you draw a vertical line from the corner of the eye, it should touch the edge of the nose. (This rule may not apply if you are drawing someone of a different race)
- Both eyes should look in the same direction. The pupils and irises should be the same.
- The highlight should be placed in the same place in each eye (half in the pupil, half in the iris).
1. Creating a contour line
Using markings, draw the outline of the eyes and nose. Notice the vertical lines drawn from the corners of the eyes and touching the wings of the nose. Place your eyes at the same level as each other.

2. Shading and drawing eyebrows
When you are sure of the accuracy of the result, carefully erase the marking line. Use a pencil to draw dark colors.
The darkest element of the eye is the pupil. Highlight the shadowed areas and eyebrows. Before drawing the hair, do some shading inside the outline.

3. Blending and Highlighting Highlights
Mix tones by the tortillion. Only small areas of the paper should remain white, including the whites of the eyes. Use an eraser to create small highlights on the eyebrows and eyes.

Half-turned eyes
There are different rules for drawing a person from an angled perspective. This diagram will help you learn to see an object from different angles.
Due to perspective, facial features appear distorted. In the example drawing, the nose covers one eye; this side of the face is only partially visible.
1. Creating a contour line
Using markings, use a pencil to draw the outline of the eyes at a slight angle. Please note that part of the face at an angle is not visible.
The gaze is no longer directed straight ahead, and the irises and pupils take the form of vertical ovals. Perspective changes their perfectly round shape.

2. Shading and blending eyebrows, drawing shadows
When you are confident that the outline is accurate, erase the markings. Use a pencil to shade the shaded areas. The darkest elements are the pupils. Blend your brows to achieve a gray tone.

3. Blending and creating highlights
Use a tortillion to mix the pattern. Use an eraser to create highlights on the eyebrows. Draw the pattern of the iris and the sparkle in the eyes.

Ears
Ears are one of the most difficult body parts to draw. They contain multiple bizarre shapes. If the ears are not noticeable because of earrings or large size, we pay little attention to them. But they are not formless, as we often think.
To draw portraits and make them look realistic, you need to study their structure. Good idea– draw ears from different angles if you want to excel at drawing portraits.
Front view of the ear
Below is a typical close-up of the ear in a portrait. Most of it is hidden behind the hair. Only part of the lobe is visible.

Posterior view of the ear at an angle
This picture conveys the subtleties of the structure of the ear. The angle of the image is not typical, but perhaps someday you will have to draw a person in such an unusual pose.

Drawing ears
This exercise will help you learn the anatomy of the ear. It consists of intricate lines that harmoniously connect with each other. The markings will help you understand the composition of this mosaic.
Here are some things to keep in mind when drawing ears:
- The outer surface of the ear seems to fit around the inner surface.
- The shape of the inner surface of the ear resembles the letter U.
- The skin of the ear has its own characteristics. It is fatter, so the highlights can be very bright.
- The inside of the ear has a tubercle resembling a cup.
- The earlobe is spherical.
1. Creating a contour line
Using markings, draw the outline of the ear with a pencil. It is like a puzzle whose pieces are interconnected.

2. Shading
When you are sure that the outline is correct, carefully remove the markings with an eraser. Apply shading with a pencil.
Apply shadow on the inner surface of the ear. Don't shade too much.

3. Blending and brightening
Mix the pattern using a tortillion. To achieve a realistic image, use the eraser to create highlights.
The skin of the ear shines more, so the highlights should be bright. Don't forget about the five elements of light and shade and that the lobe is spherical.

Drawing a portrait
Once you've learned how to draw each facial feature, it's time to combine them into a portrait. Don't try this until you've had enough practice. First, master drawing facial features individually.
Before moving on to the instructions for drawing a portrait, learn how to draw hair as well. This topic is discussed in another article.
Here are tips for drawing portraits:
- Start drawing from the eyes. This will help create an association with a specific person.
- After you draw the eyes, move on to drawing the nose, then the mouth.
- Let more dark color hair will help highlight the contour of the face. By shading the background, the face looks more natural and the contour is smoother.
- Draw the hair in the direction it grows.
- In every drawing, remember the five elements of chiaroscuro.
1. Creating a contour line
Using the markings, draw an outline with a pencil female face. Be careful, take your time and watch the cells carefully.

2. Hatching and marking the direction of hair growth
When you are sure that the outline is correct, erase the marking line. Add dark tones.
Start with the eyes, then move to the nose and then to the mouth. Paying attention to the angle of the light, add dark strokes around the face. Use long pencil strokes to outline the direction of hair growth.

3. Blending and brightening
Let's move on to the final stage. It is necessary to mix the face pattern with a tortillion very carefully. White spots: There should be some glare left in the eyes and nose. Use the skills learned in the individual feature drawing exercises. Remember the five elements of chiaroscuro.
Drawing hair takes a lot of time. Convey length using long pencil strokes. Mix gently and then use an eraser to create thread-like highlights.

Practice
You've learned the basics of drawing facial features, now you need more practice. In "New big book drawing" by Lee Hammond there are many step by step instructions for beginners in drawing graphic and color images. It describes the drawing processes and human faces, and animals.