Today, soap making is becoming increasingly popular. Of course, ready-made soap can be purchased in stores of various types. The souvenir shops offer large number products self made, amazing with their skill and originality. Homemade soap has a significant advantage. It is made from renowned and quality ingredients. In addition, the cooking procedure is very exciting. You can read about how to make handmade soap at home in this article.
There are several technologies for making soap at home. Some of them are suitable for those who are just starting to get acquainted with soap making. You can make soap yourself after a short introduction or watching a master class.
Soap making is not just the process of preparing a bar of soap. This is creativity, which means creating a unique composition, color and shape of soap.
Store-bought soap may contain not only useful, but also harmful components, which reduces its use to nothing. Soap made at home will have the same properties that the soap maker will give it. Natural soap will gently and delicately care for the skin of your hands, face and body.

Soap making process:
- Preparation of soap base. The finished base can be purchased in a special soap making department. It has translucent or white. If the soap is prepared from scratch, which involves preparing the base yourself, purchase the chemical components separately and combine them in the amount corresponding to the recipe.
- Adding base oils to the base. Each oil may have its own unique properties. It is chosen independently, taking into account the expected effect of using soap. Oil can be coconut, olive, peach, apricot.
- Enrichment with essential oils. Its addition gives the soap a unique aroma and also enriches it with useful substances. Instead of essential oil, you can add fragrances or fragrances. But you can't mix them.
- Adding dyes. You can use special or food coloring. For naturalness, you can color your soap using coffee, cocoa or juice.
- Use of fillers. Add additional cosmetic properties to soap. Can be used as fillers oatmeal, honey, dried herbs and flowers, coffee, nut shells, ground fruit seeds.
- The finished composition is poured into molds. These can be plastic glasses, ceramic bowls, special molds for soap.
You need to work with the liquid composition smoothly and carefully. It is better to prepare all the ingredients in advance so that they are at hand at the right time. Before starting work, beginners need to read the tips and recommendations of experienced craftsmen.
The first piece of advice when working with ingredients and soap composition is to follow safety precautions. There is an increased danger when making soap from scratch. To work with different compositions, you need to use dishes that will be intended only for soap making.
Please note that heated base can leave thermal burns - you need to work with it very carefully.

You also need to be careful when working with fragrances and essential oils. They need to be diluted in a container specially designed for this purpose. It is important to understand that chemicals if ingested, they can cause harm to the body.
Points to consider:
- Beginners should carefully consider step by step process Job. To do this, all actions need to be written down in the plan. When working with a heated base, you need to act harmoniously and quickly, otherwise the soap may harden prematurely.
- Do not allow the base to overheat. To heat it up, it is best to use a water bath. To do this, take larger and smaller enamel dishes.
- The addition of fillers, dyes and fragrances should be moderate. Otherwise, the quality of the soap may be spoiled.
- When working with soap base, do not use water. Water is needed when working with baby soap or making soap from scratch.
Interestingly, additives have different effects on the appearance of soap, its density and hardening speed. For example, sugar and honey help soap melt quickly. But chocolate affects its hardening time. The use of vanilla gives a yellow tint to the soap, but does not enrich it with a pleasant aroma.
Homemade handmade soap: how to make
Soap can be prepared faster by using ready-made soap. baby soap or basics. You can use a special composition purchased in the store. Oils and extenders can be purchased at a grocery store, pharmacy, or craft store.
The preparation procedure is simple, especially when it comes to using a soap base. If you prepare the composition yourself, the technology may differ.

Working with chemicals involves several technologies: hot and cold. When hot, the components undergo heat treatment. When cold, the heating reaction occurs from the interaction of elements.
Technologies:
- Soap based. The base is melted and base oil, flavors, dyes, and fillers are added to it. The liquid is poured into molds for 3-6 hours.
- From scratch. Working with chemical reactions. The alkali reacts with water, and oil, dyes and fillers are added to the finished base.
It is common to make soap from scratch. The lye must be mixed with water; it must be poured into the water, and not poured into it. It is better to prepare the base in a ventilated area or outside. The mixture is allowed to cool, preparing the solid oils for mixing: they can be melted in the microwave or using the water bath method. After the base mixture is ready, fillers, dyes and flavors are added to it.
What is handmade soap made from?
The amount of ingredients for making soap may vary, since the technology for its production may be different. Soap can be prepared from ready-made baby soap, base or lye and water. Standard ingredients are added to the liquid base, which will vary depending on the personal preferences of the soap maker.
The ingredients and their properties determine the characteristics of the soap and its effect on human skin.
All preparations need to be thought out in advance. The preparation of soap should be smooth, especially after the base is heated to a liquid state. The ingredients must be selected correctly; you should not oversaturate the soap with them.
Compound:
- Soap base;
- Base oil;
- Flavorings, essential oil;
- Fillers.
The choice of ingredients depends on whether the soap should be moisturizing, cleansing, bactericidal, etc. Soap recipes homemade there are many. When choosing them, it is important to monitor the ratio of ingredients.
How to make handmade soap (video)
Homemade soap for beginners is easy to make. Anyone can learn this, the main thing is to start. It is important to familiarize yourself with professional advice and instructions. All actions must be coordinated and fast. The choice of ingredients for cosmetics depends on the properties that the soap maker wants to impart to the soap. There are three technologies for making soap: using a ready-made base, from scratch, or based on baby soap.
The simplest type of soap making at home is soap making from baby soap. In addition, for beginners in this matter, this is just a godsend. Once you try to make soap with your own hands, you are unlikely to want to go back to regular soap. Firstly, making soap at home is profitable, secondly, it is useful to use everything natural and healthy for yourself, and thirdly, it is a very exciting and interesting activity.
If you decide to make soap at home, but are afraid, so to speak, of ruining everything, then I think it’s worth trying to start taking your first steps using baby soap. Here there is less work and less time, but there is considerable experience. Don’t be afraid to experiment, because it’s your imagination and great desire that can produce an excellent result. I will try to present you in as much detail and clearly as possible the most basic meaning of how to make soap at home.
I want to talk about how to make real soap. It is, of course, better to start with baby, adding various oils, flavors and dyes to it. Here are a few simple steps the process of making the most simple soap recipes.
First, I choose the ingredients (baby soap, dyes, fragrances and base oils).
Secondly, I make soap shavings and a water bath.
Why do I prefer baby soap? Because there are no chemical additives in it. This soap is intended for delicate children's skin, because such skin is susceptible to perfumes and alkaline environments. Therefore, you can easily add your own ingredients (oils, decoctions, flowers), and you will get soap with the desired aroma, color and shape. Baby soap also contains moisturizing glycerin, lanolin, and vegetable oils, which have a beneficial effect on the skin without irritating it.
When choosing baby soap, I always pay attention to the smell - the less it is, the better, and it can be covered up. The composition should also not contain chemical additives, flavors and perfumes, since desired result in this case it is impossible to achieve and you can only ruin everything. In addition, the packaging and quality of the soap should not reveal any suspicion. Of course, if you have doubts about it, it is better to choose another option. And finally, learn from mistakes - try and draw appropriate conclusions.
For me, the main characteristics of a good soap are the following:
Soap with little or no scent.
It melts well and is easily ground into chips.
Remember to take precautions when working with hot melted soaps and oils, as well as when making shavings, which can create harmful soap dust.
What additives to choose for making soap at home? You can add anything you want to your homemade soap, but not all ingredients will be able to retain their color, smell and shape. Also, when choosing different components, take into account what type of skin you have, what it currently lacks, what problems you would like to solve with it, etc. Various supplements will help achieve results. You will learn about what our skin needs from the article “Facial care at home” on the “Sunny Hands” website .
 Base oil is added to soap to improve its qualities and properties. Each oil is unique in composition and imparts a variety of properties to the resulting soap: softness, creaminess, foaminess and others. In a special soap store you can buy jojoba, olive, and macadamia oils and use them in your first experiments. You don’t need to add these oils if you still doubt your abilities. You can add flavors and natural colors. Color and aroma will be given by well-known natural additives, such as decoctions, tinctures, berry juices, dried petals of flowers, fruits, berries, garden herbs parsley and dill, and so on. You can even use ready-made liquid or dry dyes, which are sold in the same specialty stores.
Essential oils, which can be purchased at the pharmacy, will also add special properties and aroma to your soap. And over time, when you gain experience, you can easily buy them at a soap store.
Each oil has a different effect: relaxes or invigorates, has an antimicrobial and anti-inflammatory effect, and much more.
As a scrub, you can use components such as poppy seeds, coffee, clay (blue, white, pink, green), oatmeal (flakes, whole or ground), ground nuts. IN in this case The main thing is not to overload the ingredients, as the soap can crumble a lot and lather poorly.
To make soap at home from baby soap, you will need the following utensils and tools:
- fine grater (the finer, the faster the soap shavings will melt);
- a durable saucepan for a water bath (iron and heat-resistant);
- a glass or porcelain plate (heat-resistant) of smaller diameter than the pan;
- molds for filling (soft disposable jars, silicone molds for baking);
- a plate for melting solid butter;
- a knife for cutting prepared soap and a spoon.
If everything is ready, then you can start making your own soap!
So, I grate pieces of baby soap;
For a water bath, I pour water into a saucepan on the stove so that the plate with the shavings is submerged to the brim in water. Heat must be transferred from the boiling water to the plate. And in order for the chips to melt well, you can add water or even milk to it, which is even better. The latter will give the soap special softening properties. Melting agents such as sugar (regular or vanilla), chocolate or honey will speed up the melting process. You can add a decoction of herbs, after diluting it with warm milk. Herbal infusions are also incredibly beneficial for the skin. Read how to cook them correctly. Moreover, all components must be added when the soap is in a water bath. The melting process takes on average 15-20 minutes.
 You need to make sure that your soap does not boil, otherwise there will be unwanted bubbles in the soap. And as soon as the soap melts, becomes viscous and without lumps, you can safely add base oils (1 tablespoon per 100 grams). Then I remove it from the water bath and add essential oils, dyes and other necessary components. It is better to do this at the end of the procedure, since such substances are volatile. I stir the resulting mass and pour it into molds. You can add different components to the molds if you make different soaps at the same time.
After pouring, the resulting soap should cool. To do this, I leave it to cool in the refrigerator until it reaches a solid consistency. Then I lay it out in the air to remove any remaining moisture. The water will cause the soap to dry out, so I cut off the excess with a knife.
Approximately how many ingredients should I add per 100 grams of baby soap?
1 tablespoon of base oils;
100 grams of any of the liquids listed above (milk, decoctions, etc.);
6-7 drops of essential oils;
4-5 drops of dye;
50 grams of other additives (honey, coffee, oatmeal, chocolate, sugar, etc.).
Homemade soap recipes using baby soap.
Soap "Cleansing". Thanks to its components, soap has a powerful disinfectant effect.
We will need:
Baby soap-100 g
Water-2 glasses
Camphor alcohol - 1 tbsp. l.
Ammonia-1 tbsp. l.
Citric acid-0.5 tsp.
Glycerin-1 tbsp. l.
Hydrogen peroxide-100 ml.
Let's prepare it like this:
Rub the soap on a fine grater and pour into a pan filled with 2 cups of water. After 3-4 hours, when the soap has dissolved a little in the water, place the pan in a water bath and wait for the soap to completely dissolve. As soon as the soap has melted completely, add citric acid, camphor and ammonia. Mix everything thoroughly and remove from heat.
Lastly, add hydrogen peroxide in small portions. If desired, you can add 3-4 drops of tea tree oil. Mix everything well again and pour into molds. After 2 days, you can safely use soap to cleanse problem skin. This type is prone to acne. Read how to get rid of acne on the portal “Sunny Hands” » .
 Coffee soap-scrub
Baby soap-100 g
Water-1 glass
Olive oil-1 tbsp. l
Sea buckthorn oil - 1 tbsp. l
Patchouli essential oil - 5-6 drops
Ground coffee-3 tsp.
We rub soap. Melt in a water bath. After removing from heat, add all the oils, mix, add coffee, mix again and pour into molds. The coffee for this soap can be coarsely ground, because the soap is a scrub.
In general, to make scrub soap, you can use the following ingredients as abrasives: poppy seeds, large oat flakes, ground grape seeds, ground walnut shells, and any cosmetic clay.
Soap "Honey and milk" marble.
The production of this soap differs from others not only in its recipe, but also in its unusual appearance - it will be marble. First, let's list the ingredients:
Baby soap-100 g
Milk-150 ml
Honey-1 tbsp. l.
Olive oil-1 tbsp. l.
Sea buckthorn oil - 1 tbsp. l.
Orange oil - 3-4 drops
Chocolate - 3-4 cubes
Rub the soap, put it in a water bath, add milk and honey. Don't forget to stir. When the mass is completely melted, remove from heat and divide it into 2 parts exactly in half. Add sea buckthorn and orange oil to one part, olive oil to the other and grate the chocolate pieces on a fine grater. When the mixture has cooled a little, we begin to pour it into the molds in this way: the first layer is orange, the second chocolate, orange again, etc. Then carefully mix the composition several times in a chaotic manner or in a circular motion and let it harden.
Coconut soap
 I just love the scent of coconut, so from time to time I make scented coconut soap. And the composition of all the ingredients is much smaller and simpler:
Baby soap-100 g
Water-200 ml
Coconut flakes - 3 tbsp. l
Coconut or vanilla oil - 3 tbsp. l.
Rub the soap as usual, put it in a water bath, add water. Grind the coconut shavings in a coffee grinder. You can, of course, not grind, then the soap will acquire the effect of a scrub. Remove the melted soap from the heat, add coconut shavings, vanilla or coconut oil, or you can use a mix, but then you will have to add 1.5 tablespoons of each oil. Mix everything thoroughly and pour into molds. If you replace regular water with milk in this recipe, the foam from this soap will be even softer, and the coconut aroma will be even more pronounced.
Anti-cellulite soap
Baby soap-100 g
Water-50 ml
Olive oil-2 tbsp. l
Ground coffee - 2 tbsp. l.
Coarse sea salt - 2 tbsp. l.
Rub the soap and place it in a water bath. Next add olive oil and gradually pour in the hot boiled water. Stir the whole mass continuously. When the soap is completely dissolved, remove it from the heat and add salt and coffee. Mix everything again and put it in the molds. After 2-3 days, the soap is ready for use. Using this soap is very effective in the fight against cellulite 2-3 times a week, but you should remember and know what it contains sea salt, which can dry out the skin, so after taking a shower with such soap, you should thoroughly moisturize your body with nourishing lotion or milk. They will help you make your body even more beautiful advice from the author of the portal “Sunny Hands” Olga Sheina which she shares in the article “Face and body care” .
Actually, as you can see, making soap from baby soap is not at all difficult, I would say it couldn’t be easier. The cooking sequence is the same, only the composition of the products changes. The main points of cooking are clear, everything else is up to you. The composition and type of soap will depend on what additives you choose. Let's use our imagination and go ahead! Happy soap making!
Sincerely, Evgenia Tsvetkova.
Until recently, making soap with your own hands at home was not possible. It's not even a matter of ingredients, but a lack of basic skills and information on how to do it correctly. Today, soap making has become a pleasant hobby. It allows you to create unique natural cosmetics based on natural ingredients and aromatic oils.
For some people cooking natural soap with healing supplements has become a source of additional income. This product is in great demand both for personal use and as a gift. Below, we invite you to familiarize yourself with the specifics of the process of making soap with your own hands, the main nuances and necessary components.
You can make your own soap at home from the following materials:
- bars of baby soap;
- purchased soap base;
- make it from scratch.
This product may also have different shape and thickness:
- hard. With this form, the hot liquid base is poured into prepared containers and hardens there;
- liquid form - creamy, transparent, with or without added solid particles, etc.
Handmade soap is also convenient because you can add any ingredients you like to it: herbs, flowers, honey, crushed seeds, perfumes, dyes, abrasive particles, etc. It all depends on the flight of your own imagination and taste preferences. So, let's look at several soap-making techniques at home in more detail.
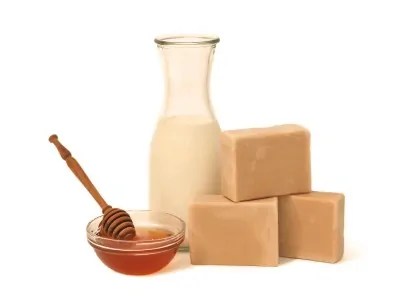
Homemade soap based on baby soap
For this recipe you will need baby soap, which you can get at any hardware store. We use honey, milk and cosmetic oils as additives. However, you can diversify it with those ingredients that you and your skin like: perfume compositions, decoctions of medicinal herbs, abrasive particles, etc.
Materials and equipment:
- 100 gr. milk;
- 100 gr. baby soap;
- 1 tbsp. honey or brown sugar;
- 1 tbsp. l. cosmetic oil of your choice (olive, apricot, grape seed, rose, etc.);
- aroma oil (2-3 drops is enough);
- melting bowl;
- steam bath or microwave;
- grater;
- spoon or stirring stick;
- molds. These can be various silicone containers for cakes, plastic boxes, small glass containers, etc. The more beautiful you choose the shapes, the prettier the finished bar of soap will look.
Prepare the ingredients
Grate baby soap and pour hot milk into it. Place in a cool place for 4-5 hours or overnight.

Bring until smooth
Heat the water bath to 50-60°C. Place a container with mass on it. While stirring gently, add brown sugar or honey. When the substance becomes homogeneous, remove it from the stove.
Add supplements
Pour in essential and cosmetic oils.
At this stage, you can also add other components as desired: lemon zest, dyes, solid particles (to create a scrub), etc.

Photo: Homemade handmade soap recipe
Pour into molds
Pour the hot liquid into prepared containers. Leave to harden for several hours.
Remove solids from containers. When completely cured, the product should slide out easily. If this does not happen, place the container in the freezer for a few minutes.
Wrap the bars in parchment paper for storage. You did it!

Photo: Homemade handmade soap
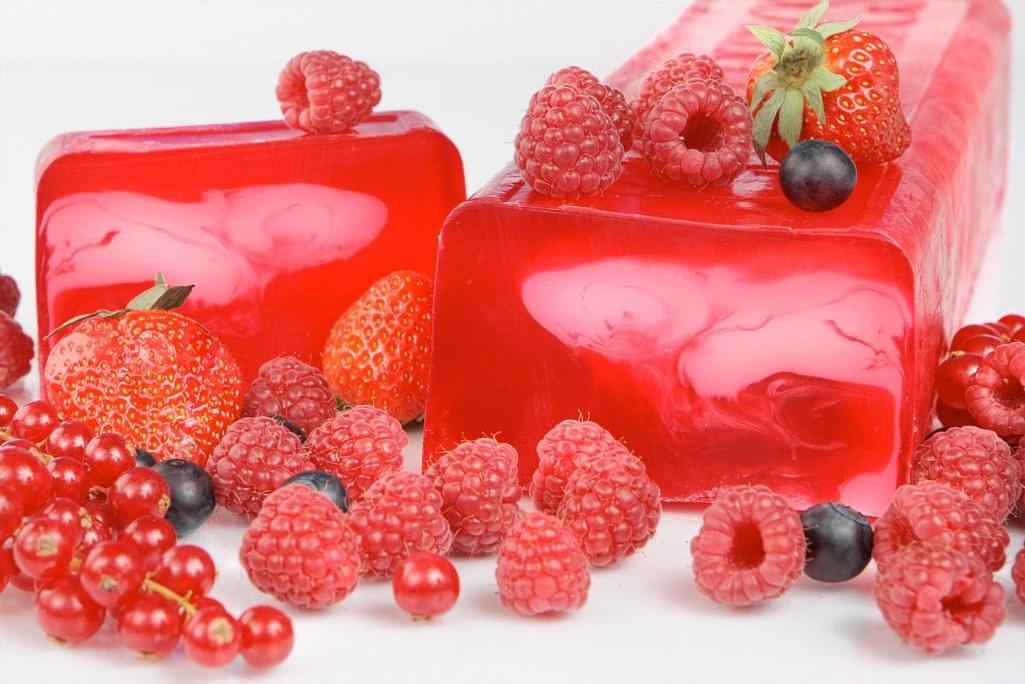
Soap base soap
Fragrant and juicy homemade soap in the form of watermelon slices is a great option for decorating your bathroom! Plus they are so nice to wash!
This product is created from a combination of white and transparent soap base. Thanks to the use of silicone triangular containers, it is very easy to prepare. This is a great soap for yourself and as a gift for family and friends!

Photo: Homemade handmade soap
Consumables and necessary equipment:
- microwave oven and safe glass containers;
- sharp knife for cutting;
- spray bottle with alcohol;
- rubber gloves;
- silicone triangular mold in the form of watermelon slices;
- disposable pipettes;
- thermometer;
- transparent soap base – 500 grams;
- emerald green and bright red dyes;
- black mica;
- aroma oil of your choice. Fresh summer scents are best;
- disposable plastic spoons – 15 pieces.

Photo: Materials for making handmade soap
Make black soap
If you don't have such soap, make your own. It is made using black mica. There is no need to add aroma oil to it, since very little is required.

Mixing mica into the base can be tricky—it doesn't dissolve well in the soap base and can clump together. To prevent this from happening, initially dilute it in glycerin or alcohol.
Note: One tablespoon of black mica requires 100 ml of base. If you need more black soap, increase the proportions accordingly.
With glycerin
- Place in glassware 1 spoon of mica. Add a few milliliters of glycerin to this and mix well.
- Add 100g of melted clear base and stir.
- Place the mixture in the microwave for 20 seconds. Repeat if necessary.
- Mix slowly and thoroughly until the mixture acquires a dark, uniform structure. After this, it will be ready to pour into molds.
With alcohol
The technique is the same, but instead of glycerin you will use alcohol.
- Mix 5-6 drops of alcohol with one tablespoon of mica. Please note: with alcohol, the resulting substance will be thinner than the version with glycerin.
- Add 100ml melted base, stir and microwave for 20 seconds. Repeat if necessary.
Black soap without additives
If you don't have alcohol or glycerin on hand, follow the steps below.
- Melt 100 ml of transparent base.
- Add 1 spoon of black mica to it: it will float on top. This method is more labor intensive - you will have to stir and shake the container many times to completely remove any lumps.
Pour the prepared black mass into any mold and wait approximately one hour. When the mass has completely hardened, take it out and cut it into small pieces in the form of watermelon seeds. Set the “bones” aside for now.

Photo: Homemade handmade soap recipe
Melt the base
This soap recipe uses ingredients for 3 bars. If you plan to make more, adjust the number of components. Each piece weighs about 150-200 grams.
Cut 250 grams of transparent base into bars and place them in a glass container. Place the container in the microwave for several periods of 30 seconds. After every 30 seconds, take out the container and mix. Do not overcook or let it boil, otherwise the substance will become rubbery. If there are any undissolved lumps in the container, stir slowly. The heat of the molten mass will dissolve them.
Add coloring and flavoring
Pour 5-6 drops of watermelon red liquid coloring into the melted base and stir slowly.
Using a pipette, add 5 drops of aroma oil to the substance.
Stir slowly until the liquid is smooth. Always stir the base slowly to avoid bubbles forming!

Photo: Homemade handmade soap recipe
Fill the red layer
Place the silicone mold on a flat surface.

Photo: Mold for making handmade soap
Pour a small amount of red liquid into each cavity and leave for a while.

Photo: Homemade handmade soap recipe
Remember - the bottom of the mold will be top part finished product.

Photo: Homemade handmade soap recipe
After 5 minutes, spray this layer and the previously cut black “bones” with alcohol.

Photo: Homemade handmade soap recipe
Place 2 – 3 pieces randomly into each cavity.

Photo: Homemade handmade soap recipe
When the seeds are laid, add more red base to the mold. It should completely cover them.

Photo: Homemade handmade soap recipe

Photo: Homemade handmade soap recipe
Repeat Step 4, using more seeds, until you have used all of the red base. Place approximately 5-7 seeds in each block. After this, leave the containers to stand for about 15 minutes.

Photo: Homemade handmade soap recipe

Photo: Homemade handmade soap recipe
Add white color
While the first layer hardens, prepare the second. This will require approximately 100 grams of white base. Pour 1-2 drops of aroma oil into the melted mass. You don't need to paint this layer!
Use a thermometer to monitor the temperature of the white mass - it should be around 130-140°.
Make sure the red watermelon layer has hardened enough. Spray it generously with alcohol, making sure to keep the edges in place. This will help the layers stick to each other better. After all, there is nothing worse than soap that separates and renders all your hard work in vain!

Photo: Homemade handmade soap recipe
When the temperature of the white mass reaches the desired level, pour approximately 30-40 grams of it into each cavity. Spray with alcohol again to remove any bubbles.

Photo: Homemade handmade soap recipe
Leave the containers for 10 - 15 minutes.

Photo: Homemade handmade soap recipe
Fill it with green color
While the white layer hardens, prepare the green one. To do this, you need to add 5-6 drops of emerald green dye and 2-3 ml of aroma oil to the melted base (150-200g).
Spray the hardened white layer generously with alcohol.

Photo: Homemade handmade soap recipe
Control the temperature of the mass and, when it reaches 140 degrees, pour the green liquid in equal portions into the molds.

Photo: Homemade handmade soap recipe
Spray with alcohol again to remove any bubbles.

Photo: Homemade handmade soap recipe
Allow the mixture to harden completely, leaving it for about 2-3 hours or overnight if possible.

Photo: Homemade handmade soap recipe
Gorgeous summer soap made with your own hands in the form of watermelon slices is ready!

Photo: Handmade soaps at home
Below are several ways to make these products yourself.
I would like to advise those who decide to make soap in their kitchen to start learning the basics by creating soap from a ready-made soap base. This option soap making for beginners It won’t discourage you from being creative and will give you results right away. The fact is that novice soap makers often confuse making soap from a base and making soap from scratch. If you want to know how to make soap at home, then first “separate” these two concepts in your head.
“From scratch” means that you will have to remember some basics chemical processes. You will be working with alkali and fatty oils; the soap-making process in this case is lengthy. And it’s better to move on to it after you get comfortable with soap making from an industrial soap base.
This was the introduction, now my Photo master class. To watch the video of the master class, go to the very end of the article.
To make your own soap you will need:
- transparent soap base, approximately 100 g;
- liquid dyes;
- flavorings or fragrances;
- cosmetic oil ( apricot kernel, grape seed and more);
- a glass for melting the base;
- a glass in which you will mix all the ingredients;
- microwave or water bath;
- spoons or sticks for stirring;
- soap molds.
Step-by-step instructions with photos
Melting the base
Cut the soap base into small cubes. This is easy to do with a regular knife.

Melt in a water bath, stirring constantly to prevent the base from sticking. Even if this happens, there is no need to be scared - just here, in the container in which you are melting the base, cut the sticky layer with a sharp knife and continue melting.
Many soap makers use the microwave, I also like to speed up the process. And the kitchen is cleaner. You can put a porcelain or glass cup with a base in the microwave; even a simple plastic one will do if you have already gotten used to the temperature and can adjust the power.

Set the “Defrost” mode, the weakest one to start with. Place the glass with the base in the microwave and turn it on for half a minute. Check how the base melts; if you don’t see any changes, the cubes haven’t even melted, you can do it in two ways. Either increase the power a little, or increase the time to 1-2 minutes.
Depending on the brand of your device, choose one or another option. It just seems incomprehensible and scary at first, but then it will be easy - you already know your microwave inside and out!
So, the base melted and it turned out to be jelly in a glass. Be sure to stir well so that there are not even small pieces of unmelted base left.

Adding oils, fragrances and dyes
Pour into the glass in which you will mix. Convenient to use disposable plastic cups. Naturally, I use them more than once; they are easy to wash after the process.
Add a few drops of base oil to the liquid foundation and stir.
Add the dye drop by drop, stirring constantly. Depending on the concentration of the dye, from one to several drops will be required.
Sometimes I dilute a very “dense” dye slightly with water.

And lastly, add the fragrance. I pour about half a teaspoon per 100 g so that the aroma is felt well.
Forming Soap
Pour over liquid soap into prepared form. Silicone does not need to be lubricated with oil or alcohol. If you are working with plastic ones and are afraid that it will be difficult to remove them from the mold, then wipe the mold with oil.

Leave the poured soap to harden. As soon as it hardens, and this happens within half an hour to an hour, the soap can be used.

If you let it sit for several days, it will be much more pleasant, this has been noticed by many soap makers. Pre-wrap the soap in cling film.
- Read this article before going to the store
- Soap base is sold from different manufacturers and of varying quality. Some people like it more “oily”, others like it to harden quickly. Only by trying, you can find your own base that is comfortable for you. To understand better, read the article about soap base from Russian manufacturers.
- Do not pour more than one third of a teaspoon of oil per 100 g of soap base. Otherwise, your soap will not lather, there will be no foam, alas.
- Food coloring is usually sold in very concentrated quantities. Therefore, they should sometimes be diluted with water. And don't do it too much rich color, the soap should remain clear, like jelly. And colored foam is of no use to you.
- Start working with silicone molds, there are no problems with them, they do not break, do not melt at high base temperatures.
- Buy products for soap making for beginners you can in or search in geographically nearby ones.
Happy soap making!
Yours, Helga.
You will find other soap making recipes in.
You might also be interested in these articles:
How to make soap with a picture
Soap making: How to make using mother of pearl beautiful soap for men
Homemade soap making has become a fascinating activity for me, a favorite hobby, the first step towards making cosmetics with my own hands. By creating your own soap at home, it turns out that you can choose ingredients that are useful specifically for your skin, give room to your imagination, and decide for yourself what its color, shape, and smell will be.
How to easily make soap at home and how is it useful?
The pros of making your own soap definitely outweigh the cons for me.
I think the main advantage, of course, is naturalness of handmade soap. When making it, you can use almost everything that you consider beneficial for your skin (milk, honey, coffee, oatmeal, vegetable oils, essential oils, vitamins, etc.). Thus, you personally make “your own” soap for yourself, select the properties and smell. It contains no industrial preservatives (well-known parabens) or dyes.
Using handmade soap, in addition to the benefits, I get aesthetic pleasure from appearance, I enjoy the feeling of its uniqueness.

Of the rather serious disadvantages, I can name, oddly enough, the same naturalness. Almost any of the natural components can cause allergies and skin irritation. Therefore, if you buy or receive such soap as a gift, do not rush to use it. Test it on a small area of skin near the elbow, and only then wash with pleasure.
Not very good foaminess can also be classified as a minus. The fact is that oils added to the composition, in addition to their own useful properties, suppress foam formation. The more oils you add, the less foam you will get. Therefore, moderation is important in everything. You can also add special foaming agents; they are available in specialized stores.
Due to the absence of strong preservatives, this soap is not recommended to be stored for longer than 6 months. We cooked it and went straight to work.
Like any other hobby, soap making takes some time. It is advisable that children, husbands, and pets do not dangle underfoot during the process. So I mostly do what I love at night.

Of course, you will need a certain amount of money for the initial purchase of components and molds. Oils and other components, except for the base, are not consumed very intensively, and they last a long time, but they must be purchased initially. My advice: do not immediately chase a large assortment , select 2-3 most universal components. Then, when you get a taste and delve deeper into the issue, you will decide what else needs to be purchased.
There are two main ways homemade soap
1. From the basics. Currently, many online stores sell this very foundation. The cost of a kilogram is 200-300 rubles. It is from it that soap of any shape and color can be made. Moreover, it is easy to use and safe. Some amateurs use grated baby soap as a base. This method I didn’t like it already during the rubbing process (not too easy). Cooking is also not as simple as in the first case. In general, I refused baby soap. In the article I am talking specifically about soap from the base.

2. “Soap from scratch.” My dream has not yet come true. Vegetable oils mixed with alkali, occurs chemical reaction saponification, which results in soap. It is unsafe, the reaction occurs with the release of heat, and alkali is dangerous due to chemical burns if handled carelessly. This soap matures after a reaction of 1-6 months. It is clear that you cannot pour it into shaped silicone molds; it is left in a large piece and then cut into bars. I do not recommend starting production without thoroughly studying the theory.
What you can use to make soap at home: a list of everything you need for soap making
All components can be purchased in special online stores, some can be purchased at grocery stores and pharmacies.
1. Soap base. Sold in large pieces in different packaging of 0.5 kg, 1 kg, 5 kg. It can be transparent and white, organic, creamy.
2. Base oils. There are liquid and solid. These are vegetable products obtained by squeezing certain parts of plants. They have the ability to penetrate deep into the skin and restore it, acting from the inside. Some can also be purchased at the pharmacy. Selected taking into account the needs of the skin. The most common: olive, almond, wheat germ, peach, apricot, grape seed, cocoa and others. They nourish, moisturize, cleanse the skin, and create a protective barrier.
3. Dyes. We use safe food dyes, pigments, as well as natural substances that can change color, for example, clay, turmeric, calendula petals, etc.

4. Flavors. You can purchase industrial ones, for example, bubble gum, berry aromas, and perfume compositions.
It can be aromatized with essential oils, which not only give a pleasant aroma, but, more importantly, serve as an active additive. These are highly concentrated volatile fragrant substances. They are able to penetrate through the skin into the blood and have a healing effect on the entire body. Their cosmetological properties are especially valuable to me. Use with caution; certain plants are prohibited for pregnant women and children. And cloves and cinnamon can cause burns.
5. Other additives. You can try introducing into soap almost any benefits that you come into your head to use. True, there is no guarantee that the effect will be the one intended, but you can and should try. Additives can be:
clay, oatmeal, coffee and coffee grounds, hydrolates, dry medicinal herbs, honey, milk, glycerin, vitamins, chocolate, menthol, etc., etc.

6. Forms. At the start of my soap-making career, I used silicone baking molds in the shape of different flowers. Now the choice is much richer, for every taste and budget. You can also use some kind of bowls or cups, but only plastic ones; you simply cannot remove the soap from the rest of the dishes.

7. Dishes. Use a suitable volume cookware and other utensils. In a word, everything that seems convenient.
8. Measuring utensils. A scale with an accuracy of 0.1 g would be very helpful. If you don’t have a scale yet, you can easily get by with different measuring cups, syringes, and spoons. It is convenient to use wooden chopsticks for stirring.
How to properly make soap at home?
First, of course, we decide on the recipe. At first, you can search on the Internet.
We prepare the necessary components and the molds we like. It is better to measure the amount of components per 100 g of base, this makes it easier to count. We cut the soap base into cubes with a side of 2-3 cm. If you don’t know how much base is needed to fill the mold, just fill it with slightly heaped pieces, then there will be enough mixture to fill and there will be no excess left.
Place in a water bath until melted. Stir all the time wooden stick to avoid boiling or overheating. After melting has taken place, remove the base from the heat and add one by one while stirring:
- base oils;
- active ingredients (hydrolates, herbal decoctions, extracts, honey, milk, etc.), liquids must be heated;
- add the dye drop by drop and mix each time to get exactly the desired color and not overdo it;
- essential oils into a slightly cooled mixture or flavorings.

Mix thoroughly again, but do not beat, so as not to form air bubbles. Pour the resulting mixture into molds. Spray a little alcohol from a spray bottle on the surface to remove bubbles. Let it harden for 20-30 minutes. After hardening, remove the soap from the mold. It is recommended to leave it to “ripen” for another 2-3 days. And then - use it for your health.
Of course, later, with experience, the process will become more complicated. The soap will be multi-colored, multi-component, with the addition of a great variety of benefits. But first, it’s better not to complicate things, but to get your teeth into simpler recipes with a small number of ingredients.
Favorite handmade soap recipes
I almost never make soap exactly like the previous one, at least the oils are changed. But there are some that I especially liked simple recipes, which I repeat almost unchanged.
The soap was designed to get rid of pustular rashes on the back. It perfectly cleanses, promotes healing, without drying out the skin at the same time. You will need:
- transparent soap base - 100 g;
- wheat germ oil - 5-7 ml;
- dry calendula petals (sold at the pharmacy) - a pinch;
- calendula extract CO2 - 5 drops;
- Blue chamomile essential oil - 5-7 drops.
Add calendula petals to the germ oil and leave for 10-15 minutes. Melted in a water bath soap base Stir in oil with petals and calendula extract. Wheat germ oil gives the soap an orange tint. If desired, the color can be enhanced by adding dye. Stir chamomile oil into the slightly cooled mixture and pour into molds.

With loofah and honey
This soap is perfect for morning care, it gently exfoliates, massages the skin (you don’t need to lather it on a washcloth, but rub it directly over the body), moisturizes, has an anti-cellulite effect and awakens. We take:
- white soap base - 100 g;
- shea butter - 5 g;
- honey - 5 g;
- Linden hydrolate - 10 ml;
- grapefruit essential oil - 10-15 drops;
- Loofah fiber - 1 tsp.
Heat the soap base with shea butter and honey in a water bath. Separately heat (not to a boil!) linden hydrosol. Pour the hydrosol into the soap mixture. Stir in the loofah, distributing it evenly throughout. At the end, add grapefruit oil and pour into molds.