Wood carving for beginners is an interesting and exciting activity that is not particularly difficult. It is not necessary to have artistic skills to create ornaments and patterns. Now ready-made sketches and video tutorials come to the aid of a beginner.


Most even accomplished masters are inspired by the work of other people, so be sure to carefully look at the stencils, diagrams and drawings of other amateurs.
Types of techniques
Sculptural carving is the most complex, requiring certain skills. There are many books on this technique.

The incised carving features a fully processed background and beautiful ornamentation. It is performed with a jigsaw, knife, and finishing can be done with a chainsaw.
Geometric carving will help you learn the technique.

In order to complete artistic carving, easier to copy finished sketch, rather than creating your own.

But most ready-made patterns are distinguished by a certain intricacy, so a novice master can try his hand at creating his own simple sketch.

Creating a Sketch
When designing a sketch you need to perform the following sequence of steps:
- The workpiece for work is selected;
- The sketch indicates the main elements and places where the thread will be applied;

- Using drawing supplies, the picture is redrawn onto graph paper or tracing paper with scale markings;
- If any elements are repeated, then creating a single stencil is enough.
With the skills to work in the simplest graphic editors(for example, Paint) you can create a sketch there, and then simply print it on paper at the required scale.

Stencils are usually used repeatedly, so it is advisable to make them from a relatively dense material (cardboard, plywood).
Here are some details of transferring the design from the template to the tree:
- The sample is fixed directly to the base with a milling cutter, cutting is carried out directly along its contour;
- The contours of the stencils are transferred to the wood with a simple pencil;
- You can transfer a sketch from paper to a board by placing tracing paper underneath it. After drawing the outline of the sketch, a trace from the carbon paper will remain on the wood;

- The simplest patterns can be transferred using pricking (with a needle, knife or awl).

Stages of work
When the sketch is transferred to the base, the real interesting process– direct processing of wood.

If you are working using the through-thread technique, the first step is to make starting holes in each element. This is usually done using an electric drill. A saw is then inserted into the holes and part of the wood is sawed out. Next, the edges are aligned and the decoration begins.
Flat-relief and volumetric carvings are performed a little differently.

First, the contours of future patterns are made with a knife. Next, the cutter cuts through the deepest central part. All other recesses are formed from it.
Small details are made using a chisel.
Sometimes may be required additional tools(for example, a mallet, for harder woods).

Deep relief is made with a chisel with a curved blade. Upon completion of the work, all edges are processed to eliminate roughness and chips.


Wood carving is a real art, complex and fascinating, requiring a steady hand, patience and some artistic skills. With great inspiration and desire, it is quite possible to master basic simple techniques, and then take on more complex ones. The work will require special tools, with the help of which the carving process will be more comfortable.
A selection of wood carving sketches
The basic tools for wood carving also include sketches, templates and. It will be much easier and clearer for a beginner to navigate a ready-made diagram than to try to create sketches on their own.
Before creating a wooden craft, you need to decide on a design or pattern. On the Internet you can find many ready-made stencils for wood carving from simple patterns to real paintings. There is no need to choose, but options medium difficulty At first, you can simplify it by removing elements that are too complex.
When creating a sketch, you need to do the following:

Stencils can be made using a text editor, which allows you to develop your own sketches, as well as add or remove details from the finished drawing. All that remains is to enlarge the sketches to the desired scale and print them out.
Next, the paper patterns are attached to a wooden base and copied by any in a convenient way, for example using carbon paper. If the template will be used repeatedly, the finished paper stencil can be transferred to a thicker cardboard or other surface. 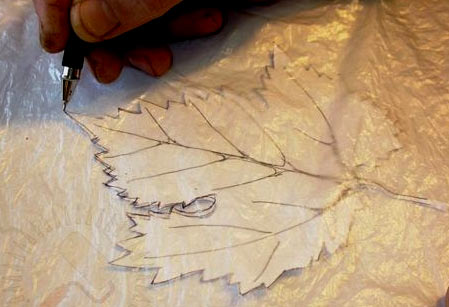
Stencils for slotted carving are usually used more than once, so it is advisable to make them from dense material: cardboard, plywood, hardboard, plastic panels.
If you have to make a lot of sawn carved parts, for example, when decorating a house or to build a fence from a carved picket fence, you can use a milling machine.
For it, special ready-made stencils made of metal or polymers are used. Such a rigid template is installed on the workpiece and limits the movement of the machine strictly according to the pattern. Such templates are quite expensive, so it is not advisable to purchase them for single products.
Transferring an image to wood
There are several ways to transfer a drawing from a template:

How to choose a template for wood carving
It must be remembered that for large wooden products, for example for or, you need to choose the appropriate stencils. Small elements will simply be invisible. And for crafts such as boxes and frames, you can choose more complex patterns with small details.
Also for different techniques threads, you need to select the appropriate patterns and templates:

Sketches and stencils for wood carving have a special place, and it is rare that a master can do without such an assistant. The beauty of a wooden craft will largely depend on the accuracy of the stencil and no matter how complex the pattern.
You can make so many decorative items and useful little things from carved wood and plywood that it is stupid to limit the scope of the work. In fact, it can be absolutely anything that your imagination can handle: boxes, covers for decorative and collectible books, lampshades, panels, shutters, furniture elements, trim, cornices... But the most attractive thing about creating exclusive works is that anyone can do them willing, if he puts in a certain amount of effort.
Wood carving: photographs, drawings and sketches
The main key to success in creating interesting things with slotted carvings is the choice of pattern. It is he who conveys the overall concept and sets the aesthetic tone for the entire product.
The easiest way for beginners is to make geometric patterns, as in the photo.


Carved designs of floral and animal themes are classic ornaments for any field of application.


Inscriptions - modern version application of wood and plywood carving. At the same time, you are unlikely to be able to find drawings and sketches on the Internet - they will have to be compiled purely individually according to personal requirements for sizes, fonts, and words.

Stencils for slotted threads
However, unlike cut-out inscriptions on plywood, drawings with plant, animal and fantasy themes can be found on the Internet. So feel free to choose the stencils you like for your album, and you’ll have plenty of ideas for creativity for a long time!
The most simple sketches They are suitable both for training at the very beginning of the process of manufacturing products, and can also become individual elements of a complex design. For example, this is how carved houses are decorated.


More complex templates will require some skill and patience, but the results are worth it. Such pictures can serve as an independent product, even as a gift.


Entire compositions with an idea and meaning usually serve either a separate work, or form the basis of the work.


Tools for slotted carving: jigsaw or router
However, choosing a design is only a third of the success. Another important aspect, which must be considered before starting the work itself. Namely, the choice of tool that will be used to carve wood or plywood.
Depends on the equipment:
- how thin the thread will be;
- complexity of pictures;
- cutting speed;
- accuracy of work.
Therefore, it is important to evaluate all the pros, cons, capabilities and limitations of each traditional instruments for sawing:
A jigsaw is a device for shaped cutting of parts. Working with a hand tool is quite labor-intensive, but it allows you to cut very accurately according to the drawing. Power tools allow you to quickly produce shaped plywood products, but require caution.

A milling cutter is a tool thanks to which flat-relief slotted threads acquire a thinner and more complete appearance. It is with its help that you can round edges, remove chips, make valances, and carry out the most complex cutting.

Theoretically, a router can do the same work as a jigsaw, and even more, but in fact, such handling of the tool is fraught with damage. quick exit out of order, frequent replacement of friezes.
Materials for slotting threads
In most cases, plywood is chosen for this type of work - it is uniformly thin, has a pleasant color and structure, and does not suffer from further use or storage, unlike solid wood. It is the choice of material that becomes the third pillar of successful work.
The modern market is abundant different types materials, so it’s easy to get confused. For this work you should choose:
- FC plywood - harmless to humans and the environment, durable, easy to cut, practical;
- FB plywood is also safe for humans, but resistant to aggressive environments, since it undergoes special processing and receives a protective coating, which is why it can cost an order of magnitude more.
Pay attention! Do not under any circumstances choose to interior work FSF class plywood - it is treated with carcinogenic preservatives and is permissible for use only in fresh air- they are excellent for covering the outside of a bathhouse or a house.
Photos of carved wooden houses
For Russia special meaning has slotted carvings as decoration for building facades. Since ancient times, ornaments carved on birch bark and other similar materials have been decorating huts, bathhouses, and churches, which is colorfully demonstrated in photographs.


Video of wood milling with a hand router
If you have just decided to try your hand at curly slotted carving, it would be a good idea to watch a video with a master class. It will help you better understand how drawings are created and how such home beauty appears.
Having barely learned to hold objects in his hands, the little man shows a craving for creativity. Over time, he will have the opportunity to try himself in various types of crafts: needlework, modeling, origami, wood carving, drawing. Of course, certain skills that the child received in school will be useful for this. early childhood. Sometimes a simple hobby gradually turns into a hobby, and then becomes the work of a lifetime. So many centuries ago in Rus', one of the main types of creativity was wood carving. And in the 21st century it still arouses genuine interest among people.
Popular types of intricate art
 For a long time, people decorated their homes with wooden carvings. Various kinds of paintings, kitchen utensils, religious objects, and children's toys were considered valuable things for any family. Perhaps that's why they appeared various types wood carvings. The most popular options are:
- geometric;
- flat-notched;
- slotted;
- sculptural;
- embossed;
- openwork;
- invoice.
Fortunately, the list does not end here, because this type of creativity is widespread throughout our vast country. Let's look at just a few of them.
 Geometric wood carving involves the use of various figures in the work. These are triangles, circles, squares and polyhedra. It is used for the manufacture of furniture elements, household utensils, and wall crafts. The oldest species Such a thread is a triangular-notched thread. This is one of the most simple methods, since it is performed with only one tool - a knife with a jamb. For such wood carving you will need a simple set of items:
- lime board;
- special knife-jamb;
- ruler;
- pencil.
First, sketches of geometric shapes or a finished ornament are applied to the board. Beginners should not use it complex drawings so that the work turns out flawlessly. For the first work, material made from deciduous trees is suitable, since it is more convenient to carry out straight lines with a sharp knife.
The wooden surface should be as smooth as possible. This is achieved by planing the board. At the same time, it does not need to be sanded with sandpaper. Otherwise, the carving will not turn out clear and neat, and the tool will quickly become dull.
The flat-pit method is used to cut out depressions of various sizes and shapes on a plane. These can be oval contours and all kinds of convexities.
 The slotted type of carving is also considered quite simple. It is performed using a jigsaw. A sketch of any figure applied to a wooden plane is cut out along the contour. The result is some cute crafts. Slotted threads are used to make background objects through which other planes are visible. It is often called openwork carving, and is used to decorate furniture in the Baroque style. These can also be elements of cupboards, window frames, doors, and sometimes decorative screens. If crafts are attached to a special base, then this type of carving is considered overhead.
The process of working with the slotting method begins with a sketch, which is applied to a pre-polished workpiece. It is transferred to the surface using a special template or transparent white paper. Then holes are made on the contours and cut out on the work table using a thin jigsaw file.
 Relief carving includes two main methods: flat and blind. In addition, the blind option implies a low or convex relief. The bottom line is that the pattern is formed due to the main background of the surface.
 The flat-relief method is performed in such a way that the pattern and the surrounding background are made at the same depth over the entire area of the base. Blind carving is characterized by a convex pattern that does not have flat outlines. Such products are valued for their high decorativeness and richness of composition. After all, a unique miniature landscape with hills, depressions and depressions is created on the plane. To create such masterpieces, craftsmen use elements of almost all types of wood carving. Therefore, beginners should master each method separately in order to apply the skills with more.
The first steps on the path to mastery
 History shows that wood was traditionally used to decorate living spaces. Nowadays, various photographs, drawings and sketches of wood carvings are exhibited in local history museums or printed publications. This suggests that smart people who are willing to learn can master this art form. Wood is a wonderful natural material from which you can create decorative compositions, paintings, furniture elements and kitchen utensils. Having mastered the basics ancient art, some became real masters of wood carving, devoting their entire lives to it.
Popular wisdom says: “The hardest trouble is the beginning.” This is how it is if you do nothing. Practical advice Wood carvings for beginners open the door for brave people to the world of magnificent DIY crafts. First you need to prepare your tools and understand the basic nuances of the craft.
It is advisable for beginners to choose high-quality and durable equipment for work in order to acquire valuable craftsmanship skills.
 For wood carving you need to prepare the following tools:
- sharp knife;
- chisel;
- jigsaw;
- bit;
- drills;
- needle files;
- spoon cutter;
- bars;
- milling machine.
Of course, for beginners it will be enough to purchase a special set of tools for wood carving, which includes a knife, a jigsaw and an awl. With their help it is very convenient to master the skills of ancient craftsmanship.
The next step is the selection of raw materials. The quality of the product depends on this. There are two types of wood in nature: hard and soft. The first group includes mahogany, oak and beech. For the second - aspen, pine, spruce, birch. Of course, it is easier to work with soft wood, but with one wrong move it quickly deteriorates. Despite this, it is considered the most suitable raw material for beginners.
Hardwoods are used by professionals because they are very expensive.
In addition to the strength of the material, the color of the wood also plays a key role. A suitable raw material for learning the skill is birch. It lends itself wonderfully to cutting and drilling in any direction. When choosing patterns for wood carving, you should keep in mind that birch wood darkens over time. Despite this, she is very easy to work with. 
When the pattern is selected, it must be transferred to a wooden blank. In the age of technology, you can use ready-made photographs or drawings provided by specialists. The subjects of the images are very different, but each has its own unique beauty. When everything is ready, you can start creating your own masterpieces. Thematic wood carving lessons are an invaluable aid for beginners.
Master class on simple crafts
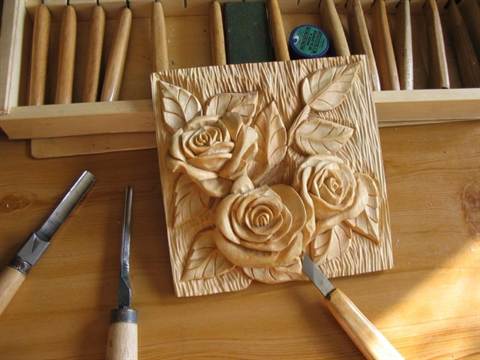
 When you look at the finished crafts, you get the impression that making them is not at all difficult. Therefore, many lovers folk craft took the instrument into their hands and got to work. To cut an ordinary flower you need to prepare the following set of items:
- wood blank;
- double soft pencil;
- tracing paper;
- chisels.
Please note that only special chisels for wood carving are suitable. They should be v-shaped, narrow and semicircular. The next stage is drawing. It can be taken from the Internet. To do this, apply a sheet of paper to the screen, redraw the diagram, and then apply it to a wooden plane. 
Start working from the central part of the sketch, carefully cutting out a circle. Then, using a v-shaped chisel, cut out the petals along the contour. Wood waste between them is removed as work progresses. If you don’t have such a chisel, professional knives for wood carving will do, as they are just as good to use in this craft. 
Using a semicircular chisel, cut out the outer part of the petal. It looks like the outline of a heart, but it's not scary. Then cuts are made in the inner part of the petal, connecting it to the center of the flower. All that remains is to round it off and the flower is ready. Now you can admire the first creation of your own hands. An invaluable aid for beginners is a themed woodcarving video that encourages them to get started immediately.
Modern technology for experienced craftsmen
IN modern world Many jobs have long been done mechanically. Applied crafts are not lagging behind in this. The use of technology allows craftsmen to save their energy and precious time. Wood carving machines make it possible to quickly and efficiently prepare the raw material for work. The only drawback of such devices is their high cost, but people for whom carving is not just a hobby are ready to purchase them.
Pantograph
 The device is designed to work with any wooden surfaces. It performs operations of various kinds, both volumetric and on a plane. The pantograph is used to process arched, bent or rotating parts. So, with the help of a machine, various elements of furniture, statues or panels are cut out.
Drill
 An excellent device for working with hardwood. It is important to take into account the properties and arrangement of the fibers of the natural material. Using a drill, craftsmen sharpen tools, polish wood, and, if necessary, polish.
Tree species with dense wood that do not have a tendency to chip are suitable for working with a drill.
CNC milling machine
 This technique is mainly used for the production of wooden furniture with carved decoration. The machine is designed to work with any type of plywood and wood. It is distinguished by high functionality and technical capabilities. When working on such equipment, it is important to use special protective equipment - goggles and gloves. Also follow the operating instructions for the device.
 As practice shows, such machines simplify the process of wood carving. They make it possible to create huge amount products for short time. The devices are used not only in industry, but also for personal workshops.
In any case, handmade products bring true satisfaction to a person. They create a pleasant atmosphere in the house, help express the master’s feelings for his loved ones, and serve for the benefit of the household for a long time. Wooden crafts retain their natural beauty for a long time and never go out of fashion. Wood carving is an art that is passed down from generation to generation. It is available to anyone who wishes to master this craft. The main thing is not to be afraid of failures, but to be willing to learn, pick up tools and create masterpieces.
Wood carving video lesson for beginners
The ancient art of wood carving has always been considered a fascinating activity; with the help of carved decorations, towers and huts of unique beauty were erected, most of which are still considered architectural monuments today. Woodcarving, or wood carving, is becoming a popular skill; it is used to make large and small masterpieces. Beginning craftsmen are helped to create masterpieces by ready-made stencils for wood carving - special templates from which three-dimensional ornaments and patterns are created.
The ancient art of wood carving has always been considered a fascinating activity.
Stencils for woodworking are used to transfer ready-made identical patterns onto a three-dimensional plane. Most often, such work is done to decorate walls and window frames, which is why sketches for working with wooden surfaces are considered the most common.
Carved patterns made using a stencil are divided into several types by craftsmen:
- ribbon carved ornament;
- carved platbands;
- carved balusters;
- pilaster;
- towels;
- brackets.
Using such ready-made templates, even a novice master can arrange and independently create a unique design and a real masterpiece of carved art. Using a ready-made stencil you can easily decorate any wooden product. Artistic cutting and openwork designs are usually useful when decorating:
- pieces of furniture;
- dishes;
- picture or photograph frames;
- boxes.
If a master wishes to convey certain national motifs or features of an object in his work, he should first study the subtleties and nuances of ornaments and patterns.
How to learn wood carving (video)
Sketches for patterns: instructions
For those craftsmen who have recently picked up tools, experienced craftsmen recommend taking into account the following nuances when preparing for work:
- the engraving template should be as simple and understandable as possible, without complex or ornate elements;
- each type of thread has its own templates for work;
- lines from the existing template to the material for work are transferred as accurately as possible, since this is the only way to achieve accuracy in the work.
When choosing a design for subsequent transfer to the material, it is worth considering a number of subtleties that will help to make the product professionally and skillfully.
- For a large product, you should not choose an openwork pattern or a pattern with small details. Such a design will be lost on the finished item and will not make it unique.
- Small items are not decorated with patterns with large elements and ornamental details, so as not to hide the shape and uniqueness of the product.
- Proportions when transferring details to fragments of the product should be observed to the finest detail so as not to disrupt the integrity of the finished ornament.
You should not start working without first creating a sketch, which you can make yourself or download ready-made photographs from the Internet.
Carved frames for mirrors: an interesting idea
Lovers of Art Nouveau style interiors will appreciate carved frames that frame paintings or mirrors.
Such interior items not only look rich and unique, but also add a special “zest” to the interior of the room. When cutting out mirror frames, experts recommend using a few basic styles to work with.
- The double baroque style contains two contours inside and outside, represented by openwork curls. The craftsmen included a feather profile in this style; it reflects some of the lightness and grace of the rectangular-shaped product.
- For mirrors, the feather profile with a back is ideal, providing a dense back part where the mirror is attached.
- The refined profile also has a dumbbell style, despite the somewhat massive frame. It is these frames that hold a heavy and massive mirror well.

Lovers of Art Nouveau style interiors will appreciate carved frames that frame paintings or mirrors.
Special decorating methods are also used to make mirror frames:
- gilding with pre-polishing;
- varnishing with a transparent material;
- patina, or artificial aging of wood;
- antique decoration with cracks called craquelure.
In order to transfer the pattern from the stencil to the product, use soft pencils, transferring the pattern as accurately and accurately as possible.
Stencils for wood carving in pencil: how to make
Those craftsmen who are just starting to try themselves as a wood carver should understand that high-quality cutting can be done only after the template has been correctly prepared.
- Initially, you should decide on a blank for carving. For beginning craftsmen, geometric carvings on a plane or a simple wooden figurine are better suited.
- A sketch of the sketch is made on paper with a pencil, while the main zones and places where the carving is planned are clearly defined.
- Using special drawing devices, the image is transferred to graph paper.
- Repeating parts are made of thick paper or thick cardboard.
- The finished paper pattern is attached to a wooden base and copied.

When making stencils for carvings made using the slotting technique, craftsmen recommend initially using thick paper for patterns.
Geometric and flat-relief carving: what is it?
Name geometric carving on wood comes from the main details and elements at the base of the pattern: geometric shapes, figures and their elements. Such ornaments are used to decorate furniture and household utensils.
To create this engraving you will need a simple set of tools:
- a piece of soft wood board;
- special knife-jamb;
- simple soft pencil;
- ruler.
When manufacturing the product, you will not need an invoice paper blank, since the elements geometric pattern Can be applied directly to wood workpieces.
Flat relief carving done in a similar way, but the design elements are not geometric shapes, and images of animals, elements of nature, people. This type of carving is also used for making backgammon.

The finished product can be treated with colorless varnish
For such a wooden engraving you will need the following materials:
- set of wood cutters;
- soft wooden blank;
- sandpaper, pencils.
The product is manufactured following a certain sequence of actions.
- The wood is cleaned and prepared for work in advance. The design is applied to carbon paper and transferred to the workpiece.
- Contour carving is made according to the drawing; the relief and frame of the product are pre-selected.
- Upon completion, the work is treated with stain, dye or simply watercolor paints. Cleaned with sandpaper.
The finished product can be treated with colorless varnish.
Flowers: wood carving for beginners
Flowers are one of the main elements of many wood carving patterns. Cutting out this element is not difficult; it is important to follow the sequence of actions and the principle of operation.
- A pattern in the form of circles is applied to the wooden surface and the details of the future flower are marked.
- The central circles are cut in a circle, after which they are cut from the outer circle to the center.
- After marking the petals, they are cut along the contour, cutting off the triangles between the petals, after which the outer contour of each petal is cut.
- An incision is made inside the flower, rounding the center of the design element.
You can decorate the drawing with any additional motifs; the geriola base of the product provides ample opportunities for toning.
Wood carving for beginners (video)
You can make templates and stencils for carving yourself, using your own creative abilities, you can download them from the Internet ready-made templates. Most of the ready-made stencils can be found on the Tatyanka website, some, no less interesting options They also offer other online resources.