Artistic carving on wood always looks very impressive. Most people have no idea how such products can be made. It seems that this requires enormous physical strength, and in addition, artistic taste and education. However, cutting out a beautiful ornament is not as difficult as it seems, you just need to learn a little technique and, as they say, get better at it. We will show popular drawings for learning wood carving techniques that will be useful for beginners and masters!
It's no secret that for manual creative work It is necessary not only to master the skills of this art, but also to have inspiration, desire and, of course, time. In order for all these parameters to come together, the master can use drawings to study simple wood carving. Not only drawings help to generate an idea, but also photographs of the work of other craftsmen.
There are sketches for different types of wood carving, and here you can find a suitable sketch for yourself completely free of charge.
We analyze drawings for wood carving: sketches for geometry
For beginning craftsmen, drawings for geometric carving. This is an easy and effective type of wood carving. To do this, you just need to determine for yourself which areas are convex and which are concave, in which case the correct picture on the tree will come out.
Boards in geometric and flat-relief techniques.
Stencil.

Stencils can be changed - for example, reducing the number of elements, or, conversely, adding details for a more interesting result.
Stencils for slotted carving.There are other types of artistic carving. One of the simple cutting techniques, provided you have the right tool, such as a router, is slotting. It is also called openwork because the finished product, made precisely and accurately, looks like lace. It has no background - it is cut out of the pattern. Hence the name. To practice this type of wood carving, you need to have a steady hand and cut clearly along the contour of the stencil. A contrasting color of fabric or foil is placed under a product made using this technique with a router or jigsaw. Examples are visible in the photo finished works, as well as sketches suitable for this technique.

Contour carving is different in that a contour pattern is cut into the wood. You can make a lot of different paintings using this technique; it is not necessary to take a ready-made stencil for carving. To decorate a nursery, you can circle the coloring book and use it as a sketch. Also, if you don’t know how to draw, you can take any sketch made in pencil and transfer it to wood. This technique produces good images of animals, birds, as well as landscapes and still lifes. The images clearly show examples of what can be carved on wood using this technique.

Black varnish carving is a type of contour carving, where a light outline is cut out on painted wood.
Examples and stencils for flat-relief wood carving.This type is different in that the drawing is above the background. In this case, the pattern has the same height. The background can be textured or smooth. The edges of the cut out pattern are usually rolled over, that is, it is carefully sanded so that they are smooth, as if oval. This technique requires a little more skill than others, but the products made this way look amazing. The photo shows examples and sketches for carving in this style.

Drawings for boxes can be distinguished as a special type. They can be made using various techniques: slotted carving, placing a base of fabric, foil or noble types of wood of a suitable color under the design; flat carving, which includes geometric and contour, or another subspecies. It differs in that indentations of the same depth are made in a flat background. In the case of geometric techniques, the recesses are usually in the shape of triangles or quadrangles. In addition, there is also a staple carving, which is also a type of flat carving and is well suited for decorating boxes. In the images you can see boxes made in various styles.
Wood has traditionally been a material used for exterior and interior decoration of residential premises. And today it’s openwork wood carvings, photographs, drawings and sketches which can be found in colorful art publications and on the Internet, amaze the imagination with its beauty and grace.
People who love to make decor with their own hands are able to master the art of artistic cutting. Wood allows you to create genre paintings and decorative compositions that can be used to decorate own house and give to friends. A favorite skill in the hands of a connoisseur of the beauty of natural materials can become the main profession. The demand for wooden carvings today is higher than ever.
Tools for work
In order to get started, you will need to select special tools and study the features of the technology. This matter has its own nuances that make it possible to more fully reveal the beauty of wood in the ornament.
You also need to stock up on suitable blanks and sketches that will be repeated on wood in the form of patterns, lace, compositions or genre scenes.

For his work, the carver uses big set tools:
- knives;
- jigsaws;
- needle files;
- chisels;
- electric drill;
- drills;
- bars;
- chisels;
- spoon cutters;
- milling machine;
- drill.
Advice for a newbie:When choosing tools for work, you need to focus on the quality and durability of such products. In the first stages, you can get by with a small number of devices.
A special set of tools is designed for a beginner. It will be enough to master the basics of artistic processing of wooden blanks.

You will also need raw materials from certain species. The quality of the product will depend on this. There are hard and soft varieties of trees. Each type has its pros and cons; in each specific case, a specific processing technology is selected.
Soft breeds include:
- linden;
- birch,
- aspen
- pine;
- juniper.
Soft material is easier to process, but it is easier to ruin it with one wrong move of a knife or chisel. Another thing is hardwood. These include:
- mahogany;
- boxwood
Solid raw materials are expensive, but products made from them are beautiful, durable and in demand. Experienced craftsmen who know how to process them work with expensive breeds. hard surface so as not to break the instrument or cause injury. Therefore, beginners should start with cheaper and more amenable material.

To select raw materials, it is necessary to take into account not only the hardness, but also the color of the wood. For beginning carvers, birch is an ideal choice for creativity. She can cut herself in different directions, lends itself well to drilling and cutting. When choosing a design for a product, you must take into account that over time, light birch wood may darken.
Coniferous species are suitable for products with a large number of slots. The soft material of pine, spruce, and cedar allows you to apply large designs and create intricate patterns. Beginners can start with conifers, as well as linden, birch and aspen.
A beginning carver should learn the basics of craftsmanship from simple ornaments. For the first job you will need a small set of tools. First, you can get by with a jigsaw, an awl and a knife.

Before you start cutting, you should organize your workplace with good lighting. Having selected a suitable workpiece with a flat surface and without knots, you need to transfer the selected pattern onto the surface of the workpiece. You can use tracing paper for this. When the stencil is transferred, it is coated with varnish on top so that it does not disappear or deteriorate during work.
A beginner will need knives, chisels, and an awl. For through slots, it is better to use a jigsaw or a manual milling machine, this will save time and effort.
The carver must master all the techniques that he will then use in his work on the product. Using a variety of decorative wood processing methods, you can create artistic masterpieces.

Artistic themes and uses
The carver uses various sketches in his work, from which he takes an image and transfers it to the surface of the workpiece. Today, for this it is not necessary to use an image made by hand with a pencil. Modern technological advances make it possible to use photographs and scanned digital images that can be taken on the Internet.
Sketch of the ornament
Samples for artistic wood processing are distinguished by their decorative and thematic variety. On the Internet, websites dedicated to this craft offer a large selection of cutting themes. The façade of a wooden house is decorated with wooden patterns. This decor will look great on doors and walls. Artistic cutting is used for the production and finishing of furniture and tableware.
Kitchen utensils and interior wooden products decorated with intricate openwork are very popular among buyers. In each specific case, the master selects the material, creates a sketch of the future product and begins to work.

The drawings come in a variety of themes. Geometric plant motifs are used. Often the wooden surface is decorated with genre scenes depicting animals, people and trees. Wood is a very plastic material, and in the hands of an experienced carver it turns into a real artistic canvas.
For each type of artistic cutting, a special surface treatment technology is used. Using different techniques, the master creates a three-dimensional canvas on which you can see the smallest details of the image.

Variety of techniques
Various technologies are used for artistic wood processing. In each specific case, the choice of method determines the product itself, its purpose and the type of wood from which it will be made. During the existence of this applied art form, several cuttings stood out:
- flat-relief;
- embossed;
- excavation, or geometric;
- slotted;
- contour;
- volumetric.
The pattern can be through, flat, relief, volumetric, small and large. The choice of finish directly depends on the size and functional purpose of the wooden product. For large items, such as decorative carvings for house facades, a large pattern is used. For interior items and furniture, craftsmen apply small patterns to the product, which are carefully worked out.

Flat creased pattern
This image has a slight relief. The image has the shape of a silhouette, and all the details are located in the same plane. For execution, an oval contour, a cushion pattern and a selected background of the pattern can be used.
How subtypes of this technology are distinguished:
- contour,
- stapled
- geometric (triangular).
To perform the contour technique, in-depth lines running along the main background are used.

Staple technology uses special notches in the form of staples to create the finish. When using geometric carving, the master applies the outline using triangular pyramids and pegs. Repeated many times different options This type of cutting allows you to create a variety of relief decors that are slightly recessed into the overall background. This technique is characterized by numerous compositions of geometric shapes in the form of rhombuses, triangles, honeycombs, wreaths, etc.

Openwork or through technique
When creating openwork images, complete removal of wood from the center of the product is used. This drawing has no background. This type of thread technology is called through. It can be simple and openwork. With openwork design, the decor is made of different heights.
Volumetric, contour and geometric wood carving are some of the most ancient techniques for decorating a wide variety of products. By and large, for the work you don’t need anything other than a wooden blank and a fairly sharp knife: with the right skill, you can get a carved frame, beautiful toy or any other product.
Of course, you will only achieve masterpieces after many years of practice. But you can start mastering carving with the simplest details: just study this article and understand the basics.
Types of carving

Despite the fact that when working with wood the most simple tools, and the processing techniques are not complicated, the result can be very different. Depending on the appearance of the treated surface, the following types of thread are distinguished:

- Contour thread- perhaps the simplest (outwardly, not in terms of execution technique). The pattern is applied to a flat surface using shallow lines, forming the contours of the design.
- Geometric carving- the most common due to its ease of learning. Unlike contour patterns, patterns are formed not by lines, but by a combination of geometric shapes, most often wedge-shaped notches.

- Flat grooved thread - technology of applying an ornament or pattern to a flat board. In this case, indentations are cut out on a flat background, which form the pattern we need.

A variation of this technique is also considered through thread, in which not only recesses, but also holes are formed in the workpiece.
- Sculptural carving(volumetric) - the most complex technique. A piece of wood, a branch or a root is taken as a blank, after which the part is given the desired shape. What is important here is not only the skill of the carver, but also how well the wood is selected.

Of course, this classification is very arbitrary, but it gives an idea of where you can strive to improve your skills.
What do you need for work?
Carver tools
To do wooden toys, carved frames, platbands and other decorative objects, the craftsman needs suitable tools. In addition to the usual carpentry tools (saw, drill, file), you also need to use special tools:
| Illustration | Tool | Purpose |
 |
Knife-jamb | A universal tool that is used for both geometric wood carving and sculptural work. |
 |
Chisels | The most extensive group of tools used to form recesses. Depending on the shape of the edge, the following varieties are distinguished:
|
 |
Klukarzy | Special chisels with a curved working part. With their help, relief carvings with strong depth are made. |
 |
Spoon cutters | As the name suggests, special tools for making wooden spoons. The special shape of the blade (ring or half-ring with one-sided sharpening) allows you to effectively select large volumes of wood. |
The price of professional cutting tools is quite high. And yet, a novice craftsman should not save: it is better to purchase several knives and chisels of decent quality. Then the first experience will not be spoiled, and you can concentrate on mastering the techniques and techniques of carving.
Wood selection

Artistic carving requires the formation of a fairly clear relief. And for this you need not only suitable tools, but also appropriate material. Not all wood is suitable for carving, and if you are just starting to master the technique, then you need to be very picky about your choice:

- Linden- ideal for a beginner. The material is soft and homogeneous, therefore the most complex drawings For wood carving, it is better to master it on linden.
- Alder (red and black)- also very good option, albeit more dense. Cuts perfectly, almost does not warp when drying. The main disadvantage is that it is difficult to find!

- Birch- harder and more elastic, but at the same time quite suitable for learning the basics of carving. It can become deformed when drying, so small products are usually cut from birch.
- Oak- an excellent option, but only for an experienced master. The relief is perfect, but you need a very sharp tool and a confident hand.

- Pear- wood with high density and good uniformity. The structure of the material allows the production of the thinnest products.

From the wood of these species, it is first necessary to cut blanks, dry them, and, if necessary, rough them. Only after this are drawings and sketches applied to them, according to which the carving is carried out.

Techniques and techniques for geometric carving
In fact, all work on a carved part comes down to three operations:
- Preparation- selection and rough processing of the workpiece, transfer of the design.
- Actually the thread- application of a relief pattern.
- Finishing- elimination of defects, grinding, varnishing, etc.
Instructions for performing basic carving operations are shown in the table:
| Illustration | Work stage |
 |
Drawing.
We transfer the contours of the pattern for processing onto a workpiece of the required size. You can construct a drawing yourself, using a ruler and compass, or you can use ready-made sketches for wood carving. In the second case, we print out the sketch and transfer it to the base, making punctures with an awl at the points of intersection of the lines. |
 |
Cutting contours.
Based on the drawing, we cut the contour lines with a cutter. At the same time, we observe the depth and direction of cutting. |
 |
Cutting out triangular elements.
After the basic cutting, we move on to the main part of the work. We cut each triangle into a wedge on both sides. After this, we cut out the third side, removing a piece of wood. |
 |
Cutting out the remaining elements.
After all the triangles have been selected, we move on to other thread details - bevels, planes, arcs, etc. We cut them, trying not to damage the already processed area. |
 |
Finish cutting.
After completing the main operations, we use a sharp cutter to process problem areas, removing defects and forming smooth, clear lines. We carefully grind the planes, trying not to remove the relief. |
 |
Staining/varnishing
We treat the product with stain or varnish, or use decorative impregnation with a tinting effect. |
Conclusion
By no means do I want to say that wood carving is easy. To achieve results, you need to study and practice, preferably under the guidance of a mentor. But the tips and videos in this article will help you take your first steps, and in the comments you can get answers to all your questions.
Having barely learned to hold objects in his hands, the little man shows a craving for creativity. Over time, he will have the opportunity to try himself in various types of crafts: needlework, modeling, origami, wood carving, drawing. Of course, certain skills that the child received in school will be useful for this. early childhood. Sometimes a simple hobby gradually turns into a hobby, and then becomes the work of a lifetime. So many centuries ago in Rus', one of the main types of creativity was wood carving. And in the 21st century it still arouses genuine interest among people.
Popular types of intricate art
 For a long time, people decorated their homes with wooden carvings. Various kinds of paintings, kitchen utensils, religious objects, and children's toys were considered valuable things for any family. Perhaps that's why they appeared various types wood carvings. The most popular options are:
- geometric;
- flat-notched;
- slotted;
- sculptural;
- embossed;
- openwork;
- invoice.
Fortunately, the list does not end here, because this type of creativity is widespread throughout our vast country. Let's look at just a few of them.
 Geometric wood carving involves the use of various figures in the work. These are triangles, circles, squares and polyhedra. It is used for the manufacture of furniture elements, household utensils, and wall crafts. The oldest species Such a thread is a triangular-notched thread. This is one of the simplest methods, since it is performed with only one tool - a knife with a blunt. For such wood carving you will need a simple set of items:
- lime board;
- special knife-jamb;
- ruler;
- pencil.
First, sketches of geometric shapes or a finished ornament are applied to the board. It is better for novice amateurs not to use complex drawings so that the work turns out flawless. For the first work, material made from deciduous trees is suitable, since it is more convenient to carry out work on it. straight lines with a sharp knife.
The wooden surface should be as smooth as possible. This is achieved by planing the board. At the same time, it does not need to be sanded with sandpaper. Otherwise, the carving will not turn out clear and neat, and the tool will quickly become dull.
The flat-pit method is used to cut out depressions of various sizes and shapes on a plane. These can be oval contours and all kinds of convexities.
 The slotted type of carving is also considered quite simple. It is performed using a jigsaw. A sketch of any figure applied to a wooden plane is cut out along the contour. The result is some cute crafts. Slotted threads are used to make background objects through which other planes are visible. She is often called openwork carving, and it is used to decorate furniture in the Baroque style. These can also be elements of cupboards, window frames, doors, and sometimes decorative screens. If crafts are attached to a special base, then this type of carving is considered overhead.
The process of working with the slotting method begins with a sketch, which is applied to a pre-polished workpiece. It is transferred to the surface using a special template or transparent white paper. Then holes are made on the contours and cut out on the work table using a thin jigsaw file.
 Relief carving includes two main methods: flat and blind. In addition, the blind option implies a low or convex relief. The bottom line is that the pattern is formed due to the main background of the surface.
 The flat-relief method is performed in such a way that the pattern and the surrounding background are made at the same depth over the entire area of the base. Blind carving is characterized by a convex pattern that does not have flat outlines. Such products are valued for their high decorativeness and richness of composition. After all, a unique miniature landscape with hills, depressions and depressions is created on the plane. To create such masterpieces, craftsmen use elements of almost all types of wood carving. Therefore, beginners should master each method separately in order to apply the skills with more.
The first steps on the path to mastery
 History shows that wood was traditionally used to decorate living spaces. Nowadays, various photographs, drawings and sketches of wood carvings are exhibited in local history museums or printed publications. This suggests that smart people who are willing to learn can master this art form. Wood is a wonderful natural material from which you can create decorative compositions, paintings, furniture elements and kitchen utensils. Having mastered the basics ancient art, some became real masters of wood carving, devoting their entire lives to it.
Popular wisdom says: “The hardest trouble is the beginning.” This is how it is if you do nothing. Practical advice Wood carvings for beginners open the door for brave people to the world of magnificent DIY crafts. First you need to prepare your tools and understand the basic nuances of the craft.
It is advisable for beginners to choose high-quality and durable equipment for work in order to acquire valuable craftsmanship skills.
 For wood carving you need to prepare the following tools:
- sharp knife;
- chisel;
- jigsaw;
- bit;
- drills;
- needle files;
- spoon cutter;
- bars;
- milling machine.
Of course, for beginners it will be enough to purchase a special set of tools for wood carving, which includes a knife, a jigsaw and an awl. With their help it is very convenient to master the skills of ancient craftsmanship.
The next step is the selection of raw materials. The quality of the product depends on this. There are two types of wood in nature: hard and soft. The first group includes mahogany, oak and beech. For the second - aspen, pine, spruce, birch. Of course, it is easier to work with soft wood, but with one wrong move it quickly deteriorates. Despite this, it is considered the most suitable raw material for beginners.
Hardwoods are used by professionals because they are very expensive.
In addition to the strength of the material, the color of the wood also plays a key role. A suitable raw material for learning the skill is birch. It lends itself wonderfully to cutting and drilling in any direction. When choosing designs for wood carving, you should keep in mind that birch wood darkens over time. Despite this, she is very easy to work with. 
When the pattern is selected, it must be transferred to a wooden blank. In the age of technology, you can use ready-made photographs or drawings provided by specialists. The subjects of the images are very different, but each has its own unique beauty. When everything is ready, you can start creating your own masterpieces. Thematic wood carving lessons are an invaluable aid for beginners.
Master class on simple crafts
 When you look at the finished crafts, you get the impression that making them is not at all difficult. Therefore, many lovers folk craft took the instrument into their hands and got to work. To cut an ordinary flower you need to prepare the following set of items:
- wood blank;
- double soft pencil;
- tracing paper;
- chisels.
Please note that only special chisels for wood carving are suitable. They should be v-shaped, narrow and semicircular. The next stage is drawing. It can be taken from the Internet. To do this, apply a sheet of paper to the screen, redraw the diagram, and then apply it to a wooden plane. 
Start working from the central part of the sketch, carefully cutting out a circle. Then, using a v-shaped chisel, cut out the petals along the contour. Wood waste between them is removed as work progresses. If you don’t have such a chisel, professional knives for wood carving will do, as they are just as good to use in this craft. 
Using a semicircular chisel, cut out the outer part of the petal. It looks like the outline of a heart, but it's not scary. Then cuts are made in the inner part of the petal, connecting it to the center of the flower. All that remains is to round it off and the flower is ready. Now you can admire the first creation of your own hands. An invaluable help for beginners is a themed video of wood carving, which encourages them to immediately get to work.
Modern technology for experienced craftsmen
IN modern world Many jobs have long been done mechanically. Applied crafts are not lagging behind in this. The use of technology allows craftsmen to save their energy and precious time. Wood carving machines make it possible to quickly and efficiently prepare the raw material for work. The only drawback of such devices is their high cost, but people for whom carving is not just a hobby are ready to purchase them.
Pantograph
 The device is designed to work with any wooden surfaces. It performs operations of various kinds, both volumetric and on a plane. The pantograph is used to process arched, bent or rotating parts. So, with the help of a machine, various elements of furniture, statues or panels are cut out.
Drill
 An excellent device for working with hardwood. It is important to take into account the properties and arrangement of the fibers of the natural material. Using a drill, craftsmen sharpen tools, polish wood, and, if necessary, polish.
Tree species with dense wood that do not have a tendency to chip are suitable for working with a drill.
CNC milling machine
 This technique is mainly used for the production of wooden furniture with carved decorations. The machine is designed to work with any type of plywood and wood. It is distinguished by high functionality and technical capabilities. When working on such equipment, it is important to use special protective equipment - goggles and gloves. Also follow the operating instructions for the device.
 As practice shows, such machines simplify the process of wood carving. They make it possible to create huge amount products for short time. The devices are used not only in industry, but also for personal workshops.
In any case, handmade products bring true satisfaction to a person. They create a pleasant atmosphere in the house, help express the master’s feelings for his loved ones, and serve for the benefit of the household for a long time. Wooden crafts retain their natural beauty for a long time and never go out of fashion. Wood carving is an art that is passed down from generation to generation. It is available to anyone who wishes to master this craft. The main thing is not to be afraid of failures, but to be willing to learn, pick up tools and create masterpieces.
Wood carving video tutorial for beginners
Wood carving is an amazingly beautiful and very popular type of hand-made wood processing these days. The carved interior details captivate with their magnificent appearance and reflect rich national traditions.

Creative people who are simply itching to do something very interesting and useful should pay attention to wood carving. Girls and women may think that this is only a man's activity. And they will be wrong, because there are no fewer women woodcarvers than men.

About wood carving for beginners
To decorate the internal and external space, various types of carvings and techniques for realizing the plan can be used. If you are interested in this type of needlework, then you must understand that you need to master the methods and techniques of wood processing, acquire the necessary tools and improve carving skills.
In the modern world of smartphones and tablets, a wooden stand decorated with wood carvings looks very original.


Skillfully executed carvings in the form of simple and ornate patterns and ornaments seem to enliven the world and endow it with sophistication, charm, emphasizing the taste of the owner of luxury items and the talent of the craftsman.


The works of the best carvers decorate the temples. Pay attention to the photo of the iconostasis of the upper Church of the Savior of the Image Not Made by Hands, which is located in Moscow, in the Church of the Intercession Holy Mother of God in Fili.

Modern masters with delicate taste, create real masterpieces.

And thanks to finishing technologies and protection of the finished product from the destructive effects of mold and insects, these wood carvings have served people for hundreds of years.
Pay attention to the magnificent carved pieces of furniture:


Stylish doors:

Delightful handmade figurines:
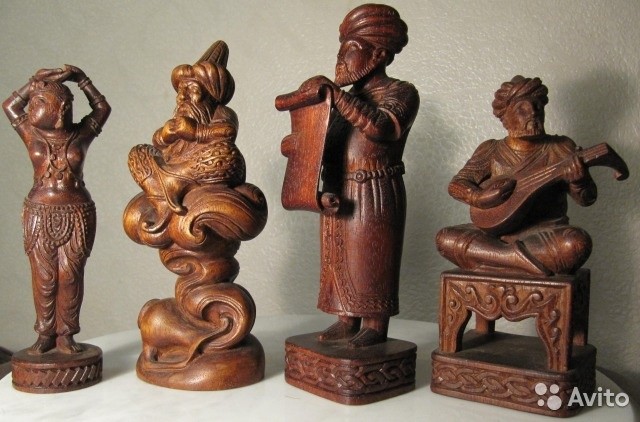

Very often, connoisseurs collect handmade carved items. Wonderful chess that is worthy of any collection.

Perhaps, over time, your wood carving masterpieces will be carefully preserved by collectors or decorate temples.
Types of wood carving
Of all types of wood carving, it is very interesting openwork or through thread on wood, which is characterized by some transparency, in which only the image remains, without a background. An example is an applied carving - this is an ornament that is attached to a finished background after production by a craftsman.

Geometric carving woodworking – This is a type of carving in which the pattern is formed using many simple geometric shapes (a rhombus is often used).

Oriental carving on wood it is distinguished by its whimsical shapes. Egypt is the cradle of the oriental type of wood carving.


Relief carving on wood. In this technique, the image is located above the background or at the same level with it. These are carved panels various shapes with a three-dimensional image.

- This is a flat-relief carving, but distinguished by an abundance of carved and stucco decorations, various colors, curls, leaves, figures of people in unnatural poses, fabulous fantastic animals.

Originated in the village of Kudrino. Well-known products in this type of carving are boxes, vases, dishes, ladles, and home decor items. The main element is floral ornament: rosettes, curls and twigs.

Volumetric (sculptural) carving Great for making sculptures, animal and human figures, toys. - a subtype of volumetric thread. This is the main industry of the village of Bogorodskoye in the Moscow region. The famous Bogorodsk toys are figurines of animals and people made of linden and alder.

Most often used to decorate wooden Scandinavian churches. Wood carvers decorated the inside and outside of church buildings with images of Gods and various animals.

- the simplest and most unique type of carving. On a flat background, the master cuts out grooves - grooves, forming a pattern. Carved landscapes - images of landscapes on wood.


All these types of carvings are quite conventional. Each master chooses the most suitable one, taking into account work experience, quality of wood and creative inspiration.
What can be decorated with carvings?
The simplest staircase is transformed, decorated with carved balusters. Balusters- these are figured columns in the form of columns, a stylish and noble decoration of the staircase. Wooden balusters look organically with a spiral wooden staircase.

Bas-relief. Another name is "low relief". This is a sculptural image on a plane. Most often these are figures of people and animals .

Choosing tools for wood carving
As in every business, wood carving has its own secrets and nuances, which allow one to reveal the beauty of wood in a wonderful ornament. It is necessary to select special tools for wood carving and stock up on the necessary blanks and sketches for wood carving, which will be embodied in the form of drawings, borders, lace or genre scenes.
Basic tools
Very high demands are placed on the quality of carving tools. Of course, skill plays an important role, but well-chosen and sharpened tools will help bring your idea to life. Experienced carvers will tell about its quality at first glance at a tool, but beginners get lost in the store because of the huge selection.
IN basic set for wood carving includes:
- several knives and chisels;
- needle files;
- hacksaws for metal;
- vice;
- sandpaper;
- drill with several types of drills;
- bars.

Knives should be made only from high quality steel. It is better to purchase them in specialized stores for creativity. Although on initial stage Just sharply sharpened knives will do. An excellent start would be knives from Tatyanka, Narex, Kogatana, etc.
It is not necessary to choose an expensive foreign-made instrument, because domestic instruments can be the same good quality but much cheaper
As your skill grows, you may need a set of tools, a milling machine, a drill, etc.

Chisels for carving
Sometimes, instead of a chisel, a sharpened screwdriver or file is used for wood carving.

Flat chisel- This is a long rod, at the end of which there is a flat cutting edge. Very often it is used for primary wood processing.
Semicircular chisel- This is one of the most important tools for work. They differ somewhat in the degree of roundness, that is, they are medium, round and sloping.
It still happens V-shaped version of chisels. It can be useful for geometric wood carving, which we will introduce you to below.
Beginners need only a small wood carving set of good quality to immediately get used to the correct movements and pressure.
In this video there is a wonderful master A. Yuriev shared with us which tools to choose for carving.
How to protect yourself from injury when carving wood
Any tool of a master carver can be compared to a straight razor, therefore, when working with it, you must strictly follow safety precautions. The material must be positioned so that you can work freely with a knife or chisel, eliminating the possibility of the sharp edge hitting your hands.
The work place should be comfortable and clean. All the extra ones in at the moment tools must be carefully folded, because they are very sharp and can cause injury.

Materials for work
Each type of wood for carving has its pros and cons. Soft wood is easy to work with, but there can also be a lot of defects. These are aspen, linden, birch. This wood is best for beginners.
Oak, boxwood, mahogany are more expensive and complex wood. It is hard and durable, so it is difficult to carve from such wood. Very often there are troubles when working with such types of wood. Either the instrument or the craftsman may be harmed.
An experienced carver can easily work with a variety of woods, including juniper. Well, for beginners it is better to use inexpensive materials - spruce, pine, pear or birch.
Whatever tools are chosen for wood carving, safety precautions must be strictly observed!
Geometric carving technology
Geometric wood carving is considered the simplest and is perfect for beginners. To create the intended design, you need to have a small set of wood carving tools and clearly follow the design. For geometric wood carving, symmetry and repetition are of utmost importance. This achieves a wonderful play of light and shadow.


Cutting boards using this technique and wooden panels look wonderful in the kitchen.

Geometric carving consists of sequential cutting out of simple geometric shapes: rectangles, triangles, squares, rhombuses. But the result is a wonderful ornament that looks different in different lighting.
Execution Sequence any wood carving is like this:
- First, a wooden blank is made (board, deck, blank).
- Next is rough leveling of the surface of the workpiece, during which all defects and roughness are removed.
- Then a decorative relief is formed using special cutters.
- After the main carving is completed, the finishing process is grinding, impregnation, painting, varnishing.
You cannot work with a workpiece on your knees! The master must have a table to work on.
Master class “Geometric wood carving on a cutting board”

Tools. You will need 2 knives for wood carving: a triangular jamb knife and a feather knife, a ruler, a compass, a pencil.

A triangle jamb knife is necessary for cutting triangular shapes of various configurations, as well as for cutting long straight lines. A pen knife is used to cut long lines such as a petal or groove. Carving knives should be sharp and comfortable.
First stage. We make a sketch of the pattern on the board. It can be applied using a compass and ruler. Or you can print out carving patterns taken from the Internet and use carbon paper to transfer them to a prepared cutting board.

Second stage. Cut out the petals. We use a pen knife.

During work thumb presses tightly to the board, and index finger touches wood easily. This will help regulate the depth of the knife into the surface and the angle of inclination. And your thumb will help you move the blade smoothly. First, we cut in one direction at an angle, then we turn the board over and cut on the other side.

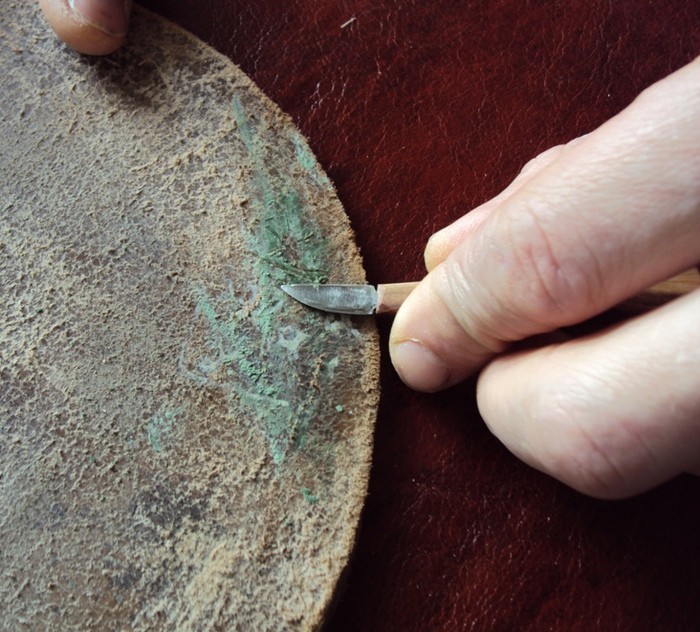
If the shavings curl like a rope, the knife is good and sharp. It must be periodically sharpened with a piece of leather with GOI paste.
Third stage. We cut out the triangles with a blunt knife. Using the heel, we cut the knife into the wood at an angle of 45 degrees, not reaching the edges of the pattern on three sides. The slots should meet on all sides in the shape of a pyramid. The sliver falls out and forms a beautiful triangle.


Fourth stage. What we couldn’t cut, carefully clean it so that the edges are frequent and even. Using the same principle, we cut out grooves and triangles around the perimeter of the board.
Fifth stage. We sand everything with sandpaper and treat it with natural impregnation. All! The work is finished. We decorate the kitchen with a useful and beautiful cutting board with wood carvings.
Wood carving designs
To perform wood carving, photographs, drawings and sketches are simply necessary. A large pattern for wood carving is used for large-scale products: for the facades of houses, interior decoration with carvings of churches, windows.
For interior items and furniture, carvers use small patterns that are carefully worked out by the craftsman.
YOU WILL NEED IT
We offer you an archive from . Choose, print, create.
Video master classes on wood carving for beginners
Of course, the wood carving looks especially impressive in the video. Channel "HAND WOOD CARVING" shows the features of geometric carving for beginners.
A woman's view of wood carving. Channel tatianacarving shows us how to make flower petals and leaves.
Konstantin Belyaev on his channel he talks in detail about wood carving cutters.
And in this video Ivan the Builder shows how to make relief-planar carving:
We will be very glad if this article inspired you to take up wood carving!