From the title it is already clear what we will talk about. We will study how to draw war with a pencil step by step. It won't be star Wars and Darth Vader and not even a shooter game, but a real war! Three soldiers in a trench, from heaps military equipment. In order to draw all this, you will need a lot of knowledge about military affairs. You can, of course, sit down to play WoT, but in the end you won’t draw anything. Who doesn’t know this is such a super action game with the participation of tanks, which has gathered a huge number of gamers in our country. By the way, the yellow-faced Chinese are no less interested in this. It seems that half of their population goes in for sports, judging by the number of Olympic medals in 2012, but the second is mired in the whirlpool of online games. For the fact that half of our population has been staring at the LCD monitor for two years now, at the same time managing to stain the gaming mouse with greasy fingers from dinner and pour coffee on the keyboard... let’s all say “Thank you” to Wargaming! Although God bless him. Now let's take a break from tanks and try to draw military actions with the participation of real ones. There are five steps ahead.
How to draw a war with a pencil step by step
Step one First, let's outline the people in motion. Head, position of the torso, arms, legs.  Step two Now let's think about what will be around our soldiers: this is a fence, stones, logs. Let's show their outlines.
  Step three Let's dress our combatants: helmet, pants, boots. Let's equip one of them with a bag. Let’s draw the face profile of the one closest to us. We will surround the fence with barbed wire.
  Step Four Let's add details: barbs on the wire, belts on people's clothes, a spatula, etc.
  Step five Let's do the shading. There are darker areas on the clothing at the folds. Let's darken the areas on the pillars. Well, here are the soldiers against the backdrop of a military and completely unpicturesque landscape.
  See similar military equipment drawing lessons.
Italy, where the historical genre originated, had all the prerequisites for the emergence of this type of painting. The Roman Empire had very high level cultural development, and her achievements became the basis of art in all countries Western Europe. It is not surprising that it was in Italy during the Renaissance, in the 15th century, that the historical genre arose in fine arts.
Short story
To understand what is in art, it is necessary to take into account the development features of the period under consideration. The Renaissance is the era of the flourishing of humanistic ideas, which led to interest not only in human personality, but also to civil and political history.
The events of the heroic past of the country were supposed to reflect the historical genre in the fine arts. Examples include the following: paintings by Andrea Mantegna “The Triumph of Caesar” (1485-1492), various paintings by Paulo Uccello dedicated to the Battle of San Romano and others. The achievements of the Renaissance in Italy quickly spread throughout Europe, where the historical genre in the visual arts also began to develop.
European artists of historical painting of the 17th-18th centuries
Events of the past also attracted masters in Western European countries. The development of this direction can be attributed to XVII century- the heyday of classicism and baroque. It should be noted that in artistic culture It was the historical genre that came to the forefront. All other types of fine art for some time gave way to it in importance, since classicism involved the creation primarily of heroic images and monumental paintings.
Peter Paul Rubens (the painting “The Battle of the Greeks with the Amazons,” 1619-1620), Nicolas Poussin (“The Rape of the Sabine Women,” 1614-1615), and Jacques-Louis David, who painted both on ancient and modern themes. These works are distinguished by a pathetic spirit, heroic poses, sublime facial expressions and gestures. In their composition, the canvases resembled the action of ancient plays and were distinguished by some theatrical pomposity. This trend includes paintings based on gospel subjects. For example, Harmens created the painting “Return prodigal son"(1669).

Historical painting in Europe in the first half of the 19th century
Classicism and Baroque soon gave way to a new cultural movement - romanticism. Representatives of this movement moved away from the heroic interpretation of the past, focusing on the emotional component. The artists set out to create such images to evoke sympathy and empathy among viewers. Historical genre in painting received a completely different design, since the theme of human experiences and emotions came to the fore. An example is Eugene Delacroix’s painting “The Massacre on the Island of Chios,” painted in 1826. Historical motives can also be found in the work of another prominent Honoré Daumier: the painting “Insurrection” (1848).
Western European historical painting of the Romantic period
In the second half XIX century The historical genre in fine arts has undergone significant changes. This is due to the emergence of a new direction - realism. Its representatives sought to create more believable images and plots. This trend includes the works of Adolf von Menzel, who in 1850 created a series of paintings dedicated to the era of Frederick the Great. Interest in history in this era is largely due to the numerous revolutions that shook Europe at that time. Hotbeds of uprisings broke out in Italy, France, and Germany. Therefore, scientists, artists, writers looked for answers to the present in the past, which explains the emergence of realism in culture.
The emergence of the Russian historical genre in painting
Russian art history is also interesting for analysis. Origins, types and genres in Russia are a topic for a separate discussion, since our culture has borrowed a lot from European art. The era of classicism in the vast expanses of our homeland dates back to the 18th century: it was at this time domestic artists turned to the events of the past in their works.
The founder of the historical genre of Russian fine art is Anton Pavlovich Losenko. His pen belongs from the past Ancient Rus'(“Vladimir and Rogneda”, 1770) and canvases dedicated to ancient subjects. His followers were Ivan Akimov, who also addressed the events Kievan Rus, Pyotr Sokolov, who depicted mythological images, Grigory Ugryumov, who turned to the history of the 13th century. These works, like European paintings in the style of classicism, are distinguished by the sublimity of their images and subjects.
Historical themes in Russian painting in 1800-1850
Genres in the fine arts were very diverse, however, due to the development of academicism, in the first half of the century, historical subjects took the dominant direction in artistic culture. Artists of this movement largely continued the traditions of classicism, choosing heroic facts from the past as the subject of their works. The historical genre in fine art, whose paintings were particularly expressive, enjoyed the greatest popularity among both the intelligentsia and the mass public.

This direction includes the works of Anton Ivanov “The Feat of a Young Kievite During the Siege of Kyiv by the Pechenegs in 968” (1810), Alexei Egorov “Rest on the Way to Egypt” (1830). At the same time, a new direction arose - romanticism, whose representatives created vivid, emotional images, rich in psychological tension. For example, Karl Pavlovich Bryullov, who created the famous painting about the death of Pompeii, Fyodor Antonovich Bruni and Alexander Andreevich Ivanov, who wrote biblical stories.

Historical subjects in the works of authors of the last quarter of a century
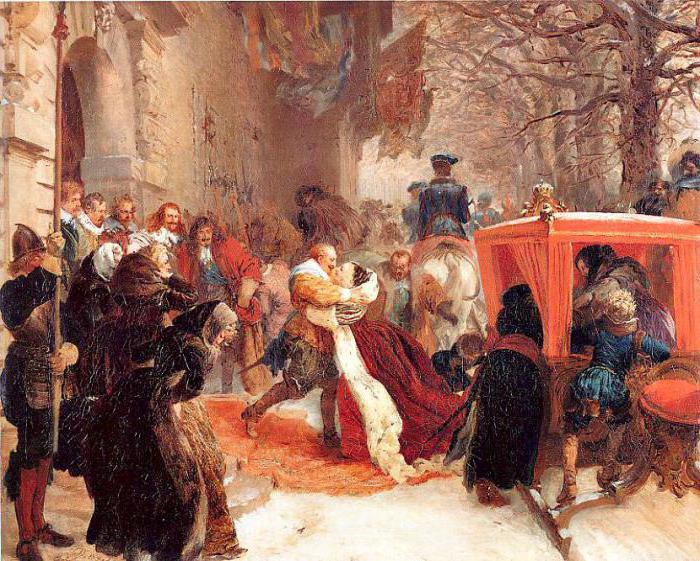
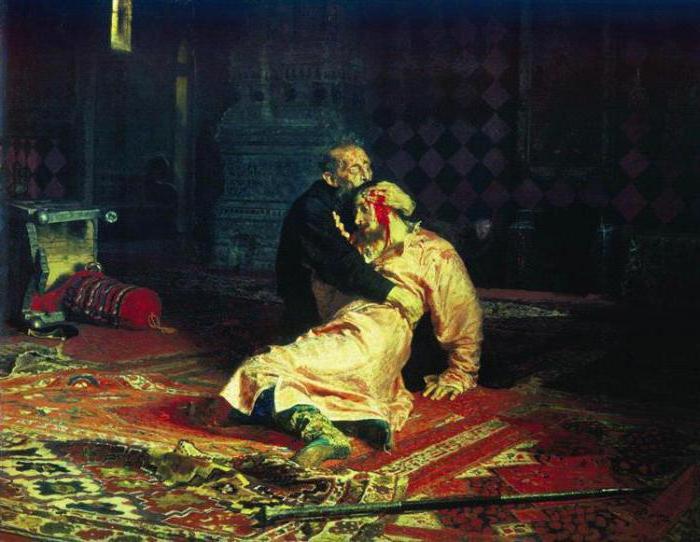
In the second half of the 19th century, painters began to paint scenes from the history of Russia. A number of paintings appear in art dedicated to certain events from the past of our country. The historical genre in fine art is represented by the following paintings: paintings by Ilya Repin “Princess Sophia in the Novodevichy Convent” (1879) and “Ivan the Terrible kills his son” (1884), works by Vasily Surikov, who turned to the most dramatic events from history Russia XVIII century. These works are distinguished by both the colorfulness and expressiveness of the images and the background of the setting.
Historical everyday genre of fine art
Domestic artists began to turn not only to political events, but also to the image Everyday life Russian people. Therefore, the so-called everyday historical genre took a prominent place in painting. The visual arts of this movement gained great popularity among the educated public of that time.
As an example, we can name the works of the following authors: Vyacheslav Schwartz, who created a painting about the royal hunt, Konstantin Makovsky, who painted canvases about the Muscovite kingdom in the 17th century. Historical everyday topics occupied great importance in the works of representatives of the World of Art association. The peculiarity of their paintings was the reproduction of pomp and solemnity, but with a tinge of sadness (Albert Benois, who depicted pompous exits Russian emperors and empresses in the 18th century, Eugene Lanceray, who captured the luxurious atmosphere at court, Valentin Serov, who painted the royal amusements).
IN Soviet time artists quite often turned to the events of Russia's past. At the same time, they revived the traditions of academicism of the 19th century, depicting heroic episodes from national history. For example, the artist V. E. Popkov is considered the founder of the “severe style” in Soviet painting(a picture depicting the construction of a hydroelectric power station). Special meaning in his work the theme of the Great Patriotic War(“Mezen widows”, 1965-1968). And T. E. Nazarenko is the author of works in which one can see turning points: the uprising of Pugachev, the Decembrists.

Contemporary artists show great interest in Russian history. I. S. Glazunov became famous for creating monumental paintings dedicated to understanding the past of our country: a work that symbolically shows the fate of the author, “Russia, wake up!” (1994) and others.
So, to summarize, we can state that historical themes occupied a very prominent place both in European fine art and in Russian painting. The historical genre has always been distinguished by truthfulness and accuracy, drama and solemnity. All convey expression, but this style is the leader.
Hello, dear readers! Today we have prepared another drawing lesson for you, in which we will tell you how to draw a knight. In general, we have already drawn a knight, but regarding that lesson we often read reviews that talk about the increased complexity of the drawing.
Indeed, our past was not easy - our warrior then turned out to be realistic, with rather complex shadows and high-quality drawing. Therefore, today we decided to present you with another knight, but a much lighter one. It will be a little more complicated than our lessons for beginners, such as articles about drawing,, or. So let's draw it!
Step 1
If you want to draw a knight very complex and realistic, or simple, like now, the beginning will be the same - this, of course, is a stickman. Let's start with it, using our help to indicate the knight's pose, his proportions and position on paper.
Our warrior is in a static position, he has straightened up to his full height and rests his left hand on his sword. Don’t forget the rules of proportions - the torso (from the neck to the waist) is on average equal to the sum of the lengths of two heads, the width of the shoulders also includes two heads (only now in width), and the arms extended along the body reach approximately the middle of the thigh. Another important rule— the length of the legs accounts for about 3 heads.

Step 2
Let's draw the silhouette of the shield and sword, then return to the head. Let's draw a vertical line of facial symmetry and a horizontal line of the helmet visor. An important clarification regarding the vertical line - it must be shifted to the side to indicate the rotation of the head. Use a circle to indicate the moving part of the visor, draw the mane and neck. There's too much going on on the helmet, so it's time for a close-up:

And now the general plan:

Step 3
Let's add volume to the body. This will not be difficult at all, because we will not have to draw any anatomical details - the knight is clad in iron from head to toe, a kind of era. Draw the balls of the shoulders, and also outline the torso and use rectangles to indicate the parts of the arm.

Step 4
Now let's repeat the same action, but with the lower part of our knight. Mark the belt and groin area with a triangle, and give the legs the shape of figures consisting of long rectangles.

Step 5
The silhouette is ready, let's start detailing. We will do this as always, starting from the head and going down to the feet. Using the markings from the second step, draw a visor, then erase all the extra guide lines from the previous steps, outline the helmet and draw two strokes in the throat area. Traditional close-up:

And now - general:

Step 6
Let's erase the extra guide lines from the area of the collarbone and shoulders, and also outline them. Mark the edge at the bottom of the armor that covers the shoulders. Also pay attention to the shoulder to our right - the lower edge of the armor seems to fit the arm, so the shoulder pad needs to be given the same slight bend as in our example.

Step 7
Now let’s outline the torso, dressed in plate armor (by the way, the part of the armor that protects the torso from the front is called the “breastplate”). So, let's erase extra lines from the bib, draw a vertical line, which should be slightly curved.
In this step we will draw a metal protective skirt, which is shaped like a horseshoe and mark a border on its edges. In the middle of this element of armor we draw four horizontal stripes - they should be slightly curved and positioned relative to the skirt in the same way as in our sample.

Step 8
A very short step, here we will work on a small part of the shoulder, which is located between the shield and the shoulder pad (we are, of course, talking about the right hand from you and me), as well as on the shield itself. Actually, let’s erase the guide lines from the indicated areas and outline them with confident, noticeable lines. Yes, we almost forgot - mark the middle of the shield with a light, barely visible vertical line.

Step 9
It's time to work on our left hand. Using the previously outlined lines, draw the area of the elbow bend, then draw a glove and a wide stripe in the biceps area. The sword deserves special attention - the handle, like the blade, should be formed by straight, even parallel lines. Hands are traditionally considered a difficult part of drawing, so in our lessons they often deserve close-ups- and this one will be no exception.

Although here, of course, everything is quite simple, the main thing is not to confuse the sizes of the phalanges and position them correctly thumb. Focus on the hilt of the sword and check the location of your fingers relative to it. And now - the general plan:

Step 10
Great, we're already at the finish line. In this stage, we will put the knight’s right leg in order - we will draw a knee in the form of a diamond in a specially marked place, then we will erase the extra lines from the previous stages, outline the leg and draw several horizontal stripes on the foot.

Step 11
The final step is to draw the second leg - everything is completely analogous to the previous step. After drawing the legs, draw the last detail - the spurs.
In this lesson we told you about how to draw a knight step by step, the article was drawn and written for you by members of the Drawingforall team. Visit our website often for new cool tutorials, it will be interesting!

We decided to devote today's lesson to a real medieval knight.
Everyone knows that a knight is not just a warrior who fought dragons in the medieval epic and often came into contact with others fairy-tale characters. As well as Japanese samurai, knights - bearers of the title of nobility. The knightly class had a very great influence on the entire history of Europe; many men from various social strata dreamed of becoming a knight in the Middle Ages.

The greatest chances of becoming a real knight were among representatives of rich noble families, whose members became famous for their devoted service to the king, or for special military merits. History buffs will definitely notice the Templar cross on our knight - we chose him for a reason, because it was this order is one of the most recognizable in the entire existence of chivalry. So, we are starting a lesson on how to draw a knight step by step for beginners, with a pencil!
To begin with, we want to demonstrate many different examples of drawing knights, and then we will tell you in detail how to draw one of them.
For convenience, you can use the content
The easiest way to draw a knight


Knights from old book for drawing :)
Rider on a horse

Quentin Dorward

Knight with shield

Goblin
Sixth drawing option


Russian warrior on horseback


And one more option


Now let’s draw it step by step
If you have already read the examples above, then it’s time to move on to a more detailed discussion of “How to draw a knight?” 
Stage 1
You start with a stickman - a special man made of sticks and circles, which is drawn to indicate the pose and basic proportions. A little about the proportions of the human body - the length of the body should be equal to seven heads. The size of the foot is approximately equal to the height of one head, the distance from the top of the head to the hips is usually equated to three heads. By the way, the height human head in all art manuals is the main unit of measurement of all body proportions.
True, we digress from the stickman. Be sure to pay attention to the proportions, especially the head. It should appear much larger than a human head, since the knight’s head is wearing a voluminous and massive helmet. The warrior's pose itself is quite simple, it does not involve any sharp actions or lunges - one arm is bent (the angle is slightly sharper than a straight line), the hand is located on the handle of the sword, and the second holds a spear with a flag and bends very slightly.
With legs everything is very simple. They bend at the knees slightly and are in the completely natural position of a person who stands straight and does not strain his legs to give them a straight position. It is important not to forget about two important lines - facial symmetry and eye symmetry, outline them and move on. 
Stage 2
At this stage, you will add volume to the arms and upper torso, following the lines of the stickman as a guide. Outline body parts in the form of modified cylinders. This will help you in the future to accurately draw all parts of the knight’s body. In general, in further steps you will draw only the shape of the armor, since, in fact, they hide the entire Templar from head to toe. 
Stage 3
Repeat the actions of the previous stage, but regarding the legs and belt of the knight - make them voluminous. The waist area is essentially a triangle, and the thighs of the legs look like cylinders. Don't forget to also mark the knees with flat ovals, then draw the calves, feet and move on to the next stage. 
Stage 4
Now work on the fabric. We are talking about the knight's mantle, as well as the elements of the robe that are on the belt and cover his legs to the knees. First, give the mantle some general silhouette, and then draw the folds. Do this using natural and smooth lines.
Remember that you are depicting in the picture a kind of light wind that blows the knight’s robes. Don’t forget to also mark the folded part of the mantle that covers the folded part. left hand. A little more work with fabric - draw a surcoat (a piece of clothing covering the legs and torso). Also at this stage, you throw on a sword, the handle of which is actually completely covered by the warrior’s hand in a mitten. 
Stage 5
You have a ready-made silhouette of a warrior, and from this stage you can begin to draw it in detail from head to feet. First draw a horizontal seam at the very top. Next, give the shape of the helmet a finished look. Then, based on the two perpendicular lines from the first steps, draw the vertical seam, as well as the holes for the eyes that need to be painted.
You complete the stage by drawing small holes at the bottom of the helmet. Be sure to pay attention to their uniform size and orderly arrangement. 
Stage 6
Great, now let's get into detail. top part torso and arms. First erase the guide lines from previous steps in the area right hand and breasts. Draw a cord with two buckles slightly below the throat - this will be the clasp of the robe. Draw curving smooth lines from it. They indicate folds of fabric that are secured with a fastener.
On the left, the mantle will fall down, and therefore the lines should gradually turn into vertical position. But again, extremely smoothly. Notice how the cloak fits the warrior's left forearm and mark this with folds. Also at this stage, draw the spear - it consists of a thin shaft and a tip that looks like a somewhat elongated diamond. 
Stage 7
Erase all the auxiliary lines from the previous steps on the torso and draw a cross with flared ends in the center of the chest. On the fabric of the robe, mark several folds that should run diagonally, from the armpit to the stomach. The belt tightens the warrior's robe, and his right hand is raised, so the folds will go from the belt up, and also towards the right hand. Draw another cross on the left side of the cloak, but do not forget to take into account the folds in the fabric. Draw the belt, the sword sheath in the belt strips and the left gauntlet. 
Stage 8
We devote this step to the folds on the fabric of the mantle and the lower part of the robe, which covers the legs of our knight. So, first of all, we align the stripes and erase all the unnecessary auxiliary lines. The folds should indicate the position of the mantle, which hangs freely from the right shoulder, which means they should be vertical and relatively long.
Please note that only one fold bends strongly, which is located near the edge of the mantle; the rest look like smooth lines. In addition, at this stage you will need to erase the guide lines from the top of the legs and draw folds in the fabric in this area. Draw them with slightly curving lines in the direction from the waist to the knees. 
Stage 9
Now you need to draw the legs from the knees to the feet. Actually, here you just need to give the legs a finished look, draw a couple of lines on the knees and mark the spurs. The chain mail fits quite tightly on the legs, and therefore try to convey the entire shape of the legs as correctly as possible. Draw the lower part of the clothing, sagging from the back. All that remains is to draw a flag with a cross flying on the shaft of a spear. Don't forget about the folds that go from bottom to top. 
Stage 10
Actually, the knight is already ready, all that remains is to work with the shadows. You start, as always, with the head. In this case - from the helmet. First, shade the darkest areas with vertical strokes, while trying to outline the cylindrical shape of the helmet. Pay attention to the light stripe at the bottom of the helmet; it should be marked and left practically unpainted. Now use lighter strokes to indicate the transition from shaded areas to light ones. These transitions should be natural and smooth. 
Stage 11
Continue painting the warrior and at this stage you will work on the limbs. It should be noted that you need to draw the armor on the legs and arms in exactly the same way. Look at your feet. This is what the first stage of shading should look like.
Cover the entire limb with very fine shading, in a criss-cross direction. After this, apply the darkest shadows and mark the transition from them to the light areas as you did with the helmet. Don't forget also about the shadows from the mantle on your arms. They should be especially thick. 
Stage 12
Now you need to draw the shadows on the legs. They are applied in the same way as on the hands at the previous stage. To add realism, leave narrow stripes of reflex light (that is, light that is thrown onto an object from a very bright surface of something) on inside shins in the area of the calf muscles. Especially thick shadows will be cast by the surcoat fabric. 
Stage 13
Well, there's quite a bit left. At this stage you need to work on the shadows on the mantle. It may seem to you that the step is voluminous and complicated, but this is not so if you correctly determine the direction and nature of the lighting. As you can see, the light falls on the knight from the side of his left hand. Therefore, almost all left-hand side his cloak should be illuminated. The areas of shadows that are created from the folds should be marked with light, barely noticeable strokes with a minimum degree of pressure on the pencil. It is necessary to outline the forearm of the left hand protruding under the warrior’s cloak, shading the edges of the protuberance so that it looks illuminated and bright.
Avoid flashy and harsh shadows, as in drawing various comic book characters. Even the most shaded areas must be painted carefully and accurately. To make the shadow more dense, shade the required area twice - first lightly shading diagonally, and then another layer on top to make a cross. From the right, the cloak is visible only from the inside, and it should be heavily shaded. Also note the shadows cast by the mantle on the knight's body. They form a sharp triangle. Its top is located under the clasp of the mantle. 
Stage 14
The last step is where you will cast the knight's shadow onto the surface and lightly shade the sword, spear and the section of the robe that covers the neck near the left shoulder. 
It was a very difficult lesson. If you couldn’t cope with it the first time, then don’t be discouraged - track the stage where you made a mistake and be sure to try again. Leonardo da Vinci often said that any obstacle can be overcome by perseverance. So just do it more attempts and everything will work out.
Source this example: drawingforall.ru
HISTORICAL GENRE, one of the main genres of fine art, is dedicated to historical events of the past and present, socially significant phenomena in the history of peoples. In the historical genre, examples of social valor find artistic expression, dramatic conflicts historical forces. Image historical events has long been associated with myths, folklore and religious legends. The historical genre itself was formed during the Renaissance, but only in the 19th century. finally separated from the allegorical and religious genres.

Surikov Vasily Ivanovich () Artist-painter, draftsman, teacher, portrait painter, master of the historical genre, the first Russian historical painter- realist.


Repin Ilya Efimovich Russian painter and writer. Born in Kuokkala, Finland, now Repino Leningrad region

“Ivan the Terrible kills his son”, 1870

“The Cossacks write a letter to the Turkish Sultan”, 1880


"Bogatyrs" 1898

"After the massacre of Igor Svyatoslavovich with the Polovtsians" 1880

"Tsar Ivan the Terrible" 1897

"The Knight at the Crossroads" 1878 Russian Museum, St. Petersburg

Ge Nikolay Nikolaevich Born in Voronezh Outstanding Master portrait, subject, historical and religious painting, updating its language on the eve of symbolism and the avant-garde.

"Peter I interrogates Tsarevich Alexei Petrovich in Peterhof" 1871

"The Court of King Solomon" 1854

Karl Bryullov () Karl Pavlovich Bryullov is an outstanding Russian historical painter, portrait painter, landscape painter, author monumental paintings; winner of honorary awards
