Artists are entitled to many benefits that will never exist. For example, coupons for free food, separate transport so as not to blend in with the gray mass in the minibus, or a personal butler. I am not an artist myself, but I am already beginning to feel all the delights of constantly working with my hands (in my case, my left hand). After drawing for a long time, not only the hands begin to hurt, but also the back, tailbone and other parts of the body subject to creative pressure. In this lesson you will learn how to draw a brush. And two at once: human and artistic. A brush is a means of transferring paint to paper, oil to bread and powder to the brain. This is exactly what the magic wand looked like when he went to study at a magic school for treatment. With the help of a brush, such a weapon of mass destruction as Malevich’s Black Square was created, which shows the ratio of the black population and the rest of the inhabitants of the Earth. Over time, the brush multiplied by spores among people and began to appear at social parties and in laboratories for the creation of chemical weapons.
After the invention of the automatic pen and hydrogen bomb the brush lost its position and moved itself exclusively into the artistic sphere, where it suddenly became a means of creating masterpieces. Being an artist, of course, does not promise great success, but sometimes there is money. What you can do with a brush:
- Chewing on it gives an influx of new brilliant ideas and also relaxes the nervous system;
- Draw the most famous painting in the world, or not to draw;
- Make a cache out of it and hide your stash;
- Use as a murder weapon;
- Poking it at someone (just not too much);
Let's try to draw it all.
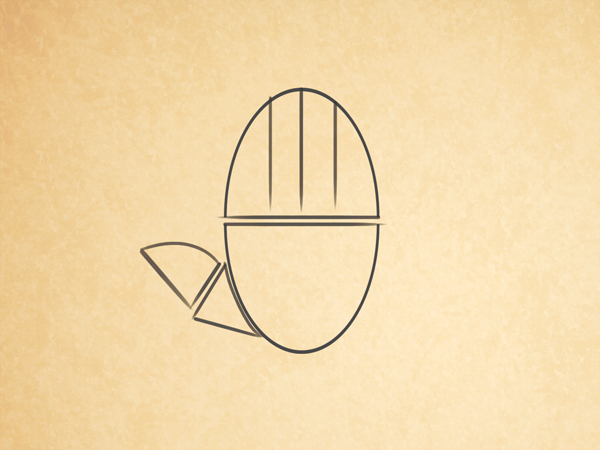
How to draw a brush with a pencil step by step
Step one. I won’t comment, because there’s not much to say here. From the pictures everything is visible and clear.  Step two.
  Step three.
  Step four.
  I hope you enjoyed the lesson. See more similar ones
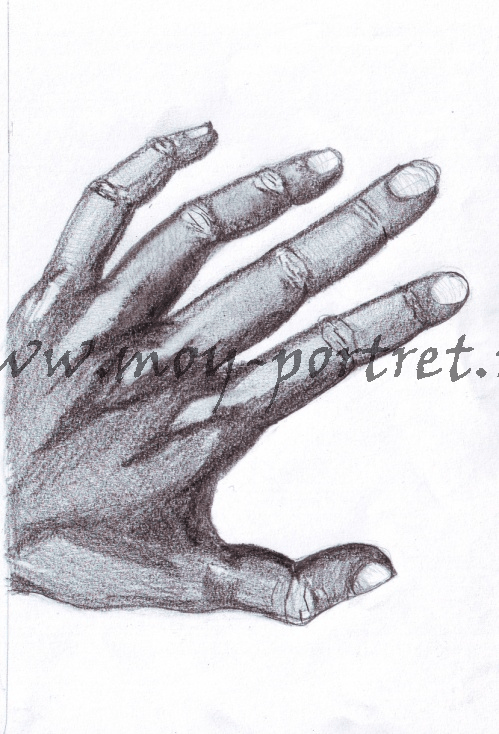
If you do not take into account a person’s face, then most of all a person’s emotions are conveyed by the position of his hands. The hands and fingers are very plastic and perfectly reflect the emotional state of a person. In this lesson we will draw a human hand with a pencil step by step, from simple to complex.
If you are learning to draw a person, portrait or figure correctly, you definitely need to know how to draw a hand, correctly and naturally, and this requires some knowledge and a little practice.
Proportions
In order to learn how to draw hands, first of all, you need to learn proportions and be able to apply your anatomical knowledge in practice. It's not as difficult as it might seem at first glance. Remembering just a few simple rules you will improve your drawing skills several times, and your hand drawings will miraculously acquire believability and naturalness.
General relationships
An interesting fact is that the hand is a bit like a shoulder blade, which consists of two parts: the metacarpus and the fingers.
The length of the fingers is equal to the length of the metacarpus.
This ratio must be respected. The drawing of a hand can be started from a schematic designation of its shape, and a line is used to show the line dividing the hand into two equal parts.
How to draw a blooming iris
The length of the entire brush can be completely different. There are people with short and long fingers and, accordingly, a square or elongated brush.
Fingers
Movable and flexible fingers consist of joints. The bones of the metacarpus are the largest and the longest, where the finger joints are attached. Each subsequent phalanx is smaller and thinner than the previous one. 
Our hands are designed according to the principle of the golden ratio, which is why women’s hands attract the glances of surrounding men. The proportions of the phalanges are in the ratio of 2/3 of the length of the previous phalanx.
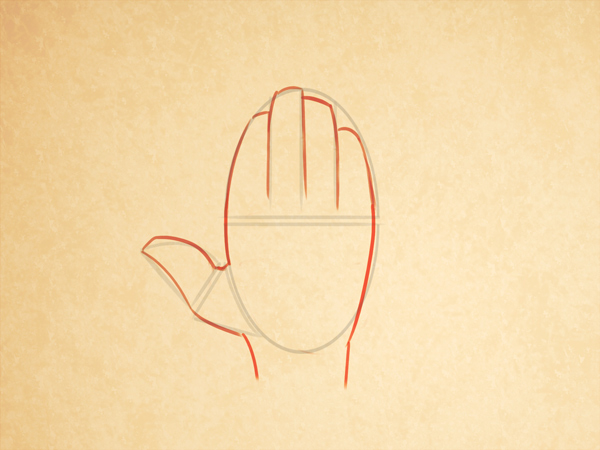
The picture below shows the first phalanx in red, the second in orange, and the third in yellow. 
All fingers except the thumb consist of four joints: three phalanges and one joint in the metacarpus. Thumb set aside, slightly turned in relation to the other fingers and consists of three joints. Its length usually reaches the middle of the first phalanx index finger.
Drawing a human figure

Length little finger almost reaches the bend of the last phalanx of the ring finger. This is shown in the illustration above.
Directions
If you carefully observe your hands different people, another one will appear common feature, which also needs to be taken into account in your sketches. If we outline the brush from above with one line, we get small semicircle, the top of which is the middle finger.
Pay attention to the inside and outside of the palm. If we draw a conventional line at the base of the fingers, we will also see a small arc that goes from the index finger and goes down to the little finger.
In the illustration below this is indicated by red arrows. You can draw a hand starting from the mitten, which is shown in the corner brown, immediately outlining all directions.

Pads and folds on inside the palms also have one general direction, they seem to descend from index finger to little finger.
Fist
A little more information about directions that will help you draw a brush more quickly and correctly. Let's say you need to depict a hand clenched into a fist. Evenly bent fingers again form a certain arc, with general direction"down to the little finger".
How to draw glass: how to make a glass vase

pay attention to top part illustration - a small hand drawn in brown. Here is a schematic diagram of how it narrows width of fingers in each subsequent phalanx, take this into account and do not forget to show it in your works. Compare the lengths of the red, orange and green segments.
The hand clenched into a fist, on the outside, under the little finger, forms a fold; it is emphasized by a small green arc in the illustration above. By labeling it, you will be able to create a more realistic image of a hand holding something or clenched into a fist, etc.
Important Details
The picture below shows what the skeleton of a hand roughly looks like. The joints where they connect are slightly wider and thicker. We need to understand this in order to know how to draw a hand realistically. This is especially true for the hands of elderly and thin people. At the bends, the finger will be a little thicker, along the length of the phalanx - a little thinner. 
Pay attention to how to draw a curved hand in profile. Look at the joint of the metacarpus and the first phalanx of the finger. In the picture above, the red line shows where the first phalanx attaches to the metacarpus joints. This is the beginning of the finger, it can be identified by the joint protruding upward - the knuckle. The green line indicates the place where there are membranes between them; they are often mistaken for the beginning of the first phalanx.
Drawing a baby: portrait and full-length
If we look at the hand in profile, we will see that the outer side is quite flat, only the knuckles protrude. The inner one, on the contrary, is soft; under each phalanx there is a protruding pad. There are two “pads” under the first phalanx, one under the joint is especially large and stands out well in everyone.
Drawing a hand step by step
Before drawing the hand, decide on the position of the forearm and wrist. To begin with, let's take the simplest example, use your brush as a nature, and do not redraw the picture below.

Human balance in motion
In general, drawing hands is a skill that needs to be constantly developed and improved. The hands are very plastic and can take on hundreds of different positions and angles.
Complex angles
Interesting angles in which the fingers are in different positions are more difficult to depict. There are several ways to help avoid mistakes.
One of the effective and most often used ways to depict a hand from a non-standard angle is to mark a line for the position of each finger: 
Sometimes the line does not cope with the task and you have to use auxiliary shapes, cylinders or parallelepipeds to indicate the position of the phalanges:

In order to give the brush some intricate position, first try for yourself how comfortable, natural and generally possible it is. The hand, fingers and each joint are interconnected, changing the position of one element of this structure often changes their position and the rest.
Looks like learning to draw human hand the most difficult, since it can take many forms and express different emotions. Animation is no exception. You will have to learn to draw hands in different angles so as to show them in dynamics and attract the viewer’s attention to them. Don't underestimate the power of a well-drawn hand in animation - it will save your work from monotony!
What you need to know
In the comments to my courses, I have been asked several times how I draw characters in different poses and with different expressions. The point is that with experience you will begin to develop own style drawing. Without other people noticing, you will have your own little tricks. These tricks are the poses and expressions you'll use more often than others, as well as certain hairstyles and clothes you'll be best at drawing. This is quite common and professional artists use this secret all the time!
However, this is very difficult to achieve in hand drawings! Let's take the head as an example. The only moving part there is the lower jaw. We can change facial expressions, but the eyes, nose and mouth remain in place (at least in real life!) With the hand everything is different. With any new movement of the brush, everything changes radically. In fact, in a scene with dialogue, the facial expression may barely change, but the hands will move very actively and under different angles.
The goal of this activity is to turn a human hand into a cartoon hand, so let's not waste time learning the names of the bones and muscles of the hand. (On the Tuts+ platform, by the way, you will have extensive opportunities to learn this too). We, in turn, will try to find a simplified way to draw a hand in a way that is practical and effective.
1. The hand in its most simplified form
 "Mom, hi! I'm on the Internet!"
 The hand is made up of a variety of bones, especially in the fingers. This means that all fingers are different sizes and can bend in different ways. different directions. For this reason, it is important that you learn to draw a hand in the most simplified way possible and be able to look at it like a small puzzle with a few key pieces. Let's try to divide it into blocks:
Step 1
Let's start with back side palms. Let's draw a simple semicircle:

Step 2
Now let's draw a triangle that is attached to one of its sides. Like this:
 Calm down: we are not drawing a cup of tea!
 Step 3
Above the triangle we will draw something resembling the tip of a knife.

Step 4
It's time to draw the fingers. In mirror image, draw the first shape at the top. "Puzzle from the hand" is ready:
Step 5
Great! All that remains is to fill in the missing details with soft contours:
 Circuit thumb the trickiest one is that it needs to be gently combined with the center of the palm.
 Note that the fingers have different formats due to differences in their sizes.
2. At a glance
You need to know a few more details of the palm. Let's take a look at them:
Step 1
Again we repeat the process above, following the basic pattern:

Step 2
Something new appears - the palm now looks a little more complex, and there are characteristic differences in its shape that need to be taken into account. Luckily, a few simplified forms are enough to show it.

Step 3
Now we can add outlines to complete the drawing with the necessary details.
 Please note that we end the sketch with soft, rounded lines. Think of the palm of your hand as a delicate sculpture.
 Profile view
When the hand is turned in profile, we can see the prominence of the muscle at the base of the thumb.

The more “childish” your drawing style is, the simpler and smoother your lines will be. Here are my little secrets that helped me understand that hands can be drawn based on simplified shapes. The most important thing is to strive for a style that will reflect personality and dynamics in the drawings at the final stage.
3. More shapes and a 3D hand
Now you can draw a flat hand for the rest of your life, right? If you want to draw hands with convincing depth, use the same technique above, just change the camera angle! Play with this technique until you feel confident.

To form your fingers, imagine them as cylinders stacked on top of each other. This technique will help us draw fingers from different angles, because with its help it is easier to “see” the hand in space.
 Hand or robot?
 The shapes into which a human hand can be formed are countless. When the palm is open, the same rules apply; when closed - others! The same thing happens when the hand holds an object, and it must adapt to its shape.
Let's learn how to draw a fist. A slightly different process, but in the end you will see that it all comes down to a simplified drawing of the main geometric shapes.

Step 1
To begin with, we simplify the bend of the little finger, draw something similar to the letter “u”.

Step 2
We kind of “wrap” the little finger around the letter “y”. Don't forget to highlight the curve that goes from the little finger to the wrist.

Step 3
We continue to draw fingers in space. This time we draw only three fingers. I'll explain why later.

Step 4
Lastly, draw the thumb and the protruding muscle at the base of the thumb.

Step 5
Fine! In a few steps we have completed a simplified drawing of a fist on one side. See how the shape of a fist can be roughly depicted using “boxes” different sizes.
 Notice how you can fit the outline of a fist into three-dimensional rectangular shapes in space.
 Obviously, if we try to simplify each hand position using various techniques, we will get tired quickly. Therefore, remember that the real secret to simplifying a hand drawing is observations from life.
 View from the opposite side: simplified drawing.
 4. The Fab Four
It is common in animation to draw characters' hands with only four fingers. This allows, in addition to enhancing the character’s dynamics, to make the artist’s life easier. This way he doesn't have to worry about too many details.
 Hands with four fingers of different styles and sizes.
 Note: When using this technique, you will need to adapt your knowledge of a five-fingered hand to a four-fingered one. Concepts need to be adapted to achieve a suitable and interesting result.
It is worth paying attention to your fingertips. In animation, the more rounded and flexible the fingertips are, the more interesting and dynamic they are. When you create characters, think of their hands as if they were separate characters!
 See how this hand has its own character?
 Another good reason to draw hands with four fingers: in this case, you have the opportunity to increase the size of the fingers, which means making them more expressive! Whole line famous cartoon characters able to stand out thanks to this technique: The Simpsons, Bugs Bunny, The Flintstones and Mickey Mouse.
The Mystery of the Little Finger
One of the biggest secrets in the design of such a brush is to make maximum use of the little finger! If you place it at a different angle in relation to the other fingers, you will break up the monotony in the perception of your hand.

 Highlight the position of the little finger in the frame. See how the nature of the action changes with this technique. The viewer's attention is now focused on the main subject in the frame, and the character's personality is given a special twist.
 5. Talk to your hand
When we need to express emotions in an animation drawing, the role of hands is irreplaceable! Look at the images below: the hands visually support and echo the facial expressions and body language of the characters.

- "I have an amazing idea!"
- "How do I look, dear?"
- "I can't believe...I'm being awarded an Oscar!"
- “I don’t understand anything... he was just here!”
- "Ahhh! My head is pounding!"
No matter how strange it may seem, hands have their own character! Not only do they maintain facial expressions and body language, they can express their own emotions!
 Do you see the greatness in these gestures above?
 However, you will often find yourself in a situation where your hands should not distract attention. In this case they should be minor character. Characters in action scenes tend to be exaggerated more than characters in quiet scenes.
 Please note that in dramatic scene movements are insignificant. There is no room for exaggeration here. Hands must emphasize the feelings of the characters - this is one of the most difficult processes in design.
 6. Knowledge test
I have prepared a short test to test your powers of observation. Analyze the pictures below and try to determine what feeling the best way describes each. Can you guess everything correctly?
 Can you guess what the hand expresses in each of the drawings?
 Raise a hand!
Now you know all the secrets of the art of drawing cartoon hands, congratulations!

Although hands are a very fun part of the body to draw, the ability to create hand designs in different styles is not so simple, and only with the help of hard training can you achieve natural results. Even if your goal is to draw for animation, it doesn't hurt to buy a good anatomical atlas to understand how the muscles and bones in the hands work. There is no need to memorize each one in detail. It is enough to understand how the hand works in motion. Remember that a character's expressions are much more important than what's underneath the skin.
One last tip: when you need to draw hands, place your own hands in front of a mirror, or just watch your hands. One of them will remain stationary while you draw (unless you've learned to draw with both hands at the same time!)

In order to paint a picture, the artist needs a canvas on a stretcher, as well as paints and brushes. The success of his work largely depends on the quality of the latter, so the choice of such instruments must be approached responsibly. To choose the right brushes for painting, you need to consider what paints you will have to work with, as well as your budget.
In an effort to choose the right brushes for painting, you need to know what they are, what the brushes are made of and what paints they are intended for. So, for example, to paint with gouache or watercolor, they use squirrel, kolinsky and synthetics. They all have their own quality characteristics:
- The column is suitable for all styles of painting, but its price is quite high.
- Squirrel is ideal for watercolors, and synthetics are ideal for acrylic painting.
- The pony brush is a good alternative to the kolinsky and squirrel brushes.
- The brush made from pig wool is more suitable for oil paints.
- A badger brush is used for soft paints.
- Sable in its quality has the properties of kolinsky and squirrels, but such bristles can be used to paint large works and miniatures.
- Synthetic brushes are not suitable for watercolors; they are more often used for acrylics.
Any brush is made of a handle, a hair tuft and a base. The quality of this drawing tool determines whether it will be convenient for the artist to work. In turn, its durability in use depends on the quality of all components of the brush.
To choose the right brush sizes and the tool itself, you need to focus on the following points:
- material from which the brush is made – brush good quality convenient to use;
- the brush handle should be smooth;
- its length should be convenient for the user.
The base of the brush should encircle the handle as tightly as possible, fixing the hair bun motionless. There should be no seam on it so that the instrument is comfortable to hold in your hand. The most important part of the product is the hair bun, which differs in material. A synthetic paint brush is of worse quality than natural brushes. Such drawing tools are classified by numbers.

Artists know how to choose brushes and what types of brushes are available. On right choice The size of the brush also affects the size of the brush, as well as what paints the specialist plans to paint with. artistic creativity. One person needs thin brushes, the other needs a round one.
Brush with good hair has the following qualities:
- her hairs are elastic;
- when wet they do not lose their shape;
- do not fall out during operation;
- the glue with which they are fastened does not extend beyond the holder.
You need to pay attention to all these characteristic signs in order to choose a good brush.
In the video: how to choose the right brushes for painting.
Types of brushes and their purpose
To choose the right brush, focus on the bristles from which the bun is assembled. You also need to know which brushes are best to use for watercolors, gouache or oil paints:
- Squirrel wool brushes. Ideal for painting with watercolors. Thin and soft brushes allow you to control the flow of paint, so they are convenient for painting small details of a picture. To ensure a high-quality brush made from squirrel hairs, the bristles are first degreased, sorted by length, unusable hairs are removed and straightened.

- Intended for watercolor paint, the artist can not only use them comfortably, but also save on price. To choose a brush for painting for children, pay attention to their painting skills.

- Sable wool brush. It is the most expensive tool used by professional artists. The choice of such brushes makes it possible to draw thin lines; they can be used to paint with gouache and watercolor.

- Pony hair tassels. Quite elastic and soft, suitable for drawing with ink. However, for those who are going to paint with gouache, this is also a worthy option. With the help of such bristles it is easy to apply strokes of paint.

- Nylon tassels. Recommended for acrylic paint, there are different shapes, it all depends on the specifics of the artist’s work. A sales assistant at an art supply store will help a beginner make the right choice.

Natural brushes are characterized by the fact that the tuft in them is made of animal hair. Made from natural material, which is much higher quality than synthetics, such brushes will last much longer.

Suitable brushes for oil work
For artists who paint with oil paints, it is recommended to purchase the following brushes:
- bristles, which are particularly elastic and quickly absorb paint;
- medium soft mongoose brushes;
- badger hair brushes that are suitable for mixing oil and acrylic;
- a synthetic nylon brush, which is almost as good in quality as natural ones.
Synthetics are inexpensive, so they use these brushes to paint on landscape paper at school. Thanks to the light nylon hairs, children can clearly see the shade of paint on the bristles. A thin brush is convenient for marking contours and boundaries between colors, while a thick brush is useful for painting large areas of the design.
Paint by number tools
Brushes by numbers are included in the kit, which is sold along with paints by numbers. Painting by numbers – modern look art, when a non-professional artist has the chance to create a painting of a famous celebrity.
Brushes by numbers, made of elastic nylon fiber, are perfect for such creativity.

To choose good brushes for painting by numbers, you need to take into account that they are divided according to their purpose, the quality of the hair and their shape. This choice also depends on the paint the artist uses. A nylon (synthetic) brush is perfect for painting with oil paints. Flat brushes are often used in shape, and everyone chooses the sizes individually. The artist needs those brushes that seem to be an extension of his hand.

What types of brushes are there?
All brushes for gouache, watercolor and oil paints may also differ in the shape of the bristles:
- Round brushes. These products are suitable for painting gouache paint, allowing you to paint over small details of the drawing.

- Flat brushes. More elastic, therefore they are used for painting areas of paintings with close-up images, for example, of the earth, sky, grass. Their capsule is compressed at the end, forming a flat tuft of hair. Artists use them to sketch cityscapes. The shape of the brush resembles a cat's tongue.

- Flute brushes Their shape is wide enough to apply broad strokes to the painting canvas. They are used mainly in working with watercolors, sometimes with oil paints.

- These brushes are round and very long in shape, needed to apply thin lines. They have found their application in graphics.

- In all respects they resemble font ones, differing only in short hair.

- Fan tassels. They are one of the varieties flat brushes. They received this name due to their fan-shaped shape. Their use allows you to soften the color stretch and contrast of contours.

The final result of the artist’s work depends on the correctly chosen tool. But for an experienced painter such a choice is not a problem. And buy all these goods in specialty store art goods are not difficult.
Tips from professional artists (2 videos)
Variety of brushes (25 photos)


The image of hands, or rather hands, is quite a difficult task. Even many successful artists, with craftsmanship and landscapes, avoid compositions involving hands. Therefore, having set yourself the task of learning to draw hands correctly, you should understand that this is a long and painstaking work. First of all, you need to study the structure of the palm, the physiological basis - the skeleton. Most The best way for this purpose it is drawing from life.

Many people refuse to learn to draw. Fears that they will not be able to overcome difficulties, that they are not talented enough, prevent them from even trying to master basic drawing skills. They are looking for reasons and culprits, because it is easier to give up on an idea than to sweat a lot. And it's really sad. After all, you should understand that the learning process will not be easy. Some lessons are easier and it only takes a few hours of practice to get satisfactory results. And some aspects cannot be studied “at once”; you need to work long and hard before the first positive results appear. Both in life and in drawing, it is easier to give up on obstacles than to stress and move on.

In order to start drawing you will need: regular drawing paper, HB and 2B pencil, eraser. The first sketch is best done with a subtle HB pencil, and to further add tone and detail we use the 2B markings.
Step by step instructions
Turn the paper over horizontal position and divide it in half. Place your hand on one half and start drawing on the other. Imagine that your fingers are cylinders, your hands and wrists are geometric shapes. Thus, we can imagine the volumes that make up a human hand.

First, let's draw several straight lines repeating the axes of the fingers. Then we will install the top of the middle finger, little finger and thumb. We draw a connecting line between the extreme points of the axes of the thumb and little finger to help calculate the distance and make it easier to evaluate in further calculations of the distance between the joints.
The sketches made may seem like nonsense, and you may have a question: “How will a hand come out of these lines and dashes?” Remember that even great things begin from small things, and it is impossible to correctly build a palm without referring to the physiological structure.


Draw the thickness of the fingers along the marked ellipses so that thin cylinders are formed.

Erase the dark construction lines and smooth out the image and add fine details such as nails, creases and wrinkles.
Then use an eraser to select light tones and shades, wipe extra lines what remained of the sketches around the hand.
Remember that the attitude with which you start work determines the success or failure of your venture.