Japan is a highly developed country whose technology is ahead of its time. Business card In Japan, in addition to reliable cars and advanced technologies, anime stands out. This type of animation is popular in Asia and other regions of the planet. It is not surprising that many are interested in how to learn to draw anime from scratch.
If you want to master this activity, pay attention to my article. In it you will find useful tips and step-by-step recommendations to make it easier to create anime-style drawings. If you haven't visited art school With perseverance and patience, master this technique.
- Choose a tool. We are talking about leads and pencils of varying hardness. You will need three different leads, which are sold either in wood frames or in the form of rods designed for power tools.
- Alternatively, buy a set of graphite sticks coated with a special layer. With their help you will make quick sketches and shade easily. large surfaces.
- You can't do without a good eraser. A soft model is better. Otherwise, during operation, the top layers of paper will be damaged and “injured.” To minimize the risk of such an event occurring, it is recommended to draw contours with thin lines.
- They draw anime with sharply sharpened pencils and leads. Be sure to buy a good sharpener. Once you gain experience, learn how to sharpen a tool using a knife.
- Proper execution of hatching involves the use of a hollow sharpened tool. This makes the task faster and easier. True, don’t focus too much on this moment. A beginner is allowed to do what is convenient and easier.
- Start mastering the art by drawing contour drawings. To start, do some work linearly, applying light shadows in certain places. The result will be a kind of quick sketch. Over time, your hand movements will become confident, and you will be able to pay more attention to the light and shadow elaboration of the drawing.
- Hatching is much more difficult to master. Draw the elements as close to each other as possible. Otherwise, the integrity of the object will be disrupted and the impression of striping will appear. At first, you can rub pencil marks with a soft piece of paper or your finger.
- When shading a drawing, be sure to keep the distance between individual strokes to a minimum. Lines crossed at a large angle should not be used.
- Newbies make mistakes. Fortunately, the pencil is easily erased, only with extreme caution. Otherwise, the paper will be severely damaged or a certain area of the work will be smeared. Remember, it is difficult to put a new layer of graphite on a damaged surface.
- If you want to remove a large amount of shading or slightly weaken the tone, use a special mass resembling plasticine. It is characterized by the ability to easily absorb excess graphite. If you don't have it on hand, take a lump of bread.
You've got your first idea of how to learn how to draw anime from scratch. If you really like drawing, it will become a hobby. Experts advise starting training with simple projects, gradually increasing complexity. Varieties of plot play minor role.
Beginners are not recommended to use complex motifs consisting of large quantity elements. To start, train on simple objects and compositions. We are talking about fruits, vegetables and simple shaped objects. Watch the video below to get a visual representation.
Video training and step by step lessons
Over time, switch to more complex subjects and learn to draw animals, buildings and technology. Lastly, start drawing people. Draw human face not easy, but depicting human emotions is completely difficult task.
Secrets of drawing anime with a pencil
Japanese cartoons, whose popularity is difficult to overestimate, have always been famous good story, active development of events and bright heroes. After watching such an animated film, many people have a desire to master the art of drawing.
In this part of the article I will tell you how to learn how to draw anime with a pencil. Following my algorithm, you will draw beautiful drawings with a piece of paper and a few pencils on hand. As an example, I will give a technique for drawing a boy, which consists of several stages.
Before we look step by step instructions, I note that Japanese drawings have certain technical nuances. In particular, anime drawing is characterized by a technique for drawing the face, eyes, nose and mouth that differs from other genres. Since the outline of the face is roughly shaped and complemented by large eyes, drawing them is not difficult.
- Initial outlines . Correctly place the outlines of the drawing, and only then draw the main outlines little boy. To make this step easier, make the primary contour from rectangular shapes. The main thing is that they match the size of the body parts.
- Head. Draw a rectangle for the head, and below it draw another rectangular shape for the neck. Starting from the neck, draw two arcs to represent the shoulders. Then draw lines for the arms and place circles in their center, which are destined to become elbows. It's easier to draw hands using rectangles and lines.
- Draw an oval face . In the anime genre, it resembles a regular rectangle connected to a triangle. These geometric figures draw together, and then delete the connecting line. The result is a face made in Japanese style, which is characterized by a narrow and sharp chin. All that remains is to add a few elements of a fashionable suit.
- Elements. The next step involves adding various elements to the drawing. Using an eraser, remove unnecessary contours and lines and begin detailing the picture. Give the final shape to the face using the starting lines. Over your head, apply an arched visor along with the cap base. Also draw the contours of the hair and ears.
- Start sanitizing your hands . Using the initial contours, carefully outline the arms. Then draw the collar and outline the legs. If you can achieve the correct proportions within this stage, then you have successfully completed this difficult process.
- Main details . As part of the final stage Special attention Focus on the main details of the drawing. It's about the eyes and face. The eyes should be located large sizes and large resin pupils. Add a small nose and a small mouth that resembles an inverted triangle.
- Cloth. Pay attention to the boy's clothes by providing them with buttons and pockets. Add additional detail to the T-shirt, draw the gloves and finish off the triangular hair.
- Coloring . Finally, color the drawing, making it bright and contrasting. Since we are drawing anime with a pencil, it is enough to shade the drawing by adding bright shadows.
If you want to draw anime comics with a pencil and build a career in this industry, my instructions will help you get started. If you follow the news and learn by mastering various techniques, bring your mastery to new level.
Drawing anime eyes - step-by-step instructions

People enjoy watching Japanese cartoons. Some people have a desire to draw something similar, plans and ideas appear. They draw their favorite characters, devoting themselves to the lesson free time, but in most cases the quality of the drawings remains low.
The hardest thing to draw are the eyes. Therefore, I will pay special attention to the question of how to learn to draw anime eyes. I hope that with the help of my tips you will draw beautiful and expressive eyes, which will allow you, for example, to prepare for the New Year by creating interesting gifts.

- There are eyes in anime various shapes, size and color. Draw the arches of the eyelids, and then draw two guide lines that must intersect. It is better to make the guide lines slightly curved and as thin as possible.
- In most cases, the iris takes up a huge part of the eye. Instead of a circle, feel free to draw an oval. When designating the pupil, remember that size determines the character’s feelings. If the pupil is small, the hero is scared. During this stage, you should not highlight the pupil too much. We will do this after drawing the highlights.
- Most often, one highlight is depicted. Alternatively, paint several small highlights, placing them on different sides. Only after drawing the highlights make the pupil bright.
- In anime, the number of eyelashes is small and in most cases does not exceed 7 pieces. Most often they are depicted as an arrow, always highlighting the line of the upper eyelid, thanks to which the eyes become voluminous and bulging.
- Do not draw the eyebrows in detail. However, they must be present without fail. Otherwise, you won’t make your cartoon character’s eyes expressive.
- Many beginners have questions regarding eye shape. In most cases it is a semicircle. Top part the eyes are represented by an almost straight line, and the lower part is a perfect semicircle.
- Draw eyelashes with a general arrow, bending down or up. The direction of the bend is determined by the shape of the eye. If you are depicting several eyelashes, place large ones on upper eyelid, and the small ones are respectively on the bottom.
You can make anime eyes lively and expressive with the help of oval highlights by placing them along the edges. You can use vertical or horizontal highlights.
Video lesson
To emphasize the main highlight, use a triangular highlight with the corner extended into the center of the eye. Round highlights are often used, which are used as main or auxiliary highlights. It depends on the style and preferences of the author.
Drawing an anime body

Continuing the conversation about Japanese animation, let's figure out how to draw an anime body at home. At first glance, this seems like a difficult task. In reality everything is different.
Japanese animation differs from cartoons created in other countries. It is aimed at both teenagers and adults. For this reason cartoons are quickly gaining popularity, which has long been comparable to the popularity of the best New Year's films.
The depiction of anime characters and the background on which the events unfold is very different from cartoons in other countries. In most cases, anime is a multi-part television film distributed via optical storage devices. IN Lately Japanese cartoons began to appear more often on widescreen screens.
After watching Japanese cartoon Many people have a desire to master anime drawing. We have covered the main points regarding art. It's time to talk about drawing the body.
- To achieve your goal, first study the proportions of the body and become familiar with the process of drawing it in the Japanese style. The Japanese like to distort proportions. A striking proof is the many cartoon characters in which certain parts of the body are disproportionate.
- Anime masters depict the female figure as elongated, complemented by thin legs and a wasp waist. The male figure is characterized by broad shoulders. Moreover, the size of the head does not always correspond to the size of the body. Perhaps this is the secret to the attractiveness of the images.
- Draw a human figure with two points connected by a vertical, which marks the center. Draw the bottom and top lines, and vertically divide the central line into eight equal parts. This is easy to do with a ruler.
- Then draw an oval body, a round pelvis, a head and legs with arms. To revive the drawing, place body parts on a slightly curved arc. This will demonstrate that the character you are portraying is moving.
Only with time will you be able to master the drawing technique various parts body, which is used by Japanese animators.
Video instruction
Japanese comics (manga) and cartoons (anime) are a huge layer of culture with its own traditions and rules. Anime characters are easily recognizable, and millions of fans of this genre visual arts scattered all over the world.
We will tell you how to draw manga and anime correctly and beautifully in a series of our lessons. In the first lesson we will start with the very basics of drawing.
Movement is life
Anime and manga are impossible without dynamics. Each episode is characterized by a certain event and a certain movement. When planning to draw your anime character, first of all think about what pose he should take in the drawing. Do not try to draw “from memory” or as you “see fit”. Manga is not only (and not always) big eyes, it is, first of all, a clear correspondence to the “real world”. You will definitely need examples. Take similar images from other works, or use a large mirror in which to pose for yourself. Try it different angles, before starting the final sketch.
Basics of drawing. Creating a hero figure
As you may know from the lesson "", the height of a person is on average seven and a half of his "heads". Because anime heroes are still some kind of heroes, then their height, as a rule, is 8 or more “heads”. This way our heroes become more expressive. The remaining body proportions are identical to those of a human.
At the first stage of drawing, we create only a mannequin of our future character, which looks more like an articulated doll than another master of the elements.
From frame to overall structure

So, let's try to give more specific features to our character. For convenience, let's take the simplest pose. Mark the muscles and place small ovals at the joints. Please note that the wrists and the very bottom of the legs remain sticks. The torso is also not connected to the legs.
Finishing the contours

Now let’s finally form the contours of the body. Carefully draw slightly curved lines that completely form the image of our hero. Smooth lines are extremely important. Any angles will create the effect of mechanicalness and unnaturalness.
Elastic band is our everything

Carefully wipe off all auxiliary lines. As you can see, we have a man. If you want to portray a woman, then in addition to pronounced breasts, you should also make her more wide hips and a slimmer waist, giving an hourglass shape. According to manga canon, women have narrower shoulders and slimmer necks. Often a woman’s legs are drawn in such a way as to further emphasize the hourglass shape.
So, wipe off all unnecessary parts. Feel free to clean up any rough edges. Our body is ready for detailing.
Posing

The “stick-stick-cucumber” approach that we used in general and in this lesson in particular - a very convenient way for beginners to learn different poses and correctly draw their characters in the required position. Once you get comfortable with this hinge method, you can later draw characters without skipping this step. Practice drawing different positions of the characters by drawing, for example, figures like in the picture above.
In the following lessons we will continue to look step-by-step at the basics of drawing anime and manga.


How to draw an anime girl for beginners? In this article we will talk about exactly this. Stock up on food and tea, because the article is long, and in some places you will see video lessons that are a must-watch.
First, let's try to draw a standard anime girl, and then we'll talk a little about the anatomy of the head and body, and then we'll show you a couple more examples.
First drawing example

So, in the first example we literally have a standard anime girl. Let's start drawing it.
1 step
First we need to make a simple sketch. We depict a head, a T-shirt, hands and hanging hair.
If you already have some experience in drawing, then you will more or less cope with this stage.
Pay attention to the shapes of the head, we will talk about them a little later, but for now all you need to know is that they are sharp.

Step 2
We are working on the hair. We draw the braid and bangs in the form of long, sharp and uneven triangles. Also, don’t forget about the bow.

Step 3
Let's move on to detailing our drawing. We are working on the girl's face. Large eyes, eyebrows on top of the hair (this technique is often used in anime), small nose and mouth.
By the way, eyes are depicted much more complicated than they seem. At the end of the article we will provide a link to a lesson on drawing eyes.


Step 4
Great, we've already come a long way and only a little bit remains. We outline some lines with a thick pencil and shade some elements. In general, we add chiaroscuro to the picture.
Also, we depict the collar of the dress and draw circles on it. Of course, if you don't like circles, you can choose any other shape or patterns.

Step 5
Well, on last stage we color this dress and shade the arms.
By the way, this is what this girl would look like if you drew and colored her on a tablet.
What is important for a beginner to know?
Well, now a little theory, if you don’t need it or are not interested, then you can immediately move on to the following step-by-step examples. But we still recommend reading it.
In general, if you don’t know how to draw at all and have never drawn, but want to learn how to draw only anime, this is a bit of a wrong approach. You must want to learn how to draw in principle. 
Anime is not much different from regular drawings, so if you are skilled at portraying ordinary people, then you will learn to work with anime without much difficulty.
Let's give you a couple of tips:
— When drawing, try to occupy the entire area of the sheet, drawing objects large. This way you will learn faster.
- If you are bad with your hands, but good with your legs, then your hands are most likely not very good either. Draw the entire body from head to toe.
- Save your old drawings that you drew a year or two years ago, so you will see progress.
Head
The head is the only part of the body in which an anime character is very different from a regular one.
There are usually two types of heads:
Standard anime head with big eyes and simple nose and mouth.

And a supposedly realistic anime head, we don’t recommend it, because it’s more difficult to depict one :)

You will find useful articles on drawing the head, mouth, nose, etc.
Body
An anime girl's body is absolutely no different from a regular one.

If you know how to draw a body, then more than half of the success is in your pocket. Congratulations! Well, if you don’t know how, then be patient and learn :)
Video tutorial on drawing an anime body.
Second step-by-step example

This one and next example we will not describe in detail, since the essence of each stage remains the same.
Let's sketch the head.

We detail the sketch by adding a face and hair to it.

We erase the lines and sketch out the body, if you don’t understand what kind of shape this is, then take a look at the end result, everything will fall into place.

We draw hands and begin to work on the costume.

We depict the shoulders and skirt.

Well, the final touch is the legs. Try to make them not very thick, since our girl is quite thin :)
Example number three

Let's move on to the last step-by-step example in this lesson.
So, let's make a general sketch with a pronounced chest.

Well, everything is standard here: eyes, mouth, nose, ears.

Now the hair of this character is very long and reaches the lower back.

So, we have to dress her up at least a little, otherwise we end up with some kind of erotic drawing. We put her on a swimsuit with bows.

We color the hair.

Shade the swimsuit, note that the lower part is slightly darker than the upper. This gives a voluminous effect.

Don't forget about the pupils and glare.

Hurray, everything is ready!
And this is what it would look like if you drew in some graphics editor.
Here are several step-by-step linear constructions of manga characters for exercises in drawing and coloring. Pay attention to the hairstyles - the hairstyles of the characters are a kind of trademark of the manga - often the characters are recognized only by their hairstyles:
1. 2.
3. 4.
4.
Sasami Kawaii
1. 2. 3.
3. 4.
4.
5. 6.
6. 7.
7.
1. 2.
2. 3.
3. 4.
4.
5. 6.
6.
7. 8.
8.
Son Goku
1. 2.
2. 3.
3. 4.
4.
5. 6.
6.
7. 8.
8.
3. 4.
4. 5.
5.
6. 7.
7. 8.
8. 9.
9.
Ash Ketchum
1. 2.
2. 3.
3.
4. 5.
5. 6.
6.
7. 8.
8. 9.
9.
http://members.tripod.com/~incomming/

1) Before drawing the hair, draw the base - head, shoulders, face, etc.
Draw the back of the head so you know where the head ends.

2) Now draw all the non-curly parts of the hair. For example, I drew straight bangs for this girl.
You should already have an idea of what hairstyle you want to give your character. A ponytail, braids or loose hair - to have an idea now is good idea(you can make a rough sketch if necessary)

3) This is the end of my preparations for drawing the curls themselves. I braided my girl's hair into knots (or odangos, whatever you want to call them) and added a few strands to give the appearance of her hair being pulled tight.
You don't have to do your hair like I did, this is just one example of how to prepare your character for the curly phase.

4) Now we start curling. Draw several curved lines that will represent the back part of the first curl. My curl split into a thin and thick section, but you can do one thick section if you prefer.

5) Now let's draw the front part. Make a slight curve on one side to add some weight and thickness. Make sure you cover the lines you drew in step 4 to create a complete curl.

6) Draw the back of the second curl. Because this hair will be very loose and springy, I leave plenty of space between curls.

7) Draw the front half of the curl, this time adding a curve behind it, unlike the previous curl. Notice the different thickness of each curl.

8) Make another set of curls, this time closer together - if you want tight curls, draw them close throughout instead of leaving distances like I do.

9) Continue making curl after curl, varying the thickness and distance between them. You can add a few lines to the back of the curl.

10) Continue curling. Make sure you know where to stay (short is good too!)

11) Finish with a small curl.

12) Repeat the entire process on the other side of your head. Draw all the front curls before starting on the back ones.

13) Now let's move on to the rear ones. If you start to get confused, try drawing them with less pencil pressure. This can help if you have a lot of curls.

14) This is the finished version with all the curls! Still missing a few little things. Let's add them now.

15) Just add a few small curls (like the ones we ended each row with).
Finally! The sketch is ready!

16) Now stroke. Make lines of different thicknesses. Just like in the sketch, try doing the front rows first, and do each curl separately to avoid confusion.

17) These are the finished outlined curls. Alternate thin and thick lines.
Here I have completed the drawing of the character to show what the whole image will look like. But you can draw your entire character before you start doing the curls. It would be a shame if, after all this work, you don't like the rest of the picture. ;R

18) Now you can add color!
I use markers for coloring, layer by layer adding darker shades for the shadows.
Because This is not a coloring tutorial, I won't tell you what to do. Experiment or find a lesson.

This is what the picture looks like at the moment. Far from finished.
I hope this tutorial will help you understand how I draw curly hair for my characters.
Please remember that these are just guidelines. You can use them to practice and develop your own style.
Good luck!
Translation: Nancy aka Lalaokati
1.Let's get down to basics!
What are you doing wrong?
Take for example the three points A, B and C below.
What are you looking at when you draw a straight line - B and curved line- S - B? For a pencil? Or to points C or B? 
When you draw a picture, you must see the direction of the line you are drawing, look not only at the point of the pencil, but equally at all three points A, B and C. People cannot draw shapes properly if they look only at the point of the pencil. 
Then, look at the 7 random dots below. What do you see?
Just a group of dots? Or can you barely discern the shape? 
Let's number the points at random. Still not getting the shape you want? 
Let's renumber the points to give them meanings that your eyes automatically follow in shape. Those who can decipher shape from looking at dots in this way are able to draw shapes. 
Finally the dots are connected. Random lines connect to create a shape, talented people when drawing can feel the hidden lines within the picture and trace them. Your ability to draw shapes depends on whether you can actually visualize the points in the correct order. 
2. How to paint a “good picture”? "
What makes a good job? Sketch? Interesting detail? Project? Subject? Compound? All of these components are important, but if you want to hear positive feedback about your work from others, you must create an impression and convey your feelings. In other words, you must be able to connect in a subconscious way with those who see your work.
Start by drawing a square box. This is a Graphics test. 

In rooms 1-6, new information gradually added to the box. The amount of information contained in the drawings done at the absolute beginner level is excellent, ranging from simple box to advanced. This is illustrated by the difference between number 1 and number 8.
The observer (the person who set the task of drawing the boxes) would expect to see only what he asked, square box number 6 - 8 exceeds these expectations. You can't say that number 6 - 8 are mistakes. The effective key is to show individual interpretation.
It is necessary to give the drawing an element of surprise and include Additional information into it, which would make it more interesting. Of course, to do this you must be good at sketching. But on top of that, you must also come up with interesting topic, character pose and design. 
Although the character in example 9 and 10 are the same, you can see how they differ not only in design, but also in personality. This is a subconscious premise in the reader's opinion of a major anime and manga character to be attractive. This is what is expected, adding depth to their appeal. We can surprise the reader by exceeding their expectations, that's the first step when someone says your drawing is "good", but the real start is when they say it's "great".
You can also draw according to the reader's expectations similar to circle magazines.
For example, when looking at boxes, although the animator can draw up to level 8, he doesn't because readers expect to see level 6 drawing. Likewise, the animator, instead of drawing realistic illustrations, draws manga with simple lines and creates suitable Simple Distortion (SD) type characters.
First of all, draw square boxes.
What? Again!
We need to learn the basics!

How to draw with accurate perspective is explained in special books, but you do not have to draw with the precision of an architect. Once you get used to it, you won't spend much time drawing or thinking about the disappearing dot.
Draw straight lines freehand (no ruler or template). Draw a line on clean slate paper from one point to another, imagining the end result in your mind. You do the same with your sketches, only on a larger scale.
3. Before you start.
Start drawing! But before that.
It's well said that you will start drawing, but what are you going to draw?
Have you mastered the pencil willy-nilly? Are you going to draw an RPG (Role Playing Game) character? manga character? A hero in the fight? Or, are you planning to draw an illustration or logo? Charts of Basic Character Expressions? It doesn't matter if you draw - scribble. Just make sure you have a specific image of the character, location and pose. Good paintings start with a design.
Once this is decided, you draw the outline of the movement to create an overall image in which you don't have to worry about the cleanliness of the drawing or whether there is enough leg room on the page. good picture has a solid pattern. This is the first step in the sketch 
Now outline the outline in detail!
In general, people think that it is very difficult to get a harmonious sketch if you draw simple polygons. Indeed, when you draw an illustration, you don't draw a square. However, you must decide what position each body part is in. And when you figure it out, you will draw well and quickly. 
For now you can draw square boxes, but soon you will be able to draw characters. 
4. Let's get down to basics
It's time to think about body size. 
4. Shoujo Manga (Comic Girls)
A character with a very thin waist and with long legs. For girls, the body contours are defined proportionally, but the head is small. The boys are drawn almost the same, but with wider shoulders.
5. Funny SD character
This guy looks funny with a small body but big hands, legs and head.
6. Realistic type.
The length of the torso, body and legs are proportional - roughly the same as the Girls, except for the exaggerated narrow waist.
The character drawing differs with style. It's not just a change in body proportion, depending on whether it's a manga or an illustration, for example the same character will have various features. Compare different drawings of the same character below, especially looking at the ways the eyes and hands were drawn. You notice how some details have been drawn in detail while others have been left out. 
5. Drawing Details
Character drawing
While you've looked at individual characters, an animation or manga work cannot be produced with just one character. You should also be able to draw support characters.
Also look at how to draw support characters. You must express everyone's individuality with precision. There are two things you need to do, make the leads stand out and provide the supporting characters with enough personality to make them interesting. Think about the personal background (their background, their beliefs, their relationship with the main character, etc.) for each character, and then convey this information in the work through such things as their expressions, hairstyle, costume and accessories.

Characters 3 - 7 are much more difficult to draw than attractive main characters. Drawing older people will bring life-like realism to your work and characters.


Villains
1- Enemy Advisor: Wizard (character #1) An old man with a bent back.
2- Enemy Leader. Stubborn.
His shoulders are narrower than the Strong Soldier's side Positive heroes.
3 – Enemy Advisor: the bad Witch (character #2) is the same size as the witch on the Goodies' side, but she doesn't stand in a feminine pose.
4 – Enemy leader number 2. The head is taller than the Hero's, but thinner than the Enemy Leader. Attractive character.
5- Female enemy character
The power pose is a type of genre independent of me. Slightly taller than Hero.
6 - Enemy Spy. Monkey type (Short with long arms)
Steps like a ninja.
7 – Monster. Huge hands will emphasize his strength.
8 - Willens' pet
It does not have any specific meaning in history.
In history to highlight the treatment of the devil.
6. Looking for a suitable pose.
Translation: Alevtina
Step 1: Basics

1) I start drawing from the spine as this helps me define the curves of the body. I start at the top and draw a smooth S-shaped curve down to the place where we supposedly have the end of the spine (tailbone).
2) Then I sketch out the torso with details (head, arms and waist contours). I haven’t outlined the shape of my breasts yet, this is just the beginning.
3) After obtaining a good elastic sketch of the body, we outline the outer boundaries of the breasts with light curved lines (red lines). Don't forget to mark the tiny folds of skin where the arms and chest (armpits) meet.
4) I'm starting to add details. Breast volume can be shown with guide lines. Remember that boobs are attached to the body and if you outline the entire mass of the breast, it will look like a solid mass with the ribcage, and not bulging out.
5 and 6) In these two steps I try to determine the location of the nipples. In step 6 I use a little trick to locate the center of each breast. Representing the breast as a three-dimensional object will help you with this: draw vertical lines, as if dividing each breast in half, from the subclavian dimple through the center of the breasts and converging slightly at the bottom at the base. Remember: only smooth curved lines!!!
7) Since there are no people without fat deposits, I draw the body in point 7 with small roundness on the hips and torso below the chest.
8) Rough sketch of large breasts on the same torso. I use the same principle for nipple placement, only with an adjustment: the nipples are more massive and have a larger diameter, and are located lower due to the weight and volume of the breasts.
9) Small breasts on the same torso. The same rule applies: smaller breasts, the nipples are smaller and located higher.
Step 2: Angles!

A woman can be large or small, and you should try to draw your breasts in proportion. Even in the majority cartoon styles apply this rule. In the example on the left: the breasts are shaped like baseballs and appear separated from the torso. Right: they look harmonious. Remember that if the curve of the body changes, then the line of the chest changes. Here I sketched out a small diagram: I enclosed the main parts of the body, as it were, in boxes and drew them with midlines, for clarity. And remember: boobs two, and you have to draw each one separately, they are never squeezed into a single mass!
When the arms are raised, the chests stretch slightly to the sides. When one arm is raised, the breasts will be positioned slightly different levels(the closest one will pull up behind his hand). Remember to draw small curved lines under the arms as both arms are raised above the head.
Step 3: Breast Shape and Methods of Influencing It!

People often forget one important thing: breasts are not made of plastic! It's not hard. Its shape is more like a slide than a ball. Think of your breasts as a bubble filled with water: when the bubble hangs freely, it is like a pendulum, but if you press on the breasts, you will get an indentation where the pressure is applied and an increase in volume at the edge of the indentation.
Even certain clothes can put pressure on your breasts or cause them to bulge in various places. Breasts are not round all the time and are rarely round at all. (Unless, of course, they are made of silicone).
In the diagram below I show how hand movements affect the change in breast shape. On the left - chest at rest. On the right - they were squeezed or pressed. The vertical fold between the chest and torso lengthens, the chest is pressed towards the body.
Step 4: Hints

From left to right - small, medium and big breasts. The last drawing is what breasts shouldn't look like. Look closely, the red line under each breast indicates the fold of skin between the breast and rib cage. The outermost breast on the right has almost no weight, so there is no crease there. But remember that even the smallest breasts have weight!
Let's look at what color nipples are. You don't need to make them very pink. They have the same body tone, only more reddish, brownish, or orangeish.
At least I haven't seen any bright pink nipples.
(Translation note: naive author, never pulled girls’ nipples))
Next: side view of the nipple. Keep in mind that nipples do not always stick out perpendicular to your breasts. Typically they can be quite flat and not stand out, but sometimes they stick out quite boldly!
(Transl. note: yeah, the author still has some experience in this matter))
Translation: Chloe

How to draw an anime cat
Step 1. So let's get started. Draw an oval as a base for the head. Then we draw the front guide lines. They will help you arrange the details of the muzzle proportionally. Add small details of the nose, mouth and eyes. Let's move on to the body. Draw an elongated heart, this will be the chest of our cat. From the heart we draw two lines down. These will be the front paws of our kitten. After this, we draw two curved lines on the sides, these are the hind legs. Let's not forget to draw another long curved line on the right, the tail. 
Step 2. We begin the step by designing the lower part of the muzzle. We denote the eyes with curved arcs. Next we draw lines - sketches of the paws and tail. 
Step 3. Draw the fur on the chest and tail. Add details on the face and ears. Detailing the paws. 
Step 4. Add a mustache and draw the eyes. Let's detail the ear. We finish the paws and add marks on the chest. Ready! 
Step 5. This is what our cat looks like after washing extra lines. Final version. If you want, you can omit the mark on the chest or add something of your own. I tried to make the lesson as simple as possible. 
Attach a piece of paper to the photo and translate it. Simplify your hair into patches, enlarge your eyes and create large highlights in your pupils. Anime portrait is ready. But this is enough if you want to know how to draw yourself in
You have read a description of the process of creating many cartoon characters. But the anime style has enough nuances and special details. Manga characters immediately catch your eye, and it is impossible to confuse them with any other regular cartoon characters. Learn this and drawing anime portraits will be easy for you.
Facial expression
Do you want to convey emotions, but don't know how? Drawing a face in anime style is one thing, conveying it is another. Emotions are drawn quite simply, one might even say, with symbols.

For example, pink lines on the cheeks show that the hero is embarrassed, a wide open mouth with a grin when talking - he is angry, two arcs instead of eyes - the eyes are closed, and, most likely, the character is experiencing pleasure.
However, without studying this “ABC”, you can easily guess the hero’s state of mind. If the person in the portrait is smiling, look at how it is depicted in anime style and do the same.
Dynamics
It's easy to draw a head from the front. But it's boring and gets boring quickly. How to draw yourself in anime style so that your head is dynamic? Imagine that your head is a ball. Draw a line exactly in the middle where the eyes will be located. Now rotate this ball along with the line to change the angle of movement.
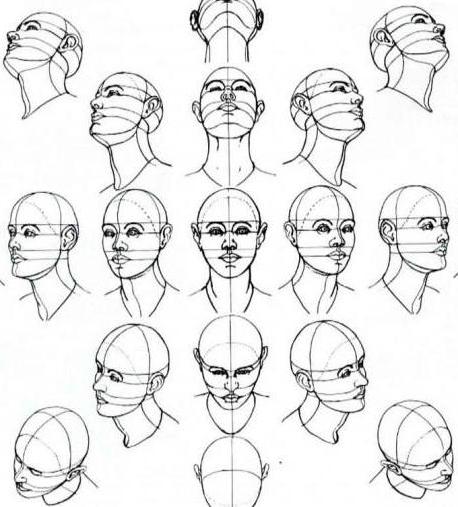
Draw lines for the nose and lips and then draw in the details of the face. The work should always be done by outlining the shapes. Draw it in detail - and it turns out that the result is not the movement that you would like.
Main mistakes
Anime in portraits obeys general rules. The nose, eyes, mouth, ears take their position on the head. If you can’t draw a regular head, it’s too early for you to think about how to draw a portrait in anime style. Mastery depends on experience.
Draw more sketches, practice. This helps in identifying errors and eventually correcting them. So, instead of opening a tutorial on how to draw an anime portrait every time, go through the list of common mistakes that you should be aware of and try to eliminate them.

Are the eyes evenly spaced along the line? Many beginning artists fail to draw identical eyes; they don’t know what to do with it or how. Drawing yourself in anime style isn't just about making your eyes the size of a galaxy. After you draw them, mark the extreme points below and above and draw lines through them. This will help you find out if the eyes are drawn evenly.
Is your chin centered between them? Draw a line down the center of the face between the eyes and make sure the chin is on this line. It should also cross the mouth and nose. In the center, third or fourth - it depends on the perspective in which the head is located.
Are the ears level with the eyes? The top point of the auricle is located at the level of the eyebrows. The earlobe is in line with the tip of the nose. But these are individual values, so there may be deviations from the given rules - take this into account.

Watch anime based on manga by different authors so you don’t have to worry about how to draw yourself in anime style. Explore different styles manga and enjoy watching it at the same time. Many otaku (avid anime fans), without studying the principles, make a good “anime” drawing the first time.