Wicker weaving is very ancient look handicrafts. This kind of weaving is quite fascinating. And although some are now replacing wicker with ordinary newspaper tubes, wicker weaving remains quite popular among modern needlewomen. In this article you will find a master class on wicker weaving for beginners. This master class will help you understand the technique of wicker weaving for beginners and will reveal many secrets on this topic.
Before you start weaving things from wicker, learn a little about harvesting wicker. Harvesting vines for weaving requires special knowledge. Usually the vine is harvested in winter; it is necessary that the vine is made from mature wood. Next, you need to process the vine: peel it from the bark; to make this process easier, you need to immerse the vine in hot water, hot water, not cold, bring to a boil and cook for 20 minutes. To choose the right vine, look at the color of its bark; if it is red or orange, you can test it for strength: bend it to form a right angle; if the vine has passed these tests, you can safely take it for yourself.
Job description
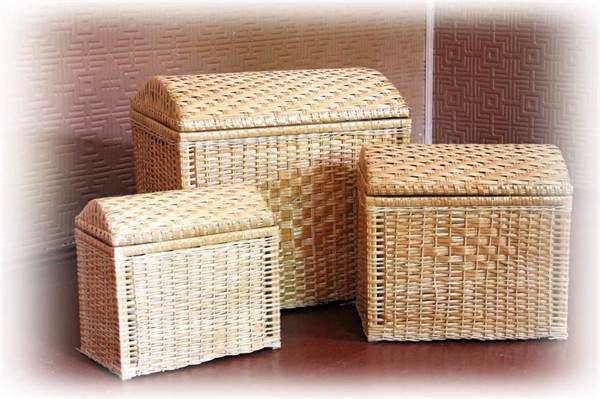
A wide variety of baskets and vases are created from vines. There is also do-it-yourself weaving of wicker furniture. But to weave furniture, you need great desire and experience in this matter. For beginners, it’s better to get by with a regular basket, which can also be very useful in everyday life.

To weave with wicker you will need:
- Hot water container
- Sharp knife
- Willow twig
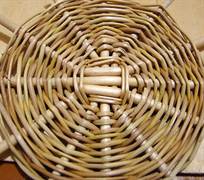
First you need to weave the bottom, to do this decide what shape it will be. In our case, the bottom will be round. So let's get started!

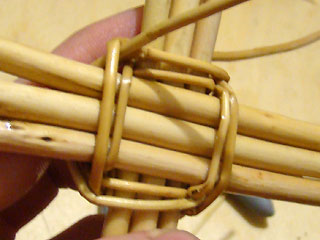
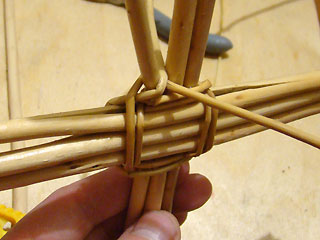
We take five sticks and make holes in the middle of them into which we insert the other five sticks. This is how we got the cross. We insert the braiding rods into the same holes and begin to braid the center with a rope of two rods. We weave two rows like this. Next, we move the two rods apart, leave the central one in place, and braid the two again. And again we weave two rows like this. Now we braid two rows of one twig.

Having finished spreading the risers of the cross, we begin to braid them with layer-by-layer weaving, as shown in the photo.

We insert under each riser the tip of a rod selected for layer-by-layer weaving, and continue weaving until we reach the desired size of the bottom.
In order to weave the walls of the basket, you need to lift the rods and begin to braid them. Raised rods are called risers.

There are many weaving techniques. The most common is with a rope. This is what we will use to weave our basket. We will do this with a rope of two rods, i.e. two rods. The previous rod presses the next one on top and, bending around the base rod with inside, comes out. Then the same is repeated with the second rod and so on. Weave like this, gradually expanding your basket. Be sure to imagine how tall your product will be and, having reached half, insert into the weaving the ends of the rods bent in half, which will serve as the handles of your basket. Such handles most often consist of three or four twigs.

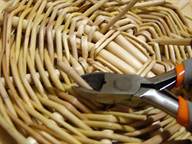
Next, continue weaving the walls of the basket. When you reach the desired height, braid the side of the basket and its handles, this will give the basket completeness and prevent it from breaking quickly. Weaving this edge also has its secrets. To properly weave an edge, you need to take any riser and insert it behind the next two with an exit to the outside. Next, take the next riser and do the same. And so on, with everyone else. We carefully cut off the excess twigs with a sharp knife. And that’s it, your wicker basket is ready!

Please note that it is important that the rods lie as close to each other as possible. To do this, many craftsmen tap them with a mallet while weaving.
And this is a basket created by layer-by-layer weaving. This weaving is also very popular among needlewomen. For things with layered weaving, we will need the same number of twigs as risers. This weaving is done simultaneously with all the rods: each rod bends around the next riser from the outside, then the next riser bends around from the inside and leads out. We repeat the same thing in turn with each rod involved in weaving. Weave this way until you reach the desired height. In the same way, gradually expanding if it is a basket.

Thematic videos
Weaving from vines is shown in the videos below. You will find many secrets that will be very useful to you in your work.
The most interesting articles:

Do-it-yourself wicker furniture is easy, and a wicker sofa is even easier
- DIY wicker furniture - the basics
- Small wicker sofa
- Making a frame for the seat
- Cut out the front legs
- Cutting out the back legs
- Making the back
- Making ribbons
- We give rigidity to our frame
- Finishing touches
- Making a seat
DIY wicker furniture is not only elegant appearance and reliability, but also pride in the fact that this is the creation of your hands.
This article will be of interest to two categories of people at the same time:
- For those who want to turn weaving furniture with their own hands into a hobby
- For those who want, without going too much into the creation process, to make a small sofa in the yard to sit on and tie their shoelaces or just take a break.
The first to learn about the basics of weaving furniture.
The second is about how to make such a sofa.
DIY wicker furniture - the basics
In fact, making wicker furniture yourself is not difficult if you move in the direction from simple to complex. Yes, you will need certain skills, and you must know a number of nuances. But they are simple, and mastering them takes a couple of minutes.
There are several types of wicker furniture:
- Frameless.
The peculiarity of creating such products is that you need to find a lot of strong sticks. Not bars, not wood, but sticks collected in some park or forest.
These sticks will be like stiffening ribs for the entire structure.
- Carpentry-frame and frame (compositing). In such products, duralumin tubes or steel rods are used as a frame.
And the weaving itself is done between them.
- Stick. The peculiarity here is that the sticks are not used to give rigidity to the weaving, but they themselves will act as a supporting structure.
Just the sofa that we will make together today belongs to this type of wicker furniture.
There are also soft and semi-rigid wicker furniture.
If you decide to make weaving furniture your hobby, you should know that weaving can be done in different ways.
Below we list the main types of weaving:
- single
- openwork
- combined - in this case several rods are used
With these types of weaving, you can not only make solid surfaces, but also create patterns.
And in order for wicker furniture made by yourself not to fall apart after the first use, it is necessary that all parts are firmly connected.
There are two types of connections: detachable and permanent.
If you connect the parts of wicker furniture using the first method, the product is easier to disassemble and reassemble.
But this method is rarely used.
The second method is more popular, since the product is more durable, and it is easier to use - after all, in order to connect the parts you need a hammer and nails, screws and glue.
But in this case, if the furniture is large, it is more difficult to transport it to another place because it cannot be disassembled.
Do you think that's enough theory for today?
How to make a small wicker sofa for the yard
You know that the main material for wicker furniture is willow. This means that if you have a yard, then there is probably a forest or a small park nearby where a willow tree grows. What are we talking about?
Besides, the first thing you need to do is go there and collect as much material as possible. Along the way, collect strong sticks - about 2.5-3 centimeters in diameter - from which you will make a frame.
As soon as you collect the material, go home and peel the bark off the sticks and willow.
Leave them to dry.
And when they dry, sand them a little so that you don’t pick up a splinter during use.
While they are drying, determine the size of the sofa:
- seat length and width
- at what distance will the seat be from the floor?
- how high will the back be?
Have you determined?
Making a frame for the seat
To do this, cut four sticks to the required sizes. Let there be two 60 cm and two 40 cm.
You fasten them with self-tapping screws. You should end up with a rectangle.
Cut out the front legs
There will be three of them. They are also made from sticks.
Their height should be equal to the distance of the seat from the floor you have chosen. Let it be 40 cm.
Cutting out the back legs
To determine their size, add the height of the backrest you have chosen to the height of the front legs.
Let the height of the back be 25 cm. Then cut out two legs 65 cm high (they will be the outermost ones) and one 70-75 cm high (you will fasten it in the middle).
Attach them to the seat with self-tapping screws.
Making the back
To do this, cut a stick slightly longer than the length of the seat, and attach it to the upper ends of the rear legs with self-tapping screws.
Since our middle leg is higher, you will get an arched back.
Making ribbons
To do this, you need to divide the willow twigs into four parts. Any stick cut in the shape of a four-pointed star will help you with this.
Make a cross-shaped cut at the end of the twig. Using your hands, divide the twig into pieces. Place the separated parts in the recesses of the stick in the shape of a star, and press on the stick until it reaches the other end. This is how you get four ribbons.
Do the same with a few more twigs.
Just not with everyone, they will still come in handy.
With these tapes you will hide the caps of screws and nails.
We give rigidity to our frame
To do this, we attach a stick between the side legs. Also using self-tapping screws. You also need to fasten the middle legs together.
Remember that the stiffeners must be at the same height.
Now you need to attach two sticks along the length of the seat, fastening the stiffening ribs connecting the legs.
Now you need to attach two sticks that will connect the back leg, located in the center, with the outer ones.
Attach the sticks diagonally.
The end that will be on the outer legs should be at the level of the stick that fastens the front and rear legs together, and fasten the other end just below the seat.
Finishing touches
Take a willow twig.
Making wicker furniture with your own hands
Roll it into an arc and fasten it to the left side of the back, nailing it:
- ends of the twig to the outer and middle legs
- and the top point of the arc to the back
Do the same with the second part of the back.
Take a larger willow twig and also roll it into an arc. Attach the ends of the arc with small nails to the side front legs, and top part in two places to the seat.
Now wrap all the parts where the caps of screws and nails are visible with the tapes made in step five.
To prevent it from unwinding, glue it with glue.
Making a seat
To do this, cut a piece of plywood to the size of the frame for the seat. Nail it to it with nails or self-tapping screws.
After this, treat the entire sofa with stain in several layers. As soon as the stain has dried, place foam rubber on the plywood and cover it with material.
All. The wicker sofa for the cottage is ready. You can use it for your pleasure.


DIY wicker furniture
Small business for weaving furniture at home, business plans and ideas: wicker chairs, tables, chairs, boxes, laundry baskets, photographs, pictures and weaving patterns with instructions on how to do it yourself. Description of weaving technology and techniques, equipment and materials (rattan, artificial rattan, willow and grapevine, hazel) for the production of wicker garden furniture, swings and hammocks
Business ideas for weaving baskets and purses: weaving oval, round and rectangular baskets, for linen and decorative ones, from wicker, birch bark and twigs, from newspaper tubes and plastic bottles, from paper and other materials.
Photos and diagrams describing weaving techniques and step-by-step instructions on how to start and finish, weaving handles, lids and bottoms of a basket, tips on harvesting vines for weaving baskets with your own hands
Weaving bracelets, baubles and other jewelry like profitable business With minimal investment: woven bracelets and jewelry made of rubber bands, beads, threads, leather, laces, wire and other materials, photos and do-it-yourself weaving patterns, weaving techniques and methods (on a machine, on a slingshot, on fingers), equipment, tools and kits for weaving, lessons and step by step instructions
How to make a wicker fence with your own hands from vines, twigs, branches, boards, hazel, reeds, rattan or composite material: instructions for creating a business with small investments in weaving fences and hedges, photographs of the manufacture and design of decorative wickerwork, descriptions of weaving techniques and methods
Home profitable business for weaving bags, string bags, purses, purses with your own hands: instructions and patterns for weaving summer bags from leather and elastic bands, from straw and macrome threads, from wicker and beads, from newspaper tubes and cord, from bags and other materials, weaving methods and tools , sales advice and wholesale, photos and pictures of interesting and original designs of wicker bags and wallets
Ideas for beginners: how to open a profitable business in weaving flowers and wreaths, wicker flowers from vines, birch bark, beads, rubber bands, patterns for direct weaving of flowers and wicker flowerpots for flower pots for sale, descriptions of weaving techniques, tools and kits for weaving DIY decorative flowers
Technology of growing and harvesting grape, rattan, willow vines and twigs for weaving furniture and other products: photos with descriptions and step-by-step instructions on how to properly grow, prepare and dry vines for weaving, preparing artificial vines for making wickerwork and jewelry with your own hands
Home » Catalog of BUSINESS IDEAS » Wicker products: ideas for home business"Weaving furniture at home" "Do-it-yourself wicker furniture" Material from the category "Weaving furniture at home" section "Wicker products: ideas for home business" on our website business ideas for organizing your own profitable business or profitable business from scratch.
Business idea for aspiring entrepreneurs who searched on the Internet: do-it-yourself wicker furniture, process, what you need to know, be able to do, types of weaving, description, What you need to know and be able to do about weaving furniture.
Technological process of weaving furniture with your own hands
To weave furniture with your own hands, you first need to know the technological process of mechanical processing of wood, choose a material that is beneficial for you (willow or rattan), find out how to store it, study each type of weaving, know how to connect elements of wicker furniture, have necessary equipment for work and allocate a place where you will practice your craft.
From equipment for mechanical processing, you need to purchase: hand saws, shmol (for planing strips to width), plows, jigs (steel plates for bending or straightening rods), chisel, iser (cone-shaped steel plate for aligning rows in products and thickening the weaving) , chisels, drills, drill bits, sandpapers, screwdrivers, knives and other tools.
The technology for the production of wicker furniture begins with the preparation or acquisition of raw materials, for example, you have the opportunity to collect it near a river or in the forest. Having brought home the rods, you need to re-sort them and clean them of bark (hot or cold), after which, when the rod is completely cleared of bark and has a creamy shiny surface, it is sent for sanding in a pincher.
The vine rod then goes through a bleaching process, is wetted and sent to dry for 20 hours. Then they make a frame for wicker furniture with their own hands and braid it with split vines.
Making wicker furniture with your own hands
And only after that they choose the type of weaving for furniture to make it with their own hands: simple, thick, continuous, sparse, openwork, layered, in rows, squares, rope and folding. To make the rods bend more easily, they are moistened in water and then dried. Parts of wicker furniture can be connected: a simple overlay or trimming of wood by 1/3 or 1/4 of the thickness of one part relative to the width of another part, corner joints (into an overlay), an overlay with trimming and bending, a connection with an oblique cut of two parts, fastening girth, connection with shoots, undercuts and proges.
After fixing and forming all the elements with your own hands on wicker furniture, they are assembled again, dried and sanded, and then only coated with varnish, which dries quickly and makes the surface glossy and shiny.
Do-it-yourself wicker furniture made from wicker Do-it-yourself furniture weaving technology What you need to know and be able to do about weaving furniture
What should be the focus of choosing knitted furniture
Like all other things, fashion is wicker furniture is one of the decisive factors in the growth of consumer demand for it.
Today it is difficult to judge the fashion for furniture in general; its wide variety allows the consumer to create exactly the interior that corresponds to his ideas of a comfortable life. Those who focus on a pleasant, exclusive interior in a romantic style, among their preferred options, consider hanging furniture to have full or partial arrangements of living spaces, including open and closed verandas.
Which manufacturer is better
Today on the market there is mainly knitted furniture of European, domestic and Indonesian production.
Which one would I prefer?
It is traditionally believed that European quality of goods is better than, for example, Asia. The cost of producing furniture in Europe is much higher, so you cannot talk about its affordability, but it is a big advantage that there are almost no complaints about the quality from users.
Indonesian wicker furniture is relatively cheap and is plentiful today.
It is supposed to be handcrafted and varied. Unfortunately, there are many complaints from Russian buyers because most of the models produced in Asian countries are not correct due to the frame breaking, and repairing the products is not recommended as it is very expensive. In addition, Asian standards for physical parameters people are different from Asian standards.
For example, armchairs and stools may not fit as the overall height, depth and height of the armrests are for Asian.
The Russian manufacturer presents a wide range of wicker products on the market. Home wicker furniture has high quality, and the prices are quite high. The big advantage of buying domestic products is the possibility of repairs in case of failure and immediate warranty from the supplier.
Why weaving furniture
In general, knitwear, walnut, cane, bamboo, sisal, abac, raffia are used to weave various products and furniture.
Modern knitted furniture is made mainly from rattan. Most manufacturers choose rattan for a reason, but most of them meet the requirements of all the parameters required for the material during its processing and during operation.
Rattan, wood, and metals can be used as product frames. Can be used for exterior decoration various materials: glass, leather, textiles, plastics, etc.
DIY wicker furniture
The products are coated with various varnishes and colors. Today we offer furniture made from natural and artificial rattan.
A special feature of woven products is that fasteners are practically not used for their manufacture. The technology allows knitting in such a way that the product will firmly hold the mold in the future.
Conclusions
When choosing knitted furniture, be guided by:
Your personal desire visual perception;
about their financial capabilities.
When you settle on similar options, carefully study the information about the supplier, the material from which the furniture is made, and the manufacturer's warranty.
Capture the product using your parameters: take the strap size and form the model in a practical way: whether it suits you.
If you're buying furniture from a real store, don't be shy and sit on it, lie, open all the drawers and doors.

Since ancient times, man has mastered the technique of weaving furniture. Until technologies and modern finishing materials appeared, wicker furniture was practically the only item of home interior. A lot of time has passed since then, but the good old “wicker” does not lose its relevance today.
Moreover, what is surprising is that this type of furniture is very versatile and is equally suitable for both an urban environment and a country house.
Materials for manufacturing wicker furniture both in past times and now there are straws, reeds, vines, connected in a special way.
Moreover, in this way you can make a variety of home furnishings: such as various shapes sofas, tables, banquettes, beds and much more. In addition to the original look and spectacular appearance, wicker furniture compares favorably with traditional furniture with a number of advantages.
Perhaps one of the most important things is that such furniture is made from environmentally friendly materials, and is made exclusively by hand, and its production is absolutely harmless to the environment.
Benefits of wicker furniture
In addition, we must remember that such a set, if, of course, it is made by a professional and from high-quality materials, is very durable and will serve its owners much longer than a traditional one.
Thanks to the materials used, no matter how large it is, such furniture will not weigh much at all and therefore it will be easy to move when rearranging or, say, cleaning the room.
It is very easy to care for: you just need to wipe the product from dust and regularly moisten its surface with a sponge, for example, to prevent the “braid” from cracking.
Wicker weaving for beginners: the best DIY furniture
We must also not forget about the pleasant appearance of your furniture: weaving patterns will create good mood and at any time of the year they will remind you of nature.
The latest fashion trends have also affected this conservative type of furniture: the materials for its manufacture are processed with special chemicals, giving them increased strength and moisture resistance, and in addition, some pieces of wicker furniture are equipped with small wheels, which greatly simplify its movement.
Life does not stand still and now models of wicker furniture are appearing, which in addition to the basic material also contain modern ones.
For example, as various shelves and tabletops, the design of wicker furniture increasingly contains impact-resistant glass, which, thanks to a special manufacturing technology, can withstand significant loads and physical impact. In addition, in the braided design you can increasingly find elements made of chromed iron, which improve the appearance and increase the strength of the product.
Among other things, some types of wicker furniture include special pillows that increase the softness of the products, and since these pillows are equipped with removable covers, they are easy to care for and maintain the pleasant appearance of your set.
Material for making wicker furniture
The most common material for making wicker furniture in our latitudes is undoubtedly willow: probably every summer resident has baskets made of this material, and abroad they use rattan palm for these purposes.
Unfortunately, wicker furniture has one significant drawback - its price. Because this handmade, then it will cost quite a bit: for example, domestic furniture made from willow, in the form of a set of items from a sofa and two armchairs, can reach an amount of several thousand rubles, and a similar imported set of furniture will cost about $1,000.
In the case of purchasing a whole living room set, the price can easily exceed $10,000.
However, if you are a true connoisseur of everything natural and for you originality and spectacular appearance play decisive role when purchasing, then wicker furniture is what you need. And at any time of the year it will give you pleasant and dear memories. Happy shopping!
Title: “Mushroom picking with a basket”
Goals: to introduce students to traditional nature management - the use of natural materials - vines for crafts - baskets to go mushroom hunting in the fall.
Age of children involved: 5-10 grades.
Required for work: desire, vine, awl, pruning shears, template.
Good afternoon Guess what the riddle is about:
It is comfortable and light
Its name is short
In the economy it serves us for centuries,
This word contains the name ZINA.
You can go mushroom hunting with her,
Can you pick berries?
It's not hard to wear
And very easy to break!
They weave them from twigs and bast,
Right- basket. This is what we will learn to weave. And let's get acquainted with the Cossack craft - wicker weaving.
Step-by-step work process.
1 step- Conduct instruction on work safety when harvesting vines, when working with an awl, pruning shears, and about your workplace.
Step 2- Prepare the necessary tools.
Step 3- Go to the forest, prepare a long vine - a little thicker and thin flexible (150 pieces), even different colors are possible.

Step 4- We use raw vine. Let's start work by designing the bottom of an oval basket in the future - for this we will make a cross from the intersection of seven rods located parallel to each other with three.

Step 5- Now braid all 20 twigs with a vine, starting from the thin end, cutting the twigs diagonally towards the inside of the basket

Step 6- Continue weaving for about 20 rows.

Step 7- At the end of the work, cut off the cross rods - the basis for the bottom.

Step 8- Insert the rods - the ribs of the basket walls - into the bottom between the woven rows of vines, later bringing them together at the top through an oval-shaped template.

Now build up the walls of the basket to the required height using multi-colored vines. Now start weaving from the thick end of the vine

Step 9- Place the ribs along the top inside the walls, one after another.


Step 10-- Having selected 9 loops for the handle, pass them through the top rows and fasten them inside.

Step 11- You can weave a variety of baskets to go mushroom hunting.

Thank you for participating in the master class.
A basket full of mushrooms for you!!!
This article is published to replace my old guide; to see the old version look here www.bushcraft.ridgeonnet.com/basic_basket_old_version.htm
I'll start with an introduction to simple terminology...
When you look at the bottom of the basket, the strong straight rods radiating out from the center are called "Spokes". After they are folded up to form the walls, I call them "Racks". (These straight bars creating a profile are usually called “Box”)
All sections of willow that bend between the spokes/posts are called “Weavers” (traditionally called “Weft”).
My knowledge and experience of basket weaving is based on self-teaching. I have not taken any specialized courses, so the instructions below describe my own methods. A specialist may use a technique that differs slightly from my method of making this type of product. Not being an expert, I still want to present my knowledge about basket weaving in this article.

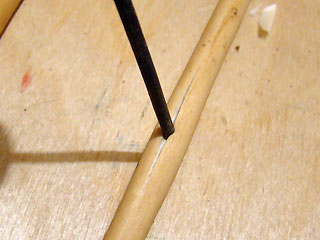
I collect willow twigs for baskets in rural areas. Not all types of willow are suitable for making baskets; some of them produce a material that is too brittle and cracks when bent too hard when making the edges of the basket. When I'm looking for a suitable willow tree, I simply bend the branch 90 degrees or more, and if it cracks, it's not suitable for the basket... and I have to look for other options. Often the best option is a willow with bark colored red, purple and orange colors. I don't know any names of willow species, I just know what is best and what is worst from what I see.
If you do not have the opportunity to collect the willow yourself, you can buy ready-made rods. Musgrove's Willow (http://www.musgrovewillows.co.uk/) is an excellent company where you can buy about 700 rods for about £20, including postage.
If the collected rods are damp, they must be dried. Baskets made from freshly cut twigs filled with sap lose their shape after a while and become loose. When a willow tree is dried, its bark wrinkles slightly.
Before you start weaving, the rods must be pre-soaked to make them more flexible. If the willow branches have retained their bark, then soaking may take about 1 week. Many people recommend wrapping the rods in a damp cloth and leaving them overnight to “ripen”.
You don't need many tools to make a simple basket like the one pictured. All you need is a pocket knife, pruning shears and possibly an awl. I've made baskets before using just a knife, but using pruners makes the job easier! 
Cut 8 twigs from a thick shoot. Cut them approximately from your elbow to your fingertips. 
Make a split a few centimeters long in the center of four of these branches. 
Insert whole rods into the split to form a cross. It's called "Slath".
(alternate thick and thin ends to even them out) 


Carefully select the thinnest and longest shoots from the collected branches, this will allow you to make good weaving from the very beginning. Take two rods and insert their thin ends into the slot as shown here... 


First we will use a weaving technique called “Twining”. This is a very simple weaving method and is good for firmly holding knitting needles and posts together. The technique consists of holding two knitting rods and twisting them one after the other so that they change places. Each bend always goes in the same direction. After each bend, the next knitting needle (or knitting needles in this case) is placed between the two knitting rods and then the next bend begins... thus holding them in place. Look at the photo... it really is very simple!
Braid four needles around. Make two rows. 


When you have finished weaving two rows around each row of four needles, start braiding each needle individually. Bend each needle outward to braid them one by one. Space the spokes evenly so that when we finish one row of weaving, we end up with evenly spaced spokes, like the spokes of a bicycle wheel. Make a couple more rows of weaving using this method. 


At some point you will get close to the end of the tying rods and will need to extend them. It is better not to add two new rods at once. Look at the photo, in this example I am replacing rod “B” with a new rod labeled “A”. I took rod A, sharpened the end, then slipped it between the rods of the last two rows, then bent it following the weaving order of the old knitting. Now I can cut the old rod B and continue weaving the basket.
When replacing one rod with another, keep the thick end thick and the thin end thin. 
Replacing the second old rod must be carried out a little further in a circle from replacing the first. 
Once you have woven a couple of rows around the needles, we stop using the twisted weaving method and continue weaving in a simple way, which consists of simply going around the rod inside and outside the knitting needle. You continue to weave in this manner until the base expands to the desired diameter. However, in order to correctly perform this simple type of weaving, we need odd number knitting needles We have 16 spokes, so we should add one more. Just place it between the rods of the last couple of rows. Sometimes it can be difficult to push a new needle in, so use an awl to widen the hole (if you don't have an awl, you can use a thick metal nail). 

Cut one of the knitting rods and continue to weave as usual, inside and out around the needles. 
To add a new tying rod, place the new one next to the old one and continue weaving. 
Continue weaving until you have weaved the bottom to the desired diameter. In my case, the bottom was made with a diameter of 8 inches. 

The bottom may take on a concave shape... this is good, because... this will give stability to the basket. You can increase the bend by constantly pressing down on the needles as you weave. 
It's time to form the walls of the basket. At this stage, use willow shoots of medium thickness, you will need one for each knitting needle. Sharpen the thick end of each of them. 

Now you need to place a new willow shoot into the weave along each spoke. If you look closely at a willow shoot, you will notice that the thick end is slightly curved; Place each shoot with the concave side facing down. 

Cut off the ends of the old rods at the level of the edge of the binding. 

Now take one of your new posts and bend it down to the left under the two adjacent rods, then turn it up as shown in the first two photos below. Now take the next rod on the left and bend it too. Continue weaving the basket in the same way in a circle. It's a bit of a challenge to keep the posts in place, but try your best.
At this stage, the racks can simply be bent upward, but it is better to bend them as described above, because this makes it possible to create an edge that gives the basket greater stability. 


The last two rods of the racks will not have subsequent racks so that they can be bent; so they just need to be screwed around the first posts. When you twist the last two rods, everything will be tightly connected.
Tie the rods of the racks together at the upper ends so that they do not fall out of their places. 


Now you can start weaving the sides of the basket. You can simply start the main weave immediately after bending the uprights, but for the purposes of this tutorial, we will start with a weaving method called "three rod wale". This type of weave gives a nice edge before starting the main weave; and also helps to firmly hold the upturned rods of the racks in the desired position.
To weave “three rods,” place three new rods along three adjacent posts. Take the leftmost rod and bend it to the right in front of two adjacent posts, then behind the third; and then go back forward. Now take the next rod and repeat the action; then the next one, etc... 


When you finish weaving the second row with three rods, you can untie the upper ends of the rods of the posts. 

Now we can start weaving with the basic method that forms the supporting sides of the basket.
We will use a type of weaving called “French Randing”. This type of weaving is very popular; with its help you can make smooth walls and weave much faster at a good pace.
First of all, you need to add one rod to each post around the circumference of the basket. Choose good, long, thin rods of equal length. Add the twigs one by one so that the direction of the growing tips of the shoots is towards the left hand. Place the butt end behind the post rod, then pass it in front of the next post on the left, then behind the third post, then bring it forward. The binding rod will hold itself in place. Now add the next rod, place the butt behind the next post on the right; weave over the end of the previous rod in the same way. Continue adding rods until you have weaved the entire basket.
Now let's start braiding... start with any knitting rod, just braid it to the left using the same method you used before: forward, back, then forward again. Then take the next weaving rod on the right and do the same... that's it, just continue weaving around the circumference of the basket. 


When you return in a circle to the place where you started weaving, you will see that two knitting rods, instead of one, ended up behind two rods of the posts. You may be confused about which tying rod to start with... Start with the rod that is located at the bottom, then everything will return to order. The photo shows that knitting rod number 1 should be braided before number 2.
Now this row of knitting is completed and you can continue by taking a knitting rod and braiding it in the same way as before. 
Continue weaving using the French welt method until all the knitting rods are braided to the ends. Cut off the individual excess ends of the rods. 

Close the Welt with a row of three rods... 

You can extend the basket to the height you need using the same French welt. One layer of welt will be sufficient for this type of basket. All we need to do now is bend the rods of the posts down and weave them into the edge. There are many various options edges, which are made by weaving the rods of the racks in front and behind in various combinations. I think you can develop your own design...
For this exact model... take one of the post rods and bend it down to the right. Place them behind the next two posts; in front of the third and fourth pillars; then behind the fifth pillar; then go back forward. Now take the next post on the right and repeat the weaving in the same order. 

The last pair of posts will not be vertical enough to braid around them. However, repeat the same weave, pushing the ends in and out of the edge to achieve the same pattern.
Finally, trim the long ends flush with the edges of the basket. 


If you don't need a handle, then the basket is complete! Great job! 
If you need to add a handle, keep reading...
To form the main part of the handle, you will need a thick flexible shoot of willow or other suitable wood. I used dogwood. Bend it and mark how long the handle you need, then cut it. Point the ends and push them down between the tying rods on opposite sides. 


Now take 4 or 5 long, medium-thick willow shoots and insert them into the weave near the end of the handle 
Wrap these shoots around the handle several times until you reach the other side. Thread the ends under the weave edge of the basket. 


Repeat last stage work from the other end to fill voids in the weave. 
Grab the ends of the rods and pull them so that the braid fits snugly against the handle. Then insert a thin willow rod into the weaving nearby. 

Bend a new piece of willow and begin wrapping it around the ends of the braid to secure the ends in place. After a few turns, hide the end as shown in the illustration. 


Finally, trim the ends. 
The cart is complete! In the center is a basket made entirely of blackberry shoots. To see how to prepare blackberry shoots for baskets, see my old article about baskets.
If you made it to the end, great! 
Excerpt from old version articles
Blackberries are an excellent material for many reasons: they dry quickly, are very flexible, beautifully colored, strong, have long shoots and are almost uniform in thickness throughout. I also worked a lot with blackberry shoots without even soaking them before weaving, thereby saving a lot of time.
If you are using willow or blackberry, you will need to dry it. You can tell it has dried out by the loss of weight and shriveled bark. There are several certain types willows that are suitable for weaving and are best collected in winter, if possible in winter, when the amount of sap is less and there are no leaves on the branches.
You may be wondering how to remove thorns from blackberries and make the branches suitable for weaving... the first time I picked blackberries I destroyed a good pair of leather gloves. I discovered that it's best to wear leather gloves, but keep a piece of tarpaulin or strong material on top. Holding the branch by the growing end, slide your hand (protected with leather or cloth) down the stem, then cut it off at the base. This will be a rough cut to remove all the thorns and leaves, but the stem will still be rough. Set the blackberry shoots aside to dry completely, then push them through the sandpaper while holding it in your hands, this will make the branches smooth and allow you to work with them without problems. The design of the baskets is the same regardless of the material you use. Choose your shoots wisely. Avoid picking blackberries that are too thick or too short to work with and look for long shoots.
Wicker weaving dates back to Ancient Egypt And Ancient Rome During the excavations, wicker chairs and boxes were found. IN Ancient times Various baskets were woven from willow. During the Renaissance and the Middle Ages, boxes, bread bins, baskets and baskets, baby cradles, and carts were created using wicker weaving. A master class on simple and quick weaving from dense wicker will help beginners quickly master the technique.
In Russia, initially, in most cases, baskets and fishing gear were woven; later, with the development of trade, weaving began to be used for packing transported goods into boxes for sale. In the 19th and early 20th centuries, before the Great Patriotic War, many factories were created throughout the country for growing cultivated willow and weaving furniture and household utensils from it. Entire plantations abandoned during the war began to be revived and weaving factories, mainly baskets, were created anew. There were entire villages that were engaged in wicker basket weaving.

Initially, grapevines were used for weaving, but more often in Europe and Asia flexible willow twigs were used for weaving. In addition, in Asia they weave furniture from materials such as rattan and bamboo.
Due to the fact that in today's Russia there are few masters in weaving from wicker, some began to be interested in how you can weave a basket from willow vine with your own hands, because there is a desire to have such a natural thing with a special aura in everyday life or in the interior. The natural energy of this item brings coziness and comfort to your home.
Harvesting vines for weaving products for beginners
Before you start creating a wicker item, you must first prepare a vine for weaving.
You can, of course, buy ready-made rods to start weaving right away, but it’s better to learn how to prepare the material yourself, this will help later in working on the product.
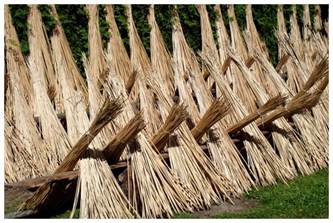
For weaving, shoots of the first year of growth are used, and they are collected all year round. Branches should be cut under acute angle with a knife or pruning shears, in order not to harm the tree, it is more useful to leave 3-4 buds on the branch remaining on the tree. When collecting twigs, it is important to check them for flexibility: the first twig cut from the tree must be bent in the place where the thicker end is; if it is not cracked, then it is suitable for decorative weaving. Spring shoots have a very soft bark, so the bark can be removed without pre-treatment, and if the shoots were collected at another time of the year, then the rods must first be soaked for 1-2 weeks or steamed for 1-2 hours, or boiled for 20 minutes, removed bark After peeling the bark, the shoots must be dried, otherwise the rod in the finished product will delaminate and break. The rods should be sorted to make it convenient during painting and weaving. Before work itself, the vine is again soaked in water to gain flexibility.
Painting can be done with aniline dyes, a solution of potassium permanganate or herbal decoctions, immersed in the dye for a while, then the rods are rinsed clean water and dry on a flat surface, preferably on a floor, so that there are no stains in the color.
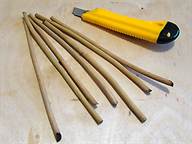
Some rods are too thick to weave small to medium-sized items, so you will need some tools to cut the rods into narrower strips.
And a pinch or pinch helps to remove the bark from the twigs.
Mastering weaving with a simple master class
Immediately before weaving, it is necessary to soak the willow rods in hot water, and also during work you will need to moisten them with water - all this to maintain the flexibility of the rods.
For beginners in wicker weaving, it is better to start with a simple element - from the bottom, this is the basis of many wicker items, using a photo or video master class.
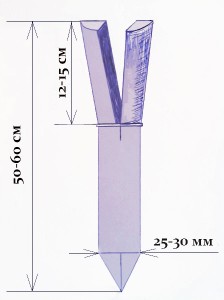
It is better to take rods for weaving with a reserve, because... for beginners, the rods often break during work; soaking or wrapping with a wet rag for the bottom requires seven or more sticks with a diameter of 4-7 mm, about 20 cm long, more is possible, depending on the desired size of the bottom and thin rods (up to 3 mm in diameter) 30 pcs. and more, the length of which must be at least 50 cm. The thicker ones are used to create the skeleton (rays), and the thin ones, in the form of a rope, braid all the ray sticks.
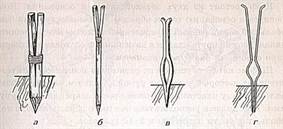
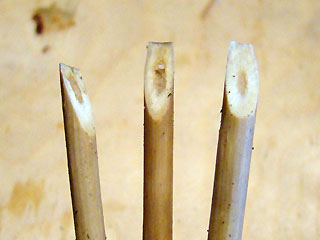
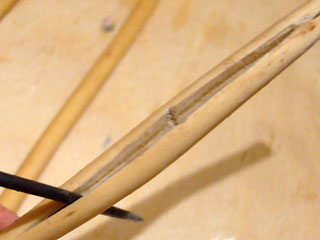
The first step is to make a cross, around which weaving will then be carried out. You need to take 3 thick sticks (you can take four for each side of the cross), cut off a third of the thickness on them in the middle part and sharpen the ends from the thinner edge, for the convenience of inserting other sticks into the crack. The other three or four sticks must also be split in the middle with a knife or awl.
This should be done carefully so as not to split too much or the entire stick, because this cannot be corrected, and the product will be defective.
Then it all comes together.

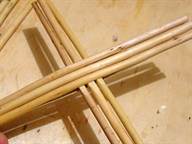
It is imperative that all the inner sticks, on which part of the thickness was cut off, be turned to one wrong side, and the fit of the outer sticks to the inner ones, in the place of the crack, should be as tight as possible.
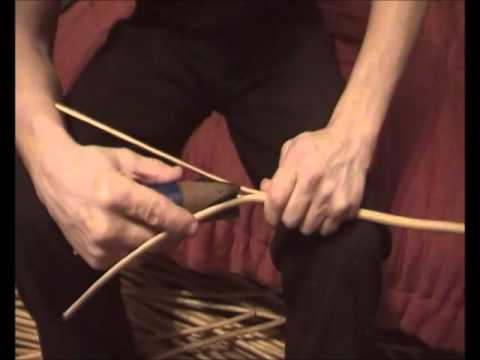
Now you should take two thin twigs and begin the braiding process. The ends of the so-called rope must be hidden in the crack of the axial sticks.

Two twigs diverge in directions, one will first go above the axes, an arc will go under the axes, then they change position. The inner guides must be braided first.

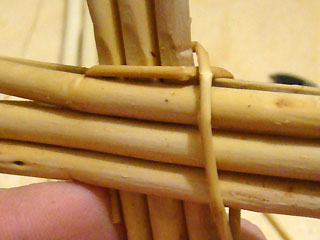
Two rows are braided (you can make three such rows of braiding), then you need to move the axes to the position of the rays, like the sun, in a circle so that the distances between all the rays are equal. The diagram in the photo below:

The braiding begins not of three sticks at once, but of each one separately in the same manner.

When the twig used to braid ends, you need to weave the next twig of similar size and color, as shown in the photo.

We must try to ensure that the ends of the finished twigs come out on the wrong side, then the front side of the bottom will be smooth and beautiful.

The twigs must be taken of different lengths so that the growth occurs evenly in different places. The larger the bottom of the product, the greater the distance between the beams of the cross, so if the product large size, you need to use more rays.
For the oval bottom of a basket or cradle, use a similar cross pattern:

Furniture for skilled hands with job description
Weaving of furniture is done by skilled craftsmen in this craft with their own hands, because it was necessary to weave a lot of different bottoms and baskets for these bottoms and gain experience. Also, to make furniture with your own hands using wicker weaving, you will need not only experience, but also a greater variety of materials and tools. Furniture requires strength, because... a greater force of gravity will act on it than, for example, on the bottom of a basket or cradle, so first a frame of sticks is built (thickness 2 cm or more). Next, you need to attach racks to the frame, which will later be braided with thinner twigs or strips/ribbons of twigs; during the weaving process, perpendicular racks are regularly added for rigidity. You can braid various types weaving.
People began to weave wicker baskets with their own hands a long time ago. This material They were also used in the manufacture of fences and cradles for babies. Even dishes were made from vines. Nowadays, wicker baskets owe their popularity to mushroom pickers. They are the ones who use such products more than other people. A good solution is to weave a separate option for picnics or home use. There are many design ideas - from the simplest to the stylish and fashionable. At the same time, it is easy to make this item yourself.
Choosing the right material
The first thing you need to do is select the material. It must be of high quality. The service life of the product depends on this indicator. Usually the vine is cut at the very beginning of spring or autumn. It is believed that at this time it has great strength.
A high-quality vine branch is determined as follows: at the thickest point, bend it all the way. It should not burst or crack. A material that meets these parameters is suitable for weaving. An important nuance - each branch must ripen.

The vine must be processed, because recently cut wood will not be able to hold the shape of the basket. There are two methods for preparing branches: soaking and leveling. In the first case, the rods are treated under running water or placed in a container and the liquid is changed every day. The water should completely cover the wood. To prevent it from floating up, it should be pressed down with a weight. This procedure must be carried out within two weeks.

The second method is faster and will take three hours. The rods must be placed in a large container and filled with boiling water. The mixture is boiled for about two hours. You should cool the vine and begin to separate the bark from the twigs. The peculiarity of the second method is that the vine branches will acquire brightness and shine. They are also easy to clean and wash.
Making a list of tools
Before you weave a wicker basket with your own hands, you need to prepare the following tools:
- awl;
- side cutters;
- weight - it will hold the vine in a certain position;
- pliers - use them to bend rods.
Equipment should be prepared in advance. This approach will speed up cart creation.
Work algorithm
How to weave baskets from wicker? First, you need to divide the work into several stages; they will help you quickly understand the algorithm of actions and master the technique:
1. Weaving the bottom begins with the fact that you need to take 8 twigs. Half of them have a hole. Each of them is 3 centimeters. The second half of the branches is threaded into these slots. As a result, a cross is formed.
 Making a cross for the bottom
2. The next step is braiding the base. You need to take two branches and circle them around four rods. So you should weave two circles. Upon completion of this action, they begin to braid each of the rods. Two more rows are created. The elements must be evenly distributed. The result of weaving is a circle.
3. Another rod is added. It is placed in the outer row and bent. It is worth noting that the previous base is cut off (due to lack of length). In the same way, all the rods are replaced and two rows are woven. The vine should bend around the rod from the inside and outside. This principle continues until the bottom is completed. There are 16 main rods. At the end of weaving you need to add another one. It is placed between the other branches in the last circle.
 Making the base
4. Having weaved the base of the intended size, you need to start creating the walls. You should choose medium-sized rods. They are attached to the bottom of the basket - into the weaving itself. The bases of the walls are bent to right angle, and the tops are tied. The bent ends are inserted into the bottom of the basket and begin to braid them. You should take three twigs. With the thin side they are inserted into the holes next to the main rods - one per rack.
5. You should weave a “braid” and repeat the pattern of the base. It should be shaped like a diamond, and it goes around each vertical rod. In this technique, 2-3 rows are performed. Such actions allow you to create the basis of the form.
 Making a frame for the walls
6. It’s time to start weaving a common “fabric”. IN in this case The method of inserting the vine behind one stand and bringing it out in front of the other is used. When the desired height of the basket is reached, the vertical branches are cut and their ends are hidden in the weaving.
 We weave the walls
The wicker basket is ready. All that remains is to make the handle. First, you should measure the length for the handle and choose a thick branch. It is bent and given the shape that will suit the basket. The ends of the rod are sharpened and inserted into the walls of the product. 6 thinner rods should be placed next to the handle. They bend around the main branch, which allows it to be firmly secured in the weaving. To prevent small branches from moving, they are secured with tape. The “tails” of the rods should be hidden in the walls of the basket.
 Making a handle
 To start using the basket to its full potential, you need to let it dry. This will take several days. This simple method is used by most beginning craftsmen. In the future, it is recommended to develop your weaving skills and create more complex designs. Not only baskets are in demand, but also furniture and decorative elements made from wicker.
Weaving instructions (2 videos)
Options for ready-made baskets (38 photos)


