All children love to draw. But sometimes a child doesn’t get what he wants. Or maybe he doesn’t have enough familiar ways to express himself? Then you can inspire him to experiment with different techniques, among which you will definitely find your favorite. After this, your child will probably want to invent something new.
Dot patterns

First we draw the simplest squiggle. Then, using a cotton swab and paints (gouache or acrylic), we make intricate patterns to suit your taste. It is better to pre-mix the paints and dilute them slightly with water on the palette.
Frottage

A technique familiar and loved by many since childhood. We place an object with a slightly protruding relief under a sheet of paper and paint over it with pastel, chalk or an unsharpened pencil.
Foam prints

By dipping a sponge in thick gouache, the child can draw landscapes, bouquets of flowers, lilac branches or animals.
Blotography


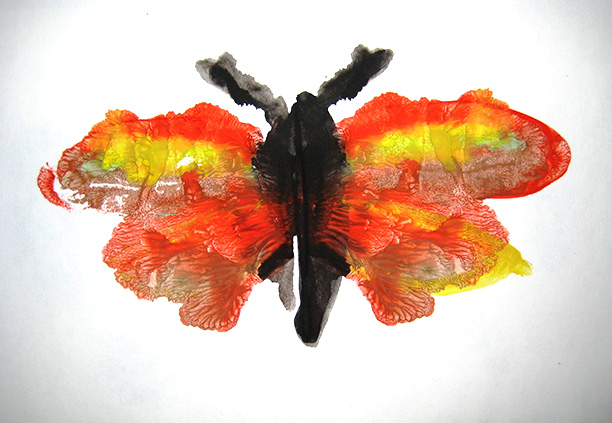
One option: drop paint onto a sheet and tilt it in different directions to create an image. Second: the child dips the brush into the paint, then places the blot on a sheet of paper and folds the sheet in half so that the blot is imprinted on the second half of the sheet. Then he unfolds the sheet and tries to understand who or what the drawing resembles.
You can see other drawings using the klyasography method
Hand and foot prints
It's simple: you need to dip your foot or palm in the paint and make an imprint on paper. And then use your imagination and add a couple of details.

You can see more about the method of drawing with palms
Paint patterns
For such an application you need to apply a thick layer of paint onto the paper. Then, with the opposite end of the brush, scratch patterns on the still wet paint - various lines and curls. When dry, cut out the desired shapes and paste them onto a thick sheet of paper.

Fingerprints
The name speaks for itself. You need to paint your finger with a thin layer and make an imprint. A couple of strokes with a felt-tip pen - and you're done!

Monotype

A design is applied to a flat, smooth surface (for example, glass) with paint. Then a sheet of paper is applied, and the print is ready. To make it more blurry, the sheet of paper must first be wetted. Once everything is dry, you can add details and outlines if desired.
Scratch

The highlight of the work is that the drawing needs to be scratched. A sheet of cardboard is densely shaded with spots of multi-colored oil pastel. Then you need to mix black gouache with soap on a palette and paint over the entire sketch. When the paint is completely dry, use a toothpick to scratch the design.
Air colors

To make the paint, mix a tablespoon of self-raising flour, a few drops of food coloring and a tablespoon of salt. Add a little water to achieve consistency thick sour cream and mix well. The paint can be placed in a pastry syringe or in a small bag. Tie tightly and cut the corner. We draw on paper or regular cardboard. Place the finished drawing in the microwave at maximum mode for 10-30 seconds.
Marbled paper

Paint a sheet of paper with yellow acrylic paint. When it is completely dry, paint over it again with diluted pink paint and cover immediately cling film. The film needs to be crumpled and gathered into folds, since they are the ones that will create the desired pattern. We wait until it dries completely and remove the film.
Painting with water

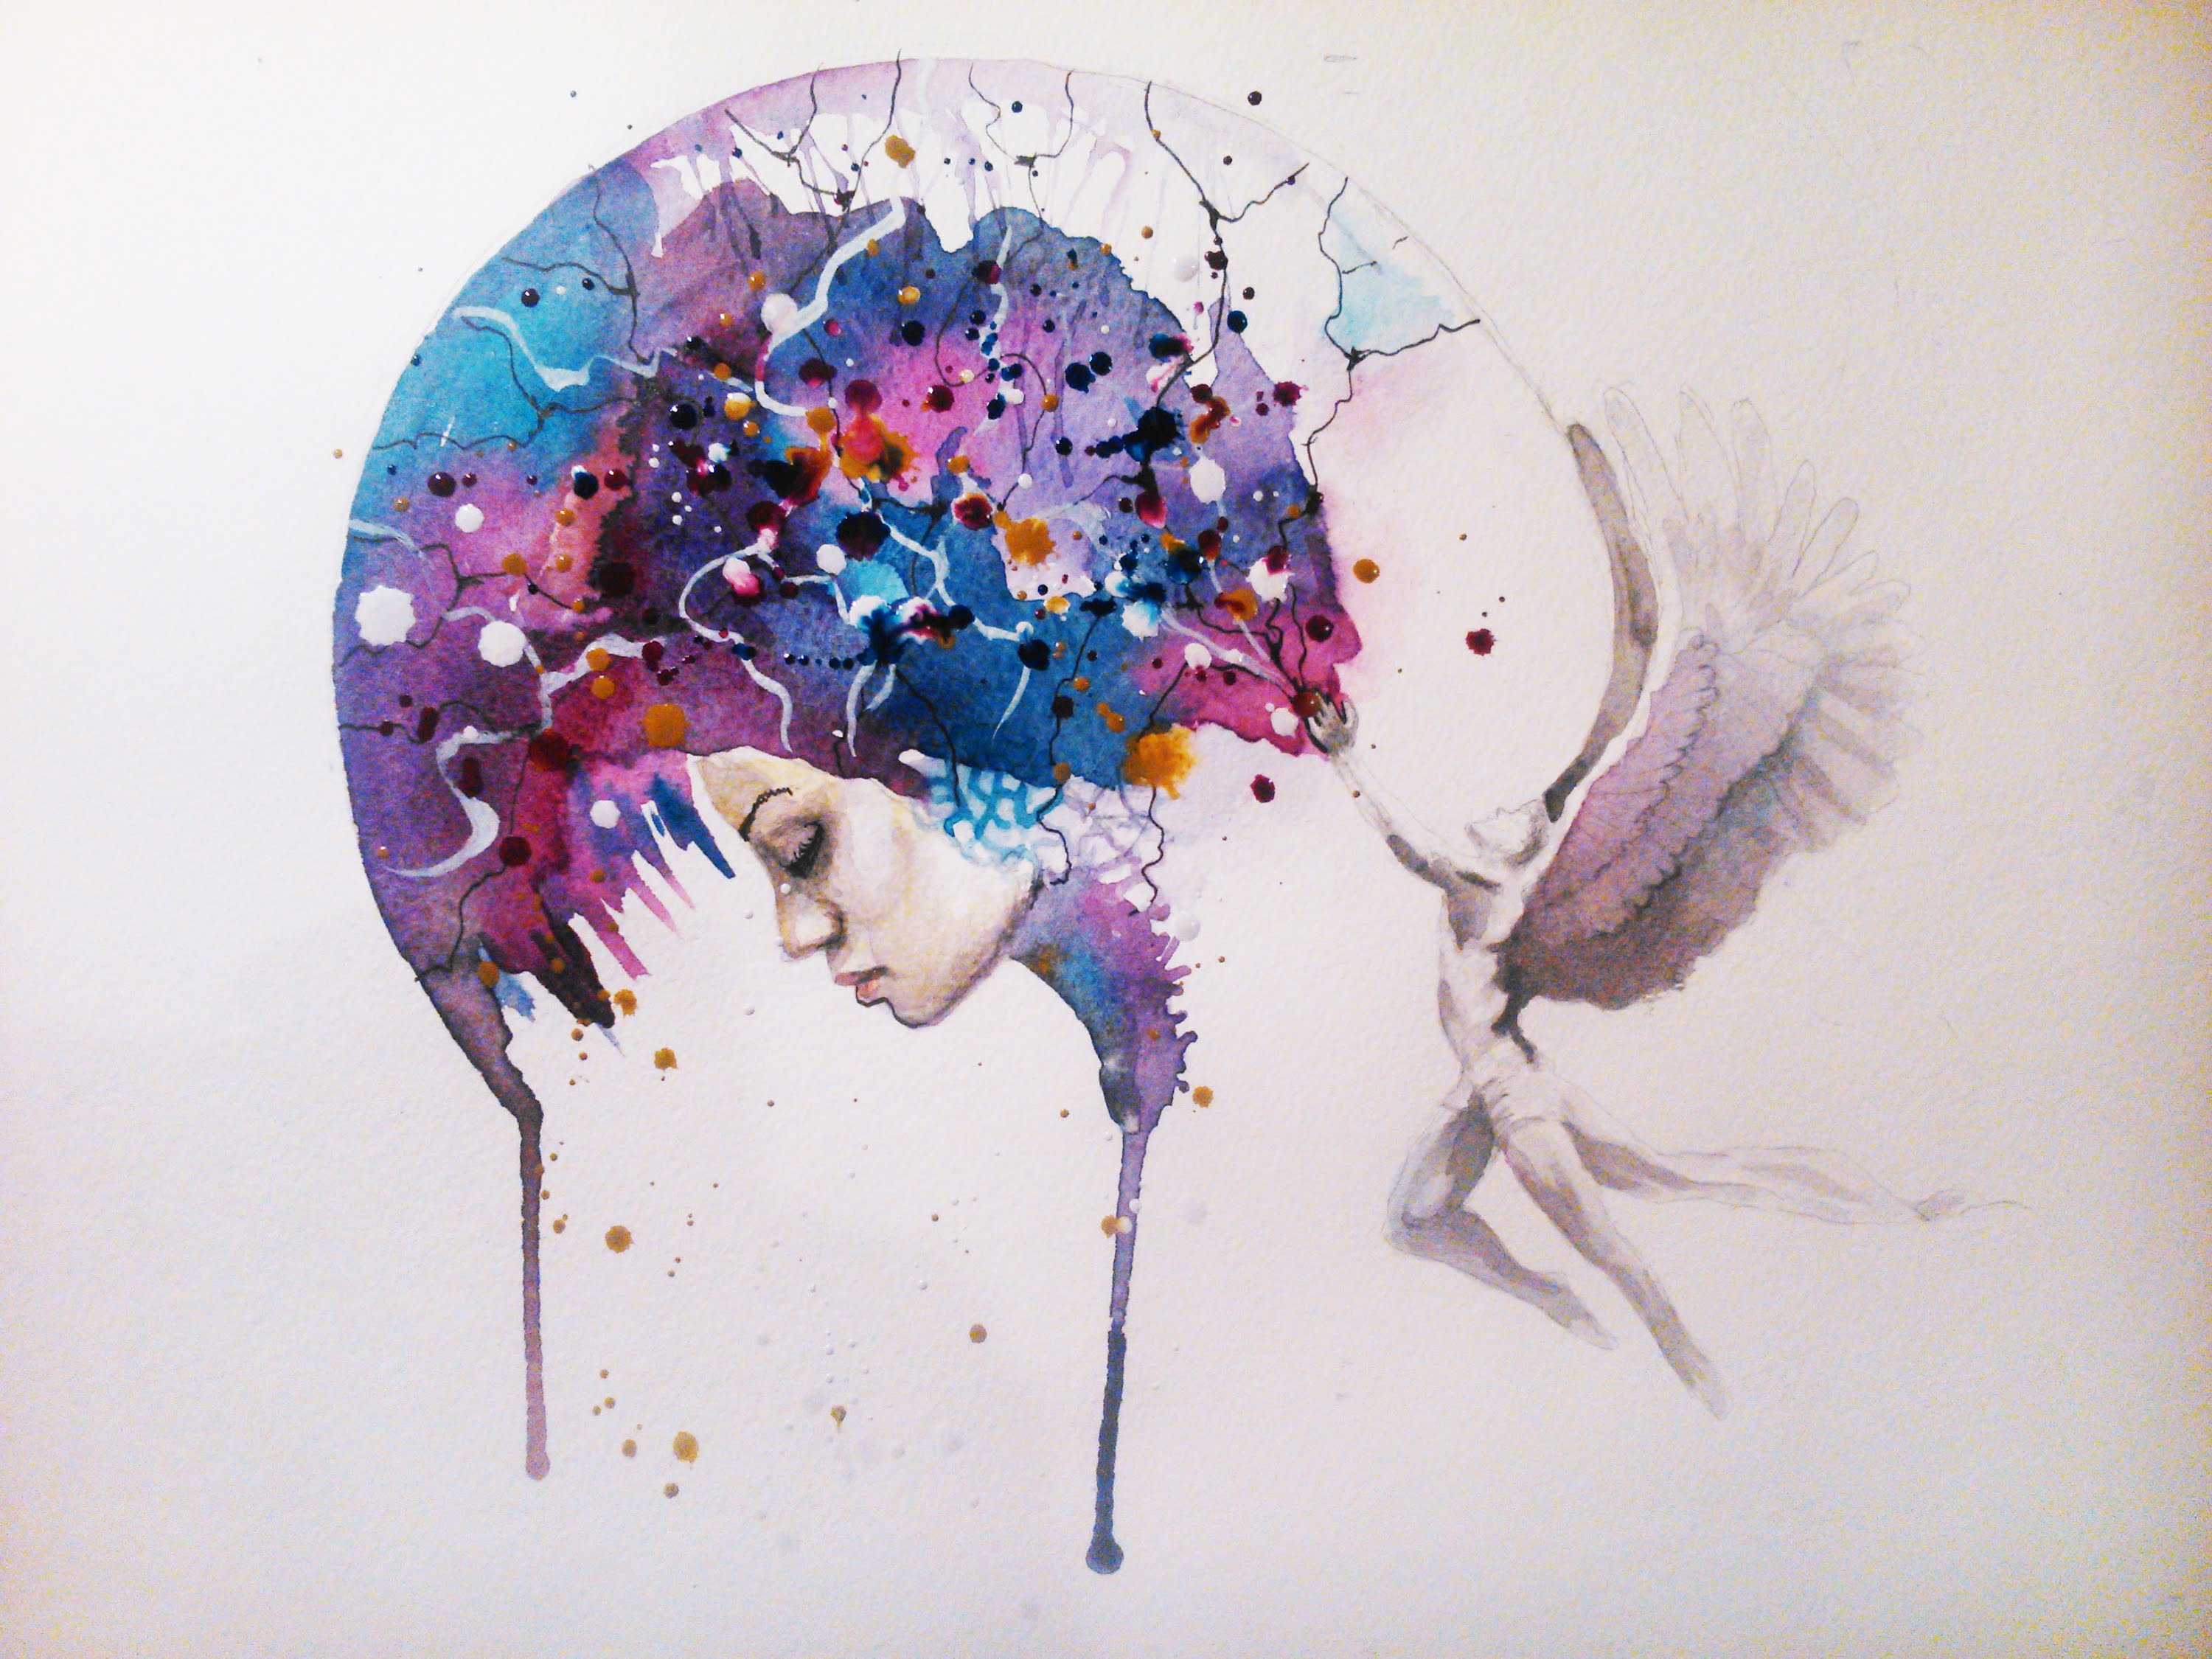
We draw with watercolors a simple figure and fill it with water. Until it dries, we put colored blots on it so that they mix with each other and form smooth transitions like this.
Prints of vegetables and fruits

Vegetables or fruits need to be cut in half. Then you can cut out some kind of pattern on it or leave it as is. We dip it in paint and make impressions on paper. You can use an apple, potato, carrot or celery for prints.
Leaf prints

The principle is the same. We smear the leaves with paint and make prints on paper.
Drawings with salt

If you sprinkle salt on a watercolor painting that is still wet, it will soak into the paint and create a grainy effect when it dries.
Brush instead of a brush

Sometimes it's worth trying something unexpected for the sake of experimentation. For example, a household brush.
Ebru, or painting on water

We will need a container of water. The main requirement is that its area coincides with the area of the sheet of paper. You can use an oven broiler or a large tray. You will also need oil paints, a solvent for them and a brush. The idea is to create patterns with paint on water, and then dip a sheet of paper into them. How to do it: www.youtube.com
Cracked wax effect

Using wax pencils, draw an image on thin paper. In our case, a flower. The background must be completely shaded. Crumple it well and then straighten the sheet with the pattern. We paint it with dark paint so that it goes into all the cracks. We rinse the drawing under the tap and dry it. If necessary, smooth it with an iron.
You can see about drawing on crumpled paper
Cardboard prints with shift

We cut the cardboard into small strips, approximately 1.5 × 3 cm. Dip the edge of a piece of cardboard into paint, press it vertically to the paper and evenly move it to the side. You will get wide lines from which the drawing is created.
Fist prints

For such a drawing, the child will have to clench his hands into fists. Then dip back side fingers into the paint and make imprints, creating the desired shape. Fish and crabs can be created using fingerprints.
Looking at the paintings of famous artists, you involuntarily admire their creativity and ability to depict in bright colors the world around us. Each of us can also try to master the art of drawing and make this hobby our favorite pastime. Presented here beautiful drawings gouache for beginners, they will allow you to test your talent in painting and master the technique of painting with paints.
To master the gouache painting technique for beginners, you need to have:
- Kit gouache paints of twelve colors.

- Sheet of paper.

- Couple flat brushes from pork bristles.

- Palette and dishes with water.

The aroma of gouache paints is familiar to everyone from childhood. It is not difficult to understand how to draw with gouache; the technique of such drawing is quite simple. You need to draw, starting with a pencil sketch.
A palette knife is used to apply paint and mix it. With its help you can apply paint in even strokes.

WITH early age We draw a simple, unpretentious landscape in gouache in an album. But, you can paint patterns, flowers, mountains, and even city buildings with such paints. For beginners, working with gouache is simply an ideal option.
By drawing a sketch with a pencil, you can avoid mistakes and do the work accurately. If you smear and mix paints directly on the canvas, you will just end up with dirt on the painting. Therefore, you can add a little water to gouache and it will turn into watercolor.
To find out how to learn to draw beautifully with gouache, you need to get acquainted with step-by-step technique. This technique involves applying gouache only horizontally during painting.
First of all, let's draw the dark fragments of the picture, and only then light color depict glare. As a result, we get the desired color without traces of dirt.

Gouache painting techniques
Among famous artists The most common techniques for painting gouache paintings are:
- Apply a wet layer of paint over the not yet dry layer. In this case, the paint applies tightly and takes a long time to dry. This method is more suitable for painting with watercolors.
- Using a dry brush, gouache paints are applied to the dried layer.
- Using a sponge, a textured picture is created. This technique is ideal when we draw autumn landscape, can be easily depicted bright colors golden autumn.
- For a beginner, the technique of splashing paint on the canvas will cheer up and help overcome anxiety. It is enough to wet the brush in paint and spray the gouache on the paper or canvas. The result is a bright and beautiful painting. Be sure to learn this method of applying paint, which helps train your hand.

Of course, we cannot paint a picture without the right brush. It is advisable to choose brushes made of nylon, goat or pig hair.

On video: how to beautifully paint the sky with gouache.
Types of gouache
Gouache is suitable for painting on cardboard, paper, canvas and other surfaces. But not every gouache has such universal properties. Let's look at the main types of such paints:
- Suitable for use on surfaces intended for painting only. It is absorbed into the material and allows you to apply a second layer, making the colors in the painting more saturated and bright.

- It has a more saturated pigment and bright coloring abilities. They decorate with it theater scenery. Children's gouache contains PVA glue, so it dries quickly. This gouache is convenient to work on plywood, ceramics or canvas. But acrylic paint fits perfectly on any surface, and after drying it does not wash off and does not lose its original color.

- Fluorescent gouache. Amazing in its properties and quality. It glows when exposed to ultraviolet rays. The color is too bright, which gives the picture a special beauty.
A step-by-step method helps even children understand the basics of painting with gouache. Such lessons will allow you to master this wonderful creativity and learn how to draw in a certain sequence, choose the right colors for reflection real beauty nature, representatives of flora and fauna on canvas.
To create pictures of nature, like drawings on any other topic, you need to start with a pencil sketch. It's easiest to draw by starting at the top of the canvas or piece of paper. As a rule, at the top is the sky, which is colored blue along the pencil contours.
Clouds are painted with whitewash, brushing white highlights across the blue sky.

Mountains are depicted in brown colors, and vegetation in green tones. The trees below are depicted in lighter or darker green gouache. The main thing is that the colors in the painting look like in reality. Paints can be mixed directly on the sheet, changing the water periodically. To create fine lines, you need to choose the right brush.
When using gouache, you must adhere to the following tips:
- You can buy gouache in tubes or jars; everyone chooses the most convenient packaging for themselves.
- The colors you need to choose are those that will be needed to work on the painting.
- Tests should be done on the palette, only after selecting the desired color, transfer it to the canvas.
- If the paint cracks, add a little gum arabic to it and stir thoroughly.
- To apply the next layer, you need to wait until the previous one has dried.
- It is advisable to coat the painting with varnish after drying.
Having mastered the technique of drawing, you can achieve success in artistic creativity. Moving step by step, from simple to complex, beginning artists gradually master the technique of painting with gouache. Below are video tutorials, the purpose of which is to help you depict the chosen plot on the canvas as accurately as possible. This step-by-step approach allows you to quickly learn how to work with paints such as gouache.
Gouache painting lessons for beginners (2 videos)
More ideas for drawings (27 photos)


If you're tired of regular watercolor and oil - try painting acrylic paints, which combine the properties of both materials. The peculiarity is that dried paintings are not afraid of water and sun, so they remain forever the way you created them. To master this kind of creativity, use the instructions below.
Drawing with acrylic paints for beginners step by step
Acrylic is often used for arts and crafts. It is universal, and unlike watercolors, it allows you to apply one layer to another without the danger of damaging the already applied drawing. The scope for creativity is expanding - you can create any picture. The main thing is to know how to paint with acrylic paints correctly and take into account all the recommendations for this process.
How to use acrylic paints for painting
For a beginning artist, 6 colors will be enough. Having learned to use acrylic, you can expand your palette to 12 or 18 shades. In addition, you will also need something on which you can paint with acrylic paints. What to use:
- The most suitable as a basis for paintings different materials– wood, glass, plastic, thick paper or cardboard, canvas and even metals.
- Brushes can be natural or synthetic.
- It is allowed to use a palette knife. If properly diluted with water, even an airbrush can be used.
You need to dilute acrylic paints for painting on a palette with a special solvent or water, adding them little by little to the acrylic so that the consistency becomes similar to watercolor. When such translucent layers are applied to a painting one after another, a very interesting effect is obtained. For undiluted acrylic, only synthetic flat and wide brushes are suitable, but you need to paint quickly, because the drying speed of the paint increases.
Drawing techniques
Before painting with acrylic paints, it is worth familiarizing yourself with the techniques in which paintings are made. Among the main methods of creating canvases are:
- Wet technique. It involves applying diluted paints onto a canvas moistened with warm water.
- The “dry” method. To paint a picture using this technique, it is recommended to use several brushes at once, which can be used to edit the composition on a dry canvas.
- "Glassing in layers." A thick acrylic layer is applied with a brush, on which a picture is then drawn.
- "Impasto." The paintings resemble oil paintings, the strokes are voluminous and clearly distinguishable.
How to paint with acrylic paints

You can paint with acrylic paints on different surfaces, but it’s suitable for every occasion. general instructions, following which it is easy to create a real masterpiece:
- Choose a surface that will serve as the basis for the future painting. Depending on its structure, select certain paints - the manufacturer gives recommendations on this matter on the jars or tubes.
- Decide on your drawing technique. For a watercolor effect, arm yourself with water or thinner and prepare your palette.
- Stock up on brushes - synthetics are suitable for undiluted acrylic, and it is easier to handle watercolor techniques with natural bristles made from ox hair or sable.
- Complete the painting with additional touches using felt-tip pen, ink, markers, gel pens or pencil.
On fabric
Painting with acrylic paints on fabric can be a little more difficult for beginners, so it's worth practicing. Silk or cotton surfaces are more suitable for materials - the pattern will lie better on them and will stick well. Before you start creative process, the fabric needs to be prepared - washed, ironed, stretched on a special frame or laid out on a flat and hard surface. Don’t forget to separate the front and back sides of the item, otherwise the paint can only ruin its appearance - put cardboard or oilcloth. Then use the following instructions:
- Buy a special felt-tip pen that is used for drawing on fabric, and apply the selected design to the fabric. When using a simple pencil for this, keep in mind that you will need to draw slightly beyond the contours so that they are not visible.
- Use artistic brushes to paint the fabric, using thinner if necessary.
- After completing the work, leave it to dry for a day and then iron it.
- Wash the item only 2 days after ironing in a gentle cycle at a temperature of about 30 degrees.
On canvas
For the first time, it is better to choose a smaller canvas. In addition, you will need a sketch made in a simple pencil. For the basis of your future painting, use ready-made photo drawings or rely on your imagination. On a separate sheet of paper, sketch out the options and transfer it to the canvas. Then prepare your brushes, a spray bottle with water, a palette and a cloth. Start drawing from the background and large details, thinking through the combination of shades. To prevent the paint from drying out, use a spray bottle - this will make the transitions between colors smoother.

On paper
It is better to take thicker paper, for example, intended for watercolors. Of all the materials, it is more economical and suitable for beginners, since it has shallow embossing, which is easy to apply strokes to. You can buy either an album or a folder with individual sheets of any format. You need to prepare a palette, a set of several brushes and water if you need to dilute the paint.
The simplest acrylic paints are suitable for painting. If you have already decided on a drawing, then start with a sketch too. Then start working on the background part, using a wide rectangular brush - movements should be fast so that the paint does not have time to dry. For watercolor technique dilute it with water or draw on damp paper, and for oil paper, apply it in pure form using a brush with uneven bristles.
On glass
The most original is acrylic painting on glass. To do this you will need:
- toothpicks or cotton swabs to correct the drawing;
- acrylic paints and varnish;
- brushes;
- diluent;
- contours to complete the basis of the drawing;
- palette.
The technique of drawing on glass is as follows:
- Clean the surface of the glass by leaving it for 20 minutes. in hot water and then degreased with alcohol.
- Use a thin marker to draw a design, placing the sketch under the glass.
- Draw a special outline around the lines.
- Apply paint to the glass in layers, waiting for the previous layer to dry. Apply more paint to the brush and lightly touch the surface to distribute the acrylic evenly.
- When finished, rinse the brushes with water and coat the painting with acrylic varnish.

What can you paint with acrylic?
Having mastered the technique of painting with acrylic paints, you can create any painting, be it a light landscape with airy clouds or a portrait loved one. An individual T-shirt design and even wall painting will be beautiful. Standard waterproof acrylic paints can also be used for drawing beautiful patterns on nails - for example, for a French-style manicure. They are applied directly over shellac. If you are creating children's toys, then acrylic is perfect for drawing eyes on a textile doll.


Painting video tutorials
Acrylic is used to paint materials and even the body - drawings on the skin look very original and bright, so such works are even performed in various competitions. Such creativity has a more complex technique and requires a certain amount of experience and diligence. To learn how to use acrylic correctly, watch interesting videos about the stages of drawing a particular picture.
On gel polish
Flowers
By numbers
Master class "Drawing for the little ones."
Shatokhina Rita Vyacheslavovna, teacher additional education MBU DO "House" children's creativity Kalininsk, Saratov region."
This master class is intended for teachers of additional education, preschool teachers. The master class will also be of interest to little artists aged 4 years and older and their parents.
Purpose: this master class is a small drawing course for the little ones, which shows how to draw geometric shapes.
Target: creating conditions for acquiring drawing skills.
Tasks: teach your child how to draw familiar images using geometric shapes;
instill the skills to carefully work with paints and brushes;
develop creative imagination and fine motor skills hands.
The kids who come to my association for classes are still very young, but they really want to draw. From experience working with children, I realized that it is easier for them to draw with geometric shapes. Children draw according to my demonstration, step by step. When starting a lesson, I never tell the children what we are going to draw today. I know from experience that they find it more interesting. In the process, they guess who they are drawing, and this brings them a lot of joy. And everyone’s drawings are different.
Master class on drawing for children “Snail”
Prepare: A4 landscape sheet, watercolor paints, brushes different sizes, a jar of water and a napkin.

Before we start painting, I tell the children that the paints are sleeping and need to be woken up by gently stroking them with a brush. Let’s wake up the yellow paint first and start painting.
Draw a bun in the center of the sheet, gradually unwinding the brush, and then draw an arc with brown paint.

We turn the arc into a loop.

We draw the horns and paint them over.

Decorating the snail's house.

We draw the eyes and mouth of the snail. Next, the children themselves come up with and decorate the background of the picture: where is the snail?

Children's works:


Master class on drawing for children “Turtle”.
Draw in the center of the sheet yellow paint“Kolobok”, draw 4 loops with brown paint.

The fifth loop is drawn larger in size; we paint over all the loops.

We draw circle eyes, first with white paint, then with black.

Decorate the turtle shell. The child can come up with his own pattern.

Master class on drawing for children “Fish”
We draw a “bun” with yellow paint, draw arcs: above and below, it looks like an eye.

Draw a triangle tail for the fish. Then we decorate the fish with red paint. draw with a brush: mouth, fins.

We draw scales and decorate the tail.

We “print” with a brush: we draw pebbles and water, draw lines with green algae paint.

Draw the eye of the fish with black paint. Black paint likes to play around, so we are especially careful with it.

"Winter meadow".
Take a sheet of blue color, A4 format. We paint the koloboks with white paint. We draw lines, draw snowdrifts.

Brown paint we draw the trunk and branches of trees, hands, eyes, mouth and broom for the snowman.

Decorate the drawing with snowflakes. Decorate the snowman: draw a bucket on his head and a scarf. Children complete the drawing and decorate it.

Using the same principle, you can draw autumn forest, only initially the koloboks will be yellow, orange and green, and leaf fall, we draw by applying a brush, we print. Children’s work:


Master class on drawing for children “Hedgehog”.
We draw the “bun” with brown paint.

Draw a triangle nose.

Child's work.
We draw a clearing for the hedgehog, the children fantasize.


Child's work:

Master class on drawing for children “Frog”.
Take a sheet of blue color, A4 format. Draw a “bun” in the center with green paint.

We draw another “bun”, and on top there are two “bridges”.

We draw the frog's legs and draw the children's attention to the fact that the frog's legs differ in their structure, which helps the frog to jump well and stay on even the most slippery surface.

We draw the frog's mouth and eyes. We decorate the picture after talking with the children: where does the frog live?

Master class on drawing for children “Cockerel”.
We draw a large bun - the body, a smaller bun - the head. We connect them with smooth lines, we get a neck.

We draw the cockerel's legs-triangles and tail, lines-arcs.

Use red paint to paint the cockerel's comb (bridges), beak and beard, and apply a brush.
magic techniques for children's creativity">
10 simple magic techniques for children's creativity
1. Monotype
Essence: imprint of paint on paper from a smooth surface. What you need: a piece of glass or tile, paper, watercolor, soft brushes, water. Process: We wet the glass, apply spots of paint on it, put a sheet on top, carefully turn it over and remove the glass. What happens: very picturesque stains that give room for imagination: “Look, mom, these are clouds! And here is the forest... And here are the waves!”Of course, God himself then ordered that what he saw among the spots be supplemented with details. Using this technique, you can make a background, and draw a graphic image on it, fine gel pen- when it dries.

You can create targeted prints, including symmetrical ones: paint is applied to one half of the sheet, then we fold it and get the second half of the picture!
You can “print” with paint different forms- for example, from leaves or templates cut out of cardboard. Then it's better to take more thick paints- gouache or acrylic.

Or first apply cut-out simple stencils to the sheet - then the background will be colorful and the images will be white.

2. Blotography
Essence: You can “inflate” original figures from colorful blots. What you need: thick paper, thick brush, gouache, drinking straws. What happens: we drip paint onto the sheet, then we blow on it through a straw, making lines. Then, depending on what we see, we supplement the image with a drawing or appliqué.
This technique is especially great for drawing trees - the branches come out very naturally curved.
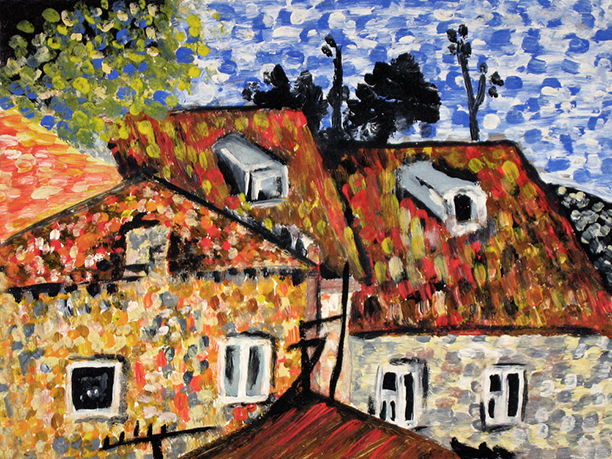
3. Fun dots
Essence: For professional artists this is a separate style called “pointillism”. What you need: paper, gouache, palette, cotton swabs. What happens: apply paint to the palette different colors, dip the sticks - and tightly cover the space with colored dots. For convenience, we’ll first make an easy one pencil sketch.
You can draw with dots using brushes, but, unlike sticks, you will need to be careful about washing them. Another cool dots are fabric outlines, but you should work with them carefully so as not to squeeze out too much and make puddles.
4. Spray
Essence: What children love is to splash. And doing it with paint is much more fun, and even meaningful! What you need: paper, liquid paint, stencils (silhouettes cut out of cardboard), old toothbrushes. What happens: We put our stencils on the leaf - and with the help of a brush we “spray” the paint on the surface, then we remove the cardboards and see the pictures. You can apply several layers - both contour images and paints.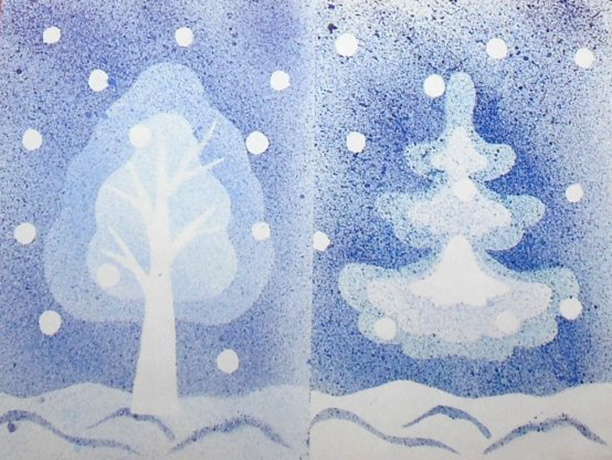
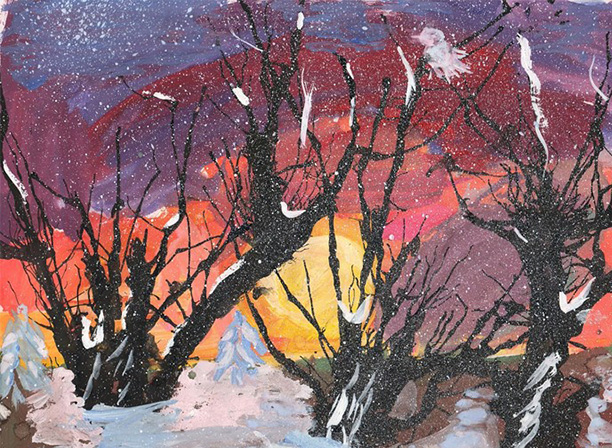
5. Scratches
Essence: this technique is elegant French name“grattage”. What you need: wax crayons, gouache, paper, liquid soap, a candle and a thin stick (for example, a knitting needle or a used rod). What happens: We color the sheet with pencils, then rub it with a candle, and cover it with a layer of dark gouache mixed with soap (so that it lies evenly). When the paint dries a little, scratch the design on it. It turns out very unusual and mysterious, especially the night and space scenes.
6. Candle arts
Essence: drawing magically appears as white lines on a colored background. What you need: paper, candle, watercolor paints and a wide tassel. What happens: We draw the outlines of some objects or creatures on paper with a candle, like a felt-tip pen. Then we cover the sheet with watercolors. As the paint flows off the paraffin or wax, the outlines they draw remain white or dotted.
7. Paper mosaic
Essence: Ancient artists decorated temples and palaces this way, and we can do the same at home. What you need: a sheet of thick paper, a glue stick, colored paper, scissors. What happens: colored paper cut into strips and then into small squares. We make the outline of the drawing with a simple pencil, carefully cover the sheet with glue and sculpt a mosaic on it. It turns out beautifully when the slightly visible background is dark.