Who among us has not dreamed of becoming an artist at least once? Especially in childhood, many of us wanted to learn how to draw beautifully, and maybe even paint real pictures. But, as often happens, dreams were shattered due to a banal lack of skills. Either due to a change of interests, or because of ordinary laziness, many lacked the desire and patience to continue developing in this direction.
So how can beginners learn to draw with a pencil?
Like any creative activity, the art of drawing contains many subtleties and helps its owner reveal not only creative potential, but also to realize your worldview in a beautiful form. These subtleties will be discussed further.
Stages and principles of training

Often, in order to fully learn how to draw, they resort to step-by-step learning and drawing practice. various compositions of different plans. There is quite a big difference if, for example, you are trying to draw a person, or if you are trying to realize some kind of landscape on paper. That is why in this case it is very important to master the skills of drawing a wide variety of objects.
Another basic principle in learning to draw is regularity. Practice is the decisive factor in developing drawing skills. It wouldn't be bad to make up your own specific schedule for a week, according to which you could devote at least 20 minutes a day to this activity. It follows from this that you also need to show some patience in such training.
What do you need to get started?
So, first of all, find yourself notebook with quite large sheets. There should be at least 50 sheets. The second point in your preparation should be the choice pencil taste. There are a great variety of pencils, so in your case best choice will be the one you are used to using. For example, it could be a pencil with a soft lead. Naturally, a little later you will one way or another have to purchase the necessary pencils in order to improve the quality of your work.
Get yourself a calendar too. Where you will celebrate not only your class schedule, but also your successes. At first, you will have to force yourself to strictly follow the schedule, but over time it will become part of your lifestyle and will bring great pleasure.
Try to draw something on the first page. Do not worry about high quality drawing. After a certain time, you will open the notebook to the first page and be surprised at the difference between how it was and what changes have occurred.

Basics
Many people think that drawing is a skill that depends only on natural talent, so they easily find excuses in the format of “not given” or “doesn’t work out.” But it’s not just about talent, but also about acquired skills. A person who can draw well without knowledge basic principles- a rare exception. Any business needs to be learned. Therefore, next we will look at the basic laws and techniques of drawing.
There are 9 basic laws of drawing, after learning which you will learn to draw quite high level. Let's discuss them.
- Law of perspective. Objects that the author wants to visually bring closer are distorted in such a way that one part of it appears closer than another part of it.
- Arrangement of objects. Objects that are at the bottom of the sheet appear much closer than others.
- Law of size. The object in the picture, which, according to the author’s plan, should be located closer, should, accordingly, look larger than those located further away.
- Law of overlap. An object that is in front of another becomes visually closer to us.
- Law of penumbra. The conventionally unlit part of the object, which is located on the opposite side of the light source, should be darker.
- Law of the shadow. To make the drawn object seem three-dimensional, you need to add a cast shadow to it, also strictly on the opposite side of the light source.
- Law of contours. It is necessary to accentuate the contours of round objects to give them depth.
- Law of the horizon. This is the case when the horizon is drawn so that the depicted objects appear to be at different distances from the observer.
- Density law. To make it seem that objects are at different distances, it is also necessary to draw near objects in more detail and distant objects in less detail.
Using these 9 basic laws in practice, it will not be difficult for you to switch to new level in drawing.

Also, in order to avoid simple mistakes, a beginner needs to follow a few important stages when creating a sketch of a drawing. Here they are:
We draw from simple to complex
More or less known fact, that the drawing is different from the drawing. What we mean first of all is that drawing a person is far from the same as drawing, say, a tree. Different things require different approaches to be executed perfectly. That is why further we will consider in detail the technique of drawing various compositions.
You should not immediately take on complex compositions. Because in the science of drawing, the mindset with which you start working is very important. If you immediately took up complex drawing, and nothing worked out for you, then you are guaranteed a bad mood. You may even lose the desire to pick up a pencil altogether. Therefore, in our training we will go from simple to complex, gradually learning new drawing techniques. Let's start with something simple.

Drawing geometric shapes
Because looking for suitable layouts geometric shapes will be quite long in time, we will be based on our imagination. For convenience, you can even download ready-made pictures of various geometric shapes from the Internet.
Cube
Let's draw a cube. Take this picture as a basis:
Repeat all the edges and sides of the geometric figure. Don't forget that the back wall of the cube is proportionally smaller than the front. Now let's pay attention to the shadow.
Imagine the light source is in front. Thus, the front side of the cube will be lighter, and sides darker. Shade the sides. Use a pencil to highlight the lines of the front corner and leave the rest thin. He will attract all the attention of the observer.
To give your figure a unique look, you can slightly distort the proportions. So we might end up with something similar.

Cylinder

Draw the plane on which your figure will be located. It should not be in the air, because the shadow must fall on something. Find on this plane the ideal place to locate the central axis of your cylinder. Draw a vertical line straight up from this point. Draw ellipses around both ends of this line. Connect the lower and upper ellipses with the same vertical lines. The sketch is almost ready. For convenience, you can add a couple of auxiliary lines. For example, in front, such a line can mark the border of the shadow. Draw the outline of the shadow on the horizontal plane on which your figure is located. The result should be something like this:

Now that we're done with the frame, it's time shade the main parts of our figure. Again, taking into account that the light should be strictly in the opposite direction from the shadow, we mark by eye where the highlight will be. It is also worth considering that the glare on the cylinder will not form a spot, but a vertical stripe. Shade the area from the shadow line to the rear border of the cylinder with a darker shade. Lubricate the border of the hatching to make the transition smooth. Shade the shadow of the figure itself. Upper part leave the cylinder light.

Drawing a sphere
Let's try to depict one of the basic geometric shapes, on the basis of which more complex objects will be drawn in the future. This figure is a sphere. She is even easier to draw than the others. You need to draw a circle. Next, from the edges of this circle, you need to draw several more concentric circles inside this figure. These circles may not be perfectly regular; moreover, they may take the shape of an ellipse.
They will serve us in order to do the shading correctly. Refer to the picture below.

Shade the circles according to the diagram shown. Draw another ellipse on the main plane. Shade this ellipse too to create a shadow. The sphere is ready.
Exercise
Try using the sphere drawing skill to draw more complex compositions, such as a plum. Notice what changes have occurred to the shadow? What happened in the end?
Answer
Shadow and light switched places. As a result, the berry acquired the illusion of transparency.

So, we found out that drawing geometric shapes is not such a difficult task.
Based on a basic knowledge of geometry and the skill of drawing such figures, you will be able to create more complex compositions with their help.
Drawing dishes
The next most difficult stage in pencil drawing is drawing dishes. In this case, the main difficulty lies more in the correct placement of shadows, both on the subject and around it.
Let's draw a simple vase. It will be great if you find a suitable example that you can study in advance.
At the very beginning, we need to indicate the parameters of the object using straight lines. Draw a small horizontal line at the bottom of the sheet. This line will be the bottom of our vase. From the center of the horizontal line, perpendicular to it, draw a vertical line. This line will indicate the height of the object. Draw another horizontal line at the top of the vertical one. If anything is not clear to you, refer to the figure below:

As we can see, we will need another horizontal line marking the narrow neck of the vase. Draw it. Next, you need to draw ellipses with centers coinciding with the intersection points of the vertical and horizontal lines. They are needed to add volume to the vase.
The next step will be drawing the outline of the object. For example, it could be like this:

The final stage will be drawing light and shadows. This is done in the same way as with geometric shapes. Simply, you first need to decide what underlies each part of the object, a sphere, cylinder, cone or cube.
Try to ensure that the outline of your vase is symmetrical on both sides.

Drawing a cup
First, using the proven method, we need to draw the vertical and horizontal lines. This time, the base of the cup will be much smaller than its neck, and not the same. Draw ellipses for the top and bottom.


Plants
Unlike geometric shapes and dishes, drawing various plants is a more difficult task than it might seem at first. For example, in contrast to relatively simple objects, in the case of flowers, bushes, trees and many others, it is better to always have a living example before your eyes. It is very difficult to reliably imagine such a number of different details and correctly display them on paper. Or it could be a finished image of the original. With the level of detail of the drawing, it is important to decide the issue at the very beginning. After all, it can be as simple as possible, or, on the contrary, contain a large number of details.
Drawings by degree of detail:

Let's start drawing.
Make a preliminary sketch of your composition. If it is not one flower but several, draw them so that the stems are slightly curved and the buds look in different directions. You don't have to make all the lines perfectly correct.

One of the most interesting things is that the initial sketch can consist of geometric shapes, albeit a little distorted. Take a closer look.
What do you see? The picture contains at least a circle, ovals, a cylinder, a distorted rhombus and cones. This tells us that sometimes, even complex images on initial stage, can be drawn using simple shapes.
Start drawing out the details. Draw the petals and add some irregularities to the petals. Add leaves to the composition. Focus on the original.
A tulip flower usually has about 6-7 petals that partially overlap each other.


If you pay attention, you will note that the thickness of the stems is the same along the entire length. The leaves are long, with a sharp end, curved. Leaves envelop the stem. Also pay attention to attaching the stem to the bud. This is noticeable on the flower turning back.
The final stage will be adding light and shadow. Using light strokes, make the areas inside the flower more shaded, as well as on inside leaves. The places where the petals intersect can also be slightly shaded. This will give the petals a transparent effect. Draw the stamens. They can be emphasized with a darker color.

As can be seen from last lesson, creating a simple composition is not a problem if you know the basic fundamentals of drawing, from simple to complex.
Drawing an oak tree
Trees are very often an integral part of various complex paintings. For example, these could be landscapes where numerous trees echo images of animals, which will be discussed later.
Take a hard pencil. It will be needed to draw very weakly general sketch tree. As always, we will go from the general to the details.
Draw a tree trunk. Since we are drawing an oak tree, it should be thick. Draw branches from the tree trunk.


Add a few clouds of leaves inside the crown. You need to deliberately leave empty areas so that some branches are visible.

Thicken the branches where they are not covered by leaves.

Start applying the main shadows. Before doing this, think about which side the light will fall from and how parts can be further shaded.


Draw the leaves. Add detail to them and distribute the shadows correctly. Select several leaves throughout the crown. This adds volume to the picture. The oak is ready!

It is not necessary to draw every leaf in the final image. You can simply thicken the contours of the leaves.
In order for a portrait of a person to have maximum resemblance to the person depicted, first of all you need to correctly draw his eyes. In this lesson you will learn how to draw human eyes step by step with a simple pencil.
If you are going to draw someone's portrait, even with a simple pencil, be prepared to make several sketches and ruin a lot of sheets of paper.
On New Year's Eve, the drawing of Father Frost and the Snow Maiden becomes very relevant. I hope this one step by step lesson using a simple pencil technique, will help you draw Santa Claus correctly.
When drawing a portrait, it is often enough just to correctly draw the eyes, lips and nose and a certain resemblance of the posing person will appear.
Every person has a nose unique features, therefore, it is impossible to give precise advice on how to draw the nose of a girl, child or man.
Drawing a hand is not at all difficult, especially at life size. To do this, just trace the contours of your hand with a pencil.
Don't complicate the drawing of comic characters. The image of the figure and face of people should be without much detail, almost schematic, slightly in a cartoonish, comic tone.
If you know how to draw a person's face, then drawing a mermaid will not be difficult, since instead of legs the mermaid has a fish tail.
The girls' eyes drawn in anime style are unnaturally large, with long eyelashes and huge black pupils.
Lesson on how to draw cartoon character Sonic, designed for very young children. The lesson was done in pencil, but you can draw with felt-tip pens or colored pencils.
Paint Winnie the Pooh It’s not difficult at all step by step and you’ll definitely get a good picture of Winnie the Pooh.
This Spider-Man drawing is done in pencil, but you can draw it with markers or colored pencils.
If you draw Iron Man step by step with a pencil, you will definitely get a beautiful picture of this hero. To Iron Man turned out more impressive, be sure to color the drawing.
This manga-style drawing was done in pencil, but on the site there is an almost identical color drawing made on a graphics tablet.
The hero of this lesson was the character famous cartoon about Pokemon. The drawing is done step by step, so even small children can cope with this task.
Since Patrick is a starfish, his body shape resembles five-pointed star. This lesson is intended for the youngest site visitors.
Another lesson is for children. I hope that drawing SpongeBob will not be difficult even for small children who are just starting to learn to draw.
This doll looks more like a little princess with a high collar and lots of lace on her dress.
There are many Smeshariki and they are all similar to each other, since their body resembles a ball or ball. Try to draw Smesharik Krosh step by step with a pencil.
Smesharik Hedgehog differs from Smesharik Krosha only in that you need to draw needles along the contour of his body.
In this lesson we will draw a chimpanzee monkey step by step. If you need a drawing of a monkey of a different species, you can draw it from a photograph.
Try to draw this graceful cat called a jaguar. Of course, a “cat” like the Jaguar only looks like a domestic cat in appearance and hunts not mice, but artiodactyls.
If you like to draw animals, be sure to draw this cute and cute Koala bear step by step with a pencil.
The bear in children's drawings has a friendly and peaceful character. In the wild, this is a dangerous and aggressive animal.
The fox is similar in appearance to a dog, but in addition to the bushy tail and the original bright red color of the fur, it also has a number of other differences, for example, a narrow and long muzzle.
An elephant is not difficult to draw. You will see this if you try to draw an elephant with me step by step with a simple pencil.
If you have tried to draw a snake and a bird, then drawing a dragon will not be difficult for you. A drawing of a dragon made in black and white pencil does not even need to be colored.
When drawing a camel, be sure to draw the surrounding desert landscape. It's easy to draw sand and bright sun, but you will get a real picture.
The spider drawing does not have to be colored. It is quite enough to shade the spider with a simple pencil, and for realism draw a web around the spider.
The snake inspires panic in many people, since some snakes are very poisonous. But in fact, this is an ordinary animal from the reptile family that uses poison for self-defense.
Drawing for children with a simple pencil is best done in stages, first outlining only general outlines frogs. And then, step by step, draw the whole picture.
The most difficult thing is to draw transparent wings with veins for a bee. I think with the help of this tutorial you can easily cope with it
A black and white drawing of an ant made with a simple pencil will look quite realistic.
The main thing is to correctly draw the long and narrow muzzle of the hedgehog. Numerous hedgehog spines are easy to draw. To make the hedgehog look more realistic, draw nearby mushrooms or fallen apples that the hedgehog collects in the fall.
There are so many unusual animals on our planet. The panda bear is an extremely beautiful and unique animal that lives only in China.
Draw a crocodile with an open mouth. This will make it easier for you to express in your drawing the ferocious and predatory nature of this most ancient creature on our planet.
You can draw a squirrel “from life”, since in any park you can meet this wonderful animal and even feed it by hand.
No one knows exactly what the dinosaur looked like. Perhaps he looked exactly like this picture.
Outwardly, a scorpion is somewhat reminiscent of a crayfish, only the scorpion’s claws are smaller, and at the edge of the tail there is a dangerous poisonous sting.
Do you think you can’t draw such a beautiful dragonfly as in my drawing? And you try it. The main thing is to take a sharper pencil so that the lines are thin and clear.
All dogs are similar to each other and at the same time, no two dogs are the same. Let's draw a very cute and good-natured St. Bernard dog, saving people caught in avalanches.
Many children keep hamsters at home, funny and cute animals. Take a piece of paper and a simple pencil and let's try to draw your pet step by step.
If you need to draw a pony, that cute little horse, then this lesson will help you do it step by step.
A donkey is very similar to a pony, but why does it have such long ears? However, it doesn't matter. The only important thing is that you can draw a donkey correctly and beautifully using this lesson.
Beginning artists draw the horse's hind legs as well as the front legs. Don't make this common mistake. Look carefully, the horse's hind legs bend in reverse.
This assignment lesson is one I really like. It is very simple, and at the same time allows anyone to accurately draw a horse's head.
In this lesson you will learn how to draw a rabbit step by step with a simple pencil. With simple steps you can draw a rabbit quickly and easily, try it.
Drawing a kitten is fun, especially when the drawing works out well. Try to draw a kitten step by step using this lesson.
Do you need to draw mushrooms? Then take advantage of this lesson. Step by step, you will draw the most popular white mushroom among mushroom pickers.
The maple leaf is very beautiful, especially in autumn time when he changes his green color into shades of yellow and red.
This lesson is not at all difficult, you just need to correctly draw the snail’s “house”. To make the snail drawing more realistic, also draw a grape leaf.
There are all sorts of patterns on the wings of a butterfly. The wings of even an ordinary cabbage butterfly are like an artist’s palette with multi-colored spots of paint.
A seascape is not difficult to draw; it is much more difficult to convey the depth of color of sea waves crashing against the rocks.
Often we do not notice what surrounds us and what we cannot live without. Trees and plants are the basis of our nature. Protect the environment!
Flowers, green grass, tree leaves not only cleanse our air of harmful impurities, but also decorate our lives. Look around with “different” eyes and you will understand how carefully we need to treat our nature.
You may need to draw a Christmas tree closer to the New Year. In addition to drawing a festive tree, the site has a lesson on how to draw Santa Claus.
There are no identical snowflakes, so you can come up with any shape of a snowflake, the main thing is that its “rays” are absolutely symmetrical.
The ladybug must be colored with colored pencils or paints, or even better, draw it against the background of the nature around it: green leaves, bright flower buds.
Against the backdrop of the darkness of space, the Shuttle will look especially impressive. This spaceship can turn into an airplane and, leaving orbit, land on Earth on its own.
Helicopters, just like airplanes, are civil and military. In this lesson you will be able to draw step by step the most common brand of civil helicopter in our country.
Your drawing of a military aircraft will definitely turn out beautiful if you can draw the wings correctly and symmetrically.
Drawing of an English military fighter from the Second World War. The lesson is done with a simple pencil.
It will be much easier for you to draw a car if you do it step by step. First you need to mark the body, and then, step by step, finish drawing other parts of the car.
Today we will talk on creative theme, namely about drawing. But don’t think that we will tell you how to draw. There are resources for this art schools. We will be interested in the usual redrawing. Can you tell me why this is necessary? Imagine that a person does not know how to draw like experts do, but he wants to draw something. Even just for the sake of useful time forwarding. This is where drawings come to the rescue; they can be drawn and colored as needed.
You can draw with either a simple pencil or colored pencils. A picture will be a good help to you. For example, you imagine a cat, but you cannot draw it from memory. Then take the finished picture and slowly begin to sketch. This is also painstaking and creative work.
Drawings for sketching, easy and beautiful step by step for beginners
Let's start with the fact that if you are just trying your hand at sketching, then you should start with a step-by-step drawing. There are diagrams that show step by step how to draw a particular object. Let's take a minion from a cartoon as an example. It can be drawn like this:

Or let's take a very simple drawing, say a fish.

And this is how you can draw with different angles hare

A good option is a cow.

If you have already mastered sketching. You can move on to more complex objects, for example, a horse.

You can not draw her entirely, but make a portrait.

You can draw not only animals, but also flowers.

Returning to animal portraits, such a wonderful tiger. Give it a try.

And finally, in the theme of the coming year of the pig, a corresponding drawing.

If you have children who love to draw, try this with them.
Drawings for sketching step by step for girls 12 years old
What can you do to interest girls? Of course, various princesses, dolls, fairy-tale characters.

For phone lovers:

And here is a whole selection of beautiful drawings.

Enough easy drawing"Best Girlfriends"

And this good picture girl with a dog. The idea of the picture itself is interesting.

This drawing is in anime style.

Another one in the same style.

Simple drawing of a cat.

Portrait drawing.

And another drawing, quite simple technically. You can practice drawing a self-portrait on it.

Sketches of drawings for boys
We found something to draw for girls, now let’s select drawings for boys. What could be better than cars? Just a lot of cars.

Military equipment, such as tanks, is also suitable.

For fans of martial arts, this drawing with a ninja is suitable.

Another such car is a jeep. Maybe dreams will come true later.

Except military equipment You can also draw the military themselves.

So the choice is also quite large.
Light and beautiful pictures for sketchbook
A sketchbook is an album for sketches and sketches. Every self-respecting artist should have such an album. But even if you are just interested in drawing, then such an album is also a must.
In this album you can not only sketch something you like, but also make your own sketches under the influence of emotions.

Portraits are popular in such albums.

A simple drawing, for example, dandelions.

You can practice by drawing various talismans.

In addition to drawings, you can make logo pictures or sketches with text.

The sketchbook is thus a kind of artist’s portfolio.
How to draw beautifully by cells
If you find it difficult to draw any pictures on clean slate paper, you can use the method. However, even experienced artists Sometimes this method is used. It consists of drawing cells or taking a ready-made sheet of paper in a cell and drawing the picture you like across these cells.

It can be simple drawings, such as a dolphin.

Or this bear cub.

Or they can be more complicated.

These drawings are more like pixels, but they are good for practice.

Drawings for sketching in the form of a unicorn
For fantasy lovers, we can advise you to draw the most traditional creature of this genre - a unicorn.

You can draw a unicorn in the classic style.

You can also make a drawing in a “cartoon” style.

Portrait of a unicorn.

And one more is enough artistic drawing.

Making beautiful drawings about autumn
Autumn. It's quite a romantic time. You can draw many wonderful compositions here.

Leaf fall.

Set of leaves and acorns for autumn design.

And this step-by-step drawing autumn landscape

And one more beautiful portrait in the leaves.

How to draw an owl with patterns step by step
If you like drawing owls, here are some options for sketching.

Owl with patterns of flowers.

Portrait of an owl.

Owl in flight.

But you can draw an owl a little easier. For this, look step by step drawings and try to do the same yourself.

Or, for example, this drawing.

Or another very simple way of drawing. We make an oval in which we draw the eyes and ears.


How to draw cartoon characters step by step
And one last thing. Cartoon drawings. They will be especially interesting for children. You can start with Luntik.

Portrait of a hare from “Well, wait a minute.”

The famous Winnie the Pooh. 
The Wolf from Mowgli

Picture from the cartoon The Smurfs.


The favorite of kids is the pony. 
Below we will present artists who are famous throughout the world thanks to their ability to draw with a regular slate pencil. Each of them has their own style, personality, as well as favorite themes for creativity. In addition, the name of each author is also a link to the artist’s personal online gallery, where you can study the pencil drawings and biography of each of them in more detail.
As you look through the images you will notice some interesting features in everyone's pictures. Some are distinguished by soft lines, smooth transitions of light and shadow and streamlined shapes. Others, on the contrary, use hard lines and clear strokes in their creativity, which create a dramatic effect.
Previously, on our website, we have already published images of some masters. Here is a list of articles where you can see equally attractive pencil drawings.
- An album of incredible illustrations from Mattias Adolfsson;
JD Hillberry
Natural abilities and desire JD Hillberry began to draw attention to his creativity as a child. Desire and talent made the master one of best artists pencil drawing in the world. While still studying in Wyoming, he began to develop his own technique, mixing coal and graphite to achieve photo realistic effect in your drawings. JD uses monochromatic light to draw the viewer's attention through the play of light and shade and texture. Throughout his career, he tried to go beyond realism and expression. After moving to Colorado in 1989, Hillberry began experimenting with trompe l'oeil drawings. Traditionally, this type of work is done in oil, but he successfully conveyed the realism of the plot using pencil. The viewer, looking at such images, is deceived into thinking that the object is in a frame, or in a window, although in fact all these elements are drawn. Working from his studio in Westminster, Colorado, JD Hillberry continues to expand public perception with his drawings.


Brian Duey
Brian is one of the most amazing artists pencil drawing that works beautifully with pencil to create inspiring works of art. Here's what he says about his work and himself:
"My name is Brian Duey. I was born and raised in Grand Rapids, Michigan. I attended public school in a small village called Granville, where he first became acquainted with art. I never thought about the seriousness of my hobby, but I discovered a strong craving for pencil drawing at the age of 20. I was sitting alone in my house, and out of boredom I decided to pick up a pencil and start drawing. I immediately fell in love with drawing and wanted to do it full time. With each drawing I got better and better. I developed my own techniques and original tricks while working. I strive to create realistic drawings and add my own conceptual ideas. I am often asked what inspires me and where I learned to draw. I can openly say that I am self-taught.
My illustrations have been published in books and on greeting cards, on CD covers and in various magazines. I have been doing commercial work since 2005, and during this time I have acquired clients all over the world. Most of my orders come from the United States, Great Britain and Canada, but I also work with customers from Ireland. My paintings have been shown in galleries throughout the United States. In 2007, I was asked to paint a portrait of Britney Spears, which was included in art gallery in Hollywood, California. The event was covered on MTV and I gained worldwide fame. I am not going to stop there and continue to work. I have new ideas and plans. One of my goals for the future is to publish a drawing tutorial.


T. S. Abe
Although we didn't find many of Abe's works, her illustrations show that she is a master high class. The artist has excellent use of a pencil and skillfully depicts complex ideas using her own methods. Abe's paintings are harmonious and balanced, complex and at the same time simple to perceive. She is one of the most talented pencil drawing artists of our time.


Cesar Del Valle
The artist uses a special unique pencil drawing technique in his works. Caesar's illustrations not only show his talent, but also reflect the author's subtle perception of the environment.


Henrik
Henrik's work is presented in Art gallery Deviant arts. His drawings are interesting example pencil art. The master miraculously uses black and white tones to convey original images and unusual ideas.


In childhood, a child does not think about why and what to draw. While drawing, he reworks his life experience, transferring it to paper, and thereby comprehends it and develops.
As you get older, it becomes more and more difficult to find ideas... We get distracted by everyday affairs, we stop hearing ourselves, our inner world. It is especially difficult at the beginning, when you are just embarking on the path of discovering yourself as an artist.
To draw well, you need to draw every day. But where do you get the inspiration for this?
Here are some ideas for you: how and what to draw every day.
What to draw? 11 ideas for daily drawing.
1. Go through the archives of your drawings and sketches.
The simplest thing is to open a folder with your old drawings and look at them.
What is unfinished about them? Where did the hitch occur? 
Look at the drawing with fresh eyes. Think how to modify or rewrite it.
In addition, immersing yourself in past drawings will immerse you in the emotions that you previously experienced. This may reinvigorate your creative muse. Maybe based on an old idea a new one will arise... And then another picture will be born.

2. Draw something from life.
Take a look around the house: walls, furniture, interior items, potted plants, souvenirs brought from trips that keep your memories. What caught your eye? 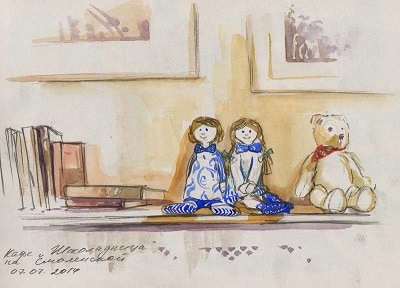
Draw one object. You can add other objects to it and draw the background.
As a result, your drawing can turn out to be very atmospheric, keeping the warmth of the house, your thoughts and memories

I suggest watching a recording of my speech on Periscope on the topic of quick sketches from nature. I hope you find this video helpful.
Sketch of a plant from life
3. Draw an abstract combination of spots.
Unleash your imagination, imagine yourself as a creator and get the most out of the play of color, how the paint flows and mixes, what new shapes and shades you observe. Cast aside doubts and fears. Create! This is great color therapy.
Depict your day, your mood, and capture it in color.

4. Create a hand-drawn recipe.
The process of cooking itself can be very creative. And if you transfer it to paper... Write down your culinary ideas, make beautiful pictures for them, create your own unique recipe books. In the future, this will inspire you to continue to create in cooking and drawing.

Don't know how to draw recipes? Watch this video:
Recipe drawing: charlotte with apples!
![]() More interesting and useful information about drawing
More interesting and useful information about drawing
from the artist Marina Trushnikova
You will find in electronic magazine“Life in Art”.
Receive magazine issues to your e-mail!
5. Draw a sweet little something for your friends or family.
This could be a postcard for a holiday - for a birthday, for the New Year, for March 8 or Valentine's Day. Or just a cute impromptu for no reason... 
Receiving a handmade card in the age of email is unusual. Such gestures are always very pleasant.
The emotions of gratitude received in return will certainly give you inspiration to continue the creative process.

6. Practice quick sketches.
Draw people and animals using sketchy human and animal anatomical figures.
To complicate the task, use a timer, setting yourself the time for this work in seconds.

In the future, the ability to quickly draw a human figure will inspire you to make quick sketches.
By observing and noticing interesting scenes, types and characters, you will be able to draw, capturing scenes from life: on the street, in the theater, in a cafe, at work.
This will allow you to develop yourself, your worldview and the inner feeling of an artist.
Seconds timer:
7. Practice creating monotypes.
Learn to create monotypes. This will allow you to create without initially thinking about the plot. Monotype will do this for you.
Use your imagination! Experiment! A monotype print will give you many opportunities for spontaneous solutions. Examine the image in the spots and streaks that have appeared. And draw in the spots a little to help the viewer see this image.

 Start painting with watercolors today!
Master the basics of watercolor painting with this popular course
“Taming Watercolor”
8. Draw a graphic design.
Do you like to draw with a simple pencil or in black and white?
Then try your hand at graphics! This can be drawing a spot with further drawing of details with a pencil, gel pen, ink or marker.
Or maybe you will first make some kind of graphic graphic, and then complement it with a background, add volume to the details, make a fill, fill it with fancy patterns, lines and scatter splash spots.
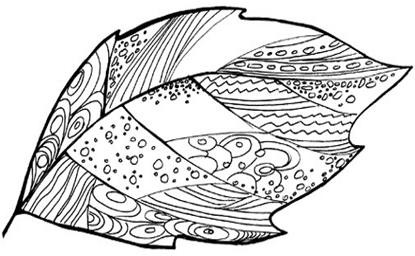
Practice making doodles!
9. Draw in a travel sketchbook.
Going on a trip? Bring a small sketchbook with you! 
A notebook filled with impressions and drawings (as well as booklets, tickets, receipts, napkins... and other “tourist trash”) will become no less valuable a memory than an album with photographs.

 IF YOU WANT TO:
- learn to quickly record your thoughts and impressions
- remove the fear of drawing in public
- bring beautiful travel books back from travels
then my sketchbooking workshop
will become an invaluable assistant for you in this!
10. Browse the websites of your favorite artists.
Look at their paintings, find something that catches you and touches your soul. Compare different techniques, try to imagine how this or that picture was painted, what the artist felt, what he wanted to say, how he saw the world while working. 
Look at your favorite painting by your favorite artist and try something like this. Or just copy a piece of the painting to study the technique, repeat it as you understand.