The human hand seems to be the most difficult to learn to draw, as it can take many shapes and express different emotions. Animation is no exception. You will have to learn to draw hands in different angles so as to show them in dynamics and attract the viewer’s attention to them. Don't underestimate the power of a well-drawn hand in animation - it will save your work from monotony!
What you need to know
In the comments to my courses, I have been asked several times how I draw characters in different poses and with different expressions. The point is that with experience you will begin to develop own style drawing. Without other people noticing, you will have your own little tricks. These tricks are the poses and expressions you'll use more often than others, as well as certain hairstyles and clothes you'll be best at drawing. This is quite common and professional artists use this secret all the time!
However, this is very difficult to achieve in hand drawings! Let's take the head as an example. The only moving part there is the lower jaw. We can change facial expressions, but the eyes, nose and mouth remain in place (at least in real life!) With the hand everything is different. With any new movement of the brush, everything changes radically. In fact, in a scene with dialogue, the facial expression may barely change, but the hands will move very actively and under different angles.
The goal of this activity is to turn a human hand into a cartoon hand, so let's not waste time learning the names of the bones and muscles of the hand. (On the Tuts+ platform, by the way, you will have extensive opportunities to learn this too). We, in turn, will try to find a simplified way to draw a hand in a way that is practical and effective.
1. The hand in its most simplified form
 "Mom, hi! I'm on the Internet!"
 The hand is made up of a variety of bones, especially in the fingers. This means that all fingers are different sizes and can bend in different ways. different directions. For this reason, it is important that you learn to draw a hand in the most simplified way possible and be able to look at it like a small puzzle with a few key pieces. Let's try to divide it into blocks:
Step 1
Let's start with back side palms. Let's draw a simple semicircle:

Step 2
Now let's draw a triangle that is attached to one of its sides. Like this:
 Calm down: we are not drawing a cup of tea!
 Step 3
Above the triangle we will draw something resembling the tip of a knife.

Step 4
It's time to draw the fingers. In mirror image, draw the first shape at the top. "Puzzle from the hand" is ready:

Step 5
Great! All that remains is to fill in the missing details with soft contours:
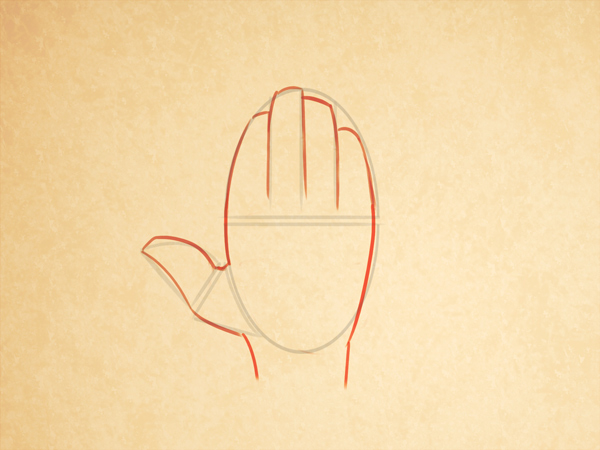 Circuit thumb the trickiest one is that it needs to be gently combined with the center of the palm.
 Note that the fingers have different formats due to differences in their sizes.
2. At a glance
You need to know a few more details of the palm. Let's take a look at them:
Step 1
Again we repeat the process above, following the basic pattern:

Step 2
Something new appears - the palm now looks a little more complex, and there are characteristic differences in its shape that need to be taken into account. Fortunately, a few simplified forms are enough to show it.

Step 3
Now we can add outlines to complete the drawing with the necessary details.
 Please note that we end the sketch with soft, rounded lines. Think of the palm of your hand as a delicate sculpture.
 Profile view
When the hand is turned in profile, we can see the prominence of the muscle at the base of the thumb.

The more “childish” your drawing style is, the simpler and smoother your lines will be. Here are my little secrets that helped me understand that hands can be drawn based on simplified shapes. The most important thing is to strive for a style that will reflect personality and dynamics in the drawings at the final stage.
3. More shapes and a 3D hand
Now you can draw a flat hand for the rest of your life, right? If you want to draw hands with convincing depth, use the same technique above, just change the camera angle! Play with this technique until you feel confident.

To form your fingers, imagine them as cylinders stacked on top of each other. This technique will help us draw fingers from different angles, because with its help it is easier to “see” the hand in space.
 Hand or robot?
 The shapes into which a human hand can be formed are countless. When the palm is open, the same rules apply; when closed - others! The same thing happens when the hand holds an object, and it must adapt to its shape.
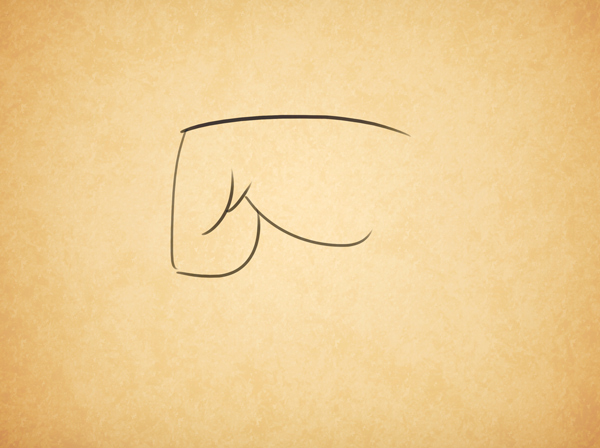
Let's learn how to draw a fist. A slightly different process, but in the end you will see that it all comes down to a simplified drawing of the main geometric shapes.

Step 1
To begin with, we simplify the bend of the little finger, draw something similar to the letter “u”.

Step 2
We kind of “wrap” the little finger around the letter “y”. Don't forget to highlight the curve that goes from the little finger to the wrist.
Step 3
We continue to draw fingers in space. This time we draw only three fingers. I'll explain why later.

Step 4
Lastly, draw the thumb and the protruding muscle at the base of the thumb.

Step 5
Fine! In a few steps we have completed a simplified drawing of a fist on one side. See how the shape of a fist can be roughly depicted using “boxes” different sizes.
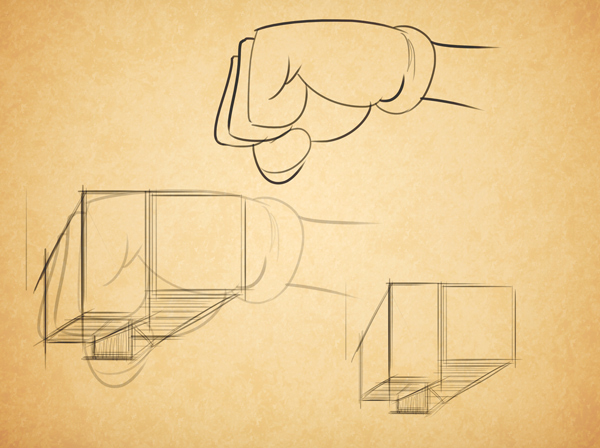 Notice how you can fit the outline of a fist into three-dimensional rectangular shapes in space.
 Obviously, if we try to simplify each hand position using various techniques, we will get tired quickly. Therefore, remember that the real secret to simplifying a hand drawing is observations from life.
 View from the opposite side: simplified drawing.
 4. The Fab Four
It is common in animation to draw characters' hands with only four fingers. This allows, in addition to enhancing the character’s dynamics, to make the artist’s life easier. This way he doesn't have to worry about too many details.
 Hands with four fingers of different styles and sizes.
 Note: When using this technique, you will need to adapt your knowledge of a five-fingered hand to a four-fingered one. Concepts need to be adapted to achieve a suitable and interesting result.
It is worth paying attention to your fingertips. In animation, the more rounded and movable the fingertips are, the more interesting and dynamic they are. When you create characters, think of their hands as if they were separate characters!
 See how this hand has its own character?
 Another good reason to draw hands with four fingers: in this case, you have the opportunity to increase the size of the fingers, which means making them more expressive! A whole series famous cartoon characters able to stand out thanks to this technique: The Simpsons, Bugs Bunny, The Flintstones and Mickey Mouse.
The Mystery of the Little Finger
One of the biggest secrets in the design of such a brush is to make maximum use of the little finger! If you place it at a different angle in relation to the other fingers, you will break up the monotony in the perception of your hand.

 Highlight the position of the little finger in the frame. See how the nature of the action changes with this technique. The viewer's attention is now focused on the main subject in the frame, and the character's personality is given a special twist.
 5. Talk to your hand
When we need to express emotions in an animation drawing, the role of hands is irreplaceable! Look at the images below: the hands visually support and echo the characters' facial expressions and body language.

- "I have an amazing idea!"
- "How do I look, honey?"
- "I can't believe...I'm being awarded an Oscar!"
- “I don’t understand anything... he was just here!”
- "Ahhh! My head is pounding!"
No matter how strange it may seem, hands have their own character! Not only do they maintain facial expressions and body language, they can express their own emotions!
 Do you see the greatness in these gestures above?
 However, you will often find yourself in a situation where your hands should not distract attention. In this case they should be minor character. Characters in action scenes tend to be exaggerated more than characters in quiet scenes.
 Please note that in dramatic scene movements are insignificant. There is no room for exaggeration here. Hands must emphasize the feelings of the characters - this is one of the most difficult processes in design.
 6. Knowledge test
I have prepared a short test to test your powers of observation. Analyze the pictures below and try to determine what feeling in the best possible way describes each. Can you guess everything correctly?
 Can you guess what the hand expresses in each of the drawings?
 Raise your hand!
Now you know all the secrets of the art of drawing cartoon hands, congratulations!

Although hands are a very fun part of the body to draw, the ability to create hand designs in different styles is not so simple, and only with the help of hard training can you achieve natural results. Even if your goal is to draw for animation, it doesn't hurt to buy a good anatomical atlas to understand how the muscles and bones in the hands work. There is no need to memorize each one in detail. It is enough to understand how the hand works in motion. Remember that a character's expressions are much more important than what's underneath the skin.
One last tip: when you need to draw hands, place your own hands in front of a mirror, or just watch your hands. One of them will remain stationary while you draw (unless you've learned to draw with both hands at the same time!)

Not everyone can paint like great artists. But you can learn to draw if you put in the effort.
His hands can tell a lot about a person. It is very difficult to depict them on paper. But the problem of how to draw a hand can be solved with work and diligence.
Anatomy to help
A complex system is the human body. The hands alone consist of several dozen elements. And in order to draw them correctly, you need to know the structure of the hands. Conventionally, hands can be divided into three main parts: wrist, metacarpus and fingers.
- The wrist is the part closest to the forearm. It is responsible for the movement of the hand, but all its elements work as a single whole.
- The metacarpus is the widest part of the hand - the palm.
- The fingers are mobile due to the phalanges. Four fingers (index, middle, ring and little fingers) have 3 phalanges, but the thumb consists of only two phalanges.
Knowledge of the basics of anatomy will allow you to correctly draw the hands step by step so that they turn out to be “talking”.
It will be easier to draw if, while sketching a sketch, you decide what the subject of the image looks like - something simple, even primitive. Agree that the brush human hand similar to a shovel not only in appearance, but also in functionality? You can start a sketch with this - draw a contour similar to a shovel: the wrist is the handle of the shovel, and the contour of the palm with fingers is its canvas. It’s difficult to immediately decide how to draw a hand with a pencil step by step, which is why it’s worth starting with a basic sketch.

The main thing is proportions
To draw any object or detail correctly and beautifully, you must maintain proportions - ratio different parts with each other. This rule also applies to the image of a person.
So, how to draw a hand? We start by determining the correct proportions. The ratio of the length of the metacarpus and fingers is on average 1:1. Naturally, this ratio different people will vary a little, because some people have long fingers and some don’t. But on average the proportions will be equal.
Depending on the length of the fingers, the outline of the palm will be either more elongated or square. Using thin lines (even before drawing the hand), draw the outline of the hand according to the proportions. The thumb does not fit into the overall silhouette; it is always somewhat apart from the other four “brothers”.

Drawing fingers
The fingers are mobile and flexible due to their joint structure, each of the three or two phalanges, if we are talking about the thumb, is attached to each other using joints and tendons. The bones of the phalanges, located one after the other, become shorter and thinner, so the fingers gradually become thinner.
Ideally, each phalanx is 2/3 the length of the previous one. These proportions are called the golden ratio - it is perceived by the eye as the most perfect.
Again, when drawing details, you need to make allowances for individual characteristics- not every person’s hands have harmonious proportions. It should also be remembered that the fingers are not the same in length: the longest finger is the middle, index and are approximately the same and shorter than the middle finger, the smallest are the little finger and thumb. Although the big one is rather the thickest. Its length corresponds to the length of the little finger.

Lines are the basis of authenticity
Before drawing a human hand, analyze again what parts the hand consists of. Remember that the contours of the palm and fingers, taking on specific shapes in the drawing, become more and more rounded. For example, the line connecting the fingers and palm is shaped like an arc, as is the outline of the hand itself - different lengths of the fingers allow you to create a semicircle when drawing fingers pressed together. The thumb is slightly turned in relation to the rest of the palm; its contour will not be straight, but somewhat rounded.

Small details matter
We have sketched out the outline of the palm, then we begin to work on the details. So, how to draw a hand authentically? This is impossible without drawing small details - folds, thickenings, fold lines, the contour of the nail plate on each finger. These seemingly insignificant touches will make the drawing more realistic.
Let's start with the fold lines on the fingers. As already mentioned, the wrist, palm and fingers consist of many elements. They allow the fingers to perform the functionality for which they are given to a person. How to draw a hand so that it looks as natural as possible? By drawing all the nuances. In places where the bones are connected by joints, there will definitely be folds on both the inside and outside of the palm. If the hand is drawn with inside, it is also necessary to draw the so-called “life lines” - fairly deep grooves in the places where the joints of the palm work.
Each finger at the end is protected by a nail - a hard plate that must be drawn for a realistic image. The nail plate is another important element in solving the problem of how to draw a hand. Nails may have different shapes- from elongated almond-shaped to almost square.
Fingers indicate a person's age. Children's fingers are rounded, with uniform thinning along the entire length. How older man becomes, the more clearly the traces of time appear on the hands. For example, in older people, the thickness of the fingers will be uneven - the joints become more and more swollen with age, which is affected by many years of work and illness. Also, joints are very visible in thin people.

How to draw a hand in different positions?
Hands not only gradually participate in the conversation, but also often serve as a “language” themselves, for example, when communicating in sign language. Palms and fingers will clearly tell what a person is thinking about at the moment time, what his mood is, what he does. How to draw a hand so that it truthfully reveals all the secrets?
When depicting the human body, it is always necessary to rely on the basics of anatomy. Hands are no exception. The size of the fist, for example, is determined by the length of the fingers. And the rule of the golden ratio will be important in any position of the fingers, even clenched into a fist. When drawing an open palm, you must special attention pay attention to drawing the lines of the metacarpus and slightly bent fingers.
How to draw a hand from the side? In this case, it will be important to draw the viewer’s attention to the fact that on the back side the palm and fingers will be drawn in almost straight lines, but on the inside, both the fingers and the palm itself have pads, which must be drawn with rounded, smooth lines.

Step-by-step drawing of human hands, with a systematic transition from a sketch to drawing small details, however, like any other object, will allow you to get a realistic drawing.
Guys, we put our soul into the site. Thank you for that
that you are discovering this beauty. Thanks for the inspiration and goosebumps.
Join us on Facebook And VKontakte
All children love to draw. But sometimes things don’t turn out the way a child wants. Or maybe he doesn’t have enough familiar ways to express himself? Then you can inspire him to experiment with different techniques, among which there is sure to be a favorite. After this, your child will probably want to invent something new.
website I have collected the most interesting techniques for you.
Dot patterns
First we draw the simplest squiggle. Then using cotton swab and paints (gouache or acrylic) we make intricate patterns as the heart desires. It is better to pre-mix the paints and dilute them slightly with water on the palette.
Frottage
A technique familiar and loved by many since childhood. We place an object with a slightly protruding relief under a sheet of paper and paint over it with pastel, chalk or an unsharpened pencil.
Foam prints
Having dipped a sponge in thick gouache, the child can draw landscapes, bouquets of flowers, lilac branches or animals.
Blotography
One option: drop paint onto a sheet and tilt it in different directions to create an image. Second: the child dips the brush into the paint, then places the blot on a sheet of paper and folds the sheet in half so that the blot is imprinted on the second half of the sheet. Then he unfolds the sheet and tries to understand who or what the drawing resembles.
Hand and foot prints
It's simple: you need to dip your foot or palm in the paint and make an imprint on paper. And then use your imagination and add a couple of details.
Paint patterns
For such an application you need to apply a thick layer of paint onto the paper. Then, using the opposite end of the brush, scratch patterns on the still wet paint - various lines and curls. When dry, cut out the desired shapes and paste them onto a thick sheet of paper.
Fingerprints
The name speaks for itself. You need to paint your finger with a thin layer and make an imprint. A couple of strokes with a felt-tip pen - and you're done!
Monotype
A design is applied to a flat, smooth surface (for example, glass) with paint. Then a sheet of paper is applied, and the print is ready. To make it more blurry, the sheet of paper must first be wetted. Once everything is dry, you can add details and outlines if desired.
Scratch
The highlight of the work is that the drawing needs to be scratched. A sheet of cardboard is densely shaded with spots of multi-colored oil pastel. Then you need to mix black gouache with soap on a palette and paint over the entire sketch. When the paint is completely dry, use a toothpick to scratch the design.
Air colors
To make the paint, mix a tablespoon of self-raising flour, a few drops of food coloring and a tablespoon of salt. Add a little water to achieve consistency thick sour cream and mix well. The paint can be placed in a pastry syringe or in a small bag. Tie tightly and cut the corner. We draw on paper or regular cardboard. Place the finished drawing in the microwave at maximum mode for 10-30 seconds.
Marbled paper
Paint a sheet of paper yellow acrylic paint. When it is completely dry, paint over it again with diluted pink paint and cover immediately cling film. The film needs to be crumpled and gathered into folds, since they are the ones that will create the desired pattern. We wait until it dries completely and remove the film.
Painting with water
We draw with watercolors a simple figure and fill it with water. Until it dries, we put colored blots on it so that they mix with each other and form smooth transitions like this.
Prints of vegetables and fruits
Vegetables or fruits need to be cut in half. Then you can cut out some kind of pattern on it or leave it as is. We dip it in paint and make impressions on paper. You can use an apple, potato, carrot or celery for prints.
Leaf prints
The principle is the same. We smear the leaves with paint and make prints on paper.
Any skill must be developed and brought to perfection; even if you have talent from birth, you need to constantly develop and hone it.
That absolutely everyone can learn to draw, and we hope that you have already started following our advice. Today we want to touch on another “sore” topic for novice artists, namely, drawing such complex parts bodies, like hands, feet and, of course, eyes. As a rule, these body parts are always the most difficult to draw and that is why it is worth giving them a little more of your time and attention when you are learning to draw.
How to draw hands
A few basic rules:
1. It is necessary to practice drawing the palm in different positions. The same principle works here as everywhere else - Practice, practice and practice again.
2. Children's palms are thicker than their fingers.
3. A woman's palm is thinner and more graceful.
4. To make the palm more masculine, add angularity to it.
5. On the palms of older people, we place more emphasis on the knuckles and draw more wrinkled skin.
First, we need to understand a little about the anatomy of the palm. Take a close look at your hands. Your main goal is not to remember what part of the hand is called, study the proportions and shapes. Please note that the phalanges of the fingers are not on the same line, and the fingers cannot be perfectly straight and are always tilted in one direction.

The index, middle, ring and little fingers are quite closely related to each other and cannot be far from each other, while the thumb is quite wide circle movements.
Try tracing your hand and filling in the outline with details. This will help you understand a little better what the palm should look like in the drawing.

Before you start drawing a hand, you should first outline its overall size and the points at which the ends of the fingers will be located. Only after this the sketch is divided into several parts.
When drawing hands, there are generally accepted proportions. For example, the length of the palm is equal to the length of the index finger multiplied by 2. Index finger equal to the innominate, sometimes the innominate can be slightly longer than the index. The little finger reaches the upper phalanx of the ring finger.

The nail should occupy half of the phalanx. Women's nails are drawn more rounded, and men's nails are drawn more square.
If you find it difficult to draw fingers, imagine that the phalanges are cylinders connected to each other.
Don't forget to add shadows to make your hand more realistic.

When starting to draw, try simpler options first, such as an open or unfolded palm. Gradually make the task more difficult, for example, by drawing a hand clenched into a fist.
How to draw feet

As in the first case, before you start drawing, you need to carefully study the anatomy of the foot.
The structure of the hands and feet are somewhat similar to each other, however, the proportions will differ.
The length of the foot is usually equal to the length of the head of the person you are drawing. The foot consists of two parts - the heel and metatarsus (the part that is connected to the toes). Upper part the feet rise to the top. The bone that is on the outside is always lower than the one on the inside. The bottom of the foot has a curve; it is not drawn flat. The thumb is always drawn parallel to the ground, and all the rest will be lowered towards the ground.

Another note is that if you draw the foot from above, the toes will be longer than when drawing the foot from below.
The bottom of the nail is halfway up the top joint, and the width of the nail is longer than its height. The thumb is the width of the second two fingers.
How to draw eyes

If your goal, of course, is to be able to draw portraits, then you will have to devote a lot of time to your eyes. The look is what needs to be conveyed first when drawing the eyes.
The first step is to draw the shape of the eye. In the future, when drawing portraits, you will have to devote quite a lot of time to this step, since an incorrectly shown form will ruin your entire drawing.
After this, outline the cornea. Immediately apply highlights to the pupil. Don't miss any little thing you see. The iris of the eye should not be completely round. From below and from above it is cut off by the eyelid. The iris that falls under the upper eyelid will always be slightly darker. The rest of the shadows and highlights will depend on your desire or who you are drawing.
Darken the white of your eye. Along the edges the shadows should be slightly darker.
Eyelashes are drawn at the final stage. They are thicker at the base than at the end. Please note that the eyelashes are reflected slightly in the eyes.

Finally, we remind you once again that the main thing is practice. Start simple and gradually improve your skill by gradually complicating your tasks.
Draw and get inspired with us.
Main photo taken from the site

In this lesson, I suggest you draw a hand in its classic position - fingers open, palm down. Perhaps you want to draw a hand clenched into a fist or a hand palm up. Or draw connecting hands, as in the background picture. Either way, this tutorial will help you draw hands. Drawing a hand is very convenient because you draw with one hand and can draw with the other. First, carefully study your hand, pay attention to the length of the fingers, all proportions. You can even outline the hand if you are going to draw it at life size.
1. Marking the contour of the hand

Indeed, if you need draw a hand on the entire sheet of paper, it is easier to outline the outline of your hand, and then, using some tips from this lesson, just add small details. If you need to draw a hand on a smaller scale, then first put two dots for the wrist and five dots for the fingers. Please note that it is not the index finger, but the middle finger on the hand that is the longest.
2. Straight contour lines of the fingers

The length of the fingers varies. They say that musicians have very long fingers. The nobles believed that long and slender fingers emphasized aristocratic origin. Maybe, but we will be drawing a regular hand, so divide the segment where the little finger will be in half and draw a line from it, parallel to the previously marked points. For the thumb, draw a rectangular outline.
3. Draw actual outlines of the fingers

At this stage, you only need to trace the straight contours of your fingers with a pencil and give them real shapes. Perhaps these preliminary contours turn out to be inaccurate, then the shape of each finger can be clarified separately.
4. General hand shape

At this step you can adjust the contours of the fingers. Make a deeper “angle” for the thumb, but you can leave the original contour, at your discretion. Mark the phalanges and remove unnecessary contour lines from the drawing.
5. The drawing is almost finished

First of all, paint your fingernails. Highlight the knuckles with a few strokes and you can say hand drawing finished. All that remains is to draw a few details in the next step.
6. How to draw a hand. Shadows

A person's hands have "wrinkles" or folds in the knuckles that stretch when the fingers are squeezed, make these areas darker. There is an area between the fingers that also needs to be highlighted. To make the hand look voluminous in the drawing, you can make some of the contour lines darker and thicker. In this case, decide which side the light source will be on. It may seem that draw a hand It's not difficult at all. Try to draw, and then compare your hand with the resulting drawing.
Let's try to draw a hockey player in motion, with a stick and puck, step by step. You might even be able to draw your favorite hockey player or goalie.
This lesson is intended for those who already know how to draw well, since drawing a person is not easy. Draw a picture dancing ballerina especially difficult, since the drawing needs to convey not only the grace of human movements, but also the grace of ballet dance.
When drawing a person, you should see the entire future image from the expected lines and all you have to do is draw them. It is important not only to accurately “maintain” the proportions of these lines in the drawing, but to accurately draw the hands, eyes, and lips. They convey the mood and character of a person.
Portraits are the most complex look fine arts. Learn to draw a portrait, even with a simple pencil, requires not only time to learn, but also talent.
Human eyes are the most attractive and important part of a person's face. Since this element of the portrait attracts the most attention, it must be drawn very accurately. In this lesson we will learn how to draw a person's eyes with a pencil step by step.
Every person has a nose unique features, therefore, it is impossible to give precise advice on how to draw the nose of a girl, child or man. You can only make an abstract or, as they say, “academic” drawing of the nose. This is exactly the version of the nose that I suggest you draw.