Ancient folk craft, common to today- woodworking. Modern machines, laser burners, plastics and other substitutes for figured carving on wood cannot replace the true art of handmade natural material. One of the types of this interesting craft is called slotted carving.
Stencil and ornament
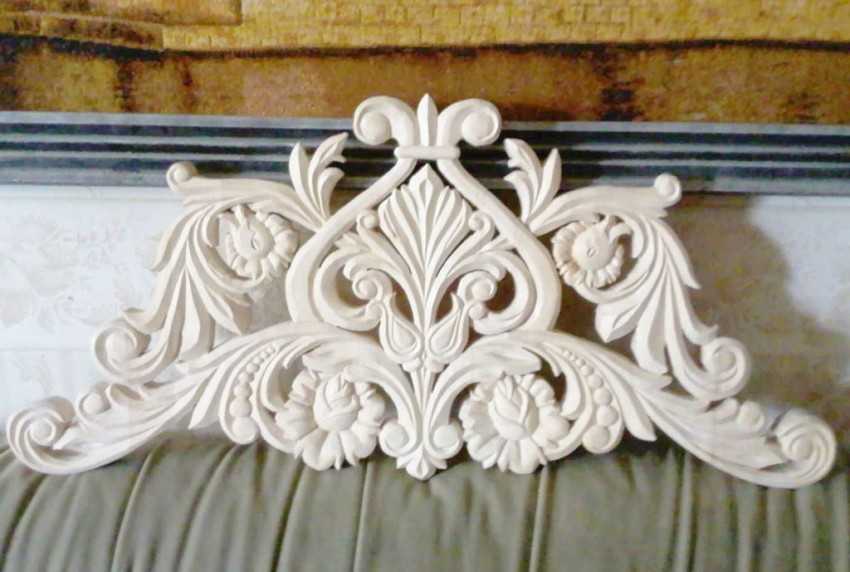
Not used as often as other types. But not at all because it is unclaimed. This is a technique that has been studied for years, although if you try to formulate what it is in a nutshell, then everything will turn out to be simple - this is a type of carving when the background, background, and substrate of the image are removed during the processing process.
Thanks to this, the design and ornament become airy, openwork, and the products amaze with their fabulous lightness. Moreover, this type of carving is not always performed on miniature planes. There are masters who do this with chainsaws.
Types of thread
In principle, among all types of carvings, which are conventionally divided into several groups, it is difficult, and there is no point in setting clear limits on technology, since the methods for manufacturing a particular product can be combined in any way you like. But for orientation, it’s worth mentioning some common wood processing methods:

Of course, this division is conditional, so we will not consider this type separately. Stencils, sketches and drawings of finished products, as well as photographs of striking works by masters, combine several processing techniques. For example, some textbooks highlight the cutting technology using jigsaws or saws, as well as the one that is performed with cutters and chisels.
Craft Basics
If you look at some photos of the works, you can clearly see that the authors used several methods of wood processing at once - when performing different elements decoration or exterior of buildings, flat-relief patterns with raw edges are rarely found, which means more than one or two technologies are used.
To begin getting acquainted with the basics of the craft, let’s remember how each of us held a jigsaw in our hands and cut figures out of planks or plywood. This is called the simplest slotted thread. For more complex work you will need more tools than a jigsaw and a dozen spare files, but the principle remains the same.
Technology and tool
To take the first step towards mastering the technique, we select a sketch or prepare a stencil if the pattern turns out to be complex and cyclically repeating. The design is transferred to the wood and then processed with the selected tool. To perform cutting, as a rule, soft wood species are used:

Depending on the chosen tool, the appropriate cutting technology is used. If a jigsaw or a hand jigsaw will be used for carving, in this case we drill holes according to the stencil for inserting the saw blade. This method is simpler, but errors are possible when working with jigsaws. A manual electric router is also used. In this case, high-quality processing of the edges of the drawing is guaranteed, however, working with a router requires experience.
Before choosing a design for a stencil, you need to compare the size of the finished product with the size of the image. In order for the design to be clearly readable, for large items you should not choose too delicate and small an ornament, but for small items, boxes, frames, an openwork pattern would be appropriate. Maintaining proportions is very important when choosing a stencil. This applies to both plant patterns, and stencils of animals, ethnic ornaments.
Among the not very common methods of carving is burning. This is a productive method, but it requires a special machine, which is quite easy to assemble with your own hands. It consists of nichrome wire, a step-down transformer, and a filament current regulator. The nichrome thread burns through the wood, making it possible to complete the work accurately and accurately.
Laser cutting is also sometimes used, but this method is not available to everyone due to the high price of the equipment. But this is the most accurate and effective method. In industrial settings, CNC machines are often used. They help to quickly and accurately produce the same type of specified patterns for the production of large batches of products.
But the most important thing when working with wood is imagination and creativity. Using unique sketches for work, the products will be unusual and truly expressive, emphasizing the individuality of the master. Therefore, experiment boldly and good luck to everyone!
All photos from the article
As soon as wooden houses began to come into fashion again, the tendency to decorate their facades with all kinds of patterns and ornaments was revived. has been used by people for many centuries and today, thanks to many technological innovations, everything is becoming available more homeowners. Next we will look at the main types this direction and the nuances of do-it-yourself wood processing.

Varieties
It is worth noting that carved ornaments can decorate any wooden product, be it a box, a cornice, a gazebo or the facade of a residential building. So, if you want to experiment, then you don’t have to build a wooden building; for the first time, for example, a stair railing or the door of an old bedside table will be enough.
Through thread

This is a very common method of creating patterns, which is used most often in the process of decorating houses. It involves the complete end-to-end removal of some elements of the wooden surface. If before everything necessary work were performed mostly with chisels and cutters, now the task is performed mainly with a jigsaw.

Blind thread

When implementing this method of applying patterns, the cutters do not pass through the wooden canvas, which is most conveniently done with a milling cutter.
In turn, blind threads are also divided into several types:
- Flat-notched. In this case, there is a background plane, and the ornament goes deeper into it. Subspecies:
| Thread name | Description |
| Contour | Most simple instructions execution, which consists only of cutting out an even groove along the contour of the pattern that does not change its size. |
| Bracketed | Here the main element is no longer a groove, but a semicircular notch created by a chisel in two steps. It is from such peculiar brackets that the ornament is created. |
| Geometric | In this case, there are two fragments: a triangular pyramid buried inside the canvas and a peg. First, the area to be treated is outlined, and then all excess is cut off according to the planned figure. |
| Black-lacquered | Unlike the first option, here the primary plane is first coated with black varnish, and only then the grooves are cut out, which results in an amazing play of light and shadow. |

- Relief. Here the fragments of the ornament are either on the same level with the background, or even higher than it. The method itself is similar to contour carving, but when it is implemented, the edges of the grooves change their shape, fitting into the overall design.
- Flat-relief. A very common way to decorate wood surfaces in architecture and applied arts. It consists in removing part of the material with a recess of several millimeters and under different angles. The result is a volumetric composition.

Sculptural carving

Of course creation wooden sculptures made of wood - this is the most complex type of processing. But with such works of art you can safely decorate not only your home, but also any place in your summer cottage.
Advice: after applying patterns to wood, be sure to treat it with antiseptics, especially when it comes to external work. This will significantly extend the service life of your masterpiece.
If you decide to decorate own house or a gazebo, then all of the above methods of applying patterns can be used in combination. But if this is the first time you’ve touched on such a task, then it’s better to stick to the simplest options.
First of all, it is worth considering wood carving patterns for beginners:

Wood selection

When choosing a suitable material, you should pay attention to the following factors:
- Texture features. So, if you want to create a complex ornament with a semantic load, then it is better to take a block with a weakly expressed wood pattern. And if you prefer to only emphasize the natural beauty of wood with your pattern, then opt for a clearly defined texture.
- Try to place the pattern itself along the fibers. This will make it easier to apply.
- Pay attention to wood damage caused by rotting or other diseases. Discard such samples immediately.
- It is also worth weeding out products with such defects as knots and pockets with tree sap.
Purpose
When decorating your home, remember the main functions performed by wooden patterns:
- Decoration appearance. This is the main purpose. It is noteworthy that in ancient times many ornaments had a specific mystical meaning and served as amulets.
- Protection from direct sunlight. A visor with a through thread does an excellent job of dispersing light.
- Fencing of dangerous places. A balcony or staircase railing can become much more attractive thanks to this finishing.

Preparation
Once you have chosen the appropriate block or board and decided on the carving method, prepare the work area. You may need a vice or clamps, a pencil, a jigsaw, a chisel and a router.

Next, use a pencil to draw a sketch of your design onto the wooden canvas. Securely secure it and start working. Be extremely careful when applying the pattern, as the slightest miscalculation can ruin the entire workpiece.
When finished, coat the resulting ornament with varnish and install it in the place where it will be located. As a result, you will receive an original product that is made with your own hands. Even if you don’t get a masterpiece the first time, don’t despair, a little practice and your craft will become a real decoration of your home.
Conclusion
Patterns used to decorate wooden buildings hundreds of years ago are back in trend and gaining popularity. With their help, you can not only revive the monotonous grayness of a classic facade, but also make it absolutely original, something that no one has ever had before.
A little fantasy right choice application method, purchasing a suitable workpiece, patience and attentiveness are the most important things you need to successfully complete your plan.

With patterns you can not only decorate your home, but also express your thoughts, create a certain business card for guests and passers-by.
One of the most luxurious products, valued for their originality and handicraft, are rightfully considered to be products made in the form of wood carvings. Since ancient times, with the help of this type of art, unsurpassedly decorated towers and huts have been created.
Some of them are currently considered architectural monuments. This art is beginning to revive in modern world. Wood carving stencils are excellent helpers in this matter.
What is a stencil for?
First, let's try to figure out what stencils for woodworking are. These are special ones that are used to apply pattern elements to the surface of wood.
They are much make it easier to repeat identical characters and allow you to speed up your work. For example, the most popular stencils for are samples for platbands.
With their help, quite a lot of work is done complex work for interior and façade design.
Stencils are divided according to their purpose for creating interior elements:
- ribbon carved ornament;
- carved platbands;
- pilasters;
- towels;
- carved balusters and more.
All varieties are considered professional templates. You can use them create several ornaments for wood carving of a voluminous nature and significantly facilitate the task assigned to the master. There is no need to create them yourself. On the Internet you can find and download the option you like.
How to choose a stencil
Wood carving designs are so diverse that they can be used by both beginners and advanced professionals. With their help, both simple ornaments and high-level works of art are created.

The main thing is to make the right choice. To do this, you must adhere to certain rules:
- if you started using incisors quite recently, then Don’t choose intricate patterns, since it is quite difficult to work with them, and the workpiece can be damaged;
- for each type of wood carving they choose their own stencil;
- Before starting work, you must apply a stencil design to the workpiece; the lines must be neat and clear.
 Finding stencils today is easy. This can be done using electronic libraries.
Every decorator will appreciate the convenience and wide selection of this source. Here you can choose drawings from a bygone era as well as modern masterpieces.
When making a choice, be sure to compare the dimensions of the workpiece and the image itself.
You also need to choose a sample that will look appropriate on an element of the interior. We pay attention to the nuances:
- for a large product there is no need to choose a stencil with small elements or openwork patterns;
- for small items, stencils with large designs are inappropriate;
- proportions must always be observed.
All these tips apply to any drawings.
Types of wood carving
Wood carving does not have a narrow direction; on the contrary, it has several varieties:
- slotted;
- flat-relief;
- embossed.
Slotted carving on plywood
 The key to success in execution slotted thread– correct choice of ornament. Thanks to it, plywood carving sets the overall concept and adds aesthetics to the product.
Drawings and ornaments on floral or animal themes are standard representatives classic style and are suitable for any direction in the interior.
Very often used slotted inscriptions. In this case, ready-made stencils are difficult to find, since they are created individually for each case. This is due to the fact that it is necessary to maintain the size, style of the font, and the set of words is always different.
Important! The situation is completely different with patterns of plant, animal and fantasy styles. Many options for this topic can be found on the Internet. Some options are shown in the photo below.
House wood carving
Brownie is the main focus of the design of huts, which is very common in the Nizhny Novgorod region. It is she who can boast of various lace patterns. To perform it yourself, you should select the appropriate sketches.
The main condition for house carving is to avoid small parts. They will get lost on the facade of the house, and will not last long.
Options for house carvings can be selected on websites dedicated to wood carvings. But there are craftsmen who can make a template to order. In this case, you can realize exactly your idea and get an original pattern.
Attention! Patterns for house carvings are applied using tape stencils.
Through wood carving
A distinctive feature of through thread is complete wood removal from the inside of the picture.

Through threads come in different styles:
- simple, in which elements are cut out along the contour of the design;
- openwork, when the pattern is created with a volumetric effect due to multi-level cutting.
Frames, various overlays, door panels, and decoration elements are made using through carvings.
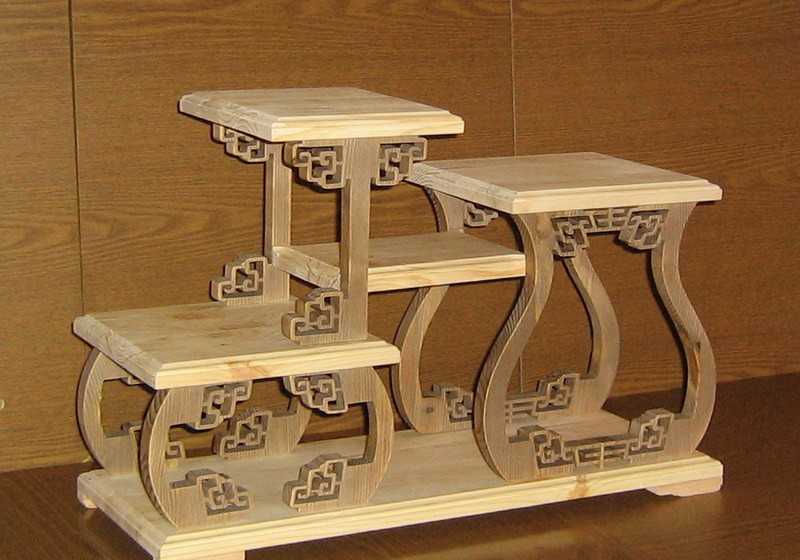
Through carving in oriental style is done using a jigsaw.
Sawing with a jigsaw
Sawing with a jigsaw is mainly carried out on plywood. To perform quality work you must have at least the slightest experience with the tool. Also an important factor is the presence of an original stencil depicting animals.

Commonly used stencils:
- a pair of swans;
- head of a deer, wolf;
- cockerels on a knitting needle;
- a horse standing on its hind legs;
- butterflies.
It all depends on the style of the interior, which needs to be supplemented with decorative elements. You can easily find examples of templates on the Internet.
 The most suitable material for sawing is birch plywood 3–10 mm thick. In addition, for work you need to prepare:
- carbon paper for interleaving the pattern;
- special paper for sanding parts;
- wood glue for joining parts;
- clear varnish to give a decent appearance.
Before starting work, the workpiece is carefully polished with glass paper, only then do they begin to transfer the design.
Floral ornament
Often plant or foliage patterns are made in the form of stripes or borders consisting of repeating patterns. Can be made in an individual composition that contains an image trees, fruiting plants, various floral elements And so on.

The work is done in various ways:
- display in a naturalistic form;
- simplified plant elements.
Floral ornaments for carving wood are in second place in popularity after geometric pattern. Favorite thematic elements at all times are lilies, grape leaves and berries, oak, hops, ivy, etc.
Sketches for patterns
Stencils for wood carving are quite diverse in their subject matter. Some of their variants are used in a narrow direction, and some can be found on any interior elements.

Here are several sketch options that can be used for a specific purpose:
- Wooden patterning is used to decorate the facade of houses. It looks perfect on both doors and walls.
- cutting artistic style used to decorate dishes and furniture.
- Products made using intricate openwork cutting are especially held in high esteem. Most often it is used for household items.
Important! A correctly selected sketch will help you complete wood carving quickly and accurately.
Useful video: templates for wood carving
Each type of cutting has its own processing technology, and detailed elements are maintained. In some cases, several techniques are used simultaneously, which are subsequently transformed into a three-dimensional canvas with the presence of the smallest fragments. This characterizes a true master.
Geometric wood carving consists of different elements that have a geometric shape and is done with one cutter. maybe: lines, squares, triangular and tetrahedral recesses, etc. This technique will even allow you to make carved works of such shapes as leaves, flowers, berries, ears of corn. If you develop the skill, it will turn into the form of contour carving.
Original box made with geometric carvings
You can search the Internet or come up with it yourself. Geometric cutting is quite simple to perform; for this you will need: a cutter, a pair of semicircular chisels. Lessons geometric carving They will show you how to play with chiaroscuro and unusual patterns. It is especially beautiful in different triangles, nail-shaped cutting and triangular-notched shape. This cutting allows for polishing and matte finishes.
For triangular notched carving, you only need a jamb knife, it has a beveled blade. In addition, the following tools are needed:
- flat chisel, 2 cm wide;
- semicircular chisel;
- hacksaw;
- files: round, square, semicircular;
- ruler;
- simple pencil;
- compass;
- eraser.
 Elements and patterns for making geometric wood carvings
 The cutting technology is simple, but each component plays its role in the work.
Wood
Wood comes in the following types: hard, very hard and soft. For beginners, it is better to use soft wood, it is easier to work with (linden, pine or aspen).
Linden is more difficult to obtain than other types, as it is often used by professionals. Pine has a disadvantage - it splits when cut.
Aspen a good option for work. There are many visual photos of what kind of wood it should be, and what the longitudinal fibers look like, along which you need to work.
Preparing for work
For the first lesson you need a board measuring 170 by 110 mm and 2 cm thick. Sketches for this work will be given below. The surface of the board must be sanded with sandpaper. Now, using a ruler and a simple pencil, draw out the entire surface of the tree in 5 cm cells.
 Wood carving patterns
 Then we draw all the figures, as shown in the figure below. There were 7 figures in total: pegs, diamonds, a twist, a pyramid, stars, squares and a rosette. From these figures you can then create new patterns. A photograph that shows what compositions can be made from just elements, and how the composition looks after processing and painting the wood.
Pegs - the first figure
In triangular-notched carving, the entire process consists of two operations - pricking and trimming. This simple moves, which are easily achievable in practice. We take the knife in our hand, thumb lies on the beveled part of the handle.
Press the cutter into vertical position, so that it deepens a few mm, then lower the blade at an angle to intersect the line of the side knife in accordance with the markings. In the same way, a prick is made on the left side of the triangle. 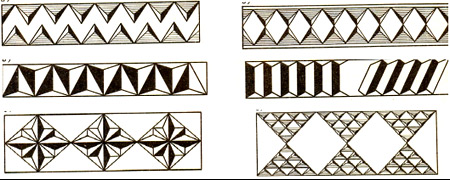
For pruning you need:
- attach the cutting part of the knife to the left side of the triangle, so it connects to the top with its bevel;
- we move the handle of the knife back, maintaining a parallel between the right side of the pattern and the cutting blade (this movement is done with the hand, as if we were pulling a bow);
- press on the knife, returning to the first position of the hand; so the nose of the knife is on top, and the cutting part is on right side triangle.
Read also
Wood carving styles
The trimmed triangle will eventually break off, hence the name “peg”. This movement is called "shooting". When doing it, try to keep the angle at 45 degrees. The drawing comes out simple with this figure, but this is the basis of geometry.
Security measures
All movements should come from the hand, this simplifies the work and takes the load off the shoulder. 
The working hand (in which the cutter is located) is pressed tightly against the work table to free the movement of the hand. When you hold the workpiece with your free hand, you need to ensure that your fingers are positioned so that they are not on the working part when the cutting process is in progress.
Diamond - second figure
Ornaments for geometric carvings consist of simple details such as pegs and diamonds. A rhombus consists of two triangles connected by their bases.
The technology is the same, only you first need to cut out the top row, and then turn the board and make the bottom one.
Viteika – third figure
It consists of mastering basic carving techniques and basic shapes. Viteyka is the same type of chips. They are simply shifted to the side in relation to each other.
 Shapes for geometric carving
 The result will be a winding path. To do this, you need to cut out and pin the lower triangles, and turn the board - the upper ones. So we will see that there remains a “snake” in the middle.
Pyramid – fourth figure
The first patterns were the simplest. And you can deal with them without difficulty. The following ones will be more difficult to complete, since they consist of several triangles and are located in a certain order in relation to each other.
So the pyramid consists of three triangles, it has in the center the point of contact of all the corners. Therefore, when cutting a given figure, each element, when pricked, comes into contact with the same point several times. The most important thing is that pruning is done in the direction of the wood layer. 
If you cut across, you will get unwanted chips that will ruin the patterns.
Asterisk – fifth figure
Geometric cutting patterns can be varied, but basically consist of the same elements that are arranged together. Same with the star shape. It consists of four pyramids, and this figure will not be difficult to make. You just need to sequentially cut out four pyramids one after another.
Squares - figure six
This element is clearly different from all the others. There are no triangles in it, and it is cut out completely differently than all the figures. This cutting method is called straw. Many sketches include squares. They can be either the border of the work, a frame, or part of the main elements of the drawing.
This figure is cut this way:
- we retreat from the marking by 1 mm to the right, holding the knife at an angle of 45 degrees, deepen it by 2 or 3 mm and cut along the line to the end;
- on the left side of the strip we do everything the same;
- We make a puncture at the end and beginning of the strip, with the knife directed vertically.
When decorating a living space, you can use a variety of materials, but traditionally wood is used for these purposes. Today, artistic processing is carried out using a huge number of techniques, but, perhaps, the most spectacular results are obtained when using slotted wood carving.
The technology cannot be called complex, but the resulting products amaze with their beauty and elegance. We will talk about this technique in more detail later.
What is a carving?
Through drilling and cutting through any background is the essence of openwork cutting. Upon completion of the work, light and airy patterns are obtained. There are through and overhead thread options. The first option creates the desired effect when illuminated, the second involves overlaying it on some background (base).


To make through cutting through wood, drills, special chisels, and files are used. The most suitable tool would be an electric jigsaw, which allows you to quickly and easily complete almost any design.

The work process itself requires the presence of pre-prepared drawings for slotted threads. Therefore, we will briefly consider some of the steps that are important to go through at the preliminary stage.

Preparatory stage
For those who are doing carving for the first time, it makes sense to focus their attention on theory. Printed publications, handicraft sites will provide comprehensive information about the decoration method in question.

After studying the technology, it is worth preparing the tools and, if necessary, purchasing them in the store. In addition to a jigsaw, you may need chisels different sizes, drill and drill bits, cutters, grinding consumables, etc.


Another important milestone at this stage will be the choice of patterns and sketches of the future decoration. You can try to do the latter yourself or find suitable ones on the Internet; fortunately, there are plenty of specialized sites on this topic. Printing to the desired scale will complete the preliminary stage.

Wood
The main requirements for the material are its dryness and quality. There are a lot of preparations in specialized stores, dedicated handmade. Suitable wood comes in construction stores and in sawmills.

In addition, you can make a good profit at furniture factories, where they always have in stock a large number of unnecessary trimmings. Another possible variant– used boxes and pallets.

The quality of work depends not only on the craftsman, but also on the species and type of wood. Each has unique properties, which is important when you have specific creative goals. Let's take a brief look at some material options.

Pine is the most accessible and inexpensive species. However, it is suitable only in rare cases. There are several reasons: resinousness, different density of layers, noticeable texture, which interferes with the creation of small patterns.

Aspen is considered a soft material and is not suitable for a beginner. It is easy to cut, the wood wrinkles and requires a lot of experience to work with it.

Birch and linden have an excellent structure and have the required density, which makes it possible to realize even the most daring sketches of slotted carving.


Plum is excellent due to its flexibility in processing, at the same time it has the required hardness. Small patterns and women's jewelry made of plum will become an excellent product in the hands of a master. Beginners should also try this material.

To avoid subsequent cracking and warping of the slotted product, it is important to remember to keep the material dry. Random drying in a warm and well-ventilated room will be the most optimal way. The boards are placed on their ends and on dies to ensure air access to all sides.

Creative process
Woodworking begins with transferring the design to the workpiece. For this purpose, all templates were prepared at the preliminary stage. When the drawing is applied to the part, the stage of drilling holes next to the drawn lines begins.

The drill should be of such a diameter that a jigsaw file can easily fit into the resulting hole. Where it is not possible to make cuts with a jigsaw (the pattern is too small and sharp bends), use a narrow hacksaw blade.

Experienced craftsmen advise using saws with fine teeth, otherwise the edges of the slots will have a ragged outline and the product will lose its aesthetics. It is advisable to drill with feather drills, having prepared a thin hole in advance.

Gluing thick paper to the back of the workpiece helps prevent torn edges when cutting through plywood. It is better for beginners to try simple patterns with large details and minimum quantity corners

Finishing
The product is processed to obtain smooth and clean edges. Use chisels; a sharp knife is useful in hard-to-reach areas.

Cleaning is carried out using sandpaper, a needle file or an abrasive wheel. The finished product is sanded on both sides until the proper appearance is obtained.

Looking at the photo of the slotted carving, it becomes clear that the resulting patterns are an excellent decorative element for furniture, window trim, and cornices. The elegance of the product makes it possible to create excellent women's jewelry, decorate screens and much more.

Photo of slotted thread